|
The past week or so has been stressful and strange for everyone. My university classes have been moved online, which means that I have a great deal of time in my room that can be used for sewing! It has been a bit difficult getting used to the new format of living, but I am very lucky to have lots of hobbies that can be done inside. About a month ago, I decided to start a new collection, so I have been hard at work on that. Thankfully, I have almost all of the fabric that I need! 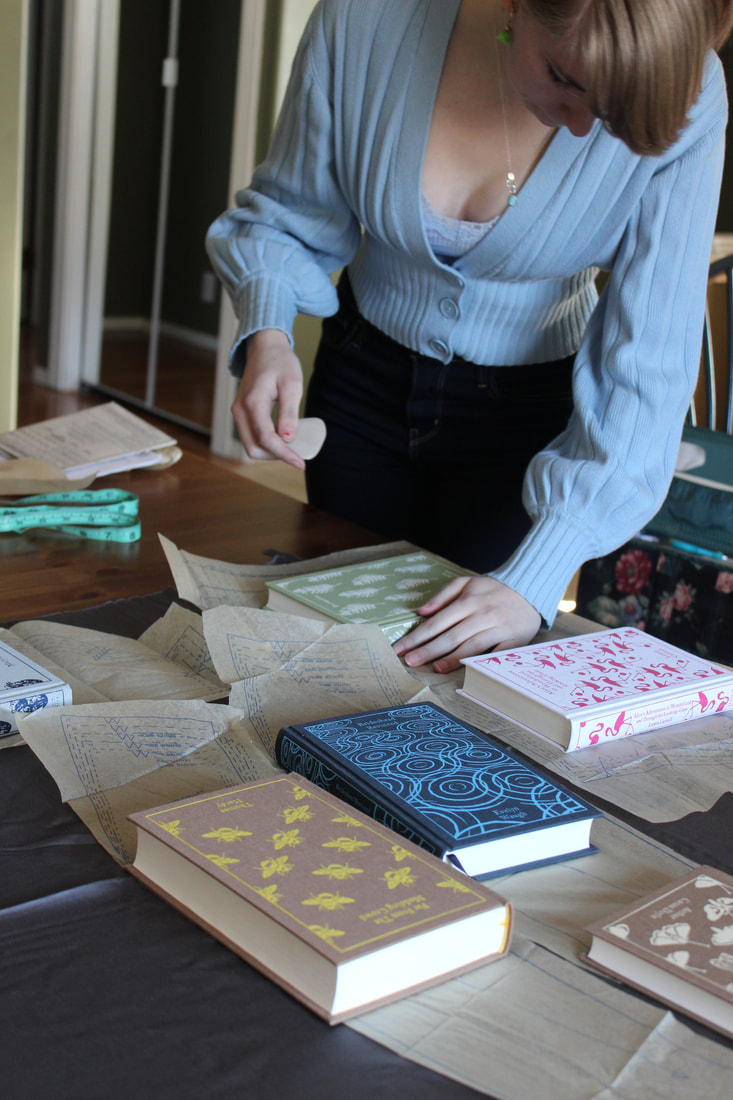 Cutting out from a stunning charcoal bamboo rayon 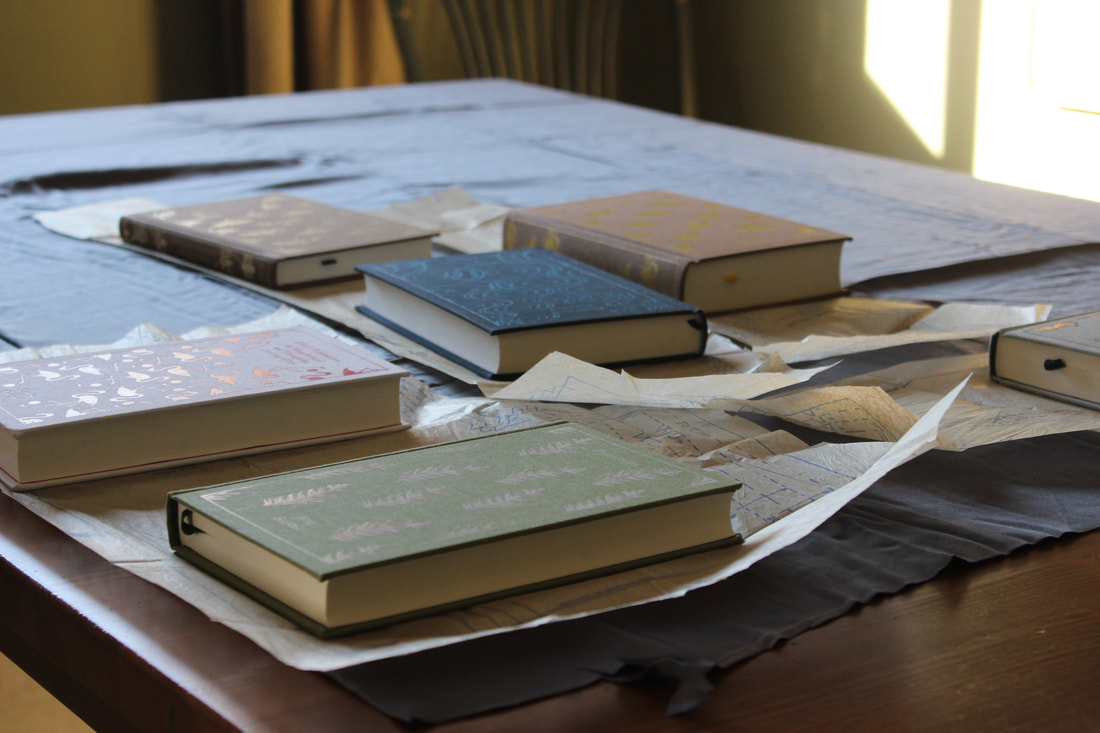 Using books as pattern weights Creating a collection needs a lot of time and work, starting with the designing. I want somewhere between 15 and 20 looks, which can be up to 40 pieces depending on how many pieces each look needs (piece=one piece of clothing, such as a shirt or skirt. Look=multiple pieces put together to create a whole outfit. Can be one piece, can be multiple). I am focusing more on dresses, for two reasons: one) because I love dresses, and two) because that cuts down on how many garments I will be drafting and sewing. I have firmly decided on 10 of my designs so far, and am currently searching for inspiration for the remaining ones. I have had people ask me how I come up with designs, and honestly I don't have a great answer for that. The inspiration comes from absolutely everywhere - Pinterest, people on the streets, beautiful buildings, movies, music, quilts, books, and everything else that I come in contact with. Most of the process is daydreaming, with bits of frantic drawing and writing to ensure that I won't forget the idea. Drawing isn't my strongest suit, and it isn't my favourite thing to do. Half of my designs are drawn out, and half of them are just written down with lots of description so that I know exactly what I was thinking about. Writing down design ideas is actually helpful when I don't have a pen and paper with me as well, since I am just able to write it down in my phone. 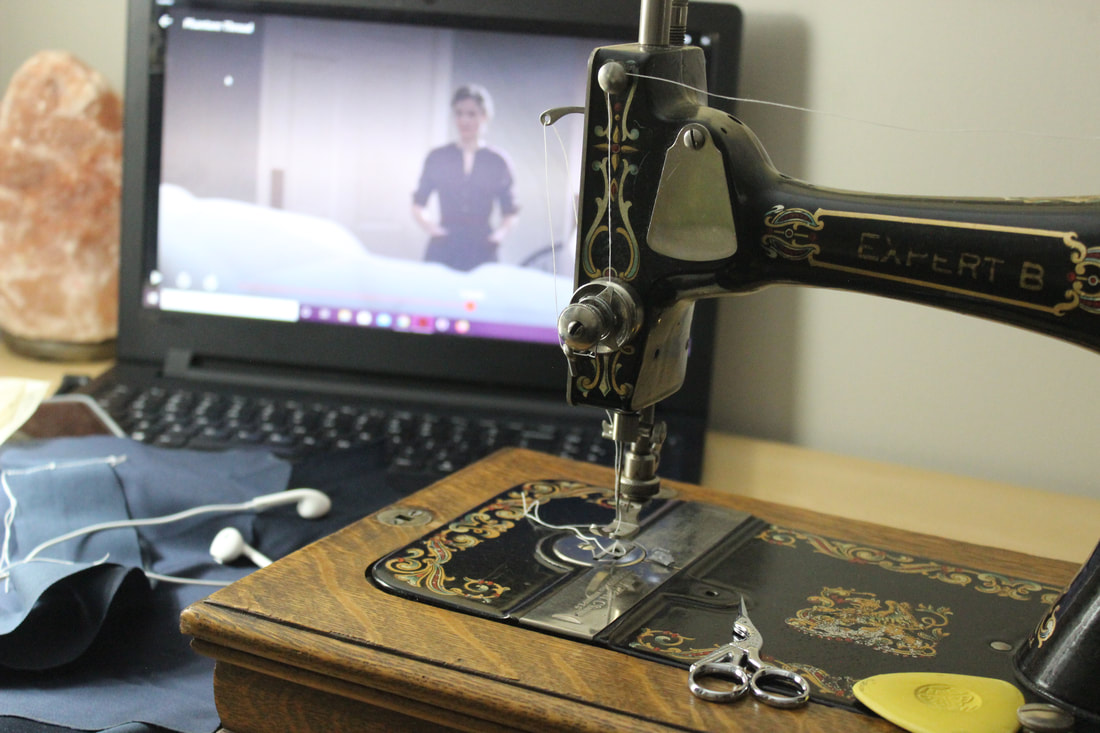 This entire collection is being sewn on this beautiful antique, hand-crank sewing machine. It takes a bit longer, but it makes the dresses feel so special! 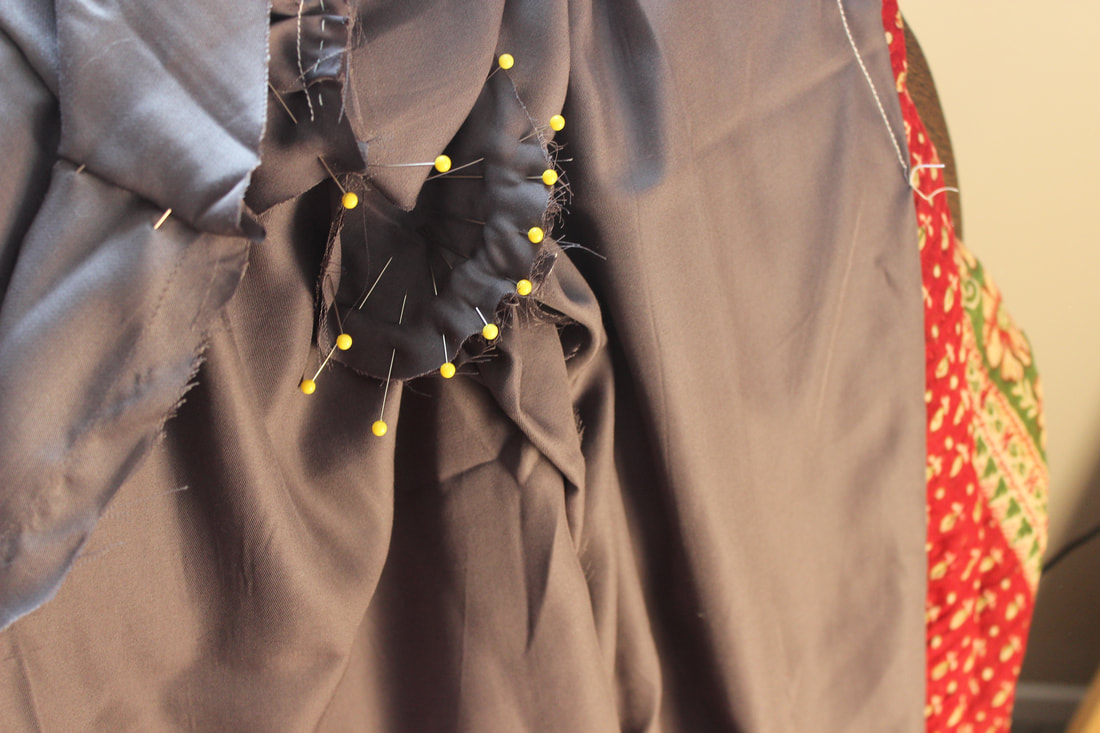 A peak at one of the garments for the collection. The next step is drafting. One of the best skills that I learnt last year at fashion school was pattern drafting! I have so much fun with it, and it is so satisfying to make something completely, utterly from scratch. I often alter the patterns that I use when they are pre-made, but I have so much more freedom just being able to make my own. Pattern drafting includes lots of math and rulers, so it can be a bit tiring on the brain. I try to spread out my pattern drafting so that I don't get sick of it, so I often have a pattern on the go while I am cutting out a different garment and sewing another one. This also makes the process more fun for me, since I can choose what I feel like working on for the day depending on my mood. However, not every part of the pattern can be drafted. I love being able to drape parts of patterns, since it gives me a lot more creative freedom (and lets me do a little less math). Draping is also fun to get videos of, since the garment changes so quickly when it is draped. 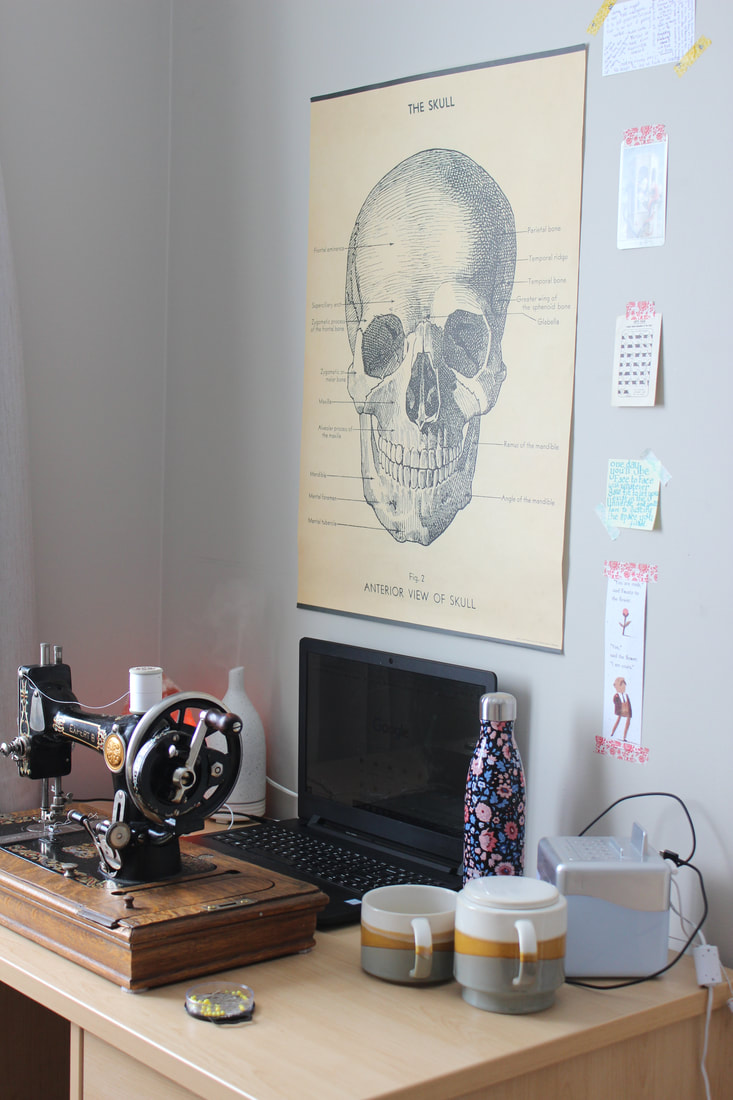 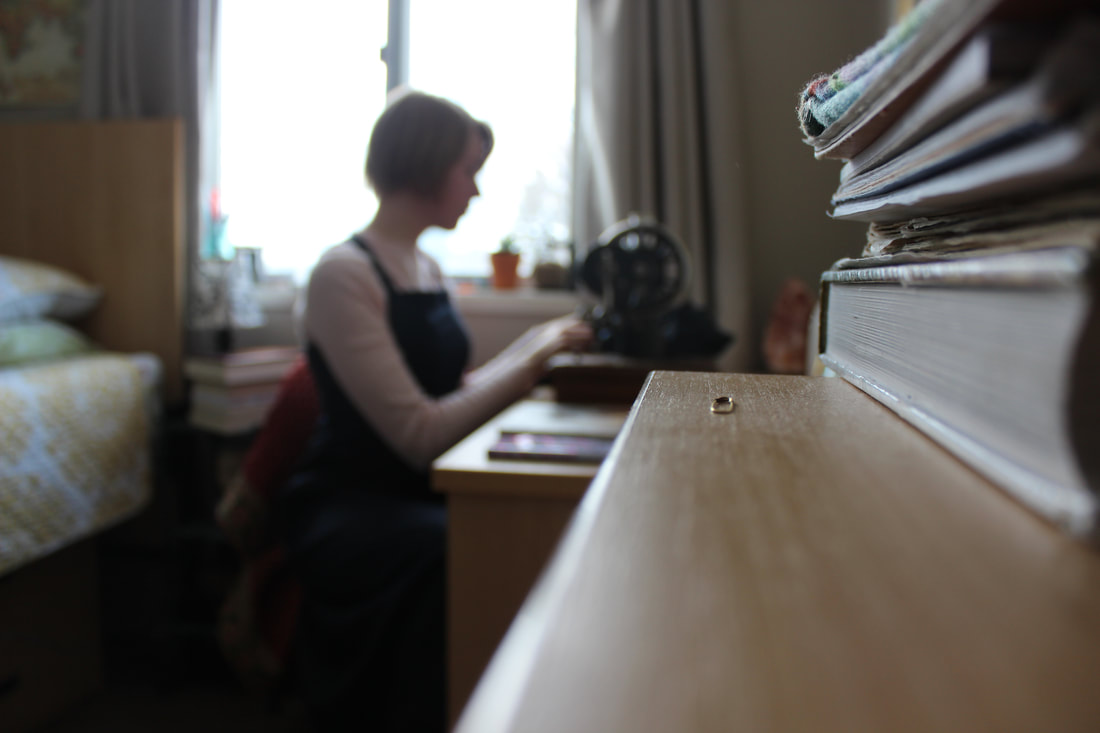 There are many other steps that are included in the process of making a collection (loads of planning for various things, organizing, fittings, adjustments, constant ironing, etc.), but one of the most important ones is the actual sewing! All of the sewing for this collection will be done on my lovely, antique White sewing machine. She is a hand-crank machine, so my right arm is getting very muscular... Obviously this makes the sewing take longer, but I feel like I have fantastic control on it to do some picky work, and the stitches are beautiful. It also makes the collection feel just a little more special to me:) 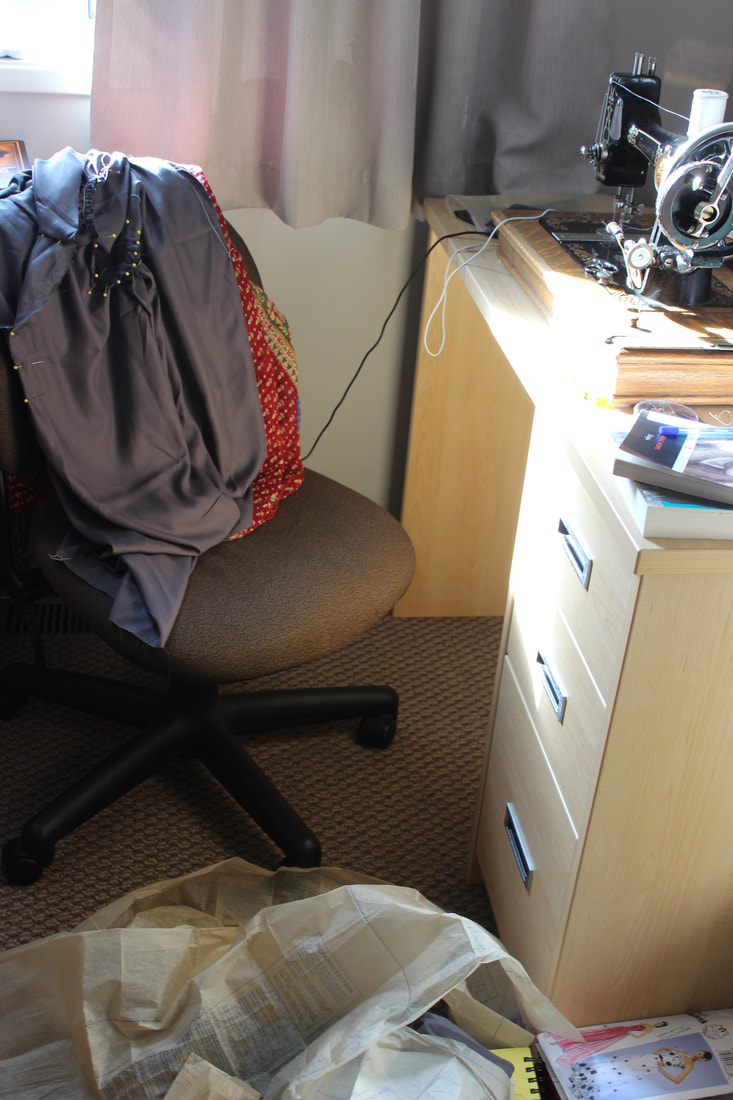 Every surface gets used when I'm sewing... So here is a sneak peak at the new collection! I will be putting up more information about it as soon as I have more ready to go, and I am video-taping the entire process so you can see it all come together once I'm done!
The collection is made mostly of eco-friendly materials, and using couture methods. What are you doing to keep your spirits up during self isolation? Any good movies I should watch? ~K
1 Comment
Over the past few days I have been spending all of my time working on a new pair of 18th century stays to go underneath the Robe a la Francaise. I used the American Duchess stays pattern as a tentative base, then altered it with the help of extant garments, other historical costumers advice, and a little imagination. Since this project is going to be entirely hand sewn and will take quite a while to complete, I thought that I would make a bit of a step-by-step of how I created them. Please don't take this as a guide to sew your own though, since I'm not focusing on historical accuracy. I just want a mostly accurate shape and a pretty garment at the end of this. 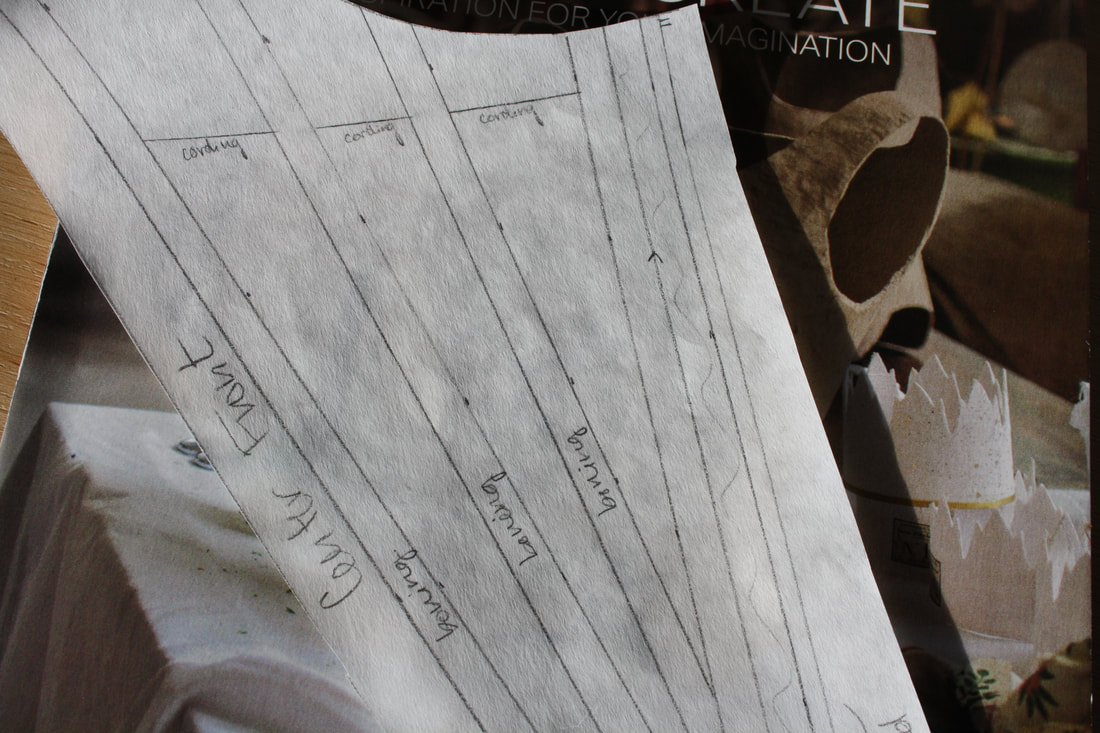 A look at the paper pattern piece of the center front panel  The two back panels of the stays After drafting the pattern on paper and adjusting it a million times to get a better fit (okay, it wasn't a million, but it sure felt like it), I cut out each section for three layers: two inside layers (where the boning will be sandwiched between) and the top silk layer. I then copied my boning pattern onto the inside layer so that I can follow that with my stitching. The boning pattern took me nearly as long as actually drafting the shape of the stays, just because I wanted to make sure that it was both comfortable and efficient. I also wanted to follow a historical example, since seamstresses through history always knew best. It can be pretty difficult to find clear photos of extant stays, but I used this one from the V&A as inspiration, since it doesn't have a front and back lacing. I cut out my front panel as just one piece, so it won't have the option of front lacing. 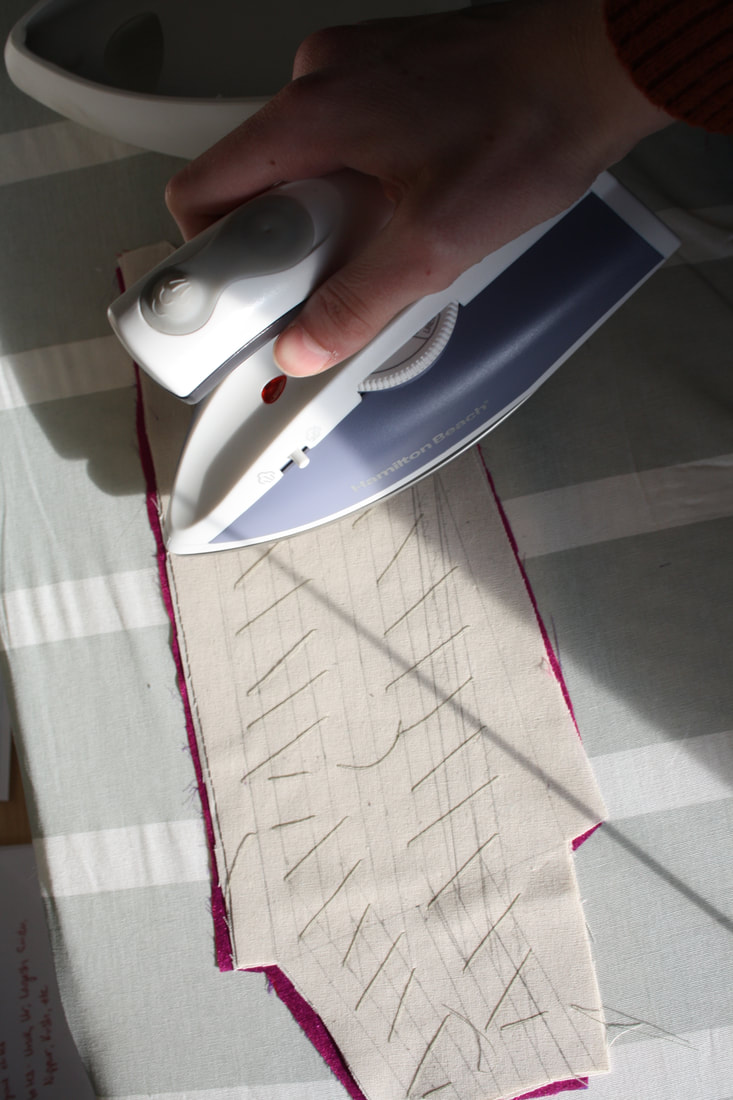 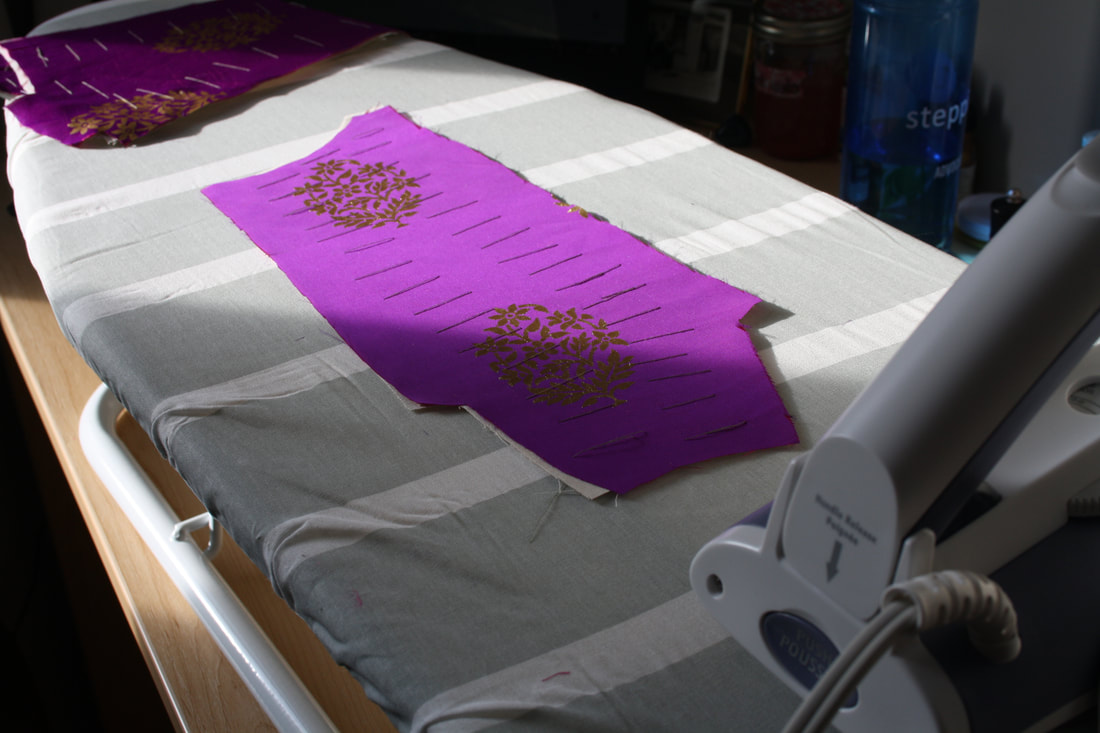 After all of the boning channels are drawn onto one of the inside layers, I pad stitched the layers together. Pad stitching is a type of tailors stitch that bastes two layers together (this is how you attach a non-fusible interfacing). I did this quickly and a bit sloppily, since I just need it to make sure that the layers don't slip while I'm stitching the channels. The sections especially needed it because of how slippery the silk is. I then ironed everything before I started any of the real stitching. 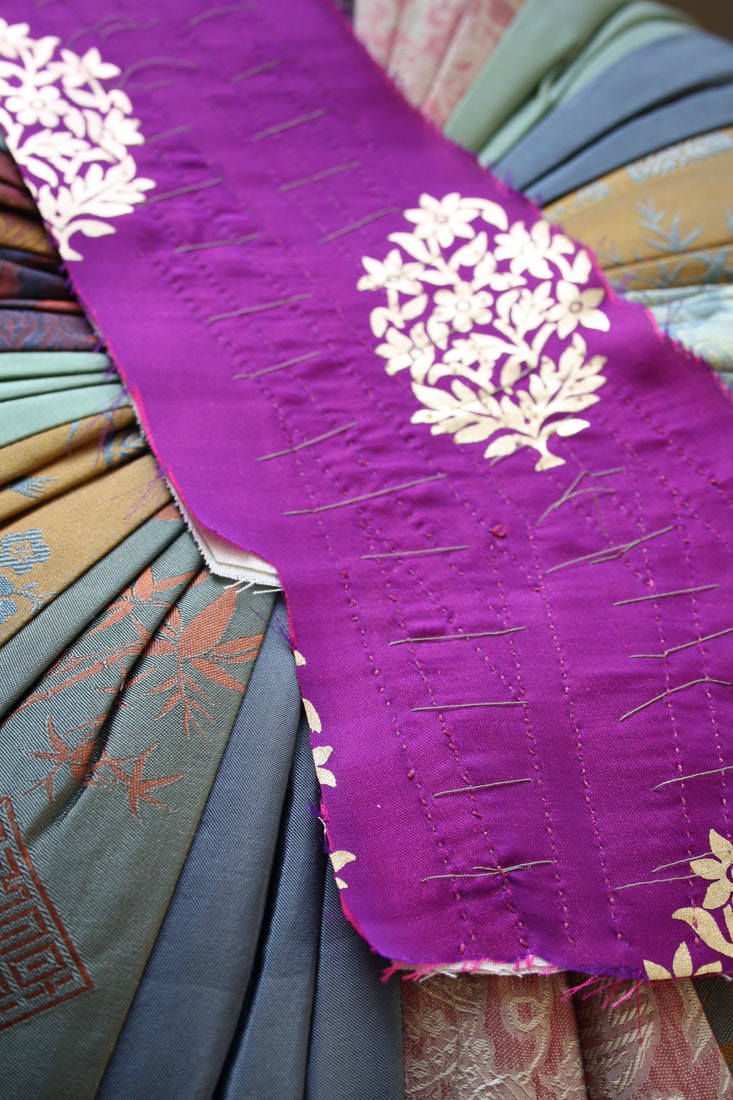 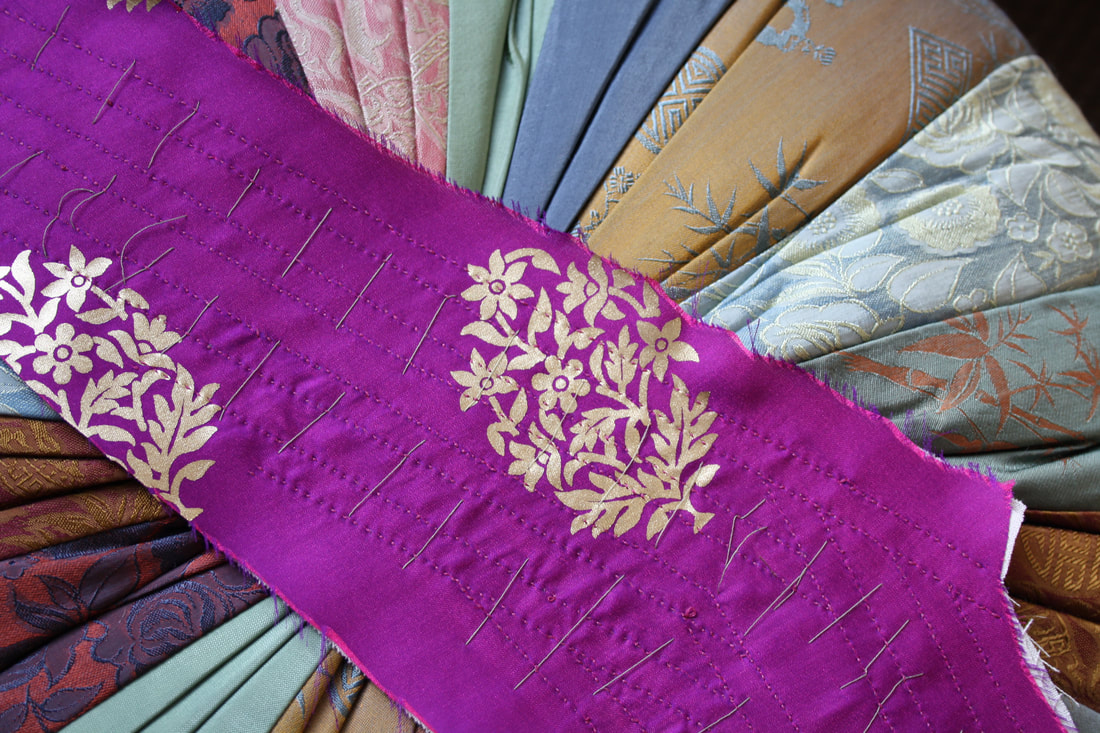 The boning channels in one panel entirely sewn up, but with the pad stitching still in. I will be removing that in a while. Now it is finally time to start on the boning channels! This could be a very tedious process since it is just a running stitch down all of the lines you drew for your boning channels, but I actually really enjoy the process. So far I've watched Crimson Peak, some Ripper Street, and Marie Antoinette while working on my sewing! 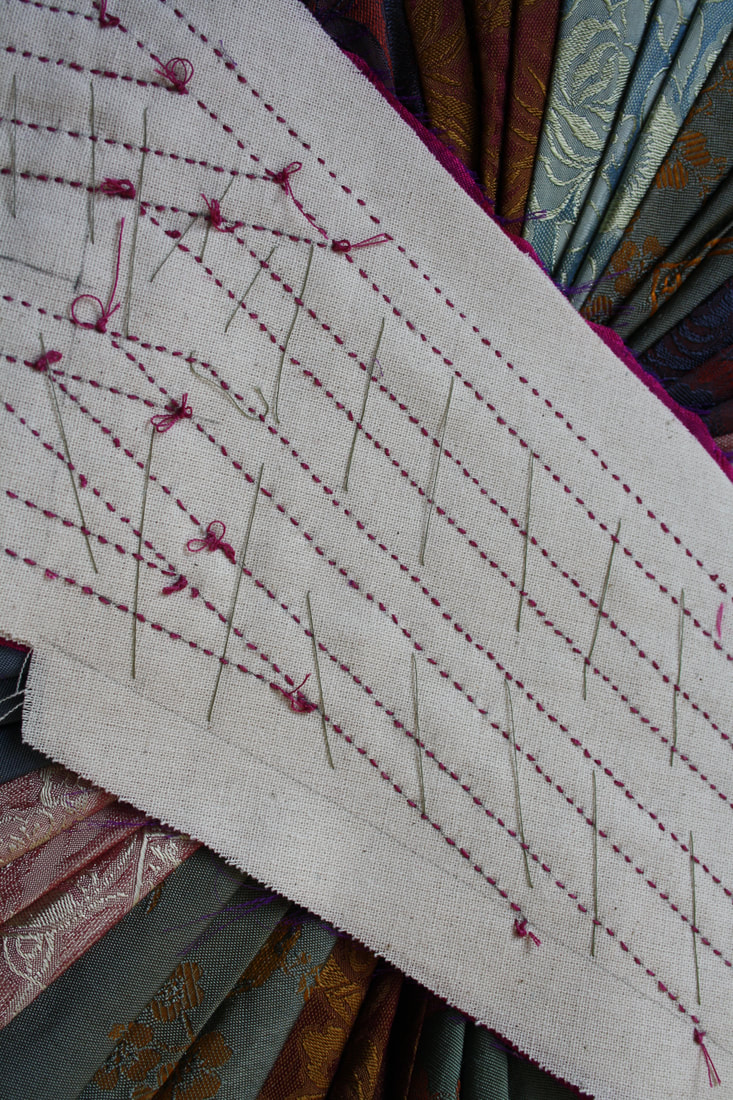 The finished panel from the inside (this will be covered with lining near the end of construction) Before I sign off, I thought that I would talk through a bit of my thought process behind the decisions I've made so far in the process. To begin with, I am including the top layer while sewing the boning channels because I want to see the stitching from the front. I have seen some more decorative stays where the top layer was sewn separately and then attached after the bones were put in, but I love the texture of the stitches and want to be able to see that once the stays are done. Another thing that I would like to mention is my choice of silk that makes up the top layer. I am very aware that it isn't historically accurate (though it does have a vintage flair to it). I decided on this one for a few reasons: one is that I only had a meter of it, so it was the perfect amount for a project like this. Second, I want the final piece to have a bit of a modern Marie Antoinette style, and I thought that this would be a great way to achieve that. Thirdly, I just really like the colour and how it looks! ~K
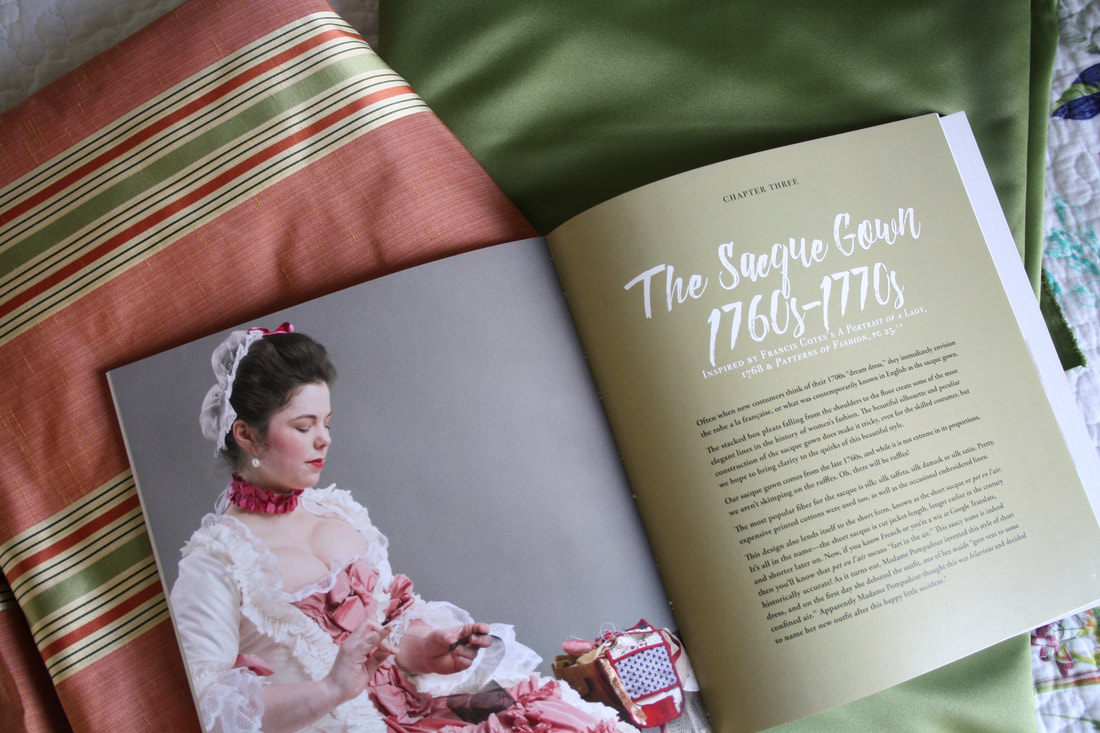 Figuring out a way to sew at school while still having time to do other things that don't involve sitting around has been difficult, but I have found that my passion and desire to make things has been revived! This is fantastic... other than the fact that I still need to do my school work. I have, however, found a way to get both done. Basically, it means that my future projects will include a great deal of hand sewing. Hand sewing has always been something that I enjoyed doing. When I first learnt to sew, it was not on a machine, and I've always found it a bit meditative. There is also the added benefit that I can watch something while doing it, which makes the task go much faster. The greatest draw back is pretty much only how time consuming it is, which is why I haven't had any new projects to post about lately. But do not fear! I have been hard at work both sewing and coming up with new ideas (as I mentioned in my last post), and I am hoping to have new photos coming up somewhat soon. While we wait, I thought that I would share my fabric haul for the projects that I spoke about in my last post. 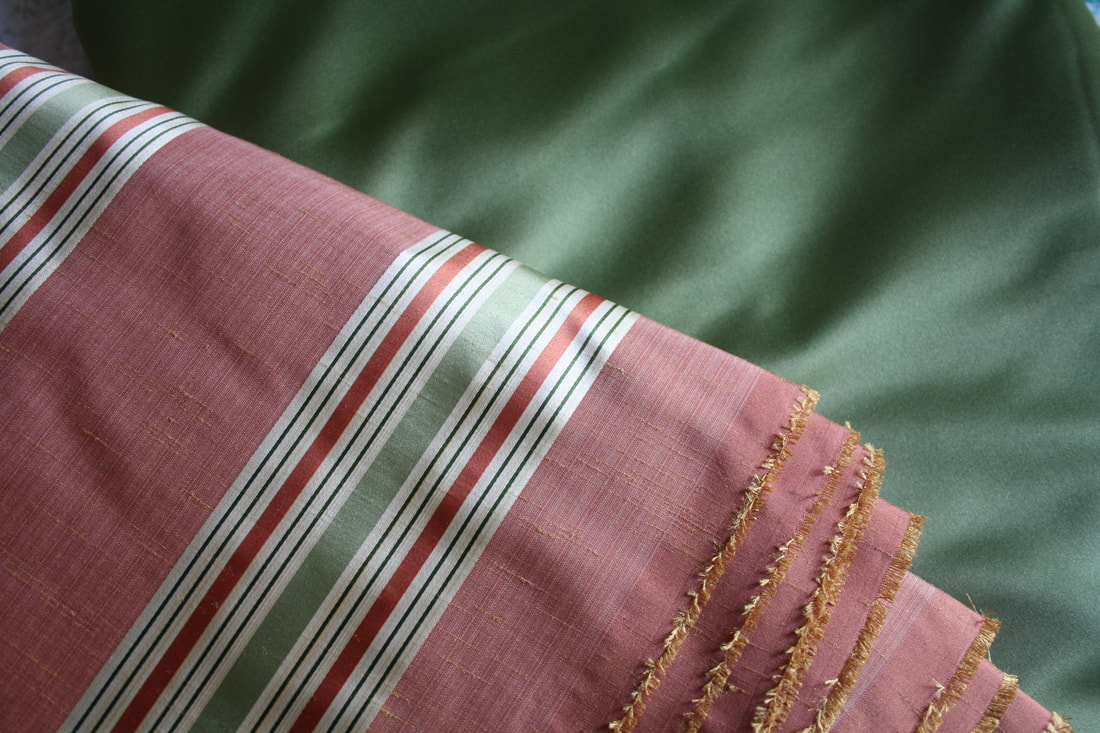 To start off with: the fabrics for my Robe a la Francaise. I have been wanting to make one of these since I first started sewing, and my love for these ridiculous, poofy dresses has not abated in all this time. Although having a fabric with a pattern makes this already difficult to construct gown even worse to drape, I couldn't help myself but pick up this lovely coral, cream, and green striped silk. I thought that these colours looked perfect for the era, and the coral is different from what I usually pick. Plus, I have seen so many stunning striped Robe a la Francaise's that I thought if I could be patient enough, it could turn out to be really beautiful. The green silk is for the petticoat that will go underneath the gown, which will be seen in the split at the front. If I have enough, I would also like to make some ruffles from the plain green to go on the gown and the stomacher. I am so excited to make this ensemble, but before I even start on it I will have to make myself a new pair of stays (the precursor to the corset which gives the wearer a sort of conical shape). My last ones, which I made for my school project a few years ago do not fit properly, and I would like to make a prettier pair this time. I also feel like I have learnt enough in the past few years about both fitting and construction methods that I could really improve the shape. 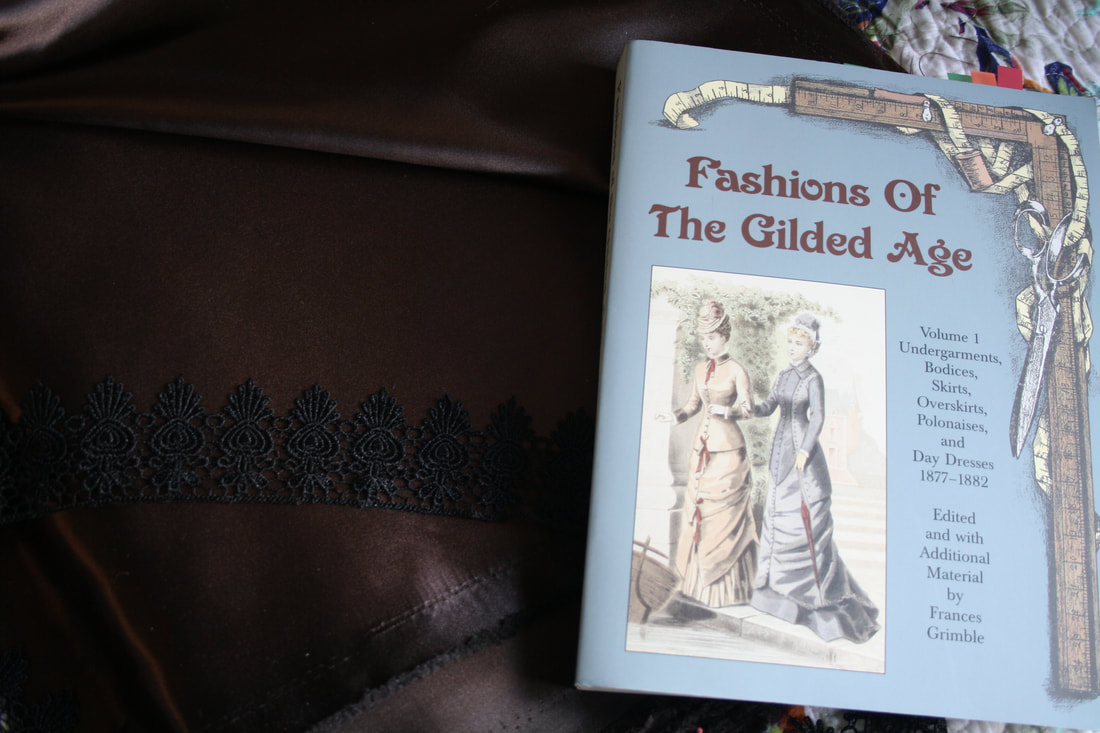 It took me quite a long time to decide on the colour for the Crimson Peak inspired gown, but I finally settled on this chocolate brown silk. I knew that I wanted a rich jewel tone, but I also didn't want to copy exactly one of the dresses from the movie. This isn't a cosplay, it's just inspired by the lovely natural form era styles and slightly morbid undertones. I also found a black lace to go with it, though I haven't decided where that lace will go yet since I haven't fully figured out the design. I would like something that comes across like an evening gown, but I also want long sleeves (like Lucille wears in the movie). During that era, evening gowns would not have long sleeves, so I either have to play with history or change the main idea. 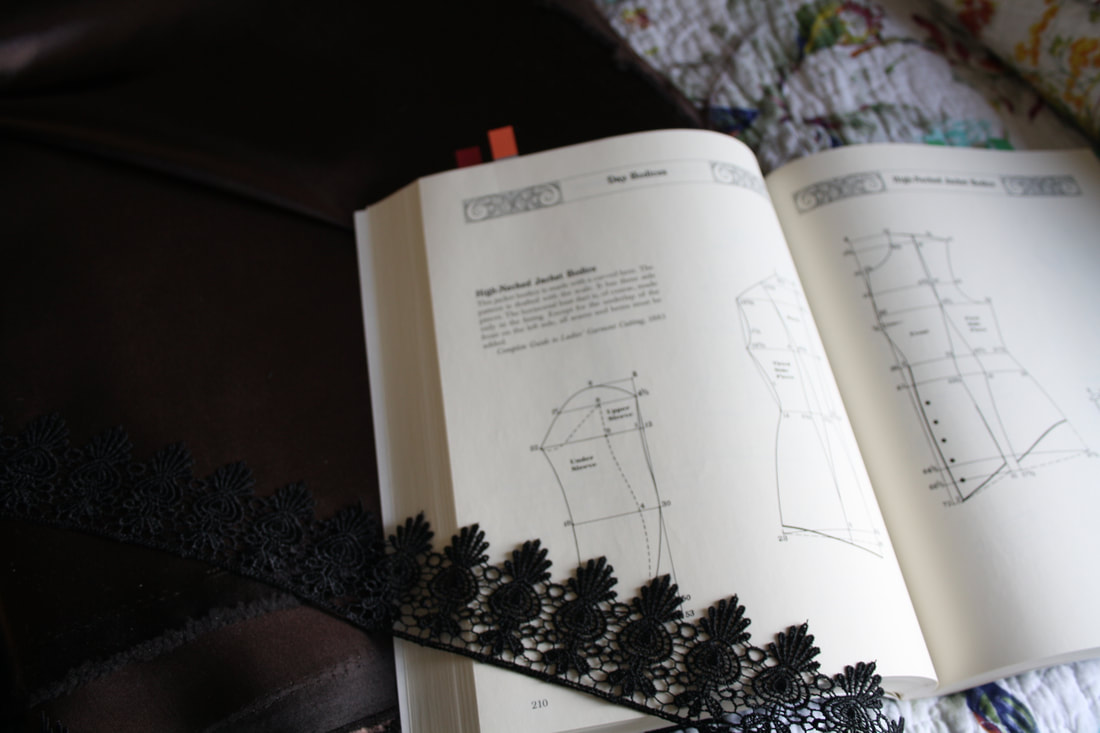 I am also very excited for this project because I finally get to use a book that I have been drooling over for months now. I will be using patterns (with some alterations, like I always do) from the book Fashions of the Guilded Age: Volume One by Frances Grimble. This book is filled with patterns from the late 1870s and excerpts from fashion magazines of the era. Since I can't seem to make it easy for myself, I will need new undergarments for this dress as well. Along with a petticoat (with a train, to keep the train of the dress clean), I will need to make another corset. I haven't really touched this era yet, so I can't wait to play around with it. 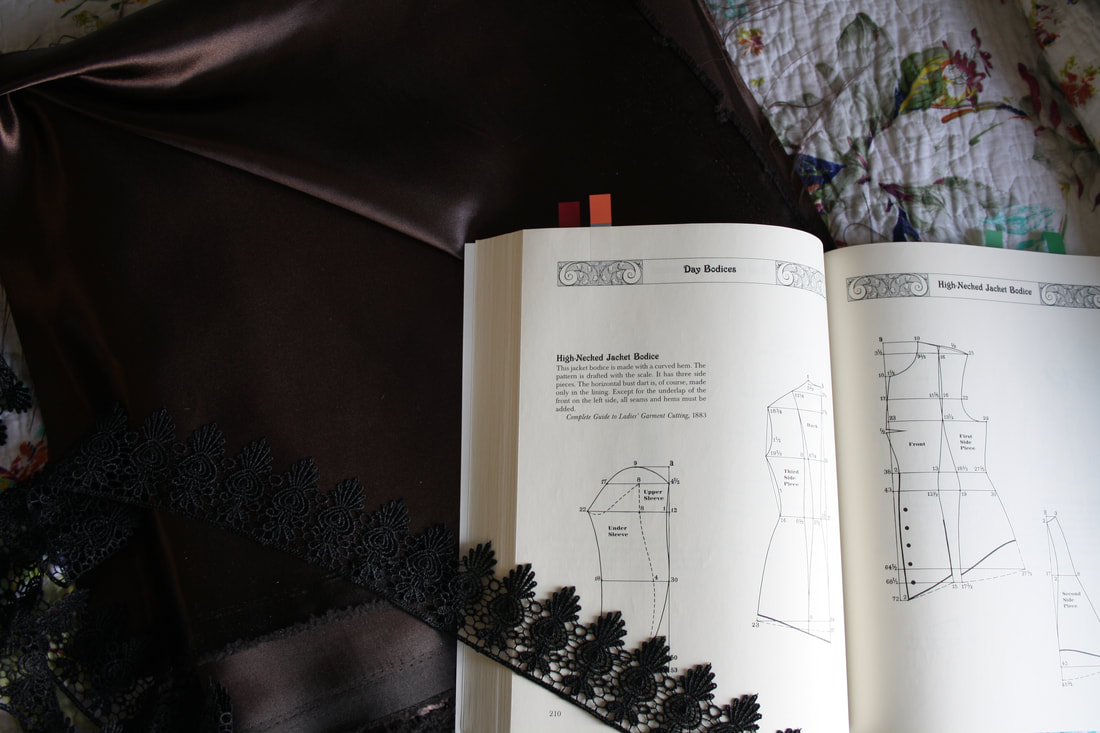 Hopefully my progress isn't too slow over the next few months, and that you are as excited for these projects as I am!
~K We made it! This is my last details post of my eco couture collection that I designed, drafted, and sewed for the Future Oceans Fashion Show that was held in Victoria, BC on Canada Day (anyone sick of hearing about this event yet?). If you want to read and see more about the event and the other garments that I created for it, you can check it out here. For the sake of not repeating myself a million times and making each post longer than necessary, I'm going to assume that you know about Future Oceans and go straight into talking about the last two garments in my little collection. 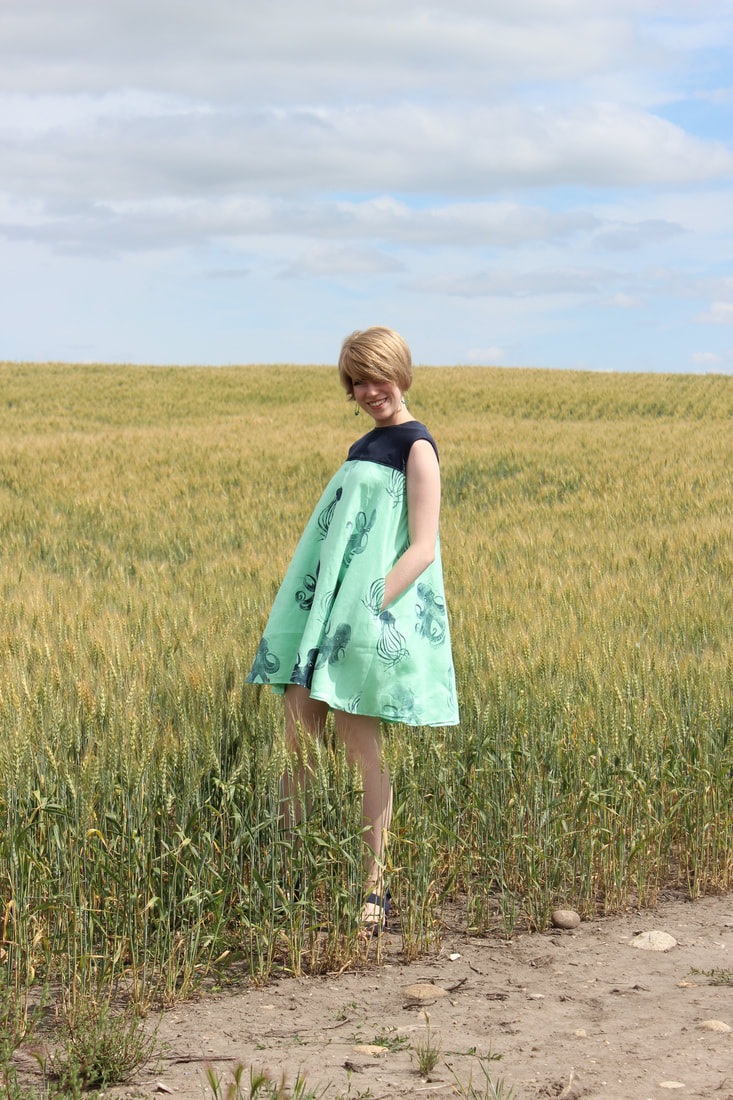 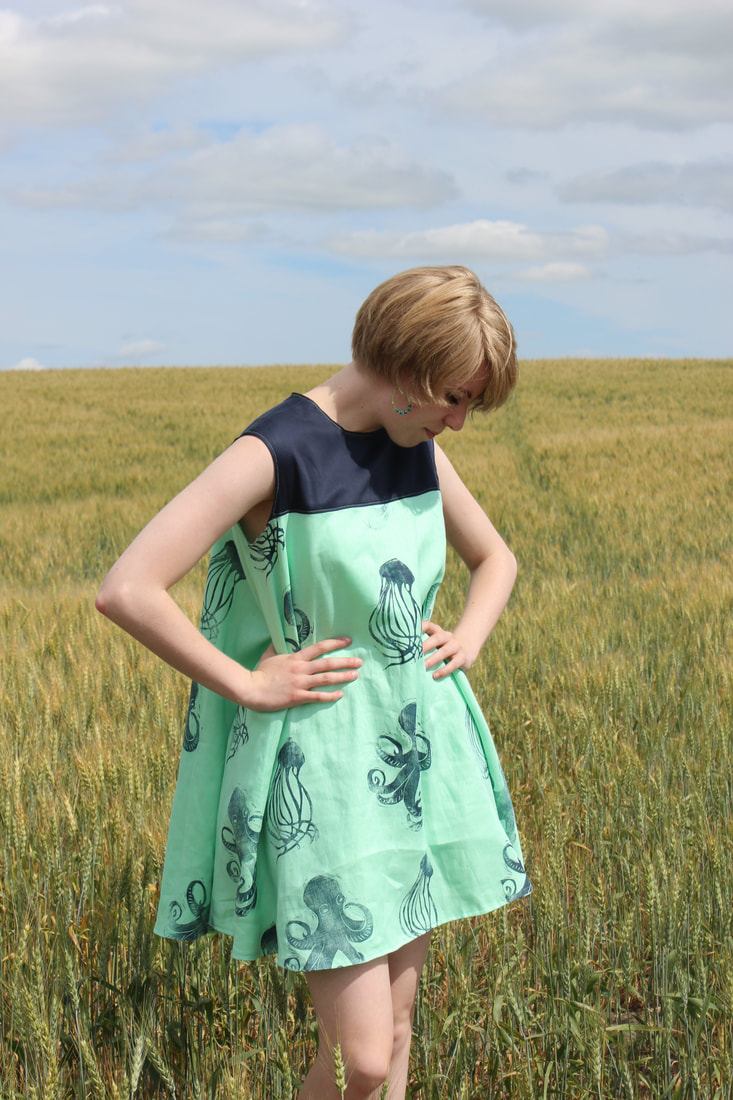 The first dress I'm going to talk about today is the first dress that I actually created for the show. I designed all of the dresses in the winter, but I didn't start patterning or sewing any of them until May. I'm not sure if I was procrastinating or if my reasoning is solid, but I chose to avoid creating any patterns until I got the fabric in. I bought my fabric from a sustainable material brand that is run out of Canada, but it still took a bit for the fabric to arrive. It was insanely exciting when it did come in, and I was hit with lots of inspiration to pattern draft after I saw it. The 1960's dress was an easy pattern to make, which is why I started with it. I wanted to ease myself in a bit, and this was a great way to do it. It was also pretty simple to sew, since it's such a simple silhouette. 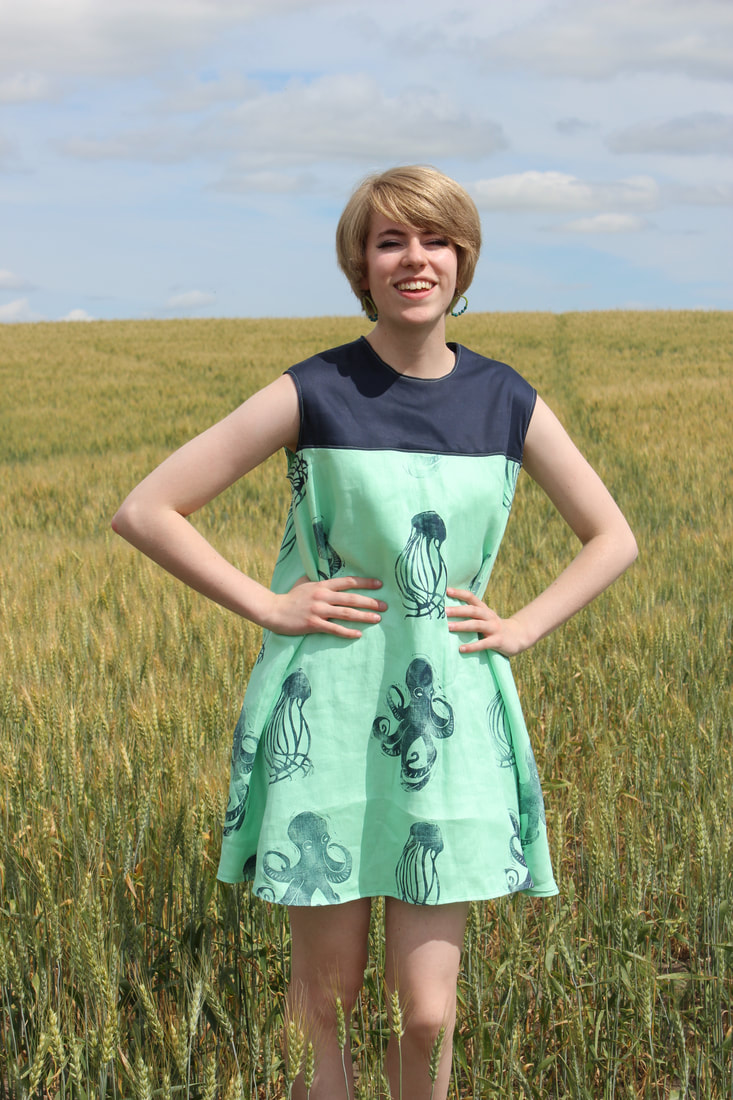 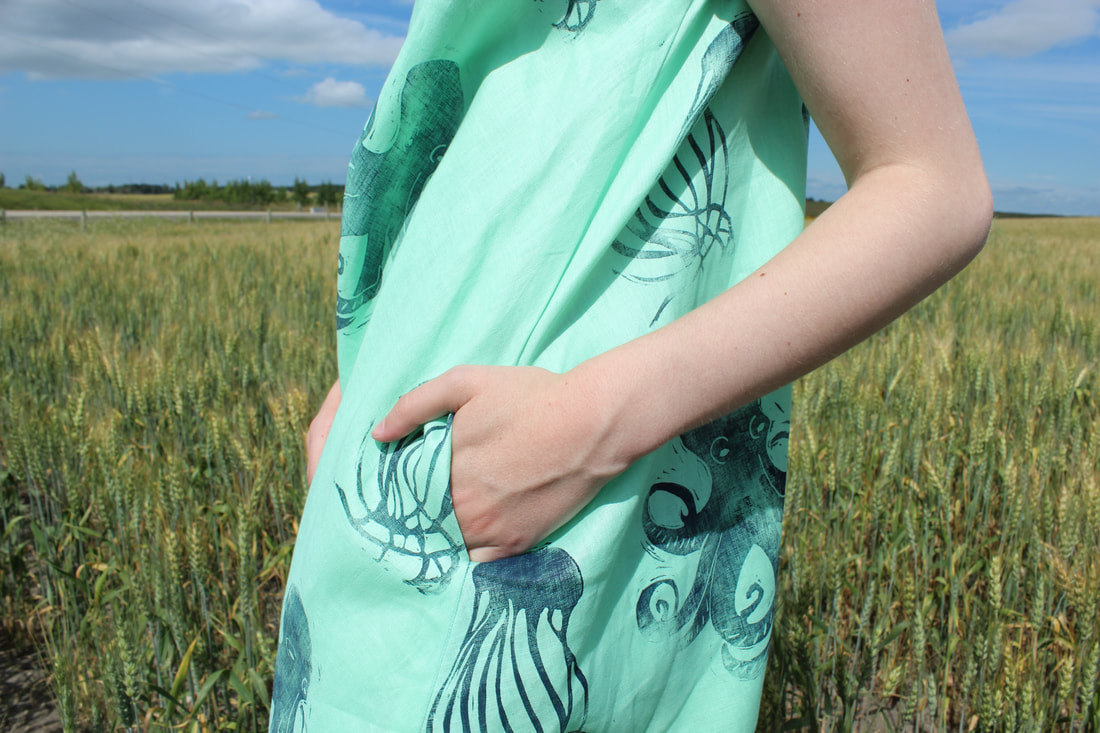 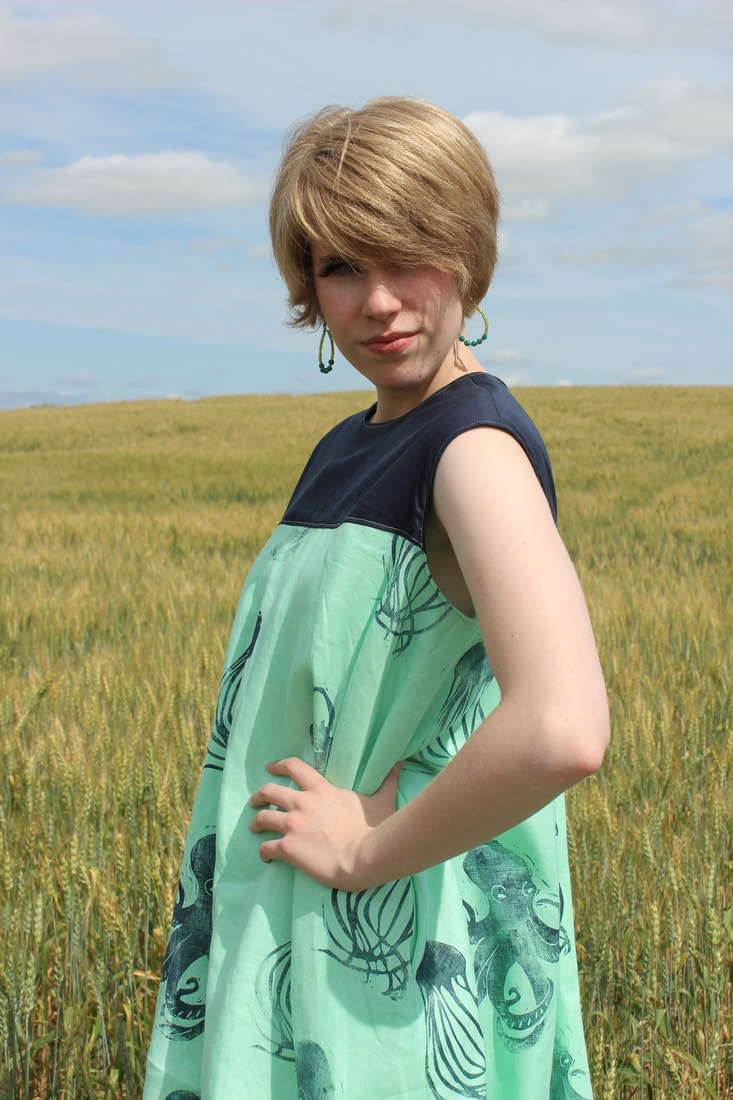 This dress is made out of organic cotton sateen (for the yoke. This is the same sateen I made the 1940's dress out of) with a sustainable linen. This linen is so floaty and wonderful to prance around in. The entire dress is lined, and it features pockets hidden in the side seams. The linen is hand stamped, like almost all of the other garments in my collection. I was inspired by trapeze dresses from the 1960's. It was an added bonus that this shape of dress is very easy to fit to different shapes and sizes, so it was very easy to find models to fit it for the show and the photoshoot the next day. 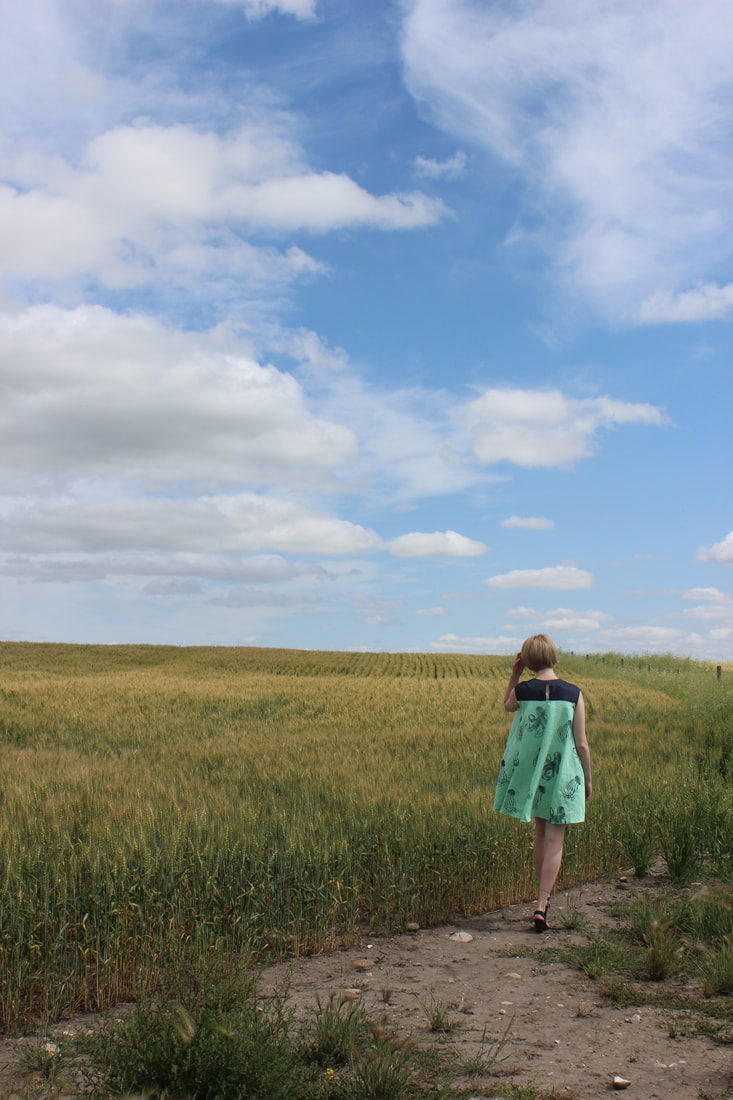 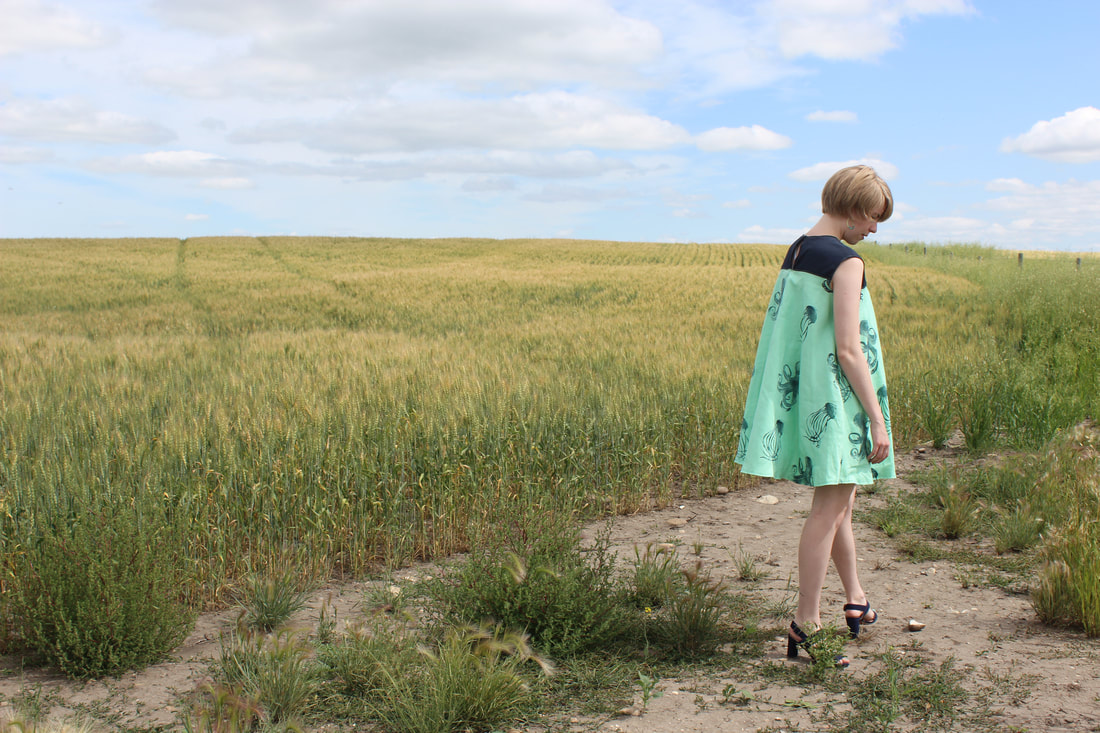 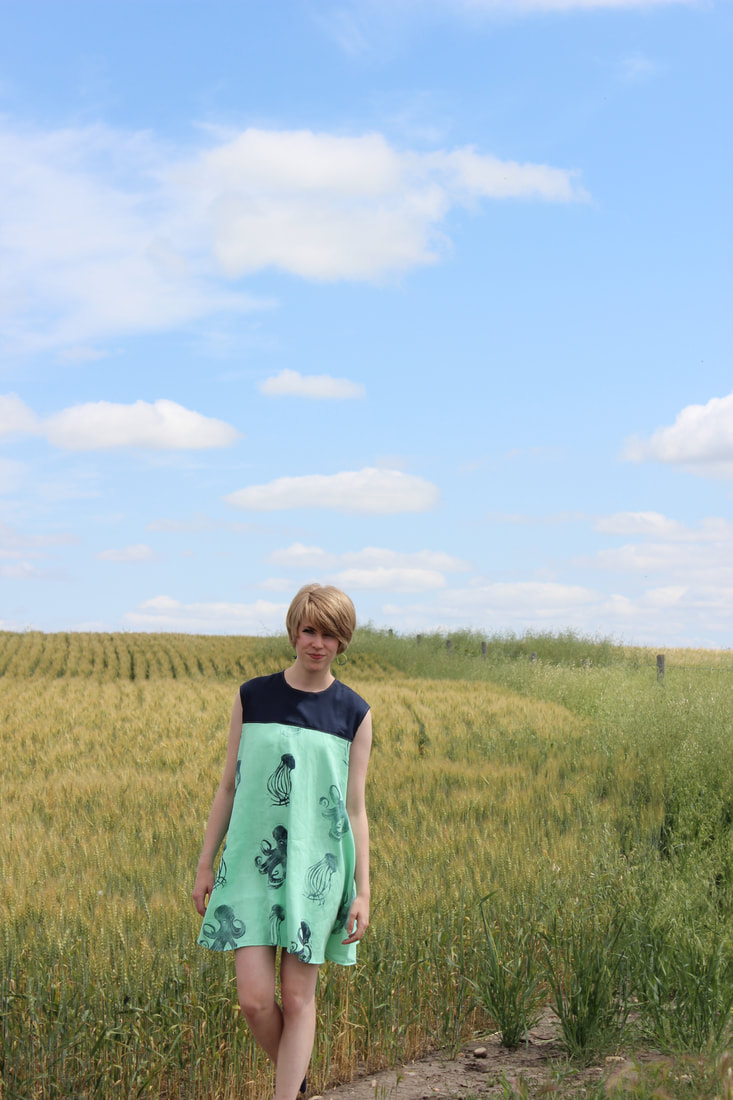 I used to hate 1970's fashion. I can now admit that I absolutely love it now. Blame Wes Anderson. Opposite of the 1960's dress, this is actually the last dress that I made for the show, and it was designed about 5 minutes before I made the pattern for it. The original collection was supposed to start at the 1930's and go to the 1960's, so this dress and the 1920's one were last minute additions when I realized that I had extra time and material on my hands. 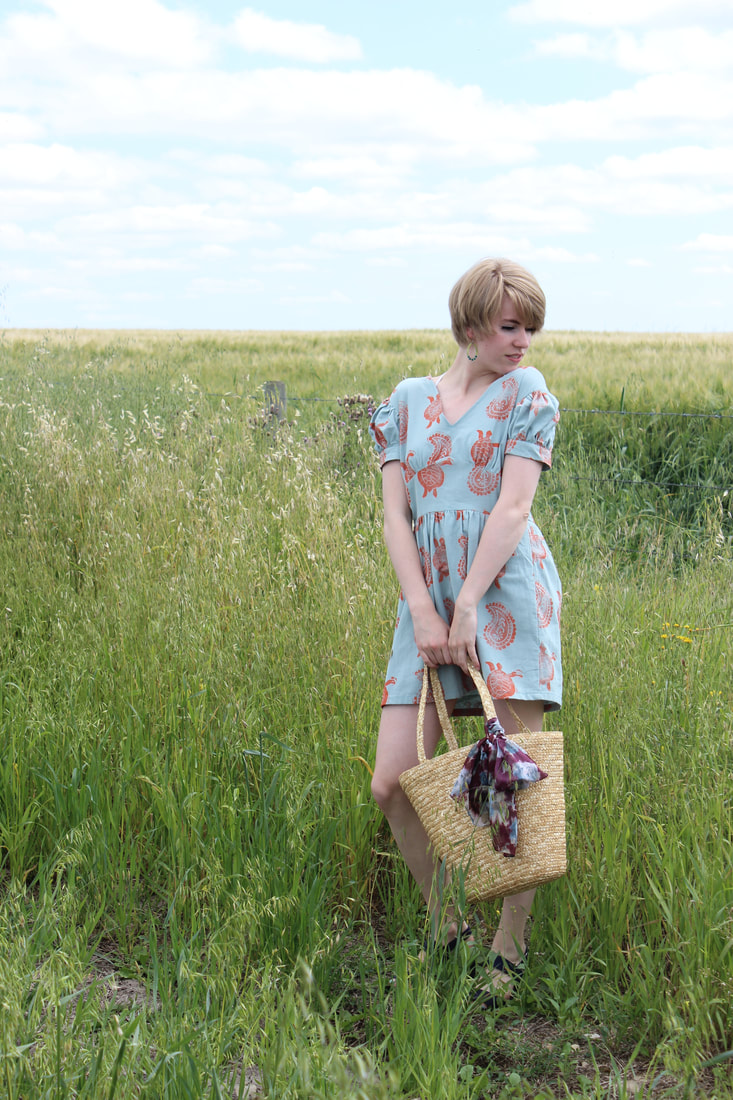 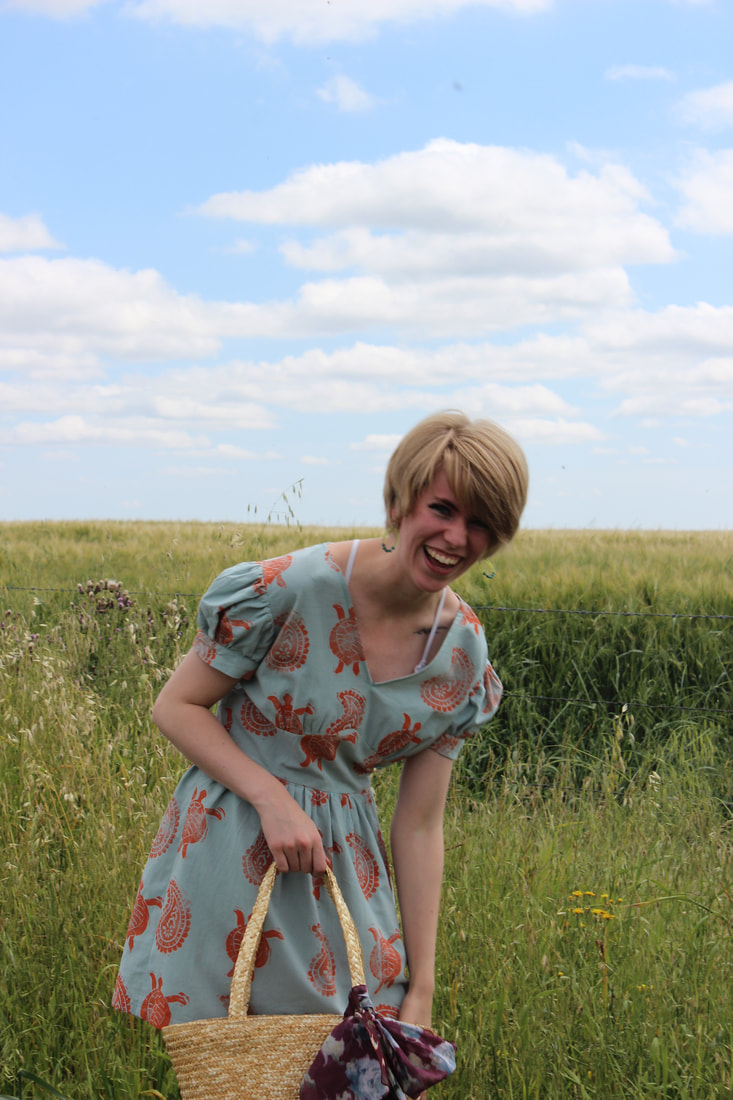 This dress was quick, dirty, and fun to make. The drafting of the pattern was relatively easy and so was putting it together. Printing the pattern on it was tons of fun as well since I got my mom to make me a special stamp for it (my mom is the one who creates all of the stamps that I use to print my fabrics). The pattern is paisley and turtles in a coral on blue cotton gauze. I loved working with the fabric when I used it for the 1950's dress, and it takes fabric ink really nicely. 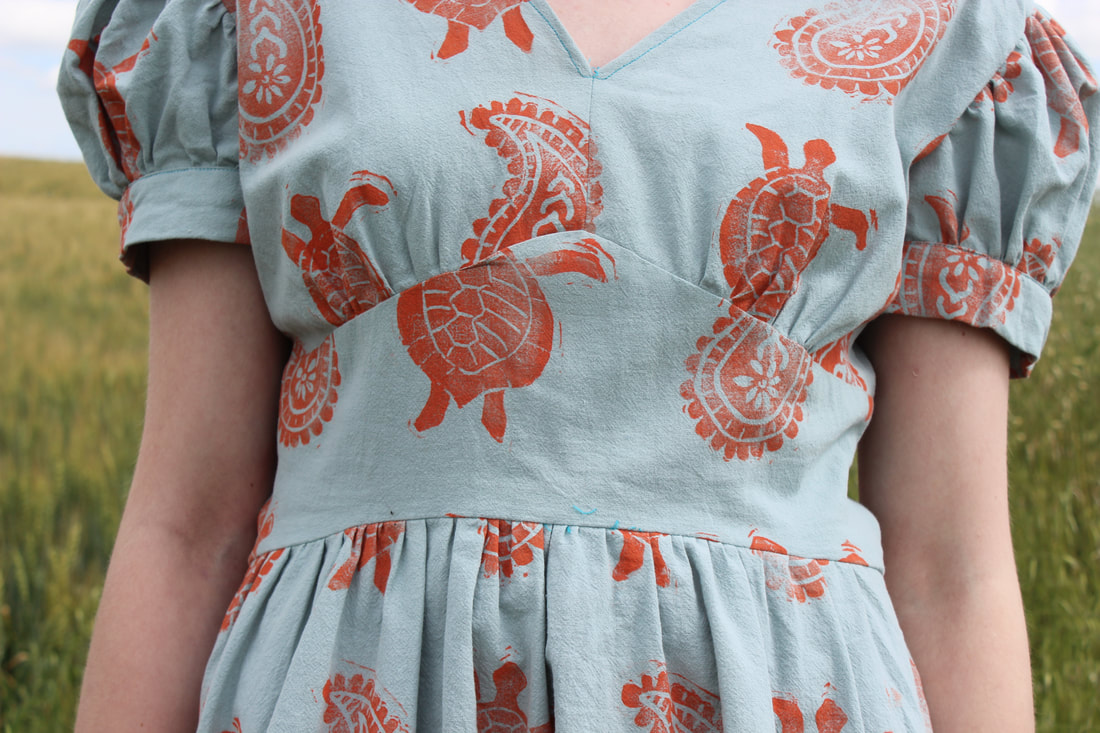 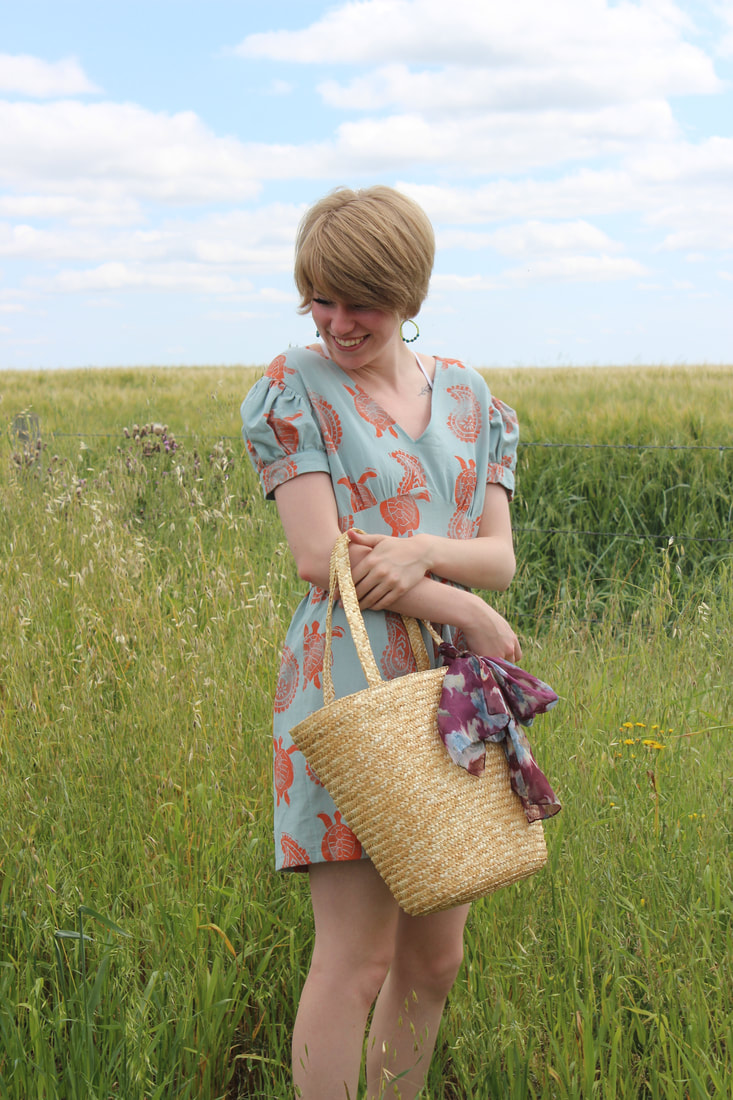 When I thought about making a dress inspired by the 1970's I was torn between making a maxi or a mini dress. The choice was made purely out of convenience in the end - I wanted it to have puffy sleeves, and if I wanted enough fabric to make that it had to be a mini. I had so much fun making this dress, and I'm thrilled with how it turned out. 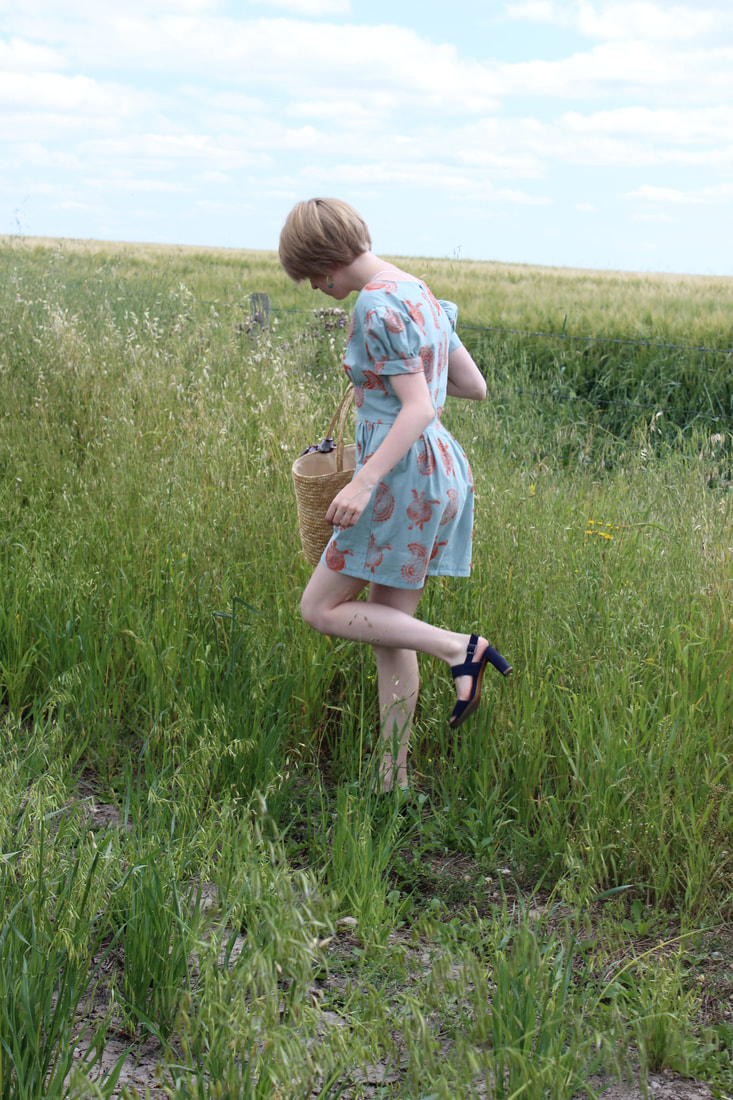 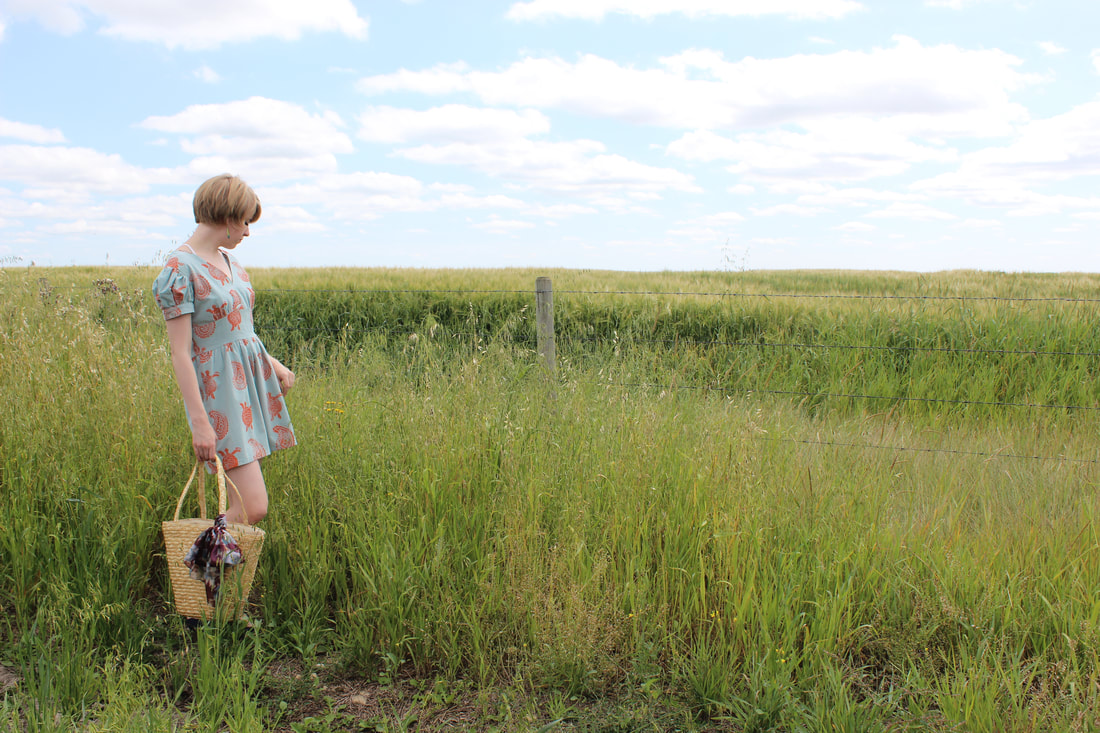 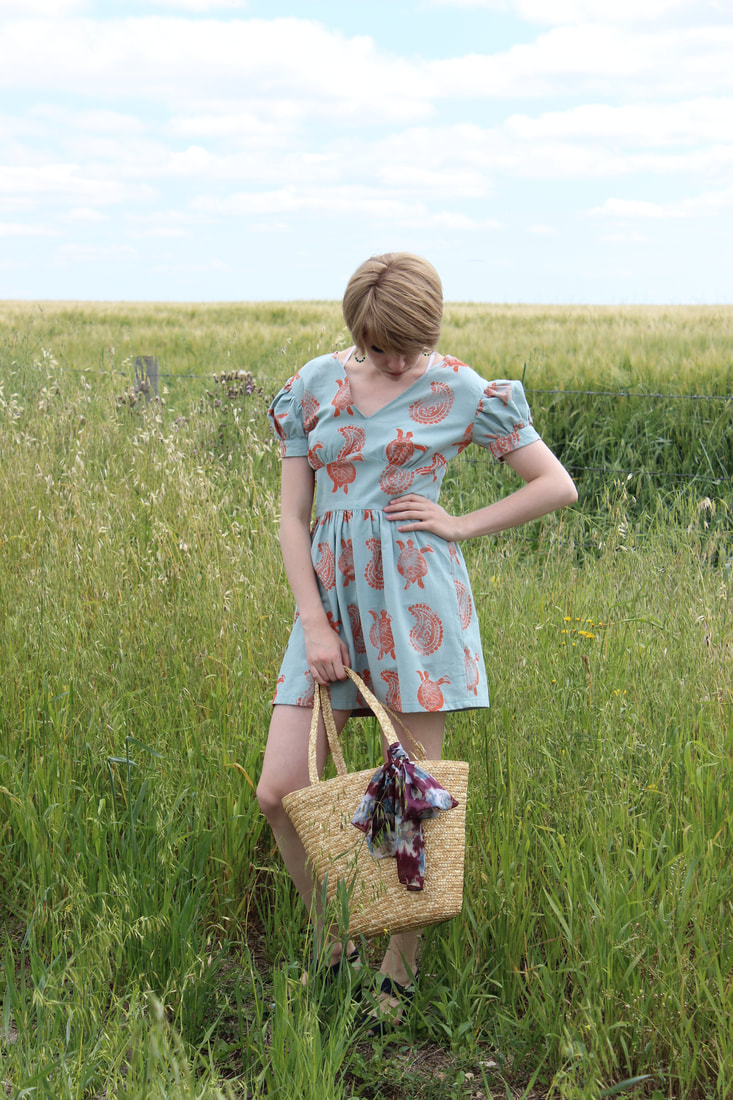 Both of these dresses are currently for sale at the Future Oceans Boutique at the Victoria Bay Center and online at the Future Oceans website! You can order either one of these dresses or a skirt (check them out here) and get it made to your measurements! 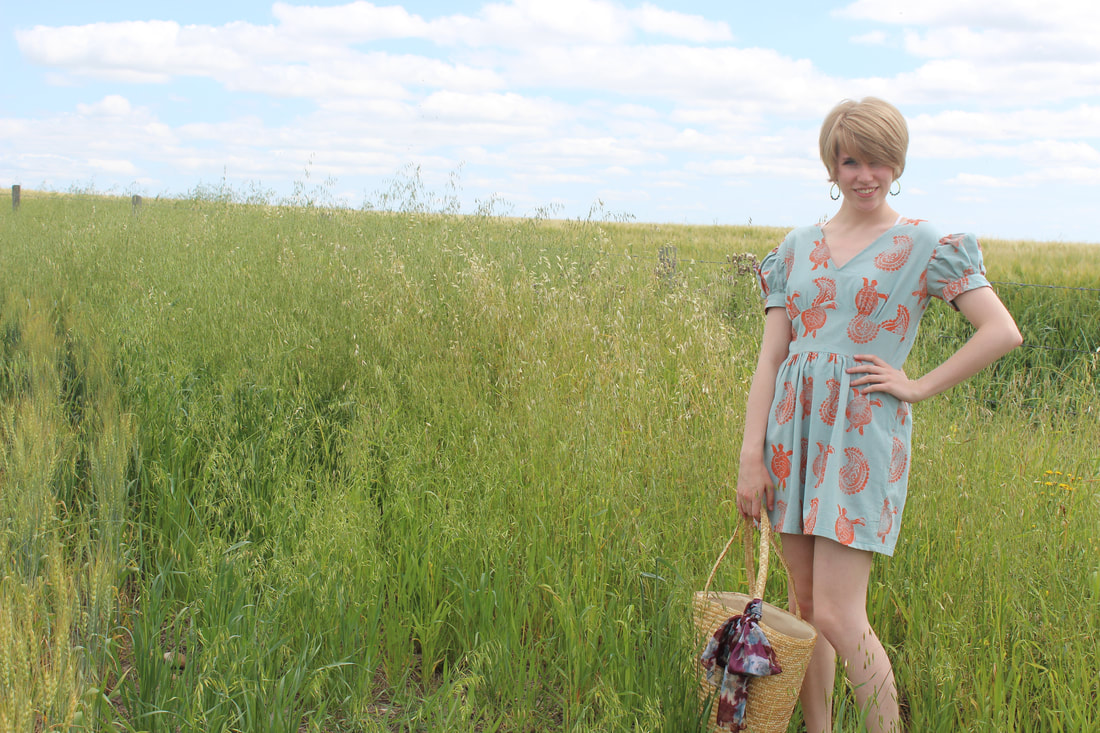 Thank you for your support!
~K Last week I focused on two pieces that are a part of my eco couture collection for Future Oceans. If you want to read more about Future Oceans (the fashion show, the garments I made for it, or some of the process while I was preparing for it) you can see more here.   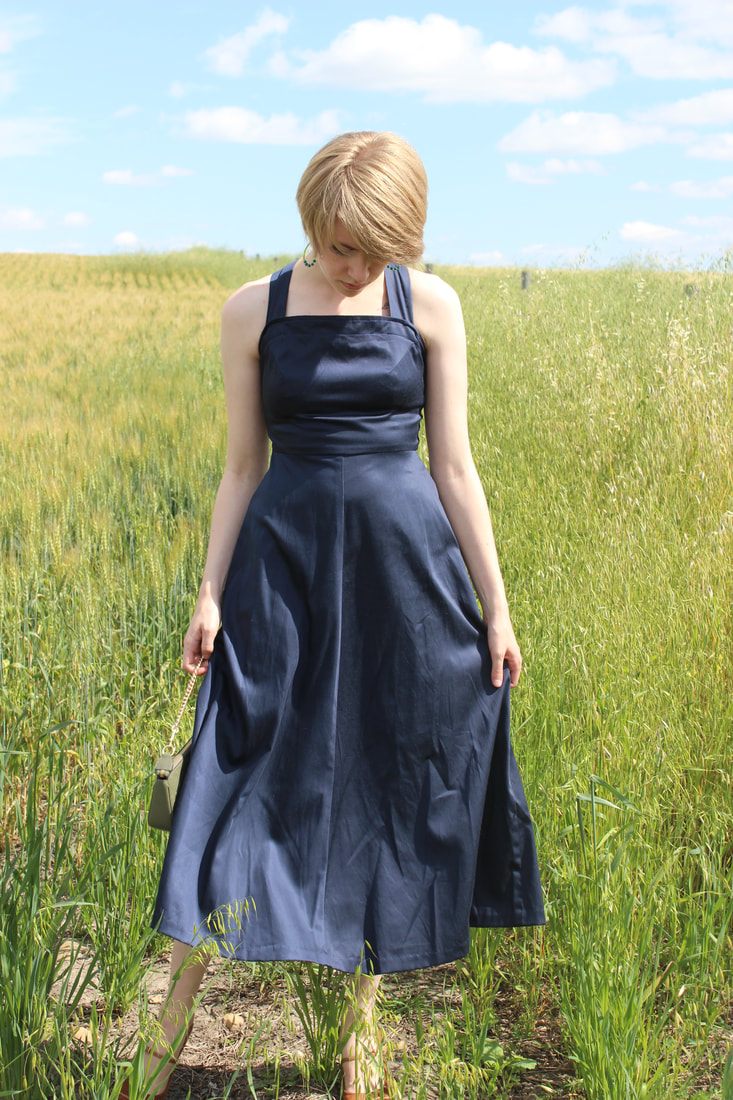 This week I wanted to look at some of the detail and design process for the dresses that I made that were inspired by some of the best decades in fashion - the 40's and 50's. I have always loved the fashion of the 40's, and I've already made quite a few pieces inspired by the era. The thought process behind this dress included much more than just what design elements I liked from the era though, since I had to take into account what type of fabrics were available for me to use, how much time I had to make it, and what kind of shape would be the most convenient to make when I wasn't sure who was going to be wearing it. 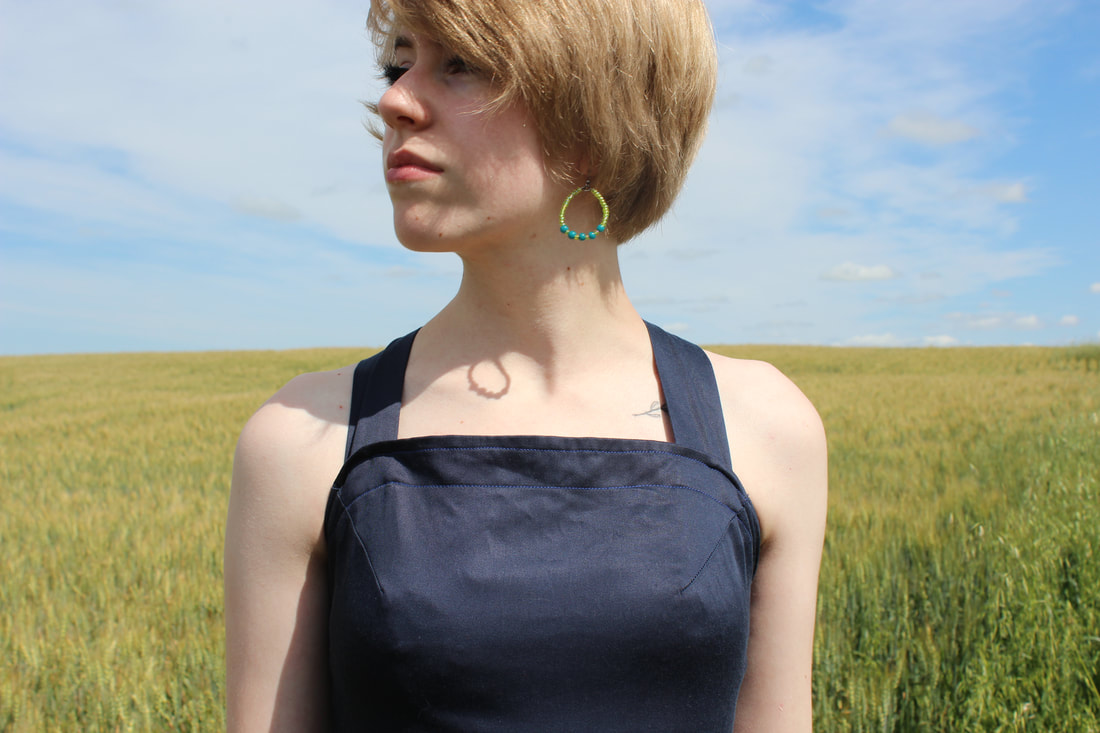 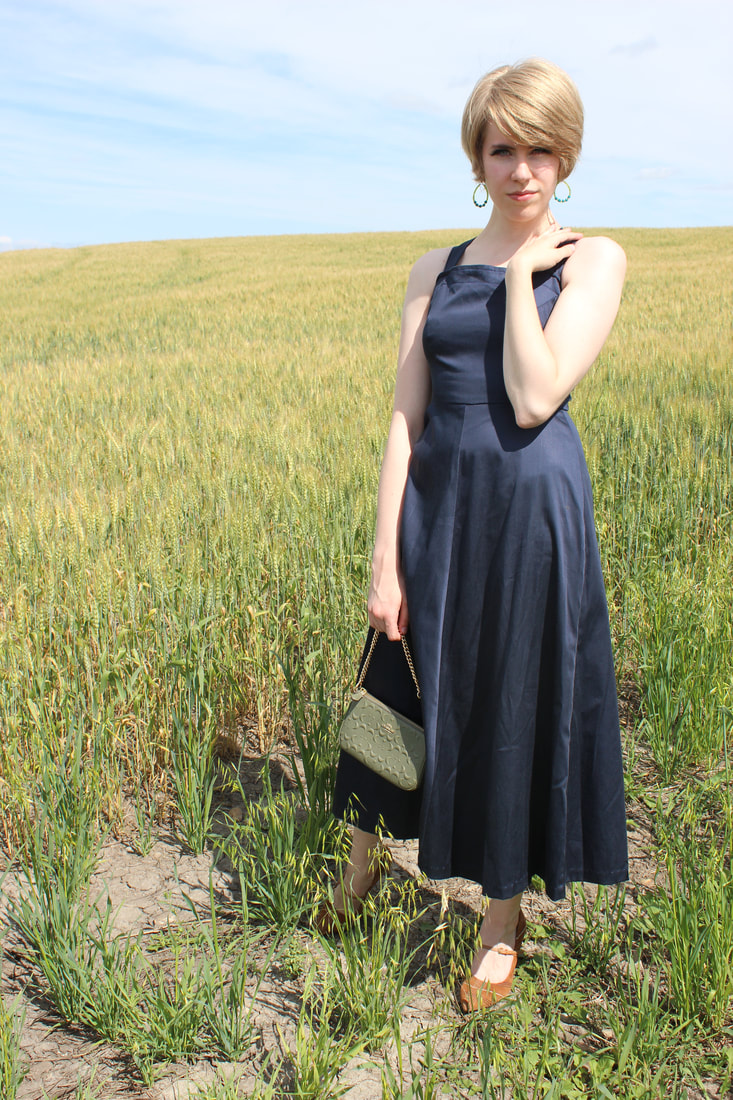 One of the most difficult aspects of designing and making garments for fashion shows is not knowing who exactly is going to be wearing them. Quite a few of the pieces that I chose to make for fashion shows have been designed to be more suitable for many different shapes, and sometimes sizes. This dress was one of the later pieces that I added, meaning that it got tacked on after I finished most of the other ones. I had some time and the material to make something else. Originally, I wasn't sure if we would have time to show it in the actual fashion show, so it was a backup that I might have worn behind stage. We did end up having the time for it, and I'm so glad because I was thrilled with how it turned out. 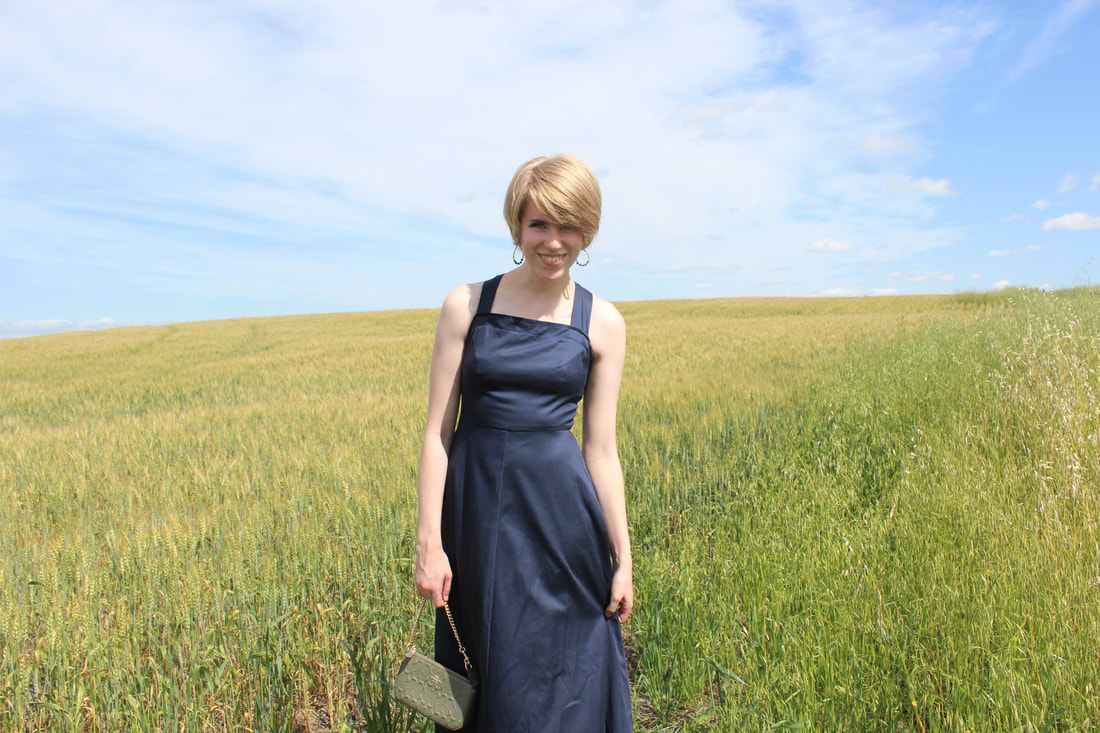 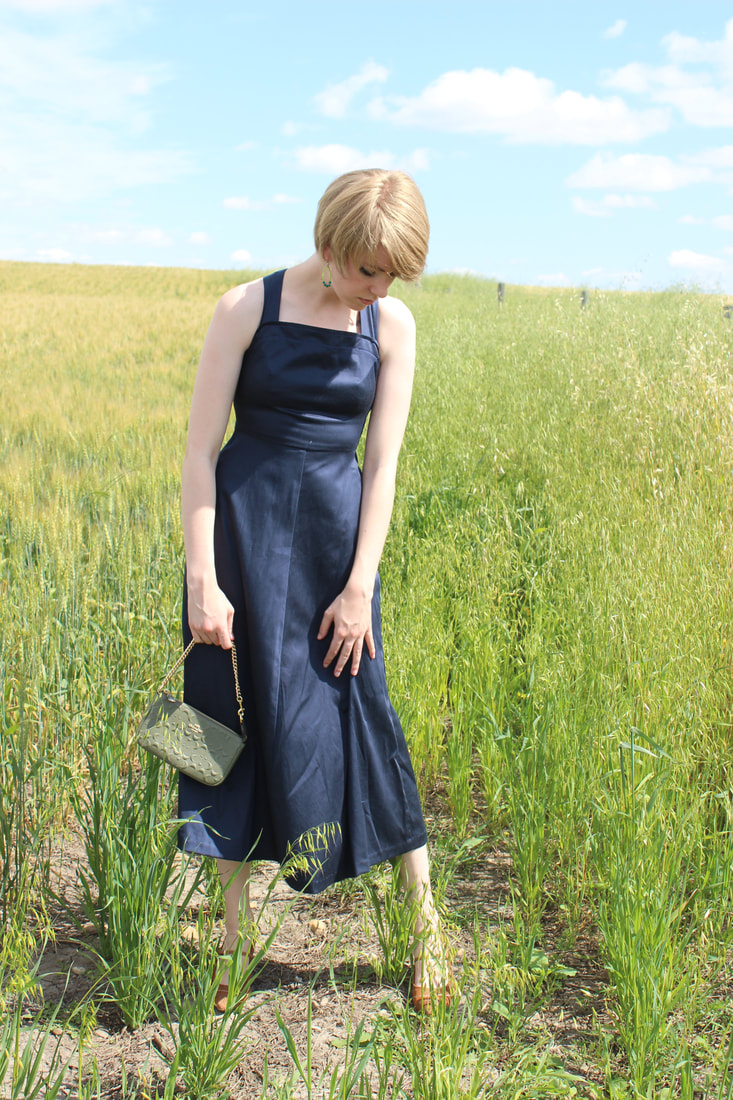 This dress is made using an organic cotton sateen with a tiny bit of stretch to it. Having that stretch made it much easier to fit to multiple different models for the show and the photoshoot the next day. I chose not to have sleeves in the design, since sleeves can restrict who can wear it and make the sewing process much longer. I adore the apron style dresses of the 40's, so I based my idea off of those. I simplified the idea a bit, and I love how it looks. The cotton sateen has a gorgeous sheen to it, and I'm glad that I didn't add any of the ruffles that are often on 1940's apron dresses. It's finished with buttons on the crossover back and top stitching. 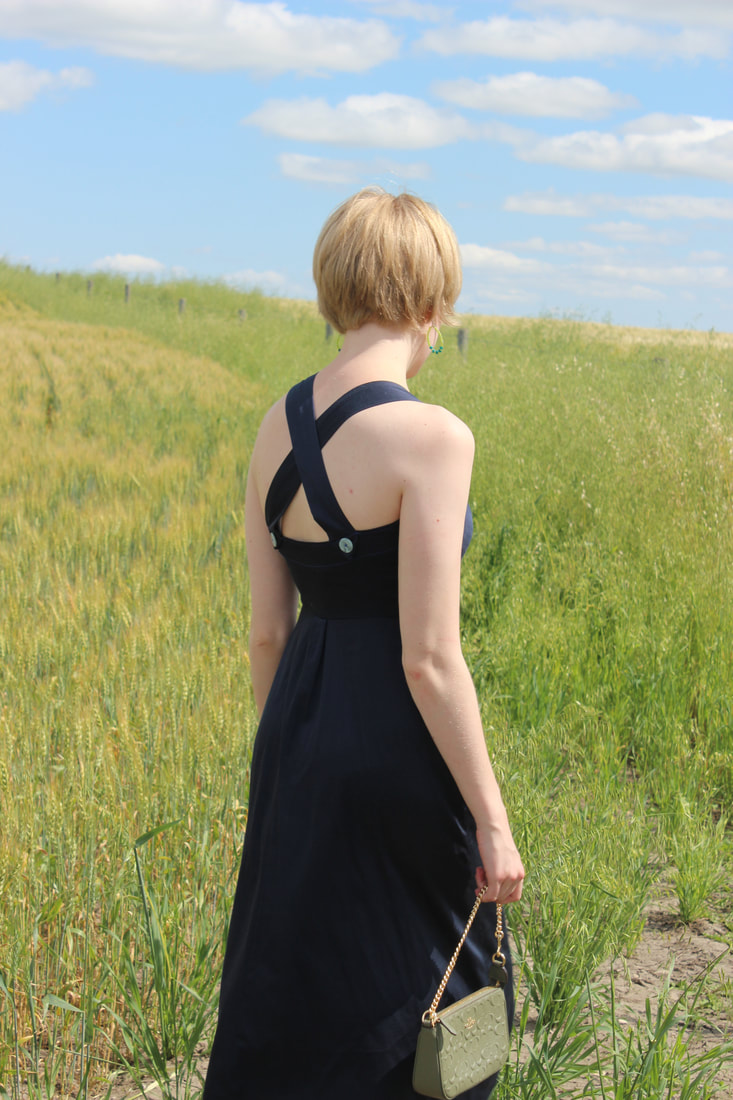 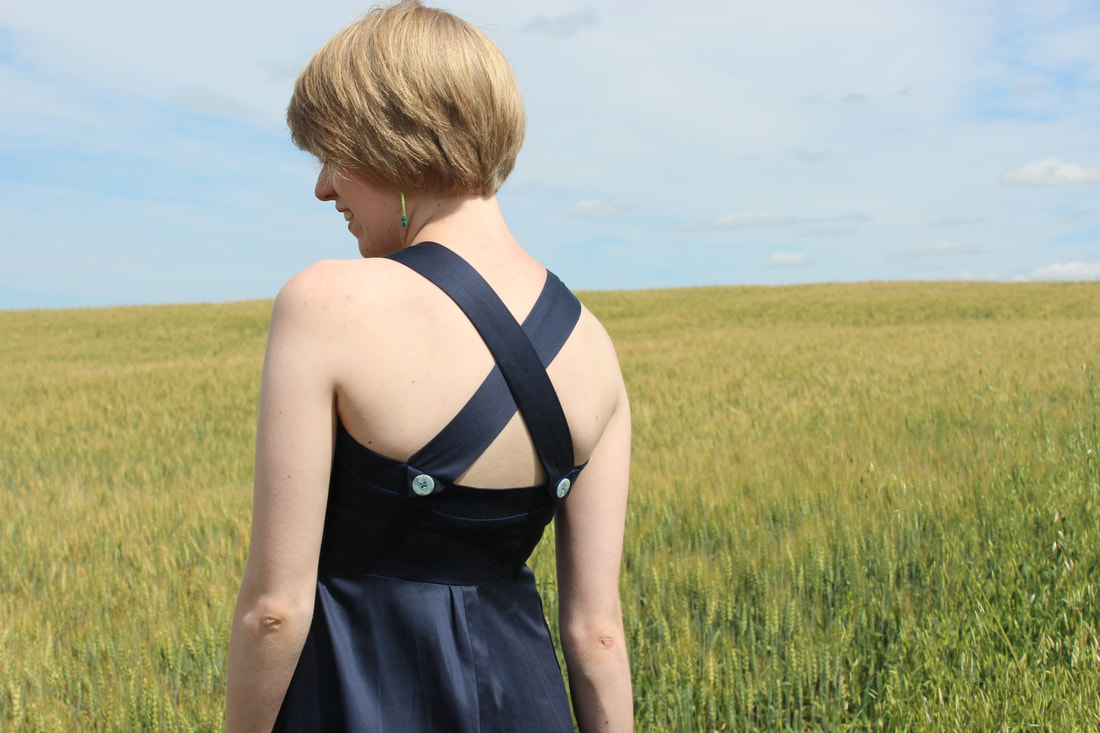 The fourth dress was the first one that I designed way back in January. This is a 1950's inspired summer dress with a front button closure and a tiered skirt. I made a dress that had a bit of a similar style for my Summer 2018 collection that I got photos of in Drumheller (see photos here), and I thought that it was so flattering that I wanted to use that silhouette again. This dress is sleeveless for ease of fitting, has darts and gathering to shape the bodice, and has a fully lined bodice. The hem is hand printed in coral to tie it in to the colour scheme that the rest of the collection has.  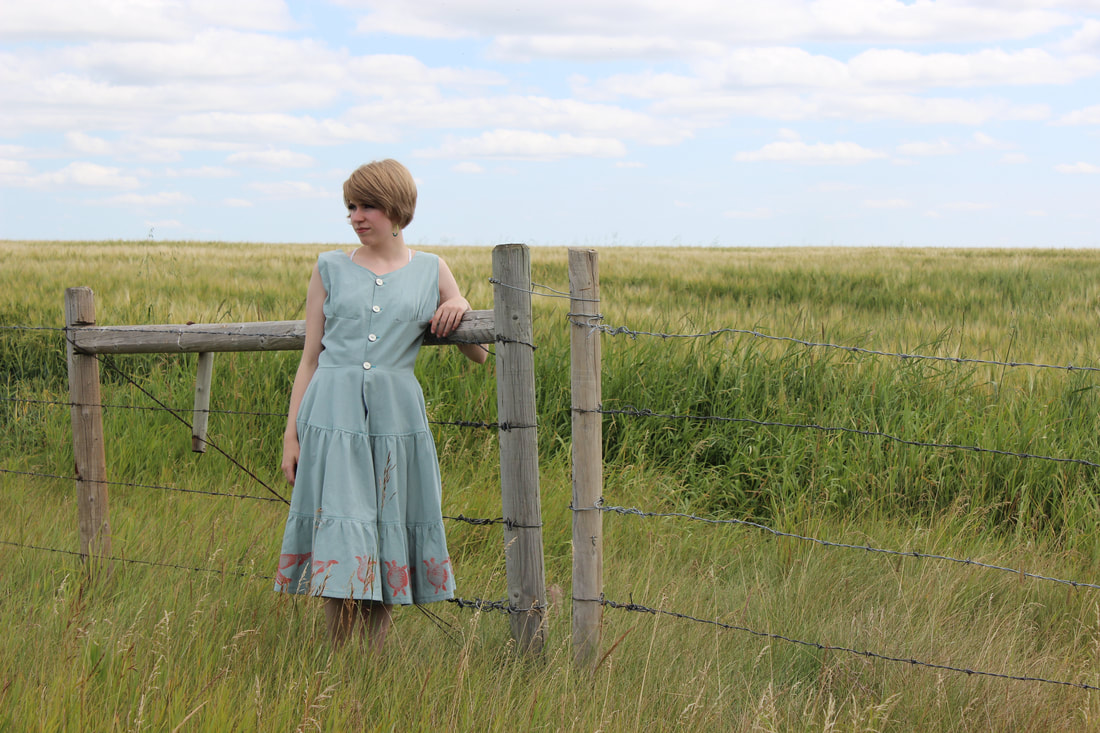  The silhouette of the 1950's is absolutely iconic, and so flattering to pretty much every single shape and size. I wanted that, but I also wanted my design to be a little bit different from the classic shape that most think of when they think of the 50's. I also wanted this to be the sort of summer dress that was comfortable and easy to wear. I used an organic cotton gauze for the dress, and the fabric was an absolute dream to work with. It ironed great and is soft on the skin. The dress is finished with hand made clay buttons. 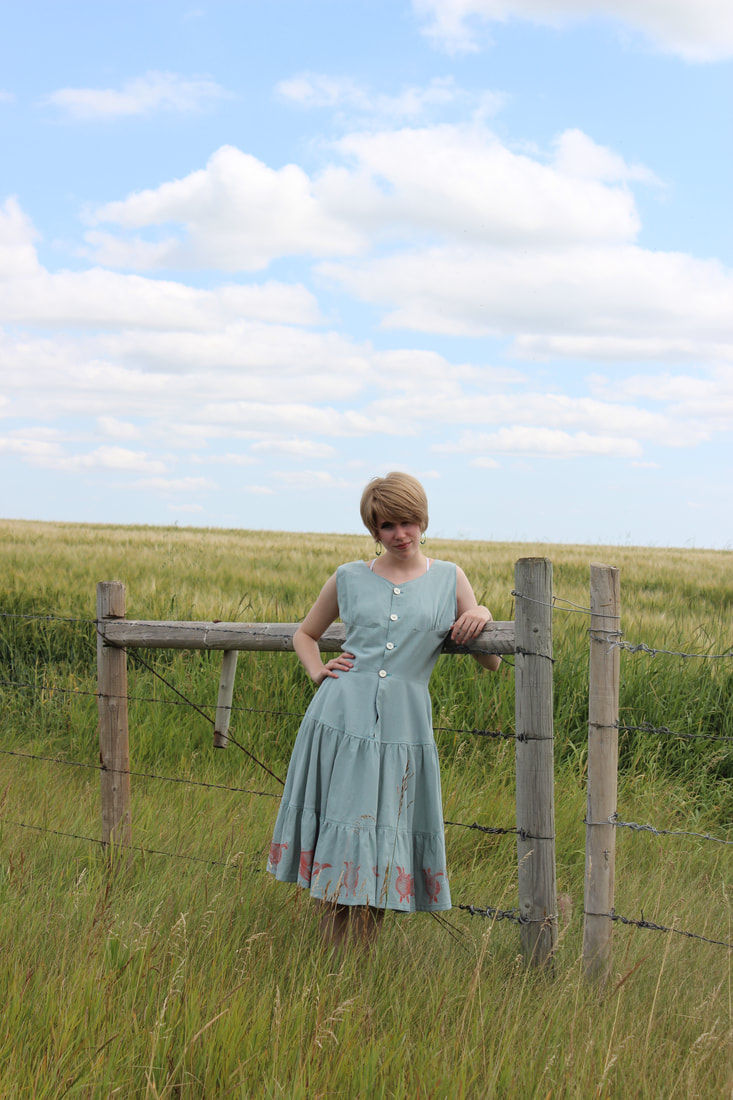 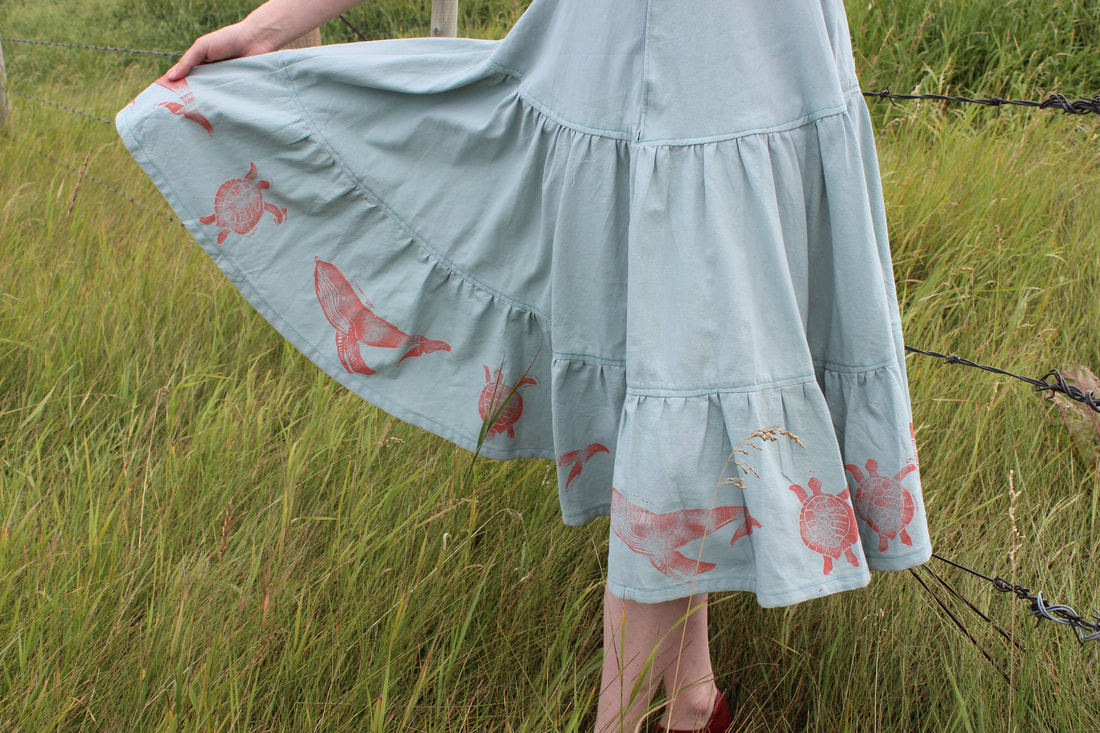 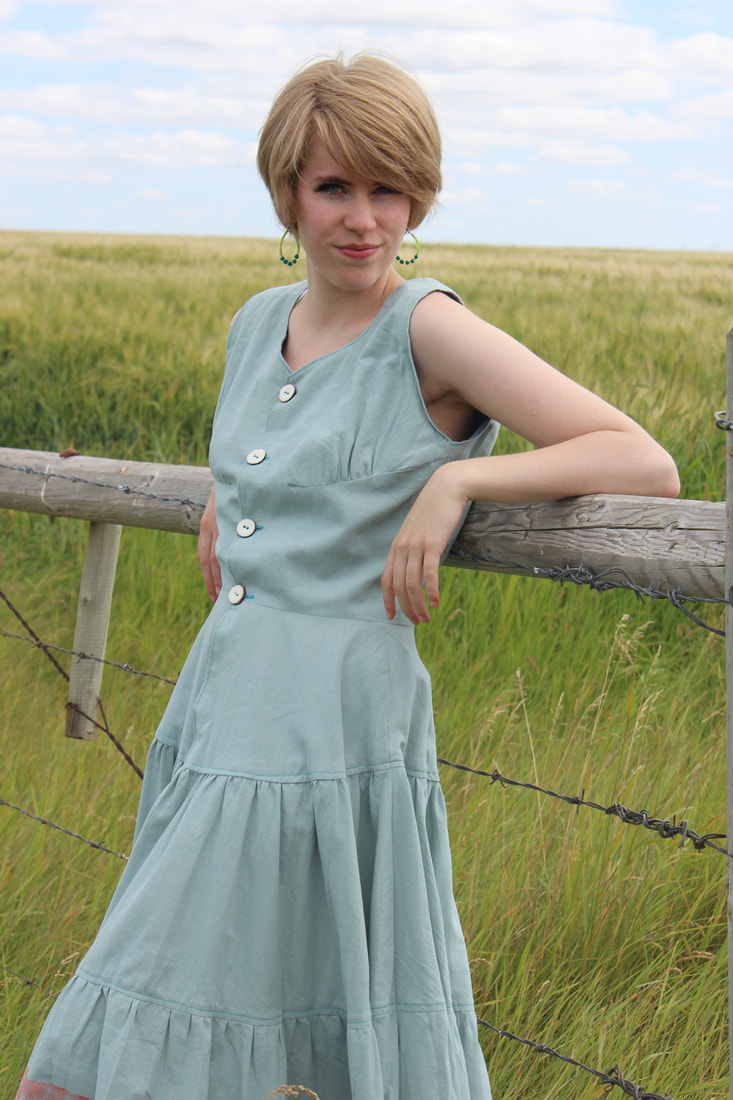 I was so spoiled in Victoria for the fashion show and all of my pieces were photographed by professional photographers the day after the show. If you want to see some of those, check out my instagram here. I will also be posting some of them here once I compile enough of them. Next week will be my last details post of the 1960's and 1970's dresses from my eco couture line. Stay tuned! 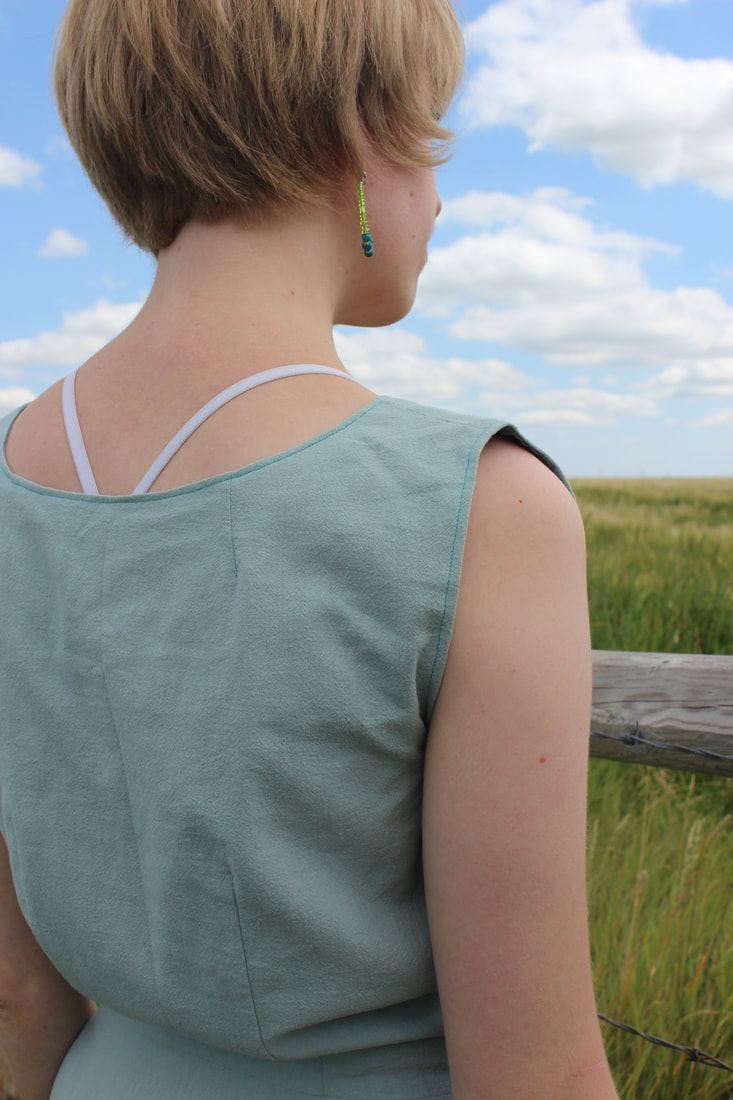 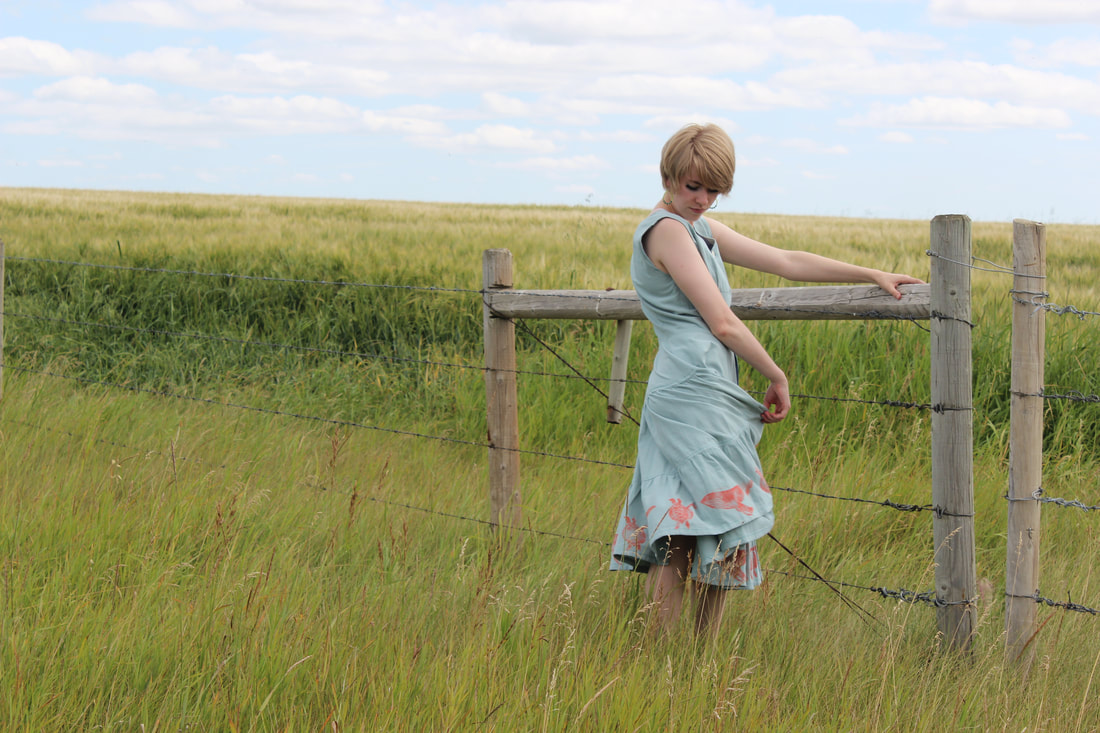 ~K
As I promised last week, here is the first detailed post about my eco couture collection for the Future Oceans fashion show that took place in Victoria, BC on July 1st. If you haven't heard about this before, or would like to learn more about the Future Oceans Fashion Show, you can see my other posts about it here. 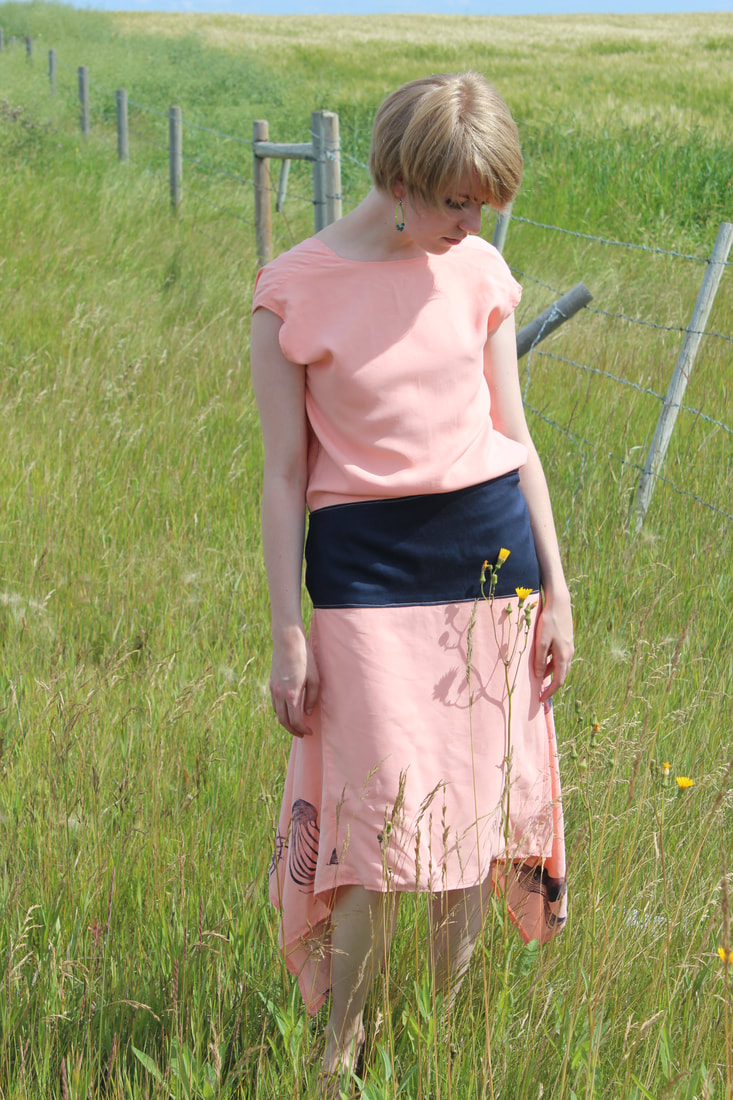 The first garment that I designed for the collection is inspired by the 1920's (which is one of my favourite decades of style). This dress is a drop waisted gown with a deep V back, knee-length handkerchief skirt, and bloused top. The side panels in the skirt are hand printed by me on a TENCEL twill, which is a sustainable material that I got locally, through a Canadian company. The waistband is an organic cotton sateen. 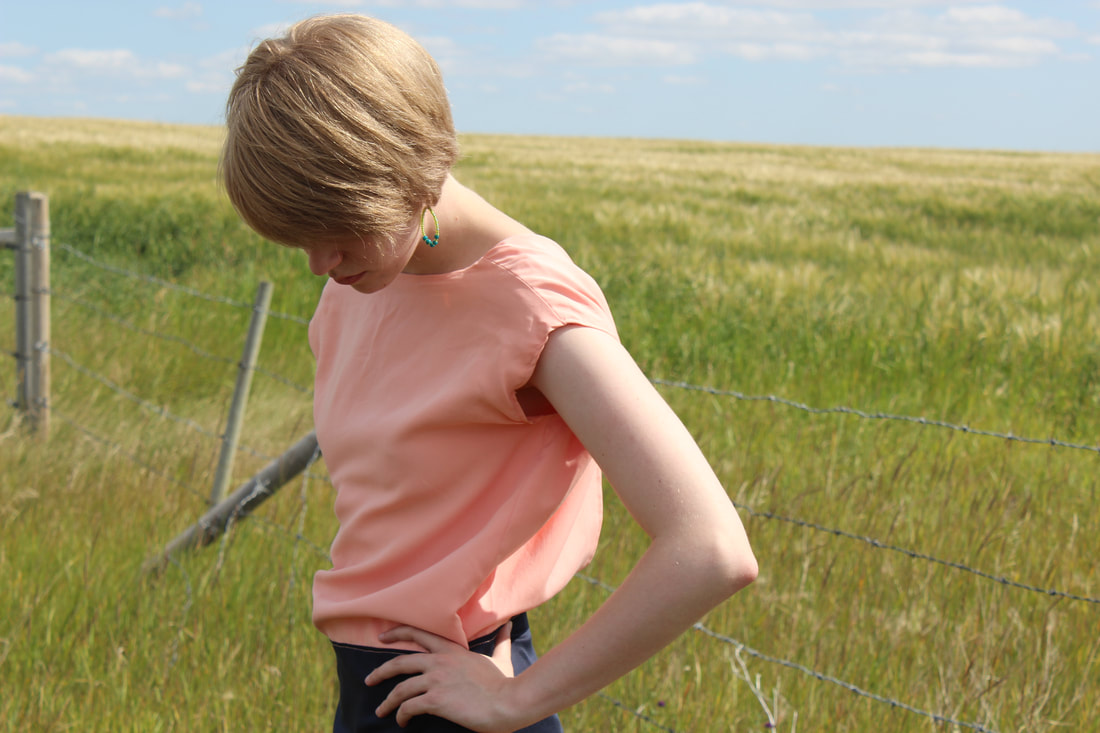  This entire dress is lined and is finished with top stitching. I've always enjoyed the aesthetic of the 1920's, but the shape can be difficult to get and make it look nice. The drop waist style can be really unflattering on a lot of shapes, depending on how it's being accomplished. I spent a lot of time on pinterest looking through extant garments from the era, as well as some modern interpretations of them (from movies and tv shows like Peaky Blinders and The Great Gatsby). None of the garments in this collection are meant to be exact replica's of dresses from each era, but more to harken to each decade. 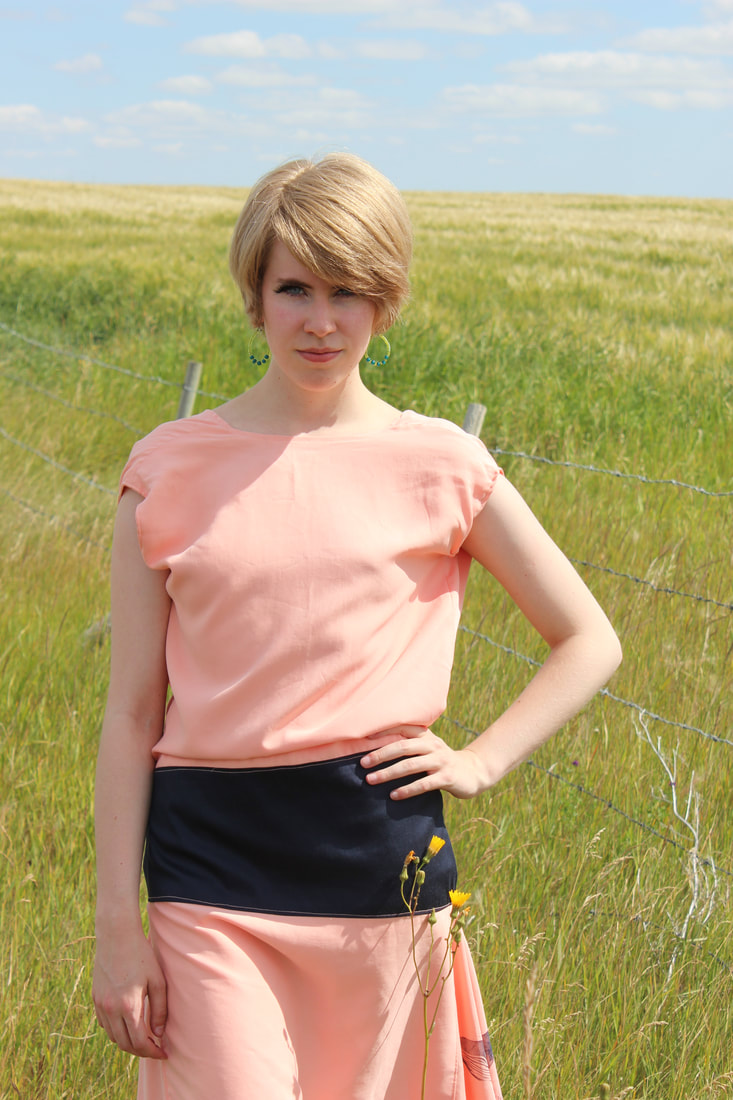 Some of my favourite dresses from the 20's have low backs, so I wanted to make sure to include that in my design. I also love the extra panels that flare out when the wearer is walking. The TENCEL twill has a beautiful drape to it, so I used it for both the 1920's and the 1930's inspired gowns. 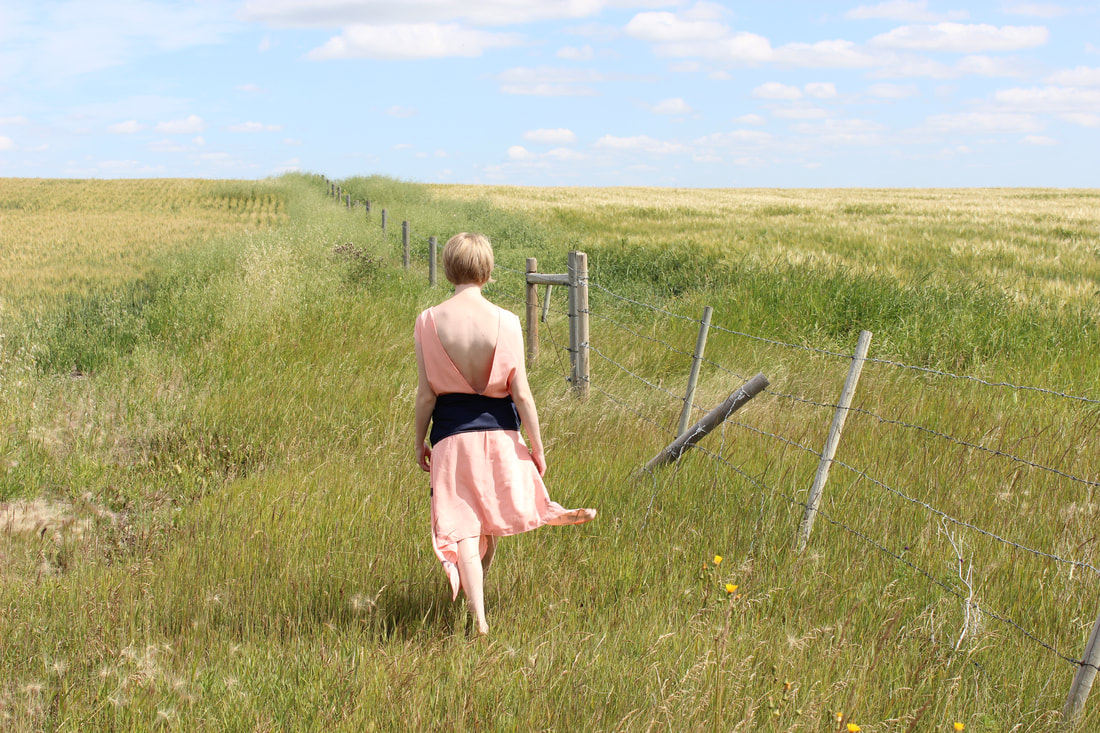 The second dress is inspired by the 1930's. This dress has a boat neckline with a deep V back, wide waistband, pleated over skirt, and thin belt. It's entirely made out of the TENCEL twill, so the whole thing is soft and has a wonderful drape to it. All of the peach sections are hand printed by me. 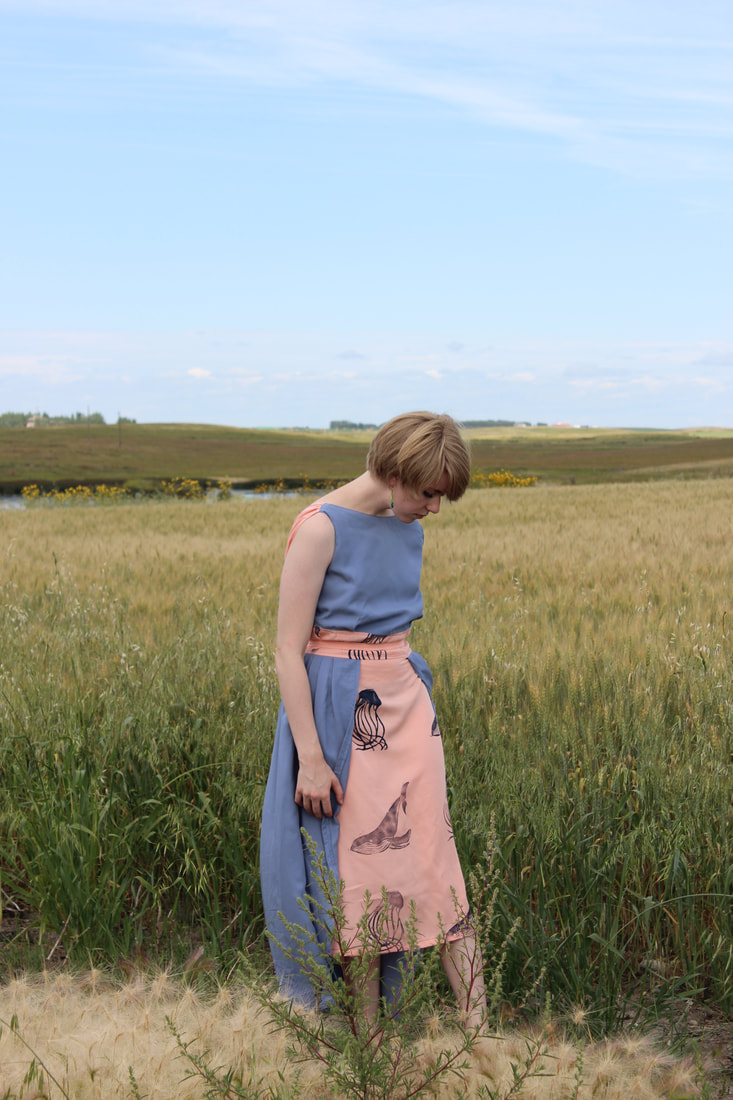  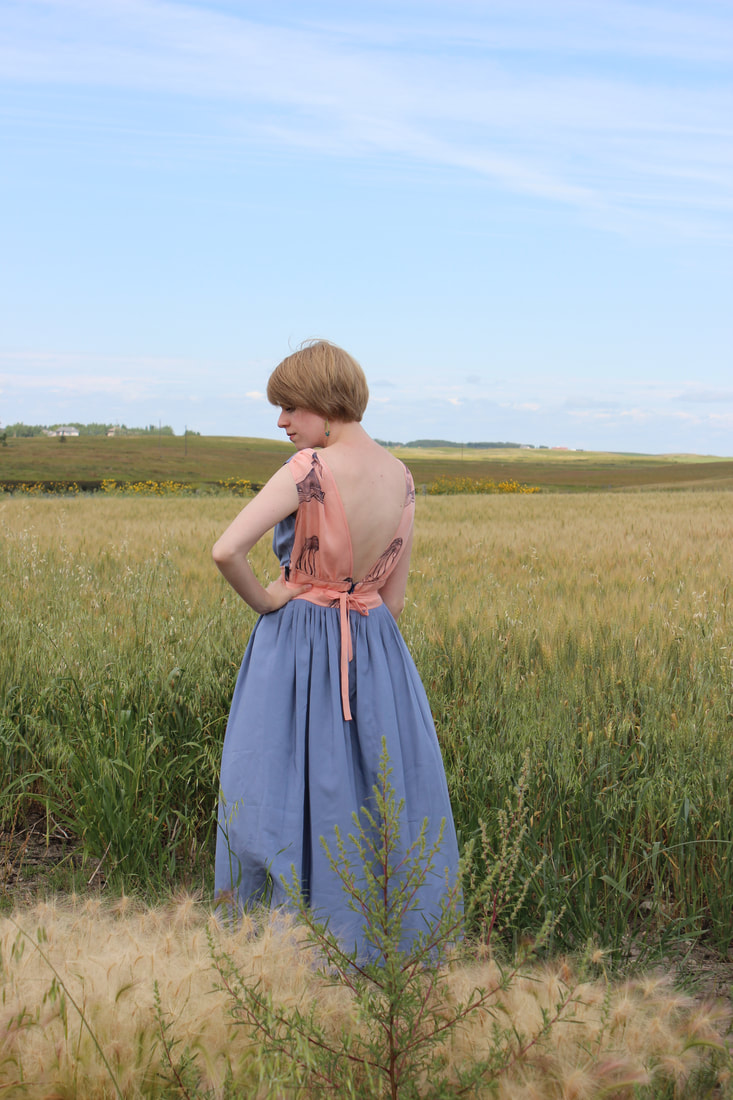 Drafting the pattern for this dress was a fun challenge, as was figuring out how to put it together while also making sure that all of the edges were nicely finished. It took me the better part of an afternoon to draft the entire pattern, and I'm pleased with how it turned out in the end. The bodice is fully lined. 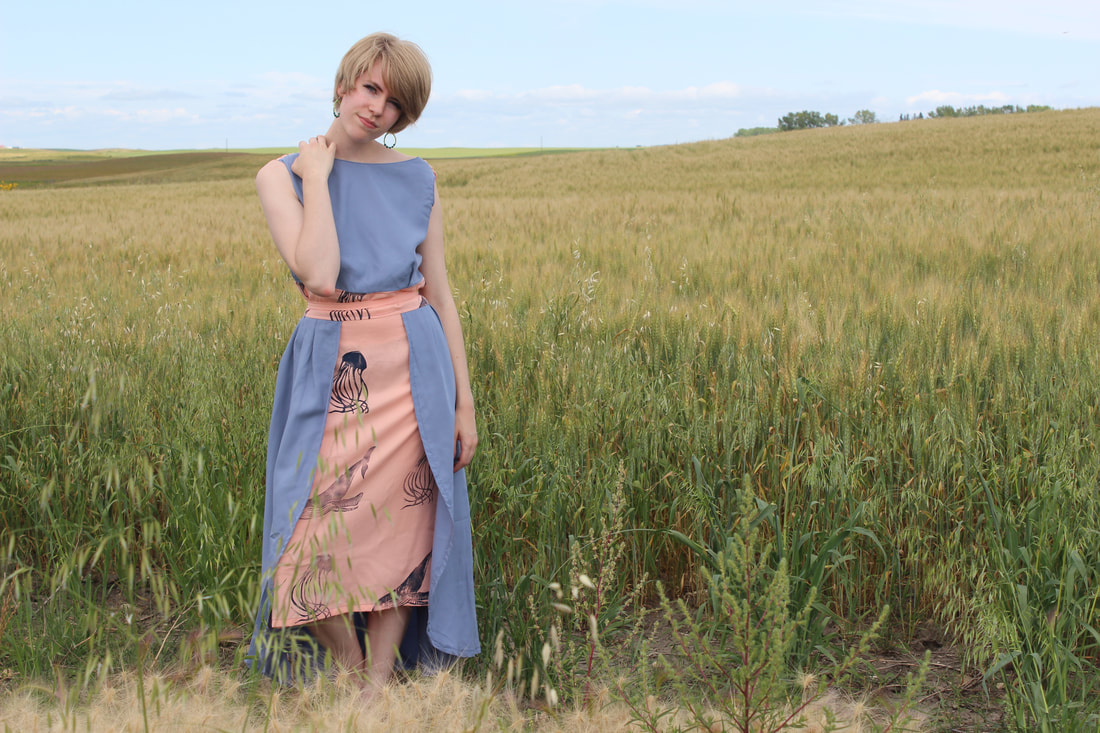 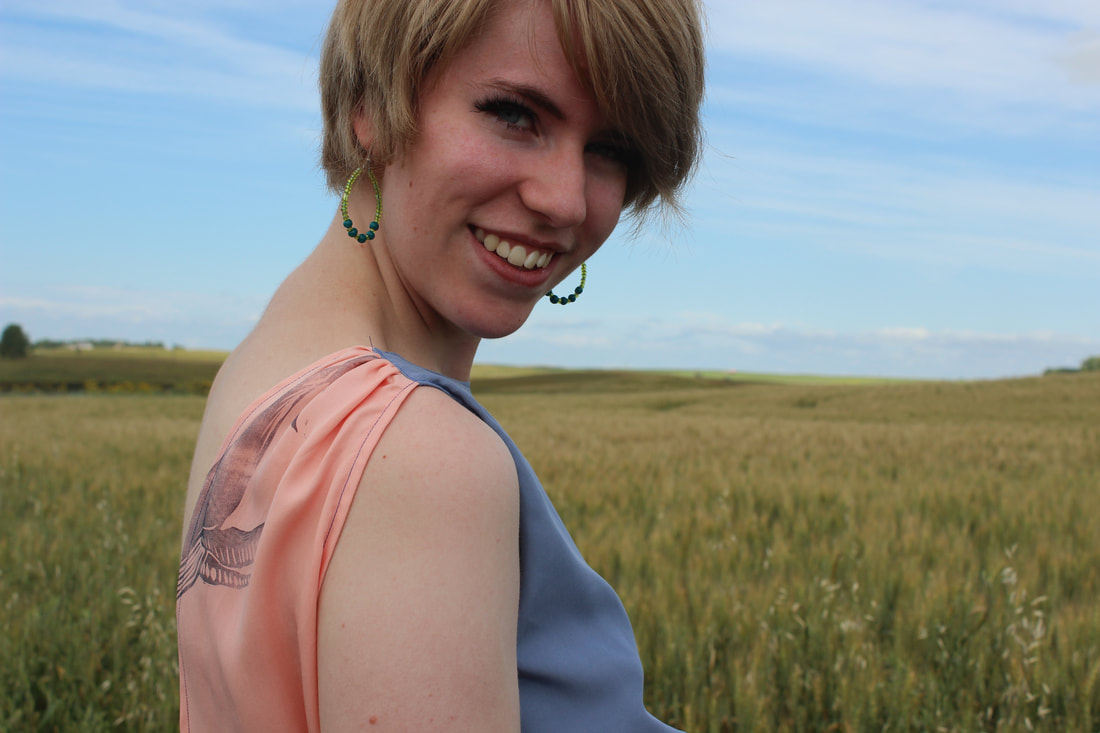 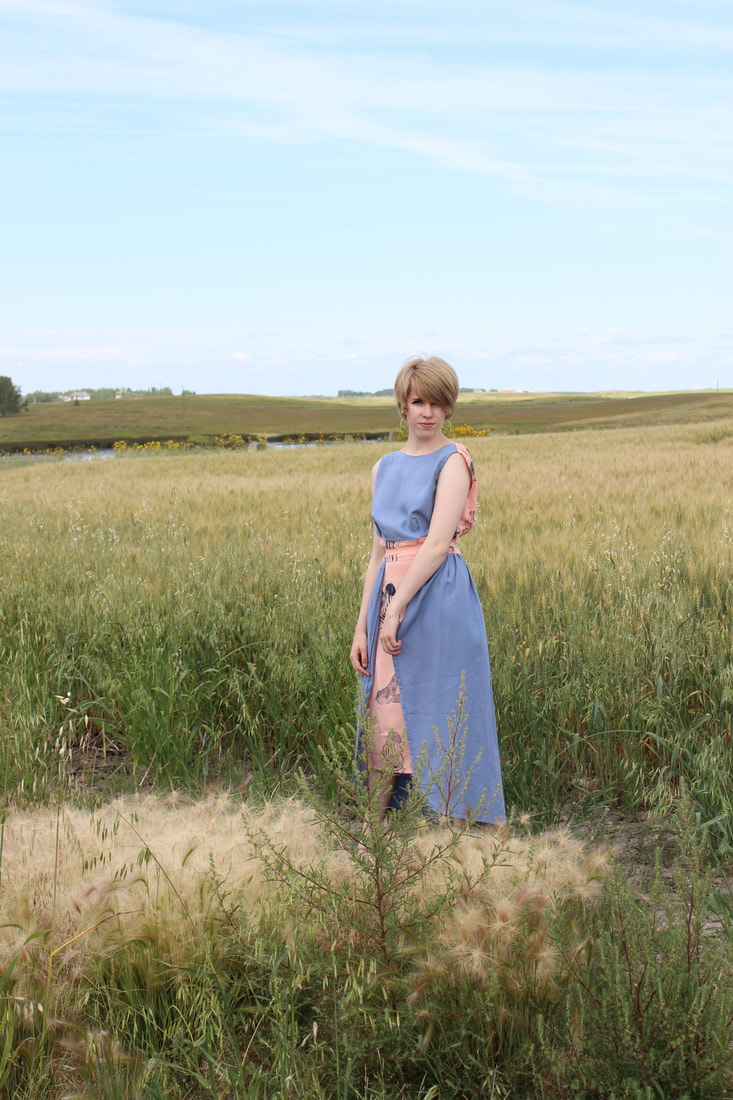 The shaping in the bodice is created from two pleats at the waist on the front, and the back pieces are gathered and meet at the waistband to create a deep V. The under skirt is just a regular straight skirt, similar to what a skirt sloper would look like. I ended up just draping the over skirt instead of patterning it so that I could get as much fullness as I wanted. The hem is shaped to be longer at the back. 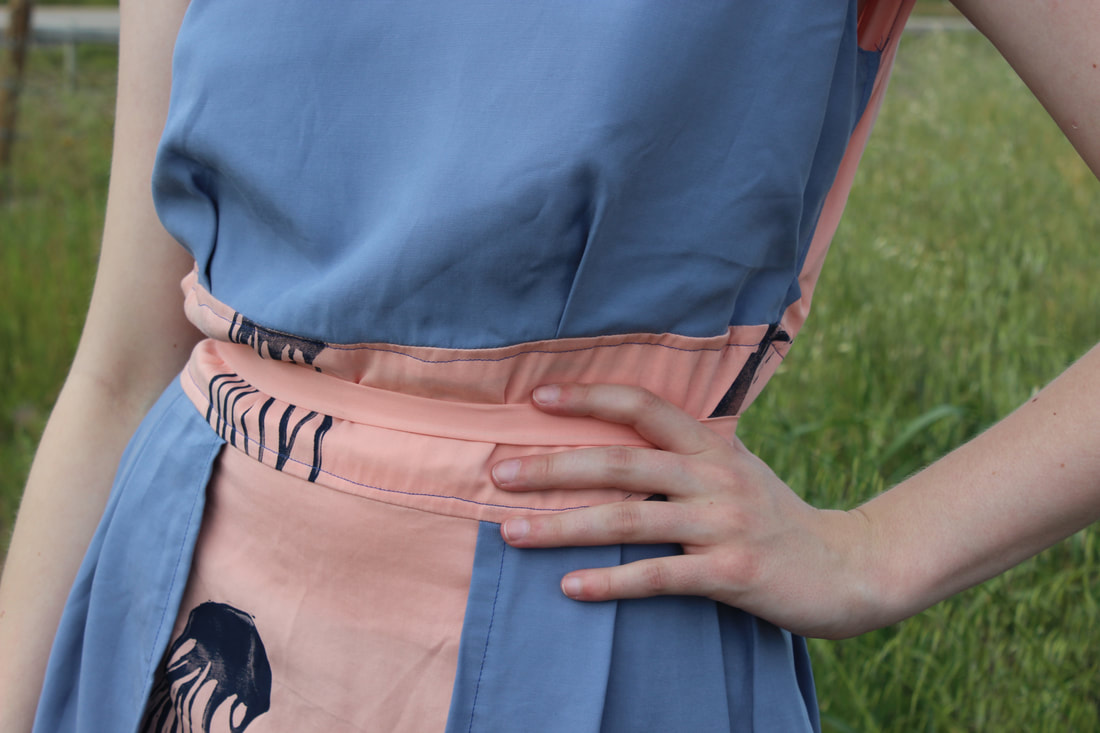 I loved designing these garments, as well as all of the other ones in the collection. Next week I will focus on the dresses styled like the 1940's and 50's!
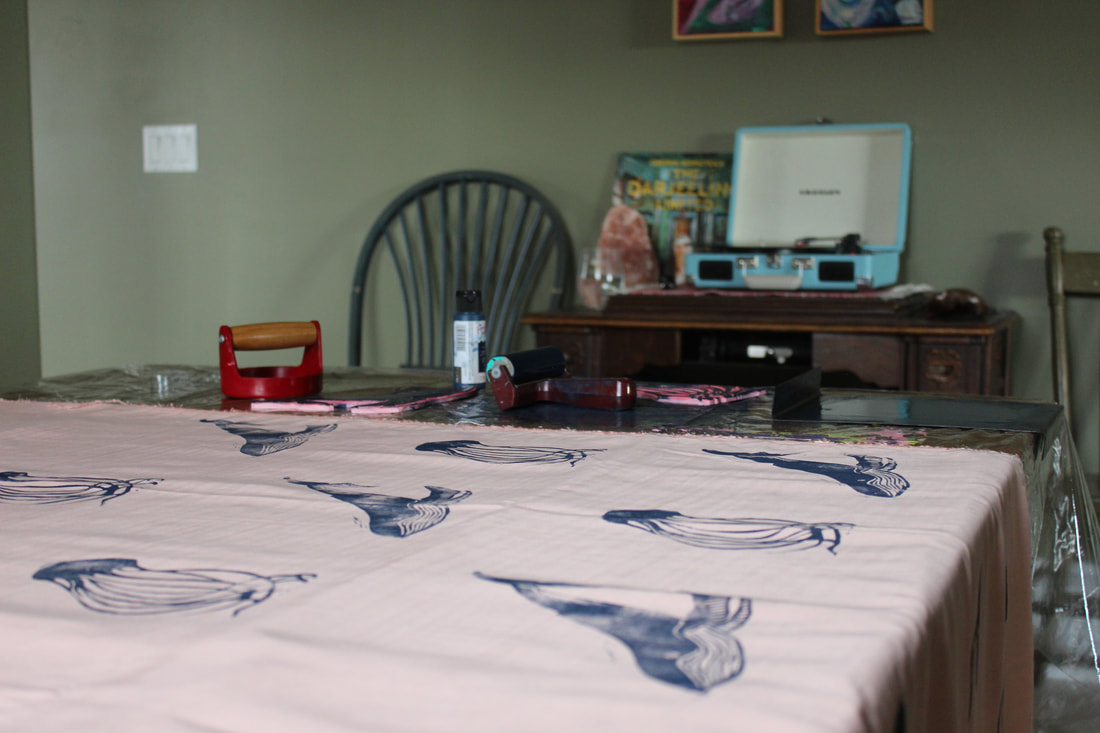
~K I have been taking videos of a lot of my progress while I have been working on my collection right now, and before taking a video I always take a quick picture to make sure that it frames everything I want it to. I ended up with a bunch of photos of my workspace, and I found it interesting to see how I set myself up without even realizing it. It was also interesting (for me, at least) to see all of the places that I work on projects. Here is a peak at where I work on different parts of my projects. 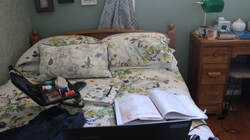 I often work on my bed when I am hand sewing. I love watching movies, and it's fun to watch something while doing some hand work. I also have a habit of watching the same movies over and over again, which is why I watch them in my room and not in the living room (to save my poor parents from hearing the same movie a million times). 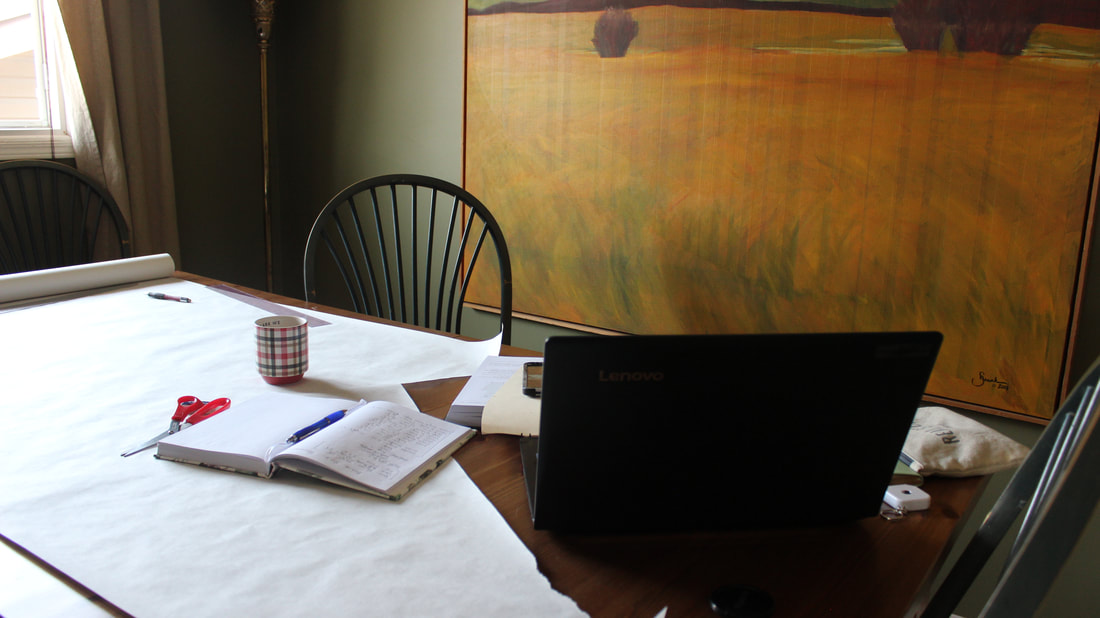 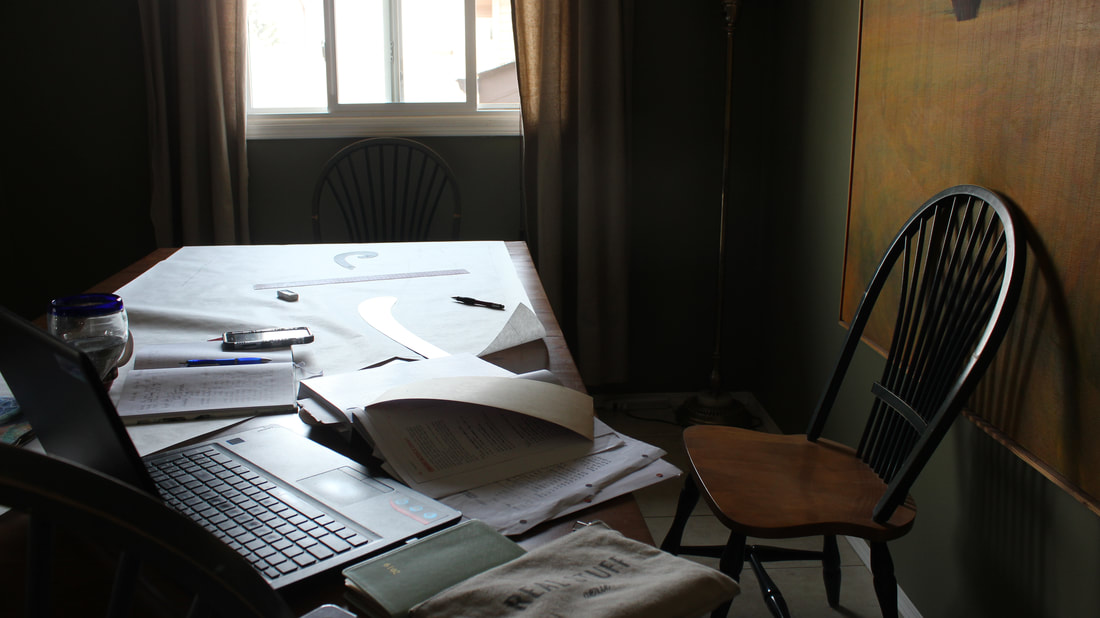 I need a lot of space for pattern drafting, so I take over our dining room table for it. I normally start out with a tidy and pleasing work space and always end up with a very cluttered one. Pattern drafting is not my favourite thing to do, but I have grown to appreciate the way it works, and it is satisfying to end up with something made completely from scratch. 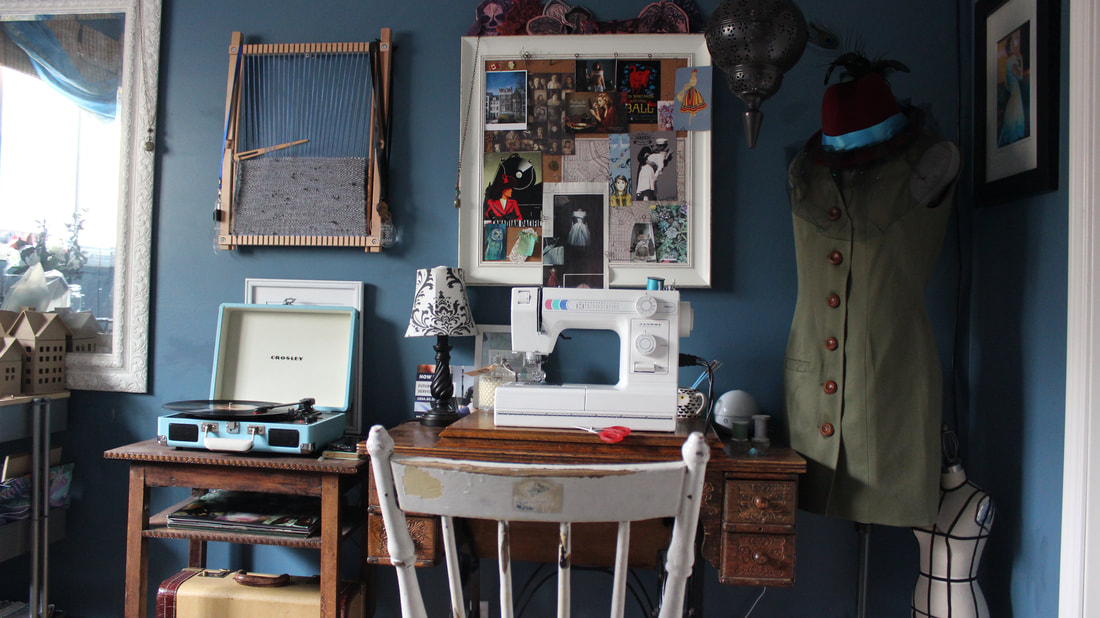 Most of my time is spent in my studio since that is where all of my supplies, my sewing machine, and my serger are. It's also nice to have a space where I can leave everything set up exactly how I want it to continue working the next day. It is usually pretty crazy while I'm working on a project, and I tidy in between. 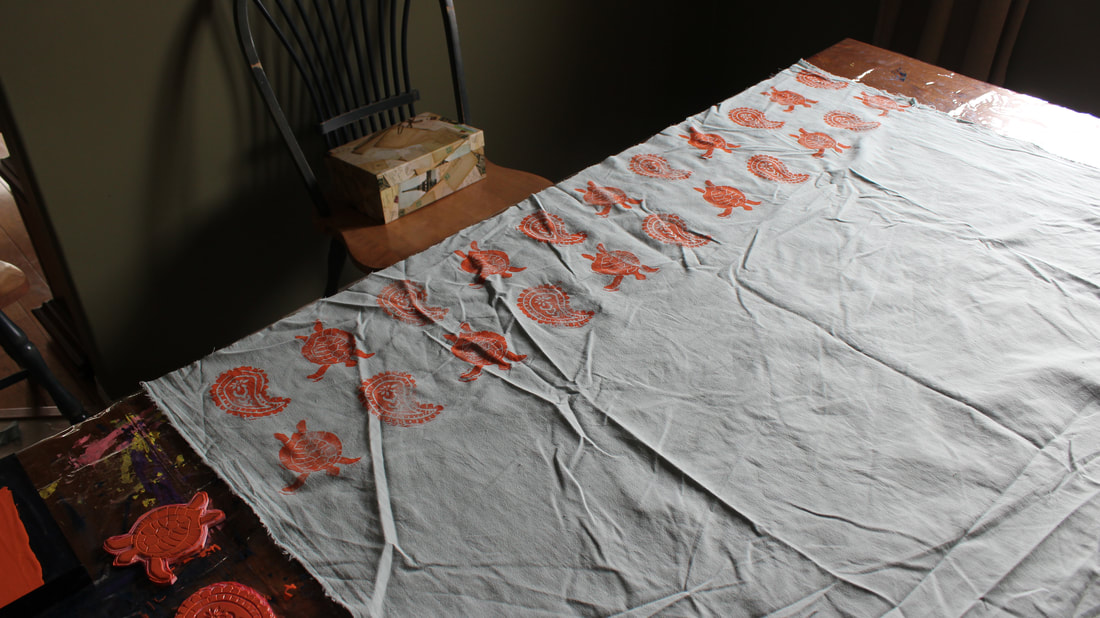 While I print fabrics I take over the dining room table again. It takes up a lot of space just like the pattern drafting. I also cut on the dining table, although I prefer to cut the smaller pieces on the floor of my studio. Printing the fabric is a pretty messy process, so I have a plastic table cloth to put down before I start. ~K
 I was lucky enough to be chosen as one of the 10 designers to create a small ready to wear collection and one art dress for a fashion show that will take place on Canada Day in Victoria, BC, at the Victoria International Marina.  Printing on of the fabrics I had so much fun coming up with the design ideas since I could do whatever era's and whatever styles I wanted to, as long as I used eco-friendly materials to make them. I am currently working on the ready to wear pieces and having a great deal of fun playing around with the materials and designs.  So far I have gotten all of my fabric through KenDor Textiles, which is a Canadian company that specializes in eco-friendly and sustainable fabrics. I have so far printed two of the fabrics, drafted two of the patterns, and cut out those two dresses so they are ready to be sewn together. Once I got my fabrics in, it has all been coming together pretty quickly! 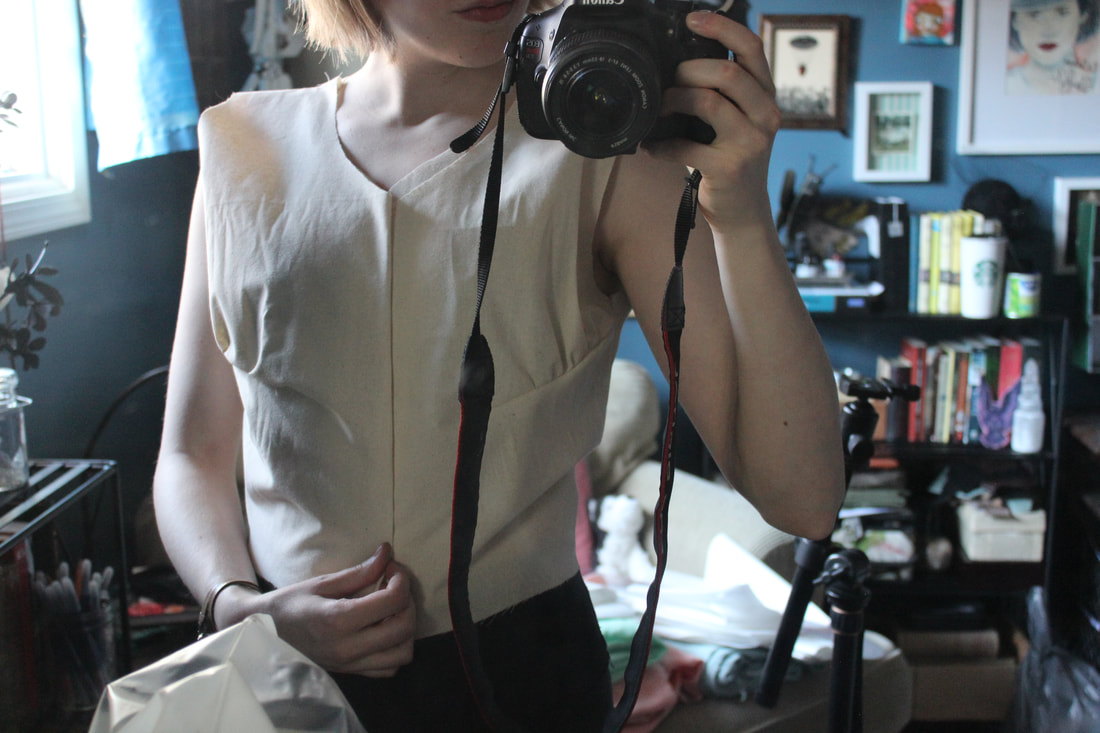 Trying on a quick bodice toile I can't wait for the actual show so I can show everyone exactly what I have been working on, but for now here are some sneak peaks! If you would like to hear more about V.I.M. Future Oceans, you can check out their website here, Instagram here, and their Facebook page here. 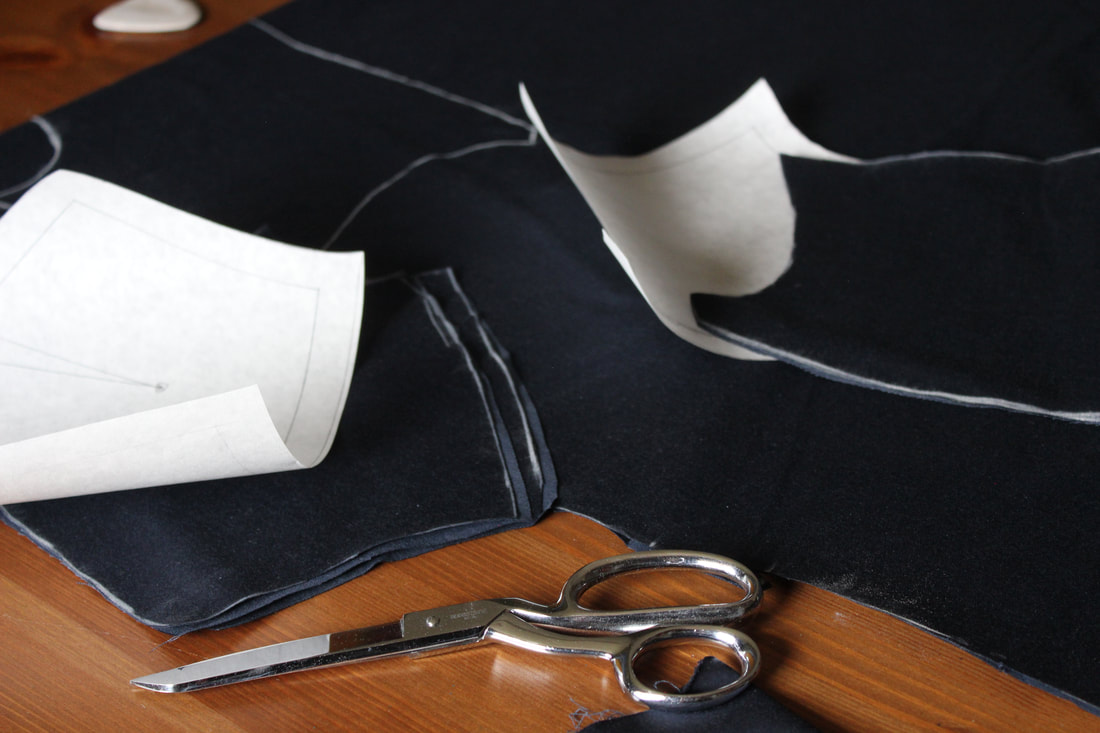 Cutting out pieces 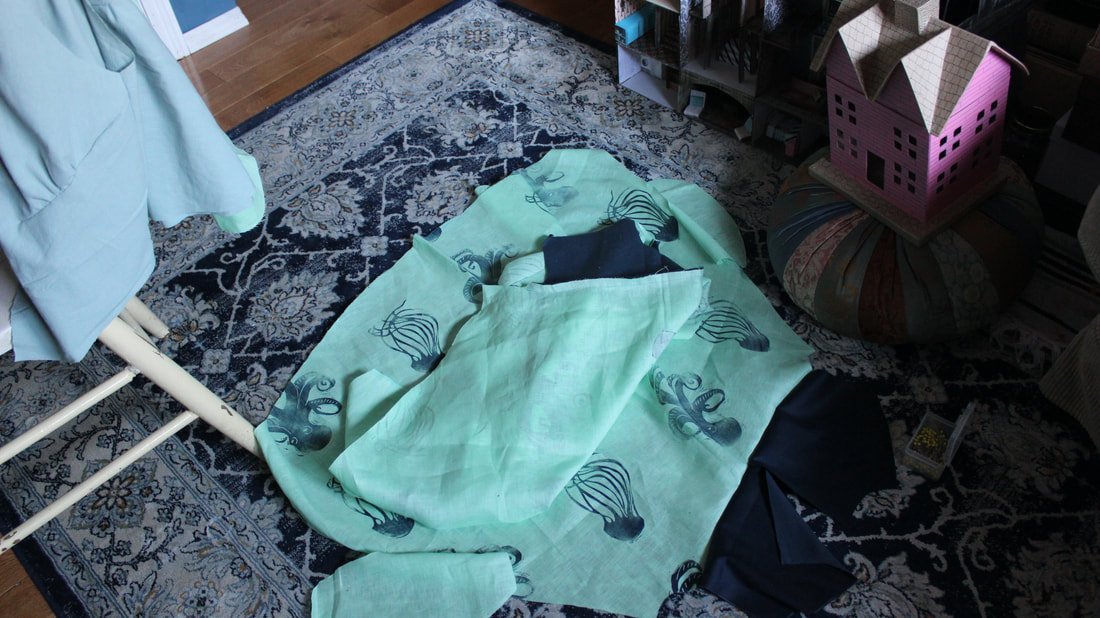 ~K
I recently printed an owl fabric for a friends mom, and it was such a nice stress reliever while being in school. I love printing fabrics, and I love owls, so this was a lovely project to have during my reading week. 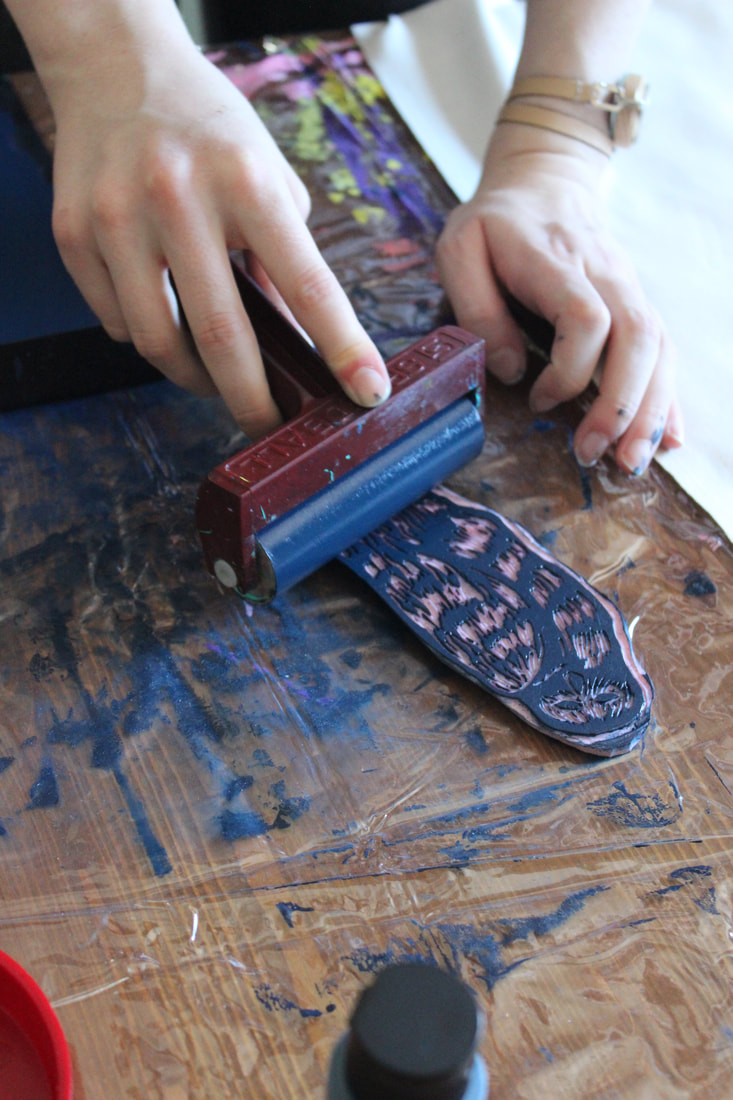 I now have three owl stamps, made for me by my mom (her website is here). 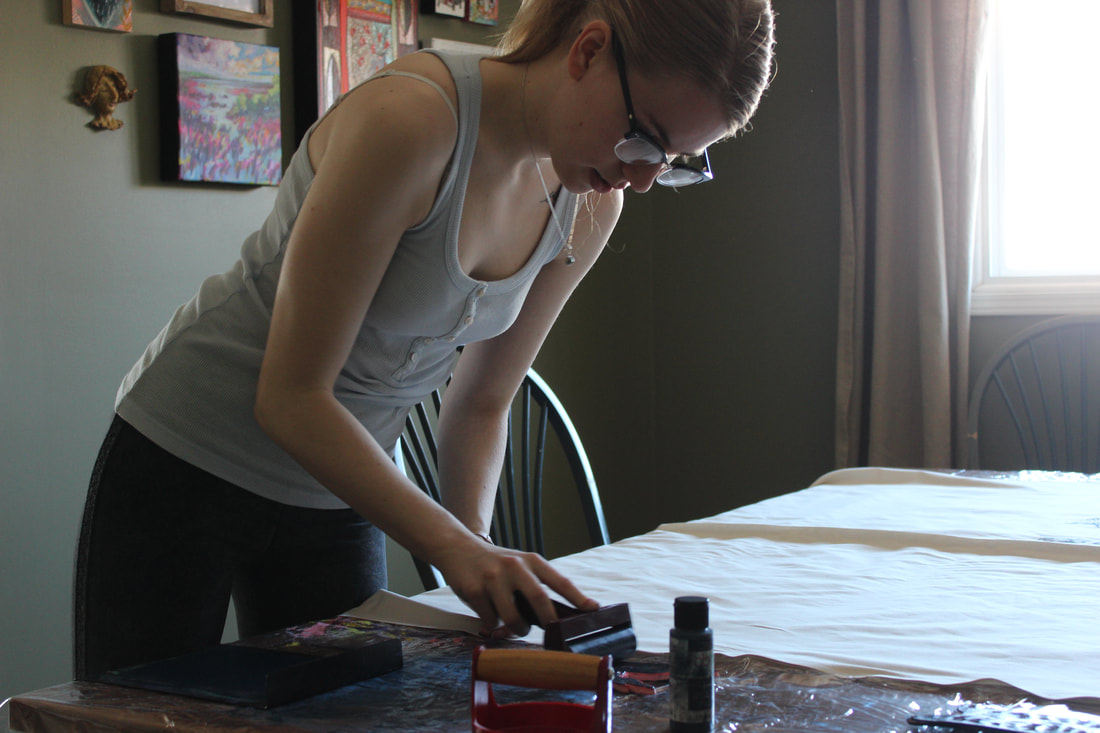 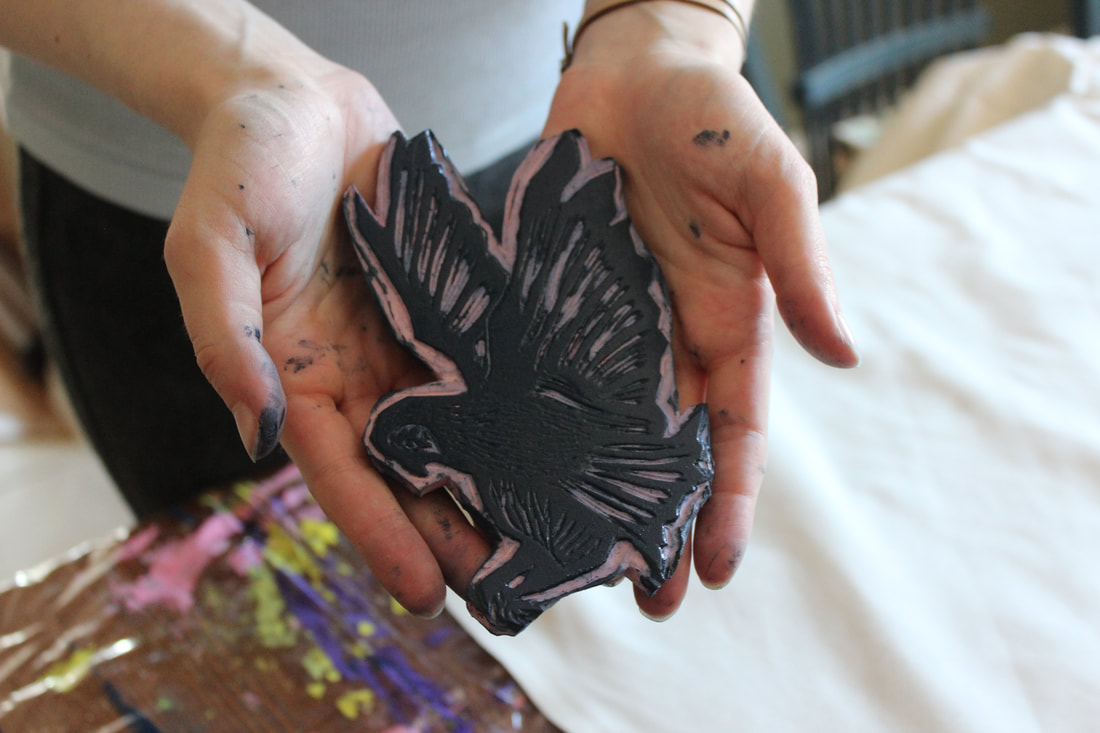 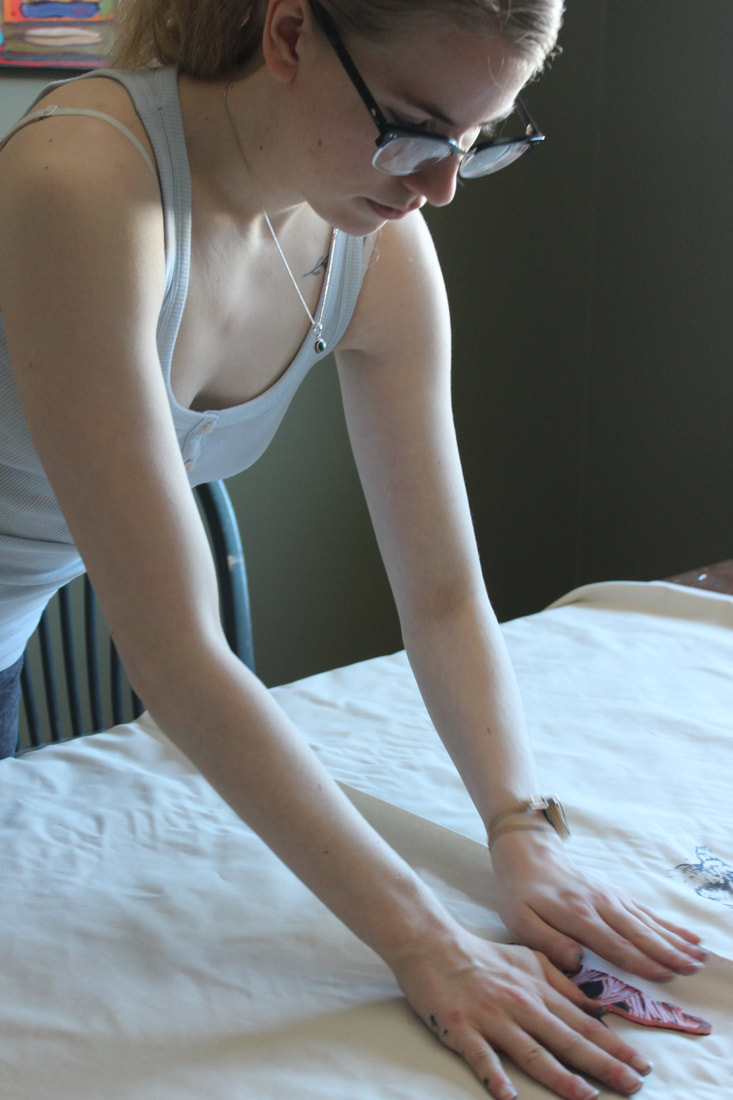 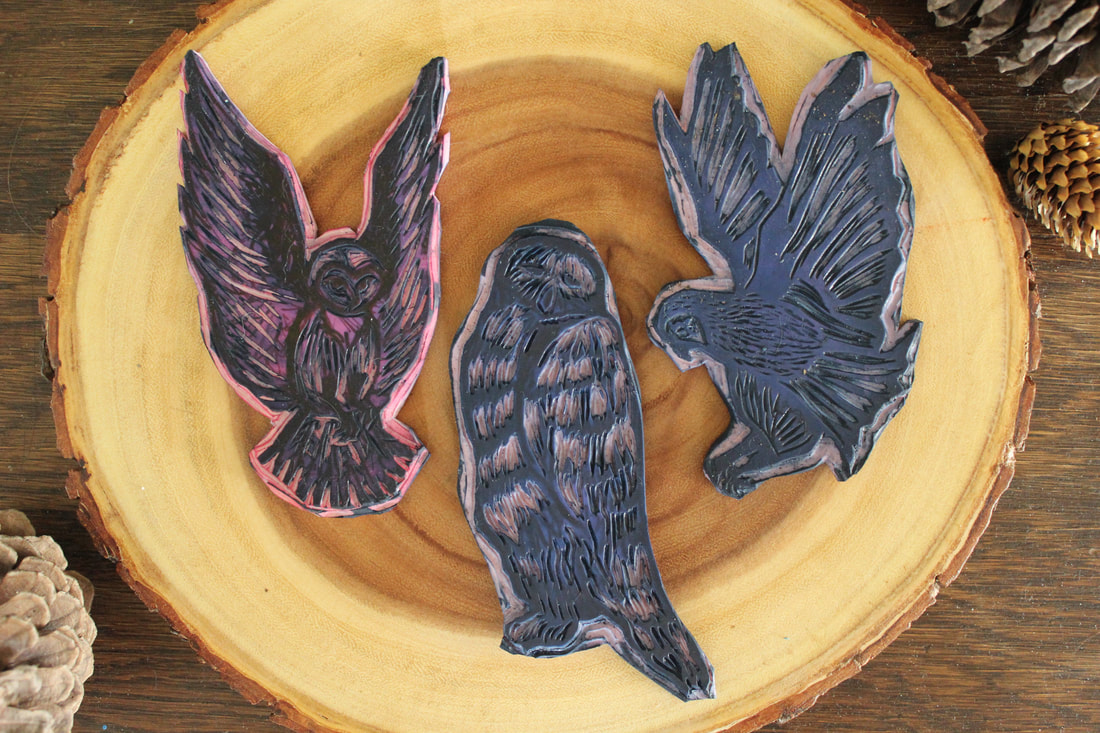 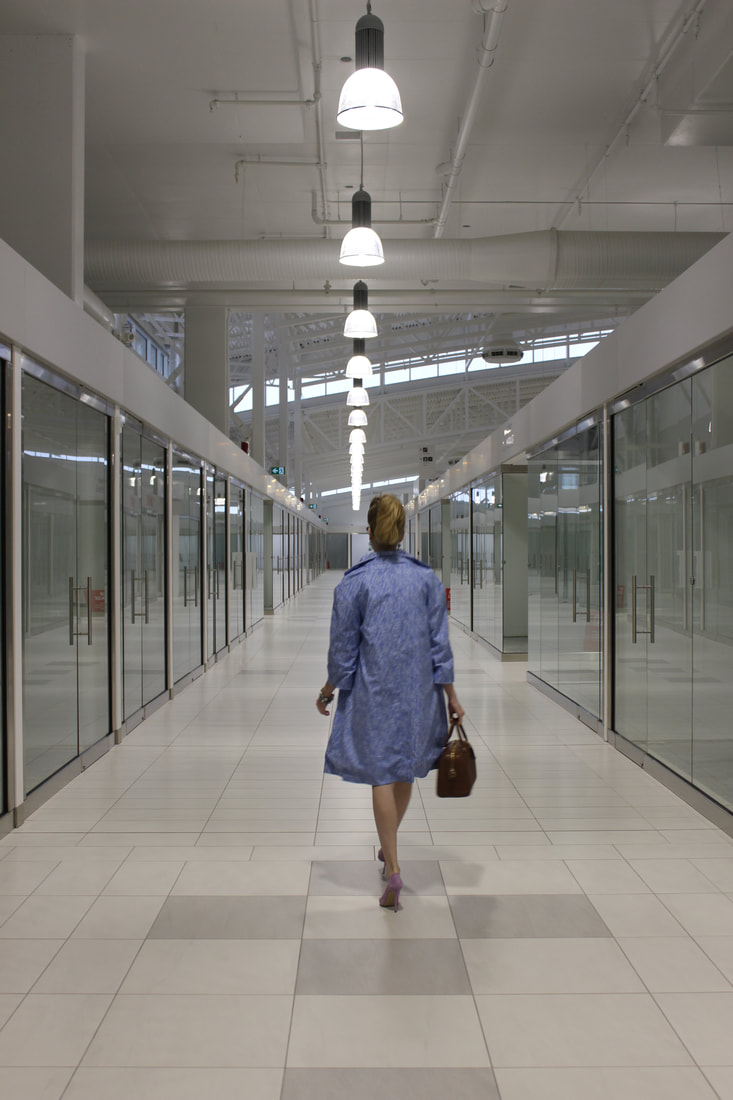 I started a 1960's ensemble almost a year ago, and was completely distracted by the beginning of school. After some issues with the lining and top stitching, I was not motivated to finish it. It has been sitting nicely on a chair in my sewing room until Christmas break, when it was finally finished and we got some lovely photos of it!  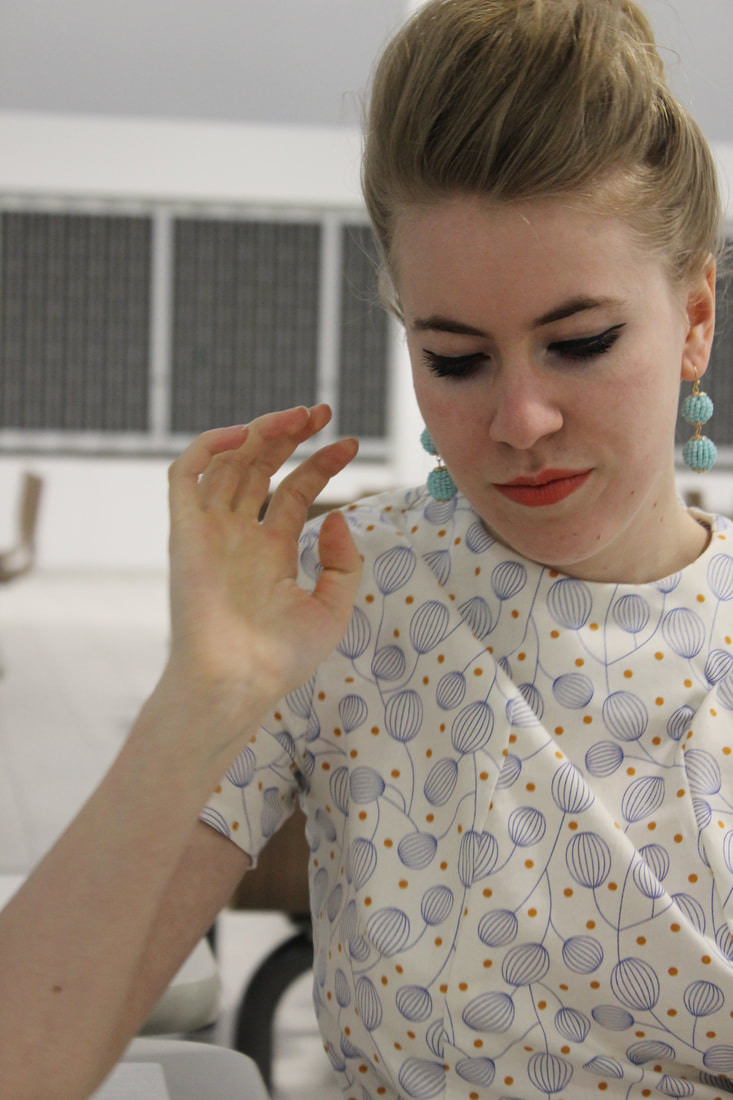   This is from a Simplicity pattern from the 1960's, and I made it using coordinating quilting cottons. I think that this pattern looks so much like Barbie clothes from the 60's! I had so much fun wearing it around a new mall that is at the moment pretty empty. The mall had a pretty creepy feeling (it is massive, and only has a few stores in it so far), but I think the photos turned out perfectly! I mix of 1960's fashion and futuristic, Blade Runner style (at least, I think the photo's look a bit like the Blade Runner). 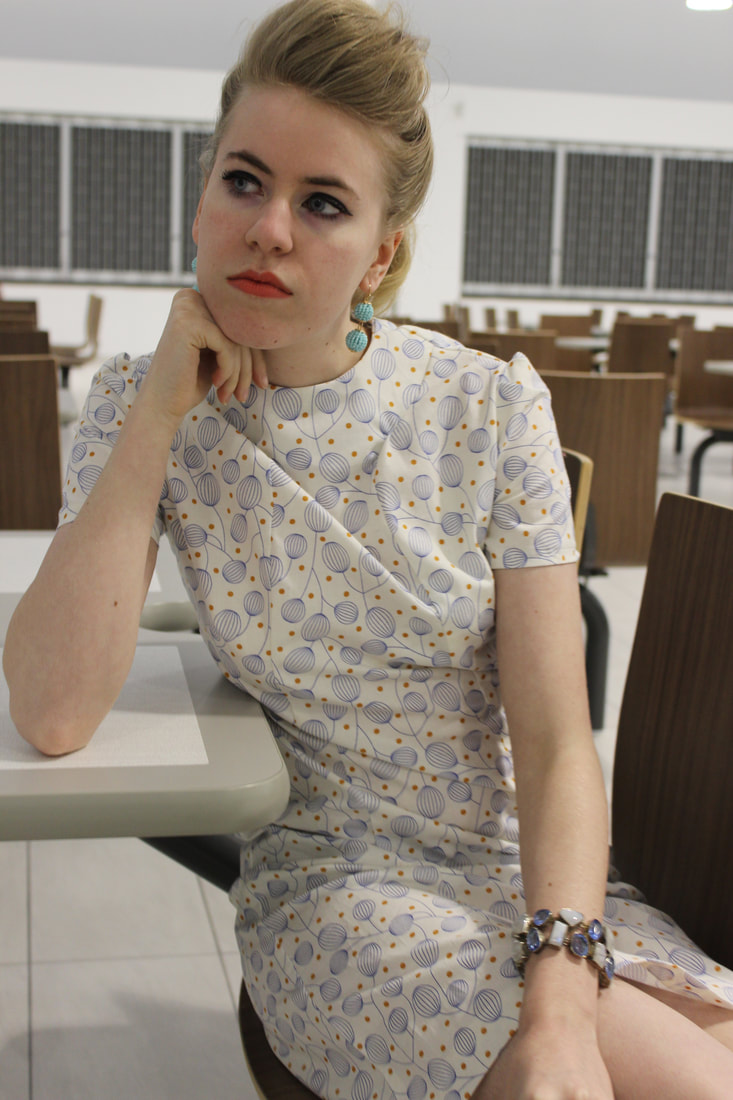 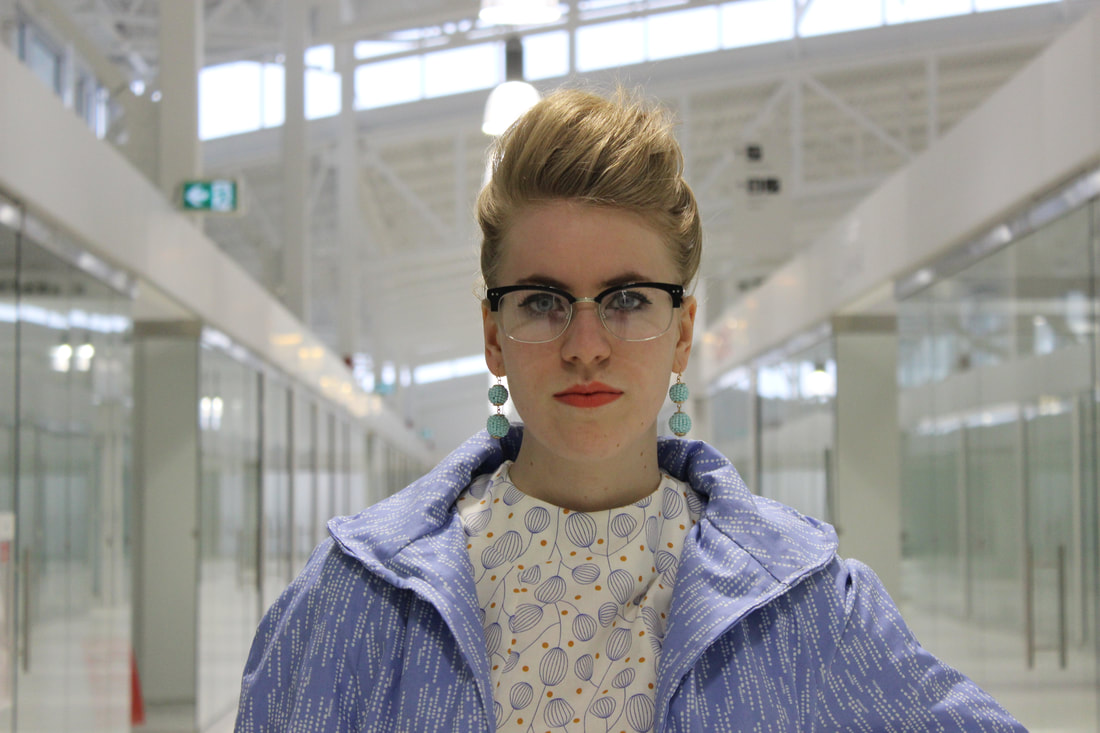 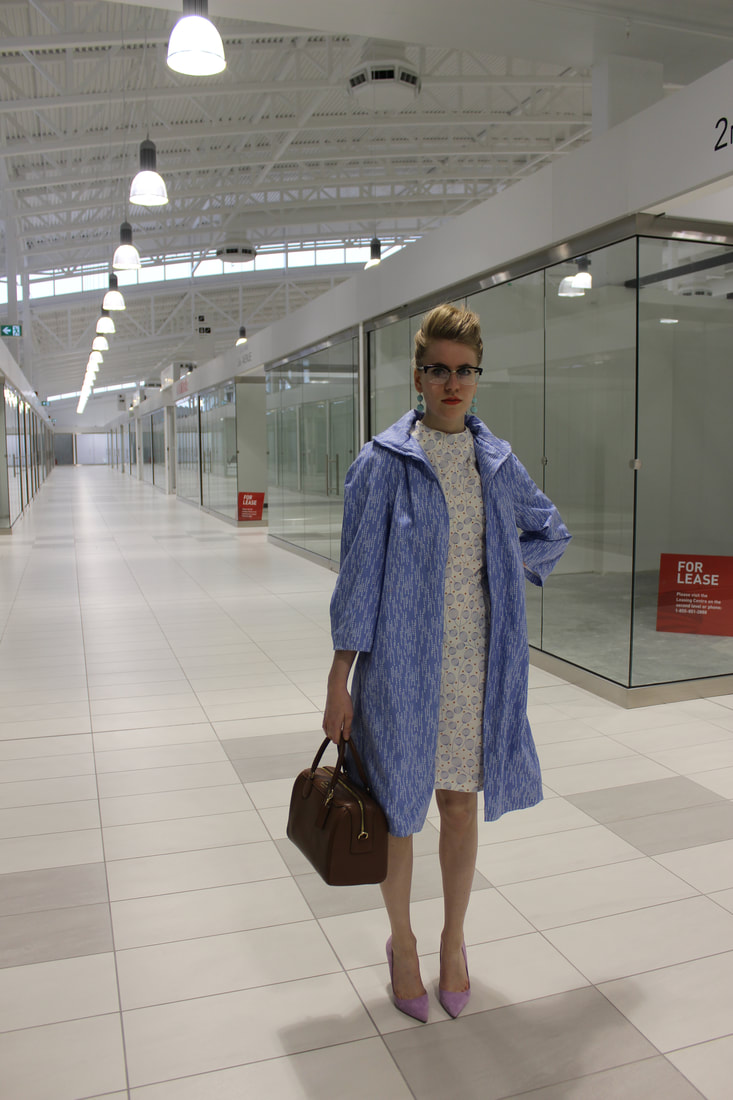 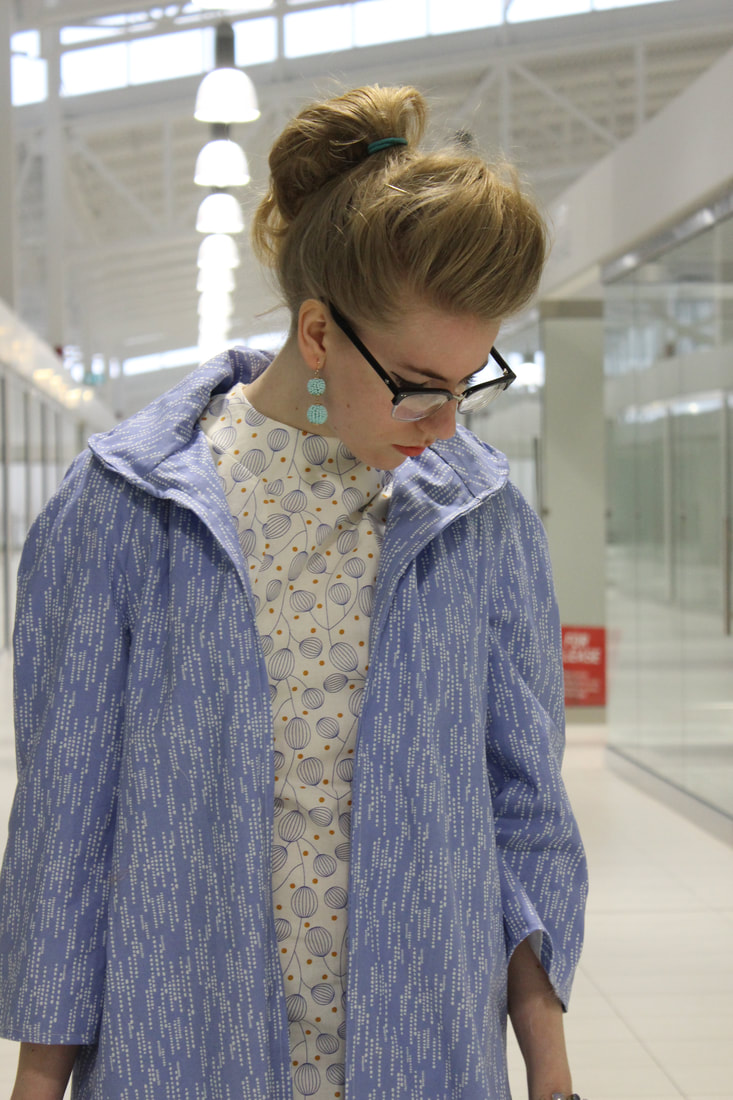 We got these photos on Boxing Day, and they were planned very last minute. We had such fun getting these though! 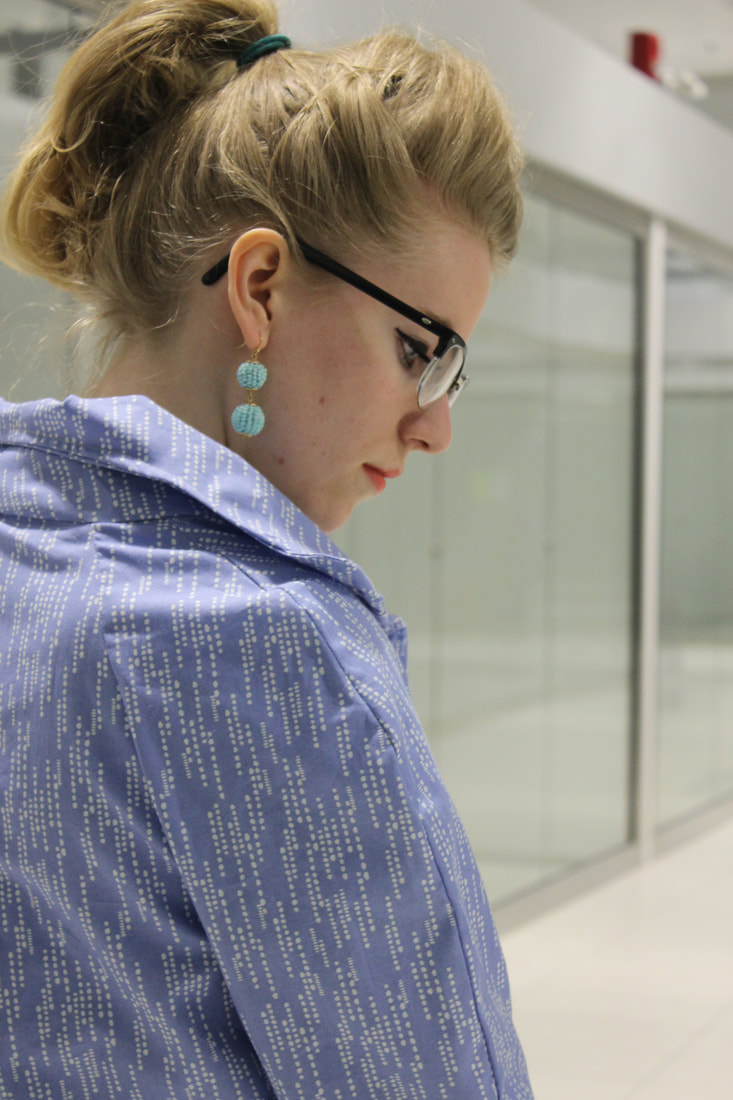 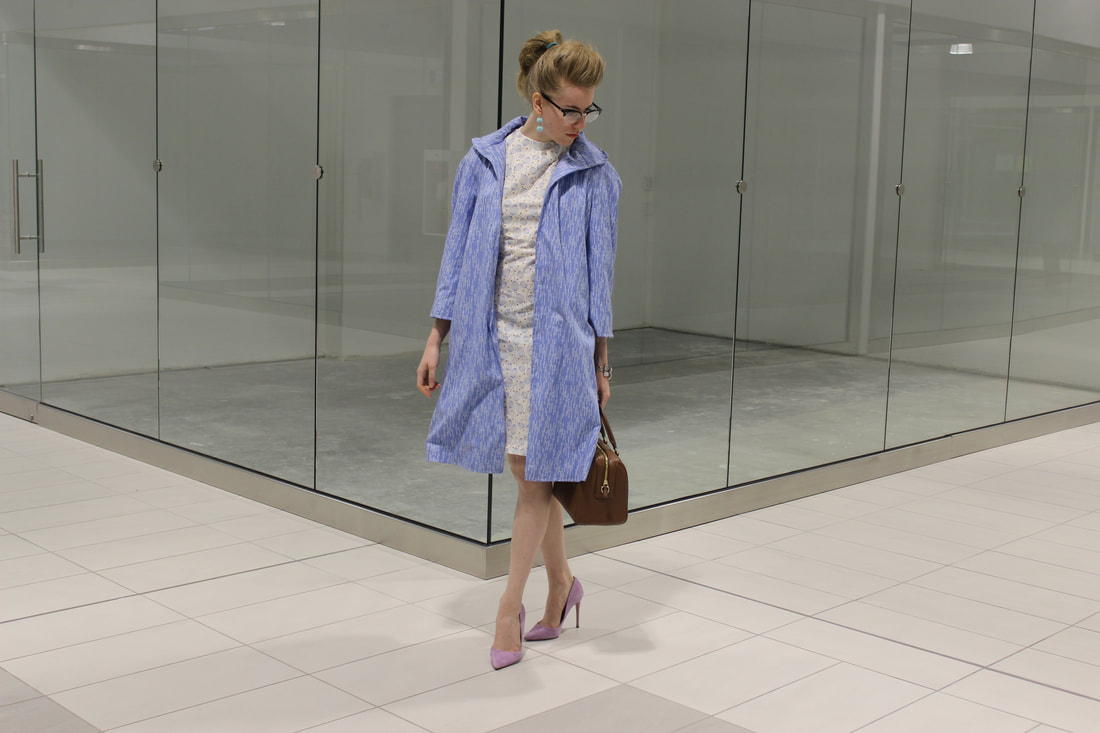 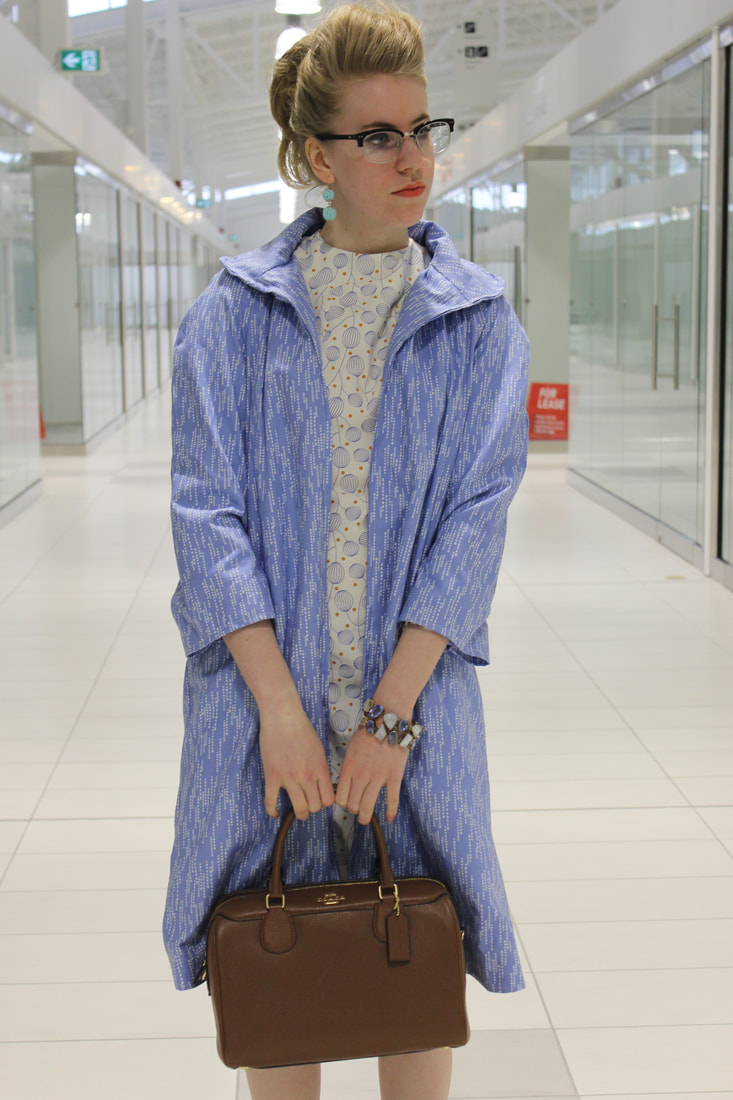 I am back in school for the second semester, so any extra sewing is on the back burner. I do have my final projects from semester one (a pair of pants and a skirt) which I am hoping to get photos of soon though, so keep your eyes peeled:) 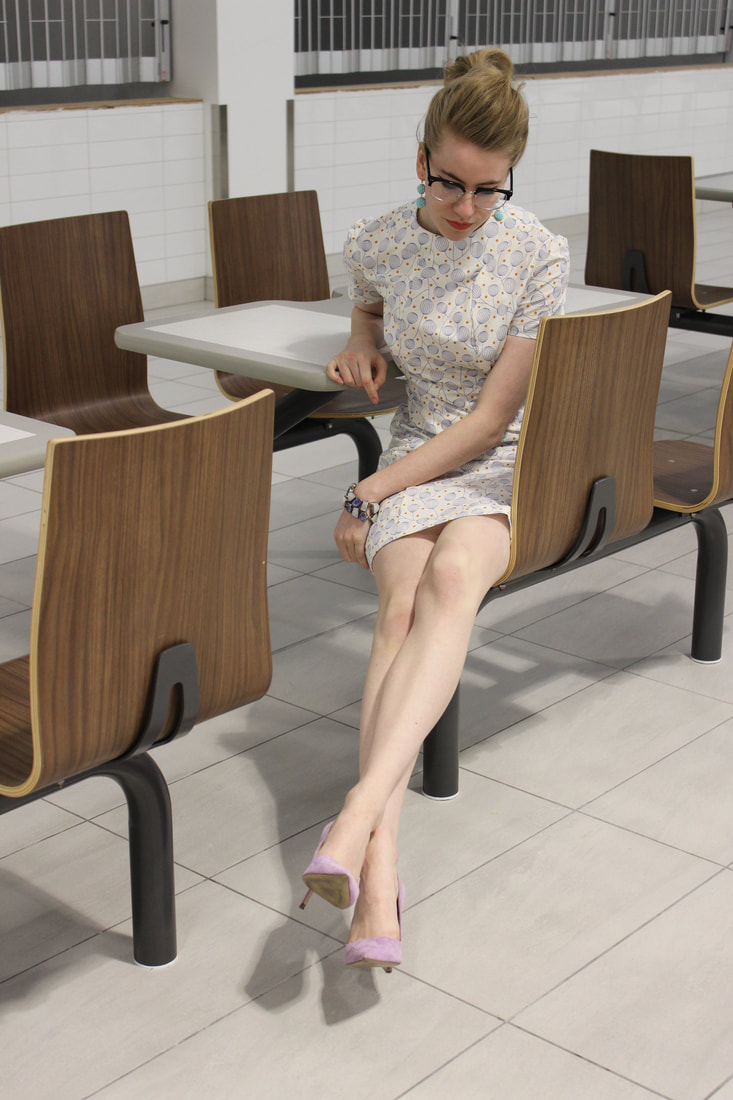 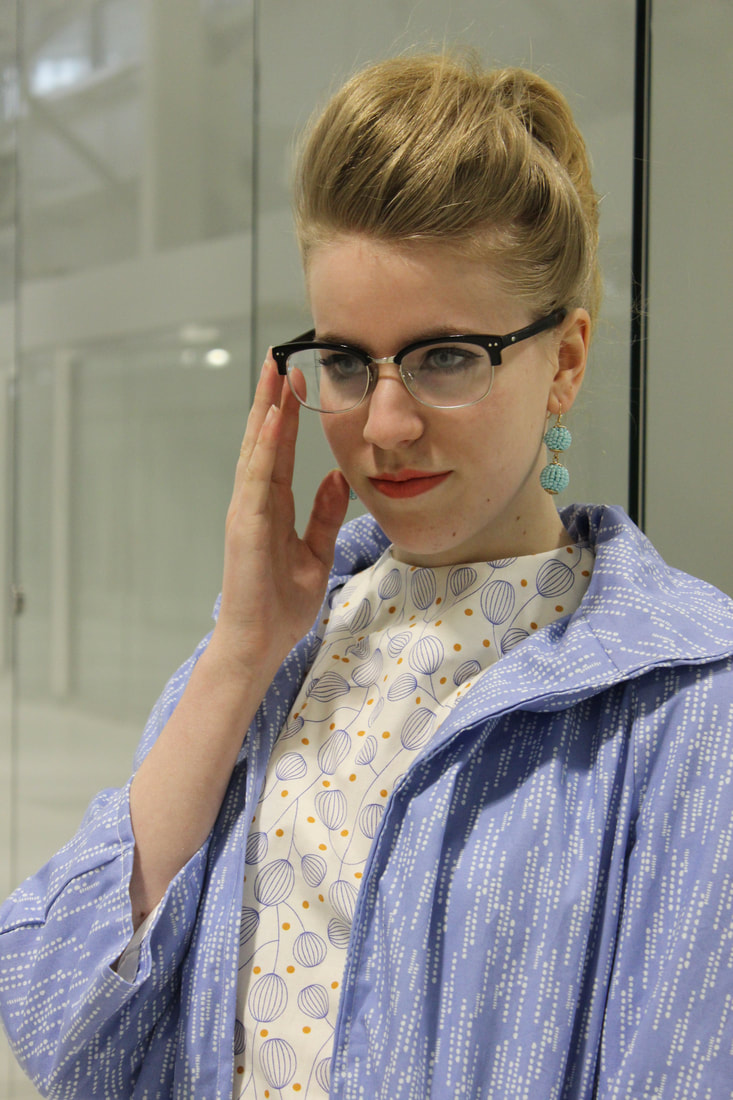 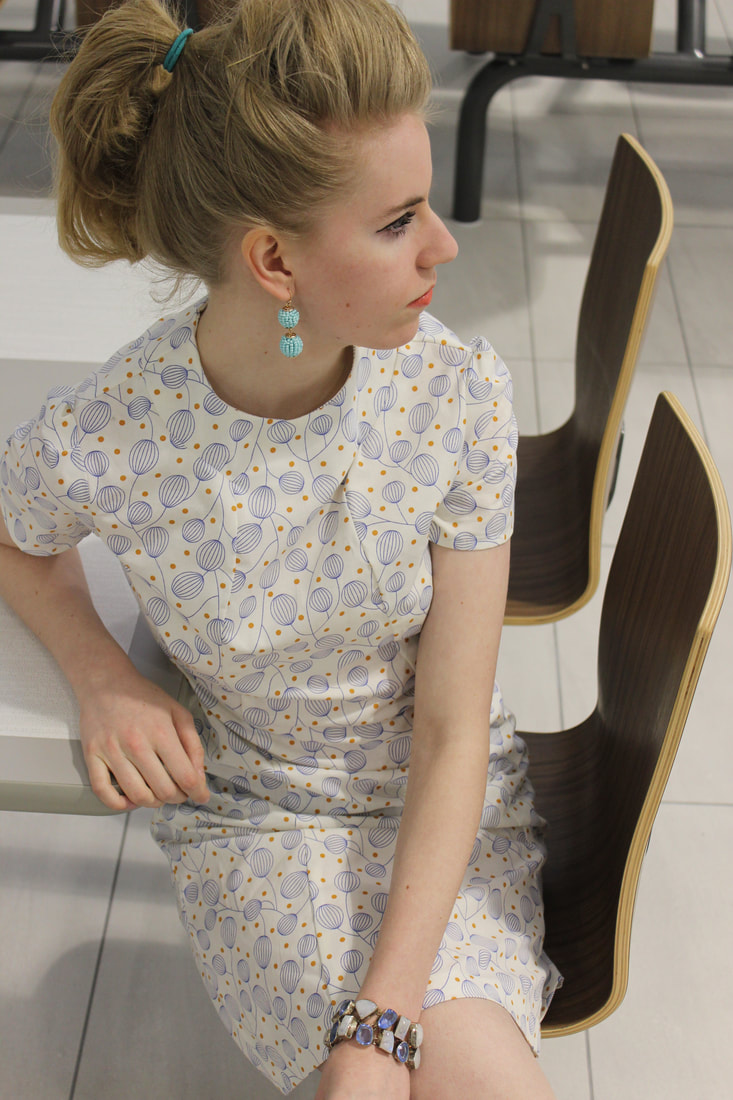 Thanks for reading! ~K 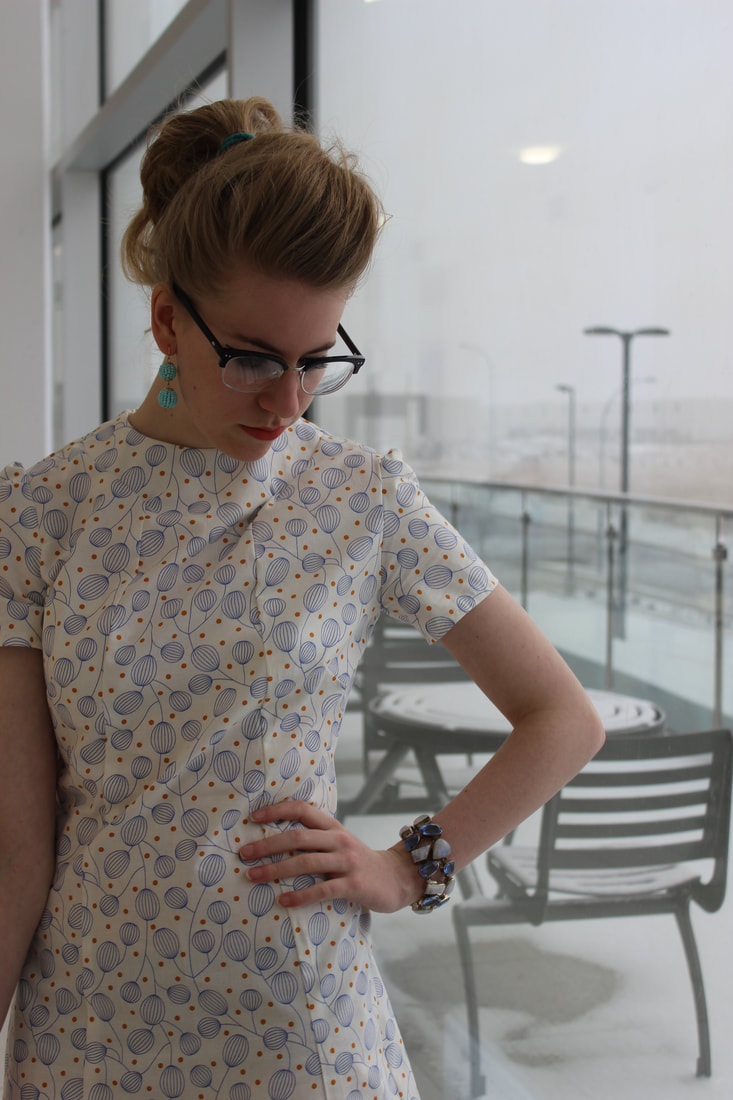 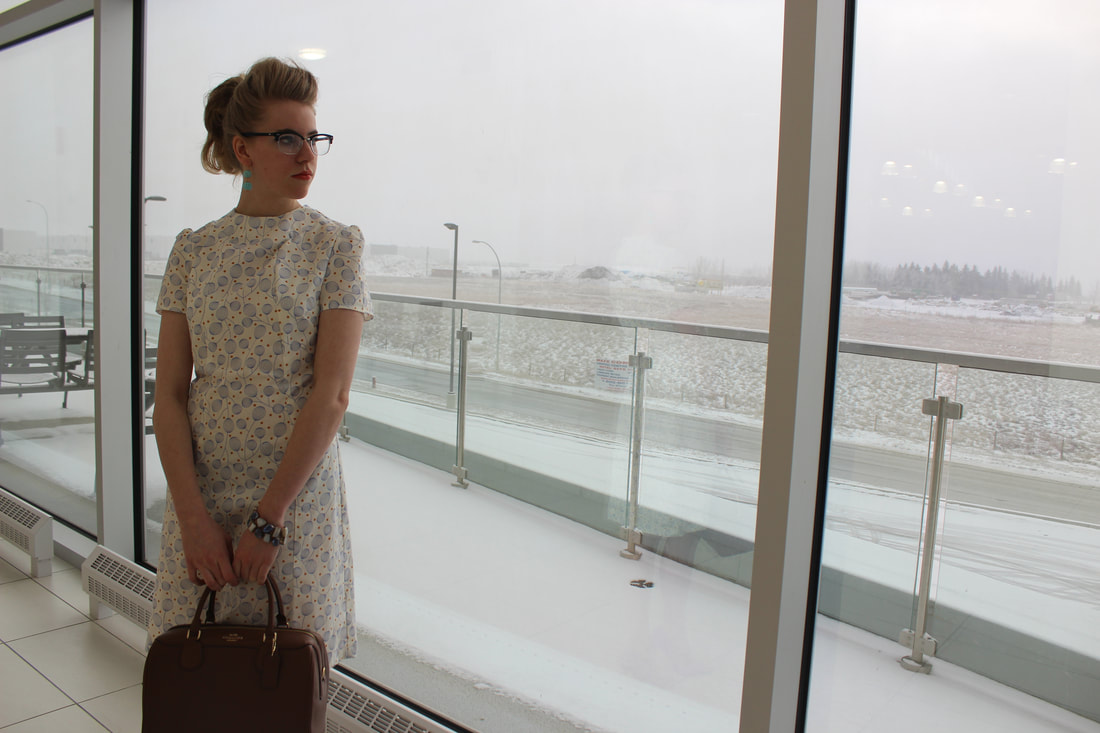 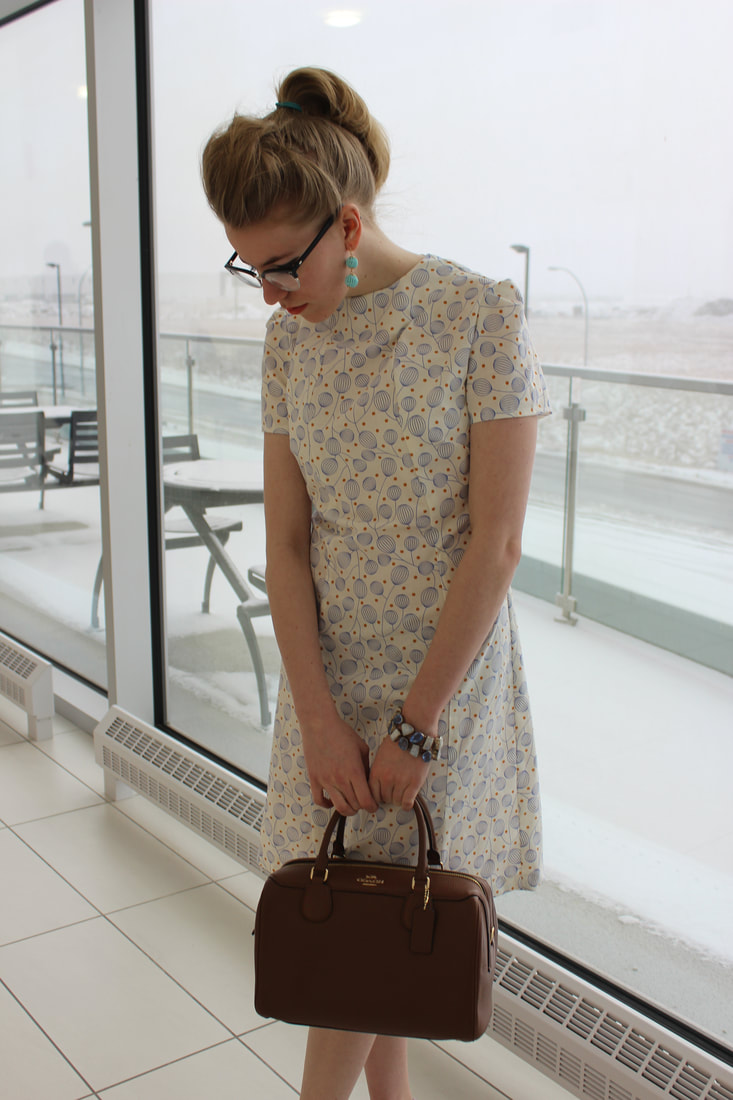 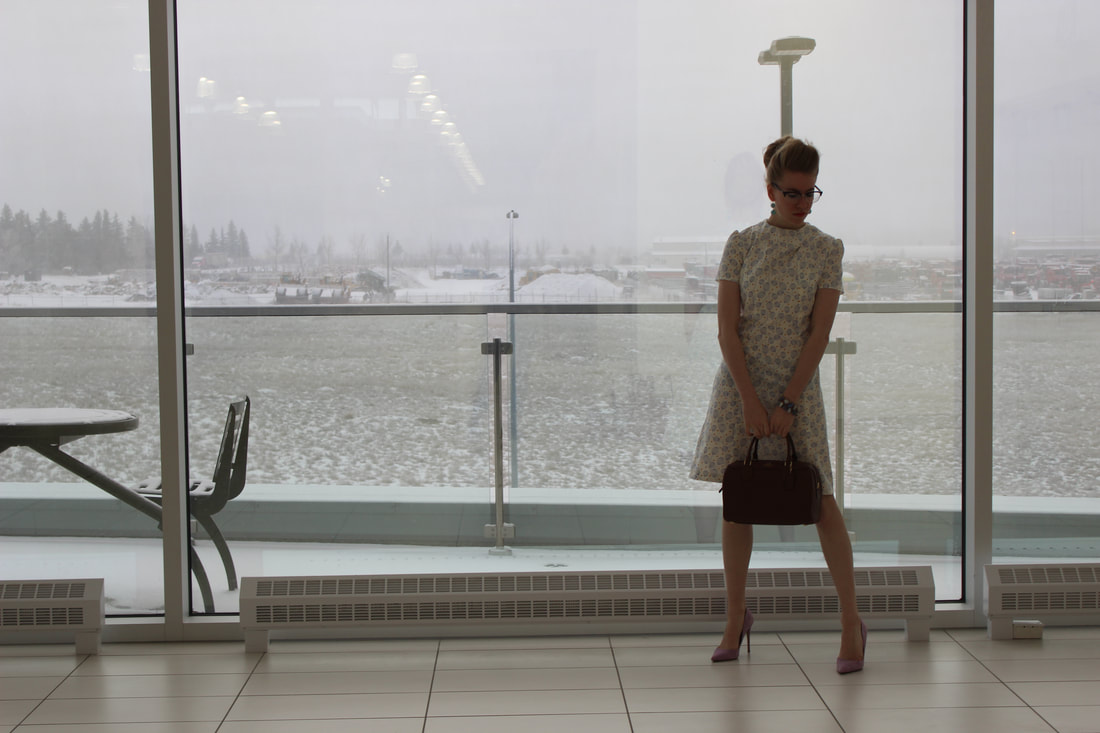 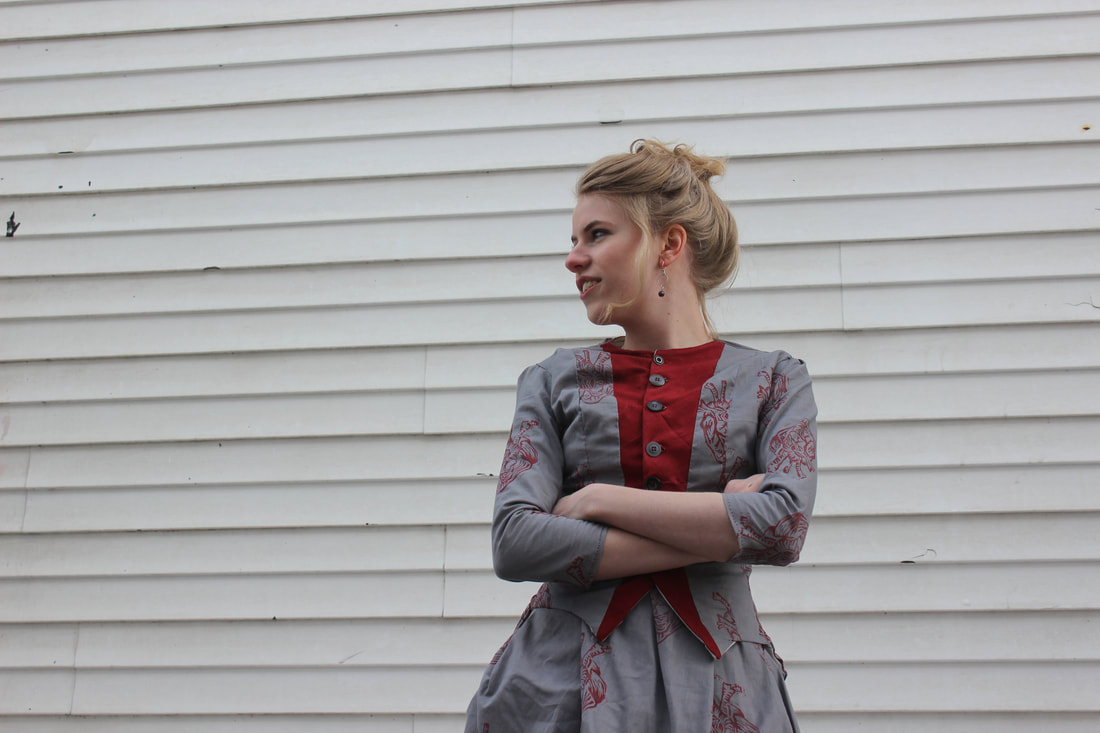 I recently went through my sewing room and cleared it out, so I have a few costumes that I am selling! As much as I love how these ones turned out (they are actually some of my favourite costumes that I have made so far), I have lots of plans for new bustle era ensembles, and I need space for them! These big costumes take up space, and I actually only wear them for the photo shoot. I am not much of a Halloween person, so they don't see the light of day after I have finished and photographed them. 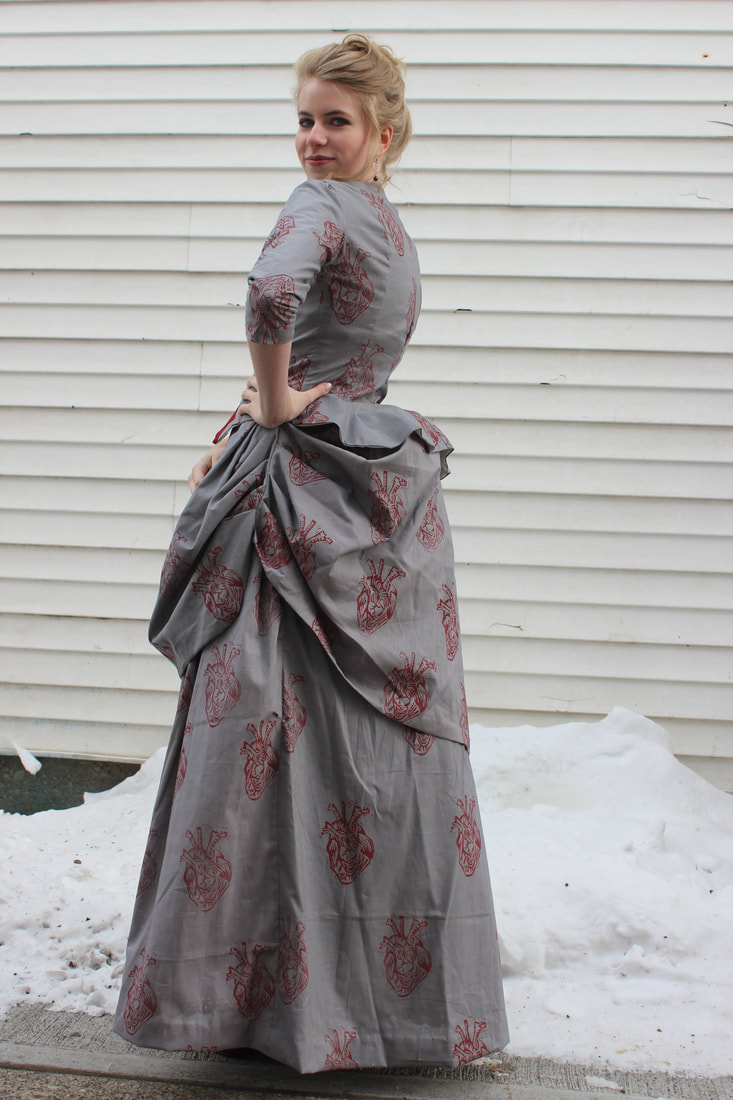 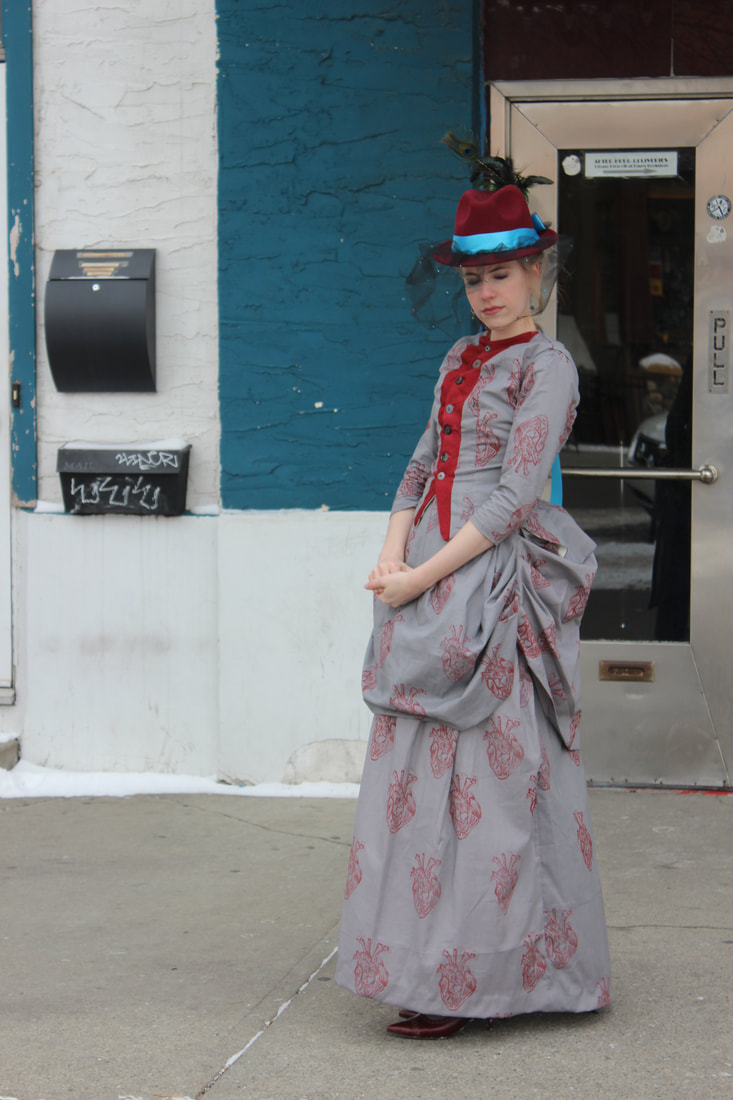 The first costume that I am selling is my Anatomical Heart bustle dress (the Frankenstein dress). This is a cotton dress that comes in 3 pieces - the bodice, the skirt, and the apron (the draping over the front and the bustle). It is hand printed with a anatomical heart stamp in red. Neither of these dresses come with the undergarments. Although they are worn over a corset and bum pad or bustle cage in the photos, they do not come with them. Find this bustle dress for sale here. You can also see more photos of this dress in my post here 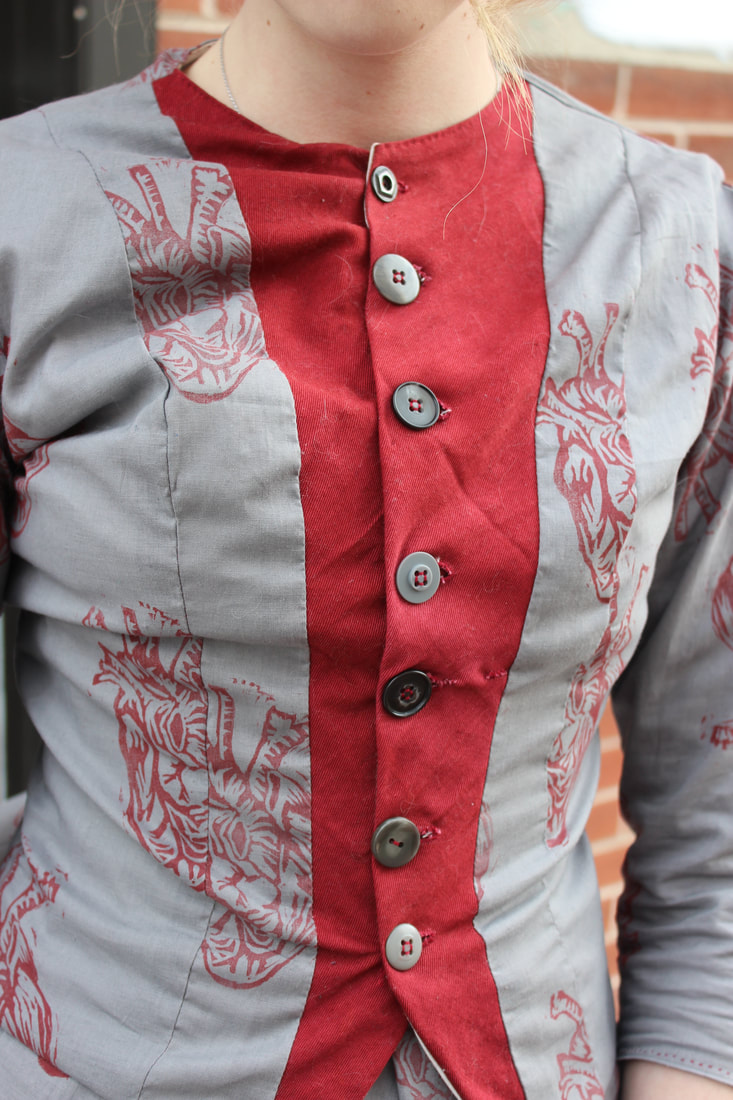 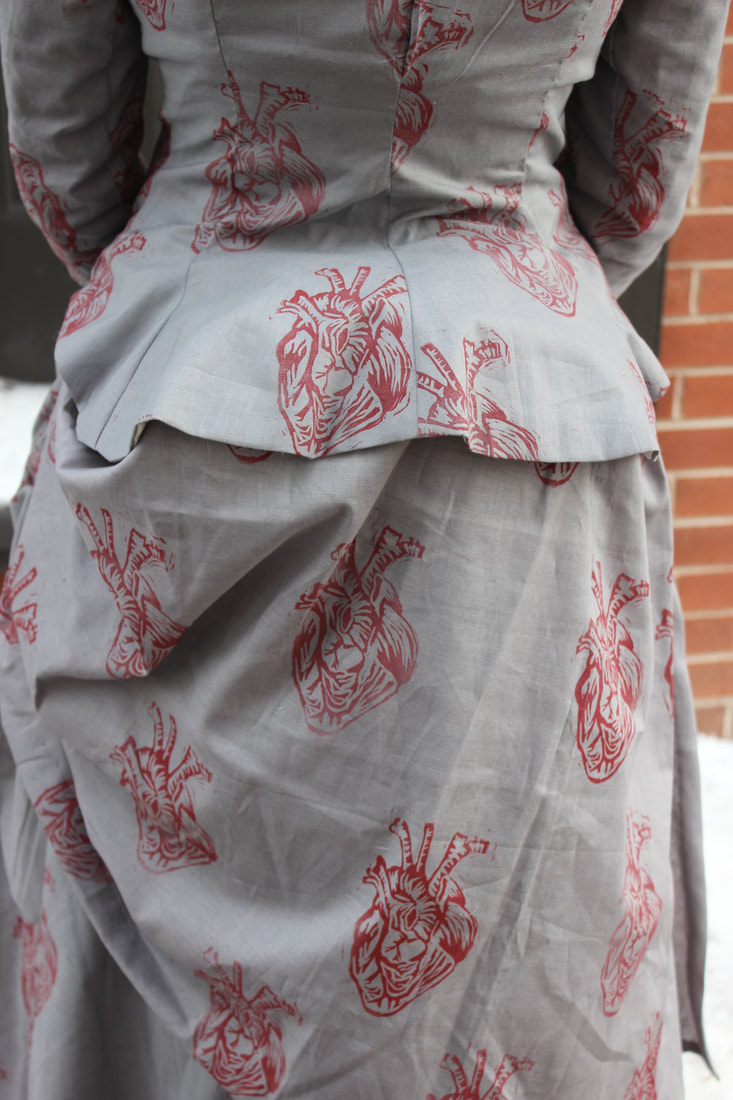 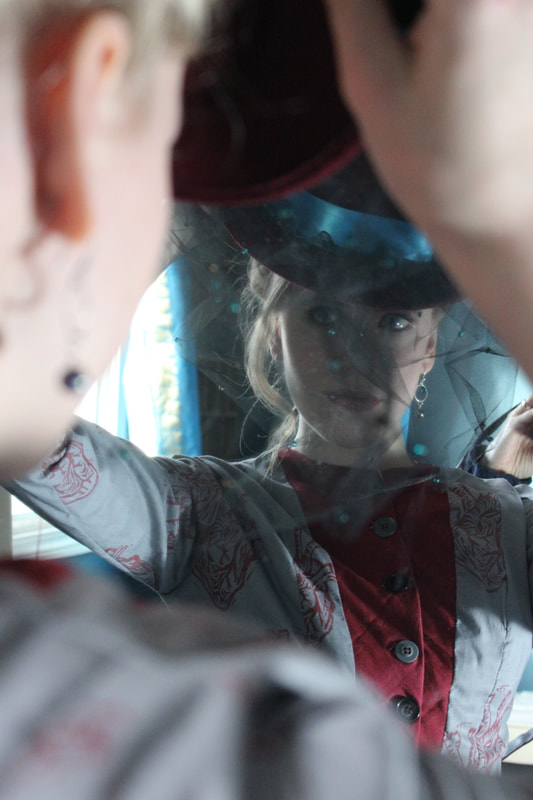 I am also selling the hat that I wore with the bustle dress! This is a felt fedora styled hat with a beaded veil, ribbon, and feathers. I wore this in the photo shoot for my Frankenstein dress. The hat will be listed shortly, so keep your eyes peeled! *Edit: The hat is now up! Check it out here 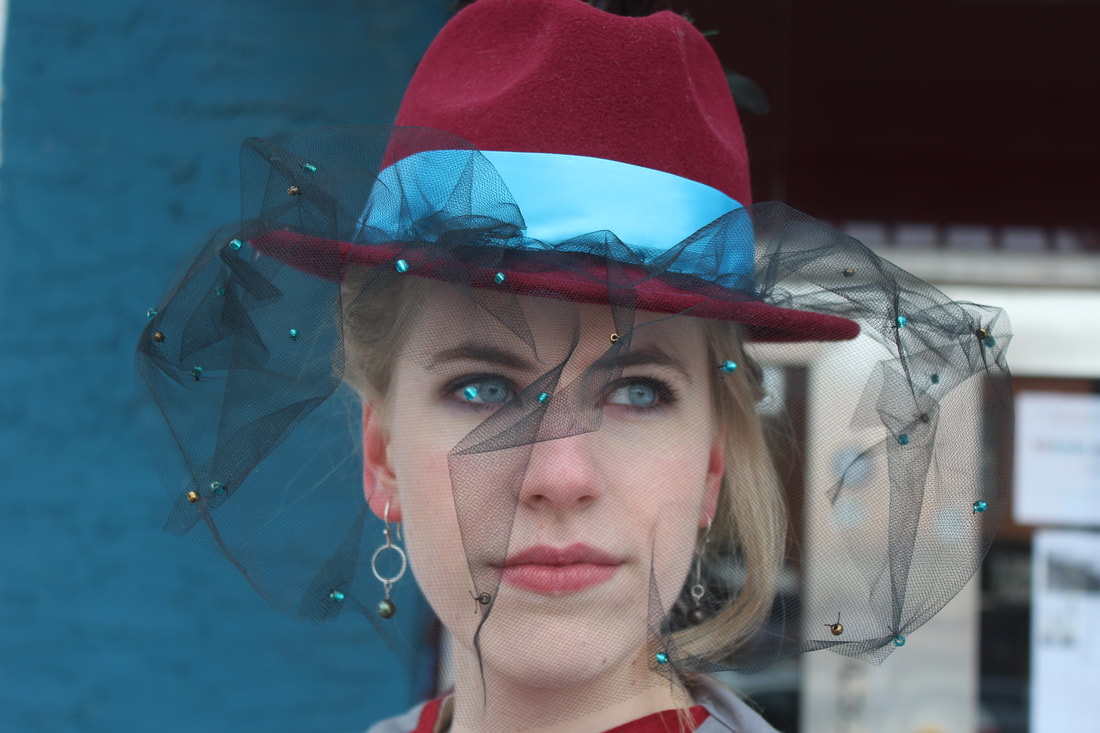 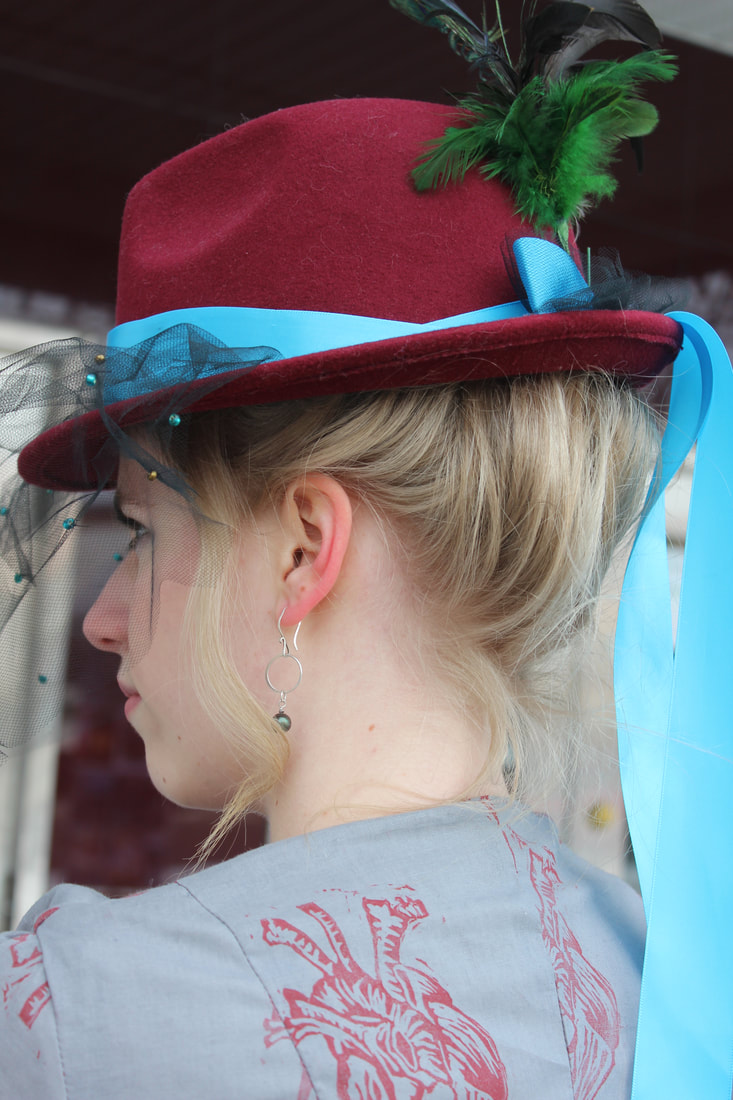 The third ensemble that I am selling is my Through the Looking glass dress. This is another bustle dress made of silk brocade and a bodice of a silk rayon mixture. This one also does not come with the under pinnings. It is a two piece dress, with a skirt with a train and plenty of room for a bustle cage to go underneath, and a bodice with long draped sleeves. To purchase this dress, click here, and to see more photos of the dress, check here 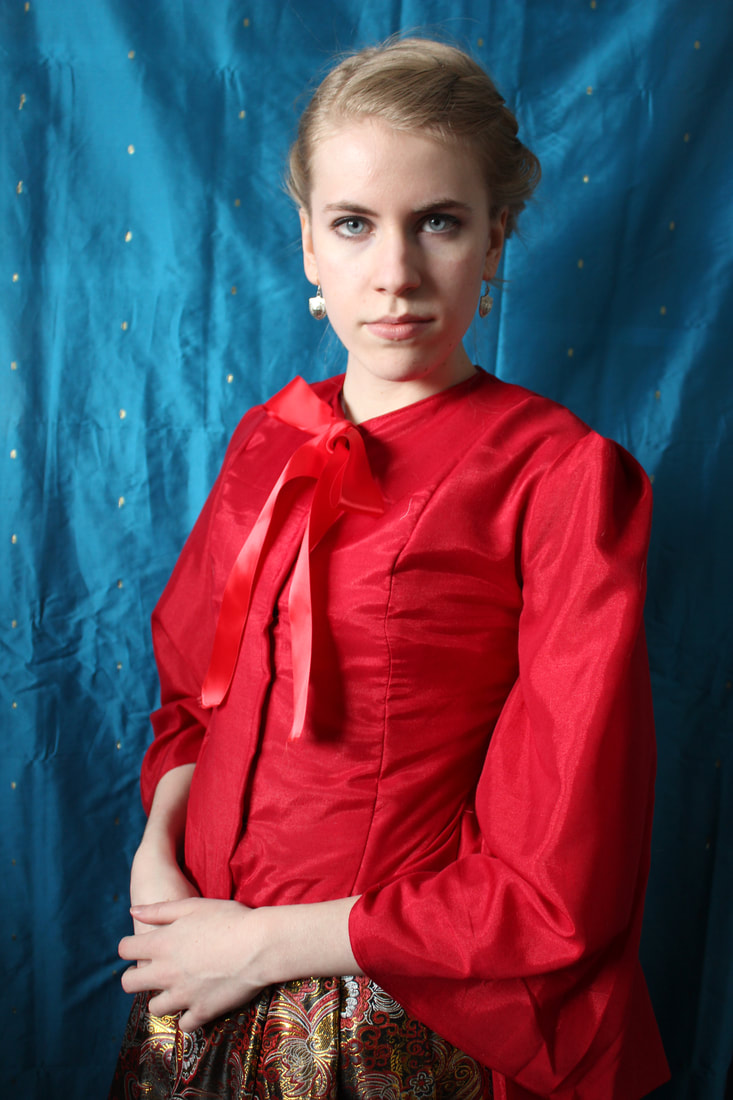 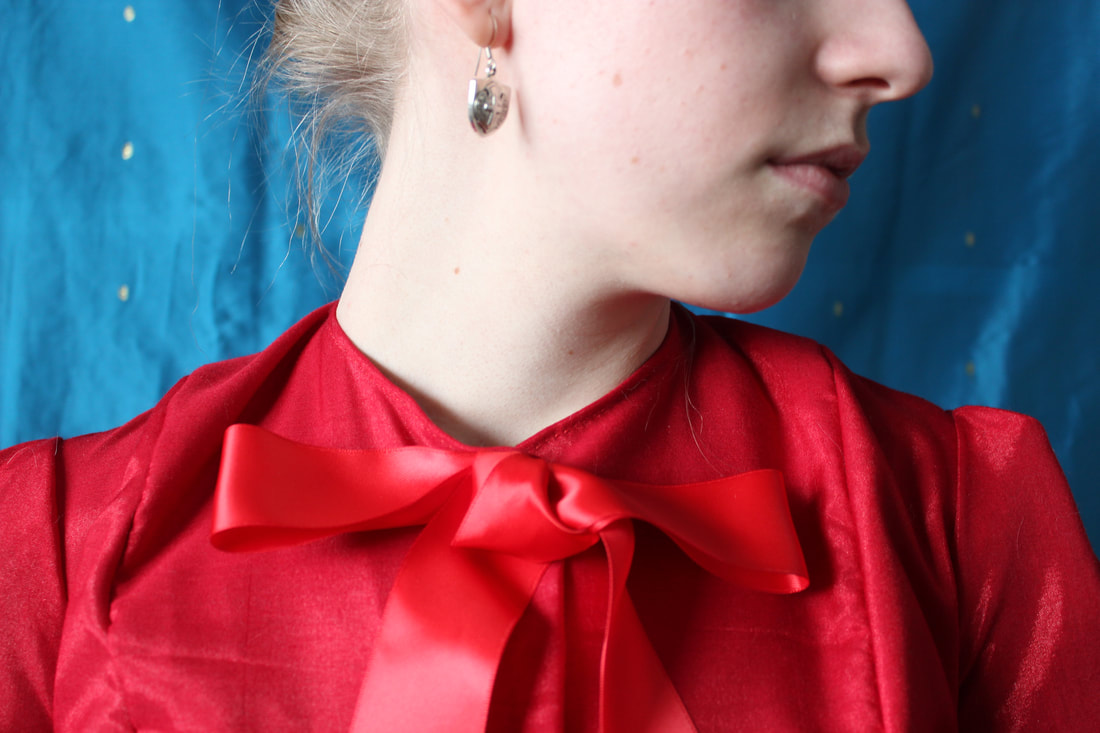 Both of these dresses are entirely hand made and draped by me, with the Frankenstein dress even printed by me. Check out my Etsy account if you are interested in purchasing any of these items! And just a reminder, I still have 2 1950's styled garments in my shop as well- my retro scissors skirt, a a pin-up styled white romper. 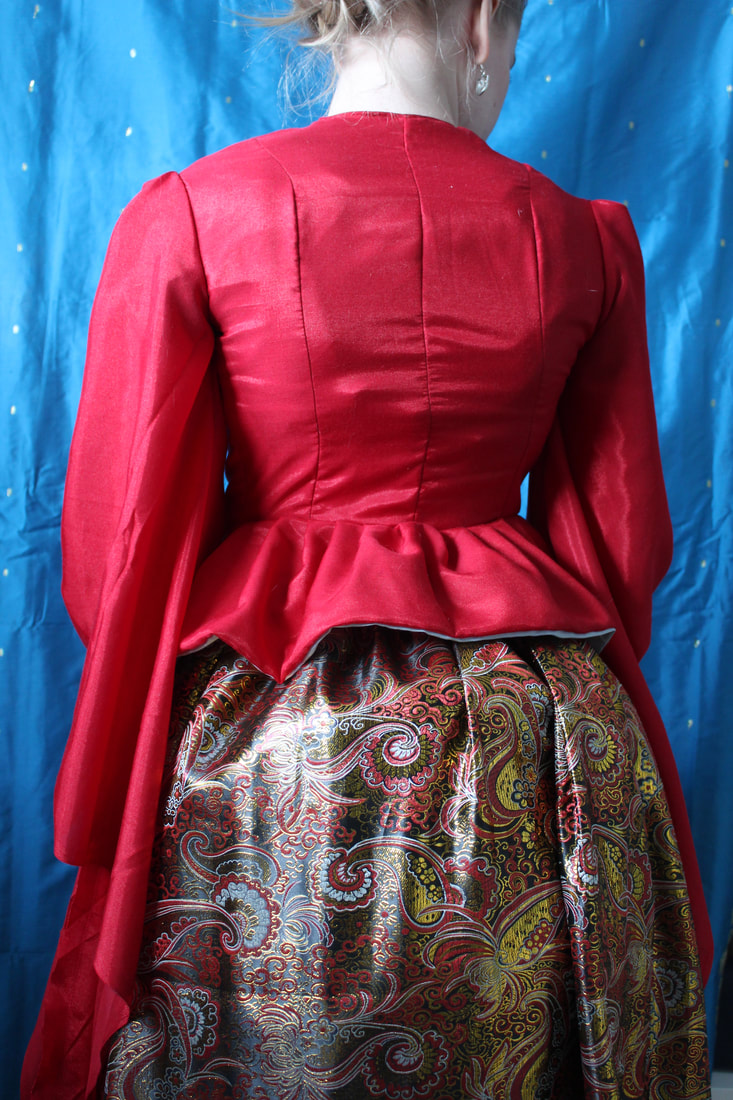 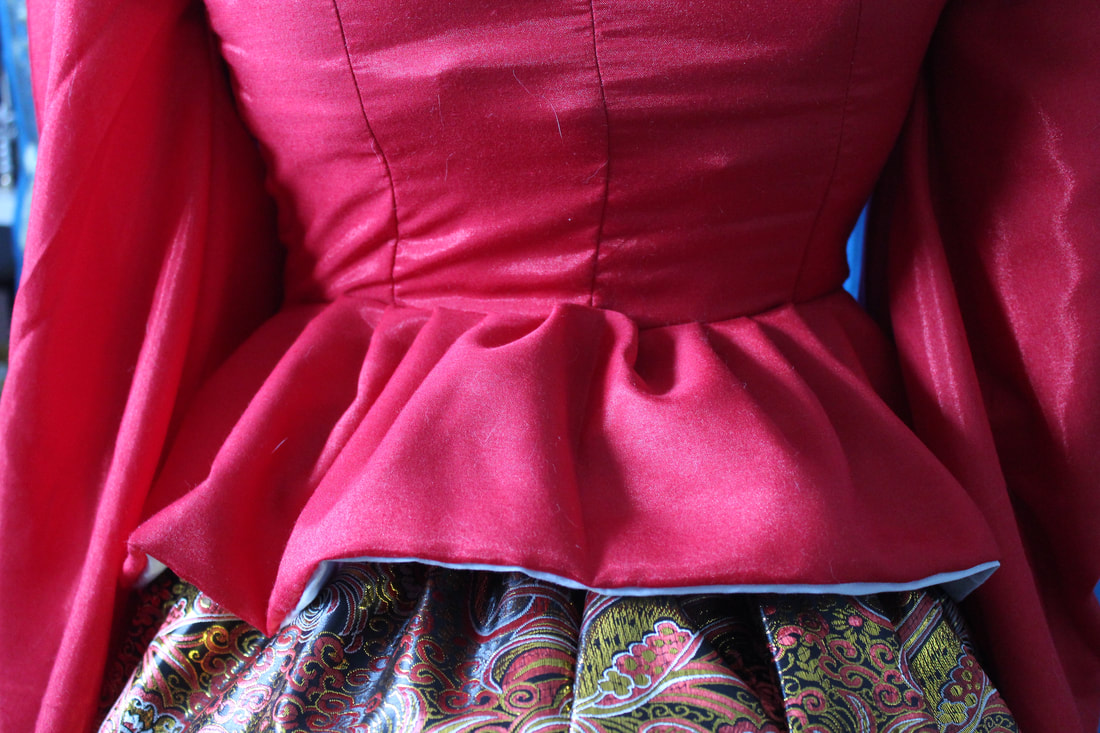 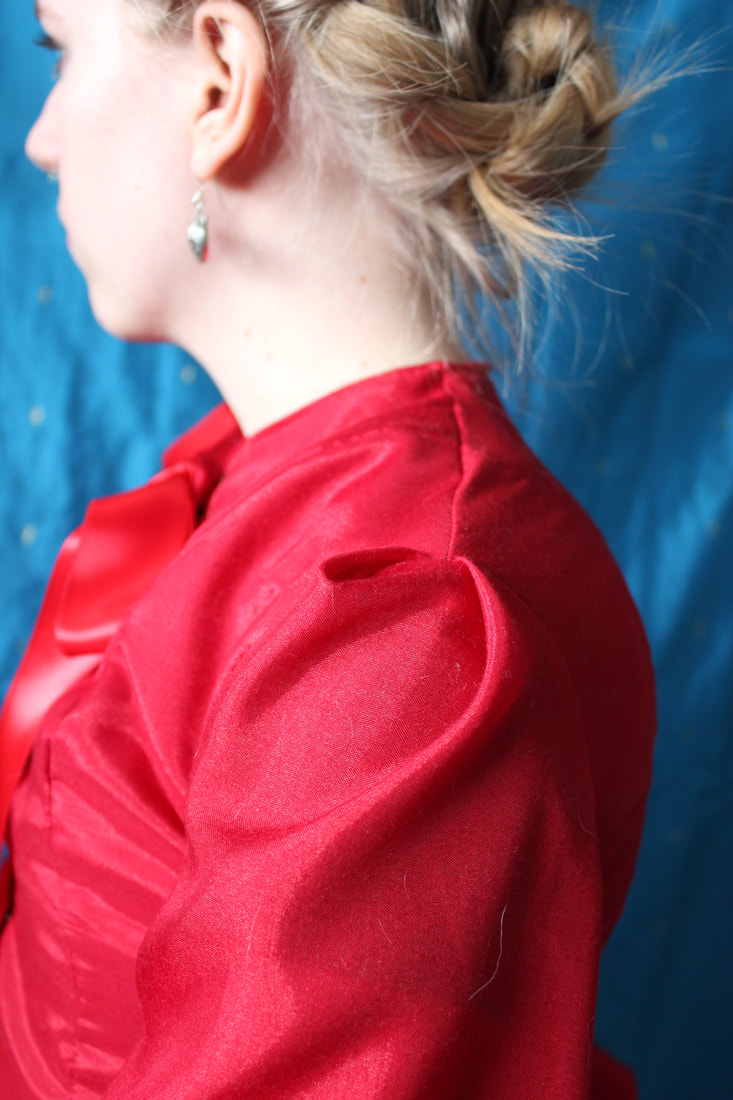 Thank you for reading, and stay tuned for new projects coming up! ~K 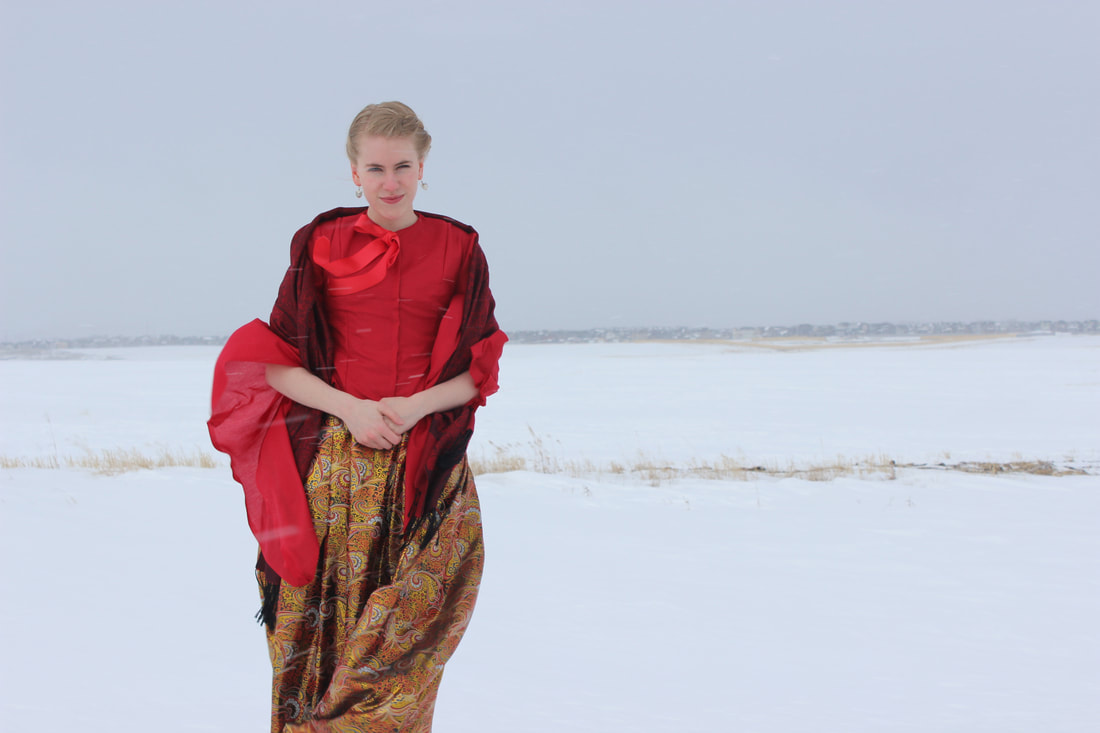 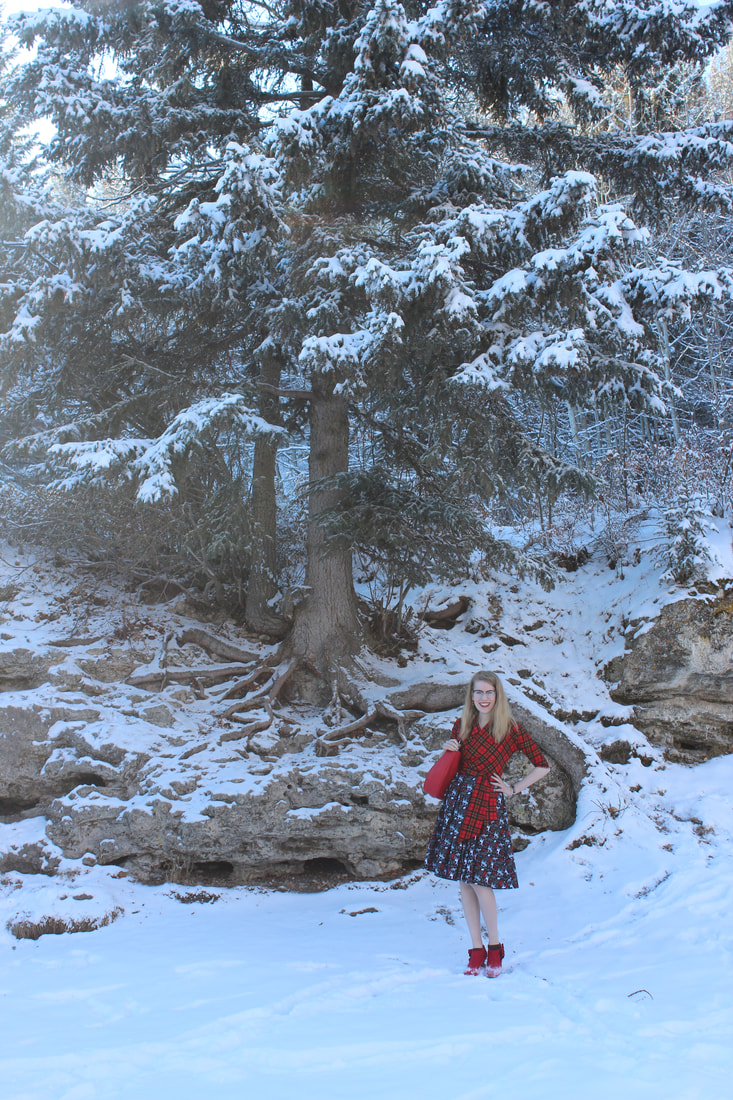 I had a bit of a sewing frenzy last weekend, and ended up finishing not one, but two garments in the two days. I was finally able to use a lovely pattern that I got by Patterns by Gertie. The fabric is from Michaels. I decided that this ensemble was very wintery, so we made our way to Big Hill Springs National Park (which is not far from where I live) to take photos. 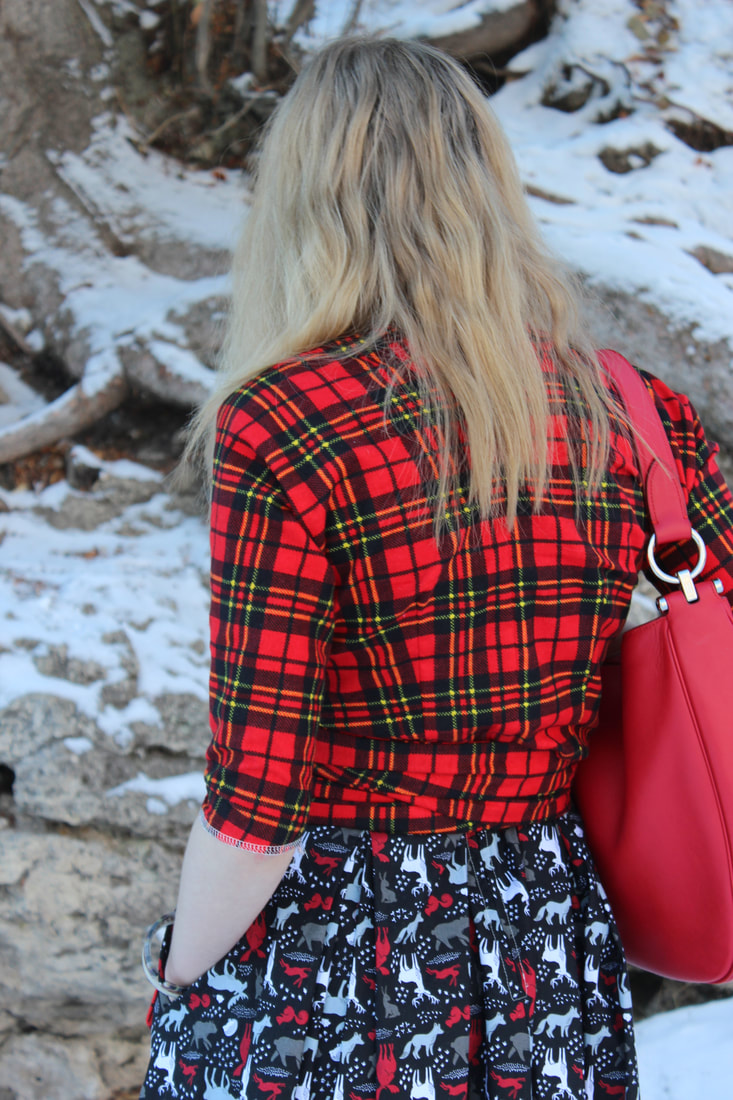 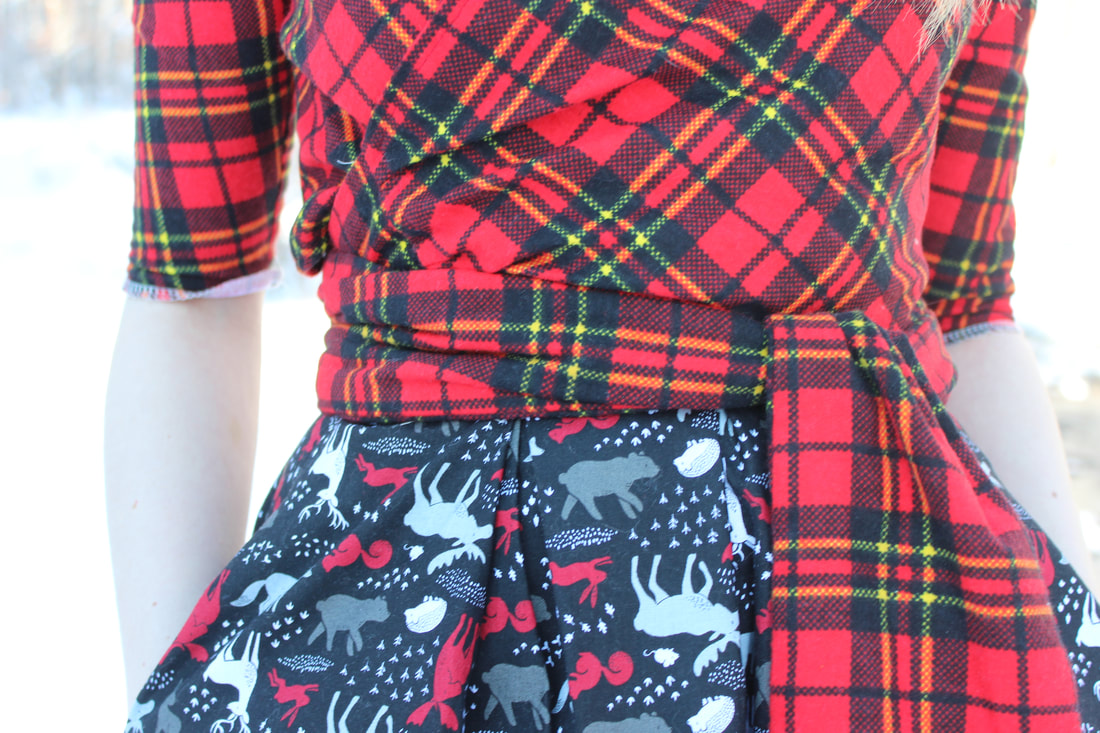 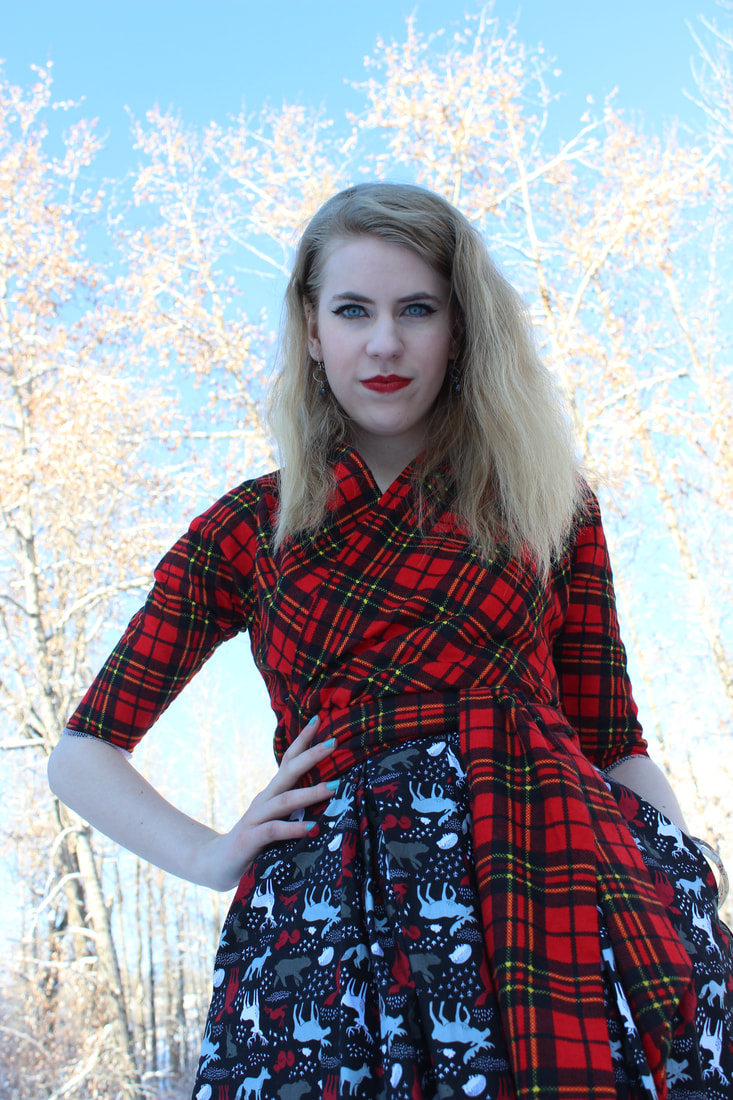 Even though there was lots of snow on the ground, it was a lovely day with warm sunshine and no wind, so it was not difficult to stand there in a skirt without a coat (although, my feet were pretty frozen by the end). I am lucky to live in an area with so many different landscapes! It makes finding places for photo shoots very easy. 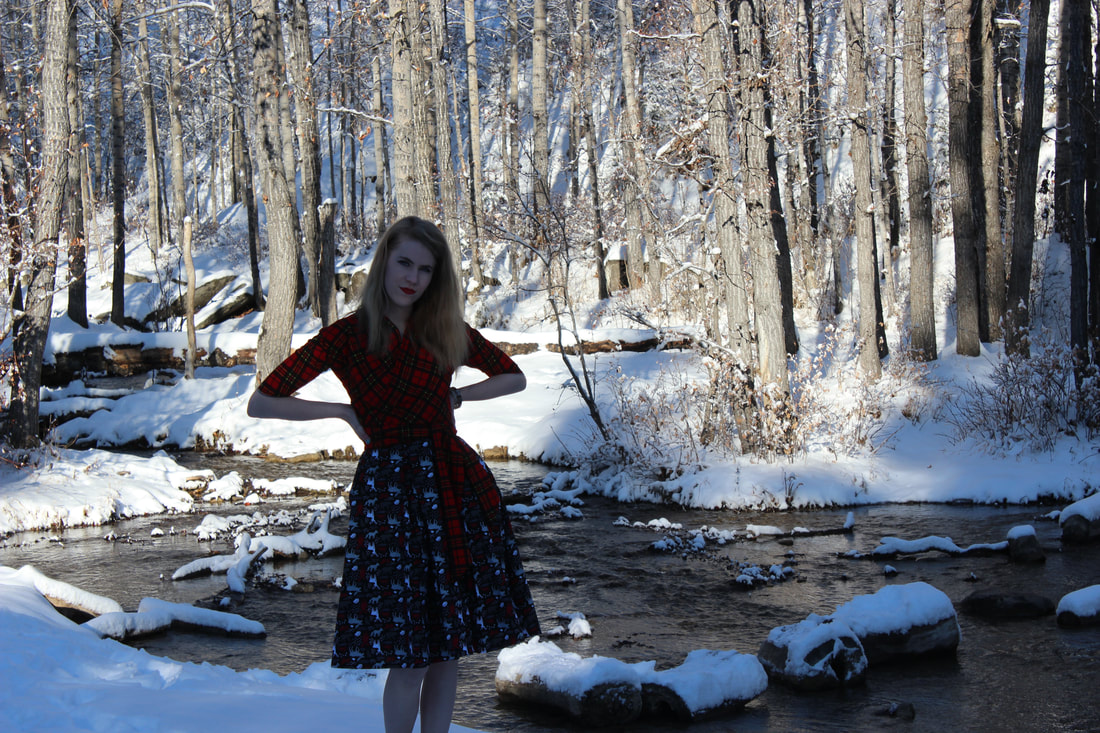 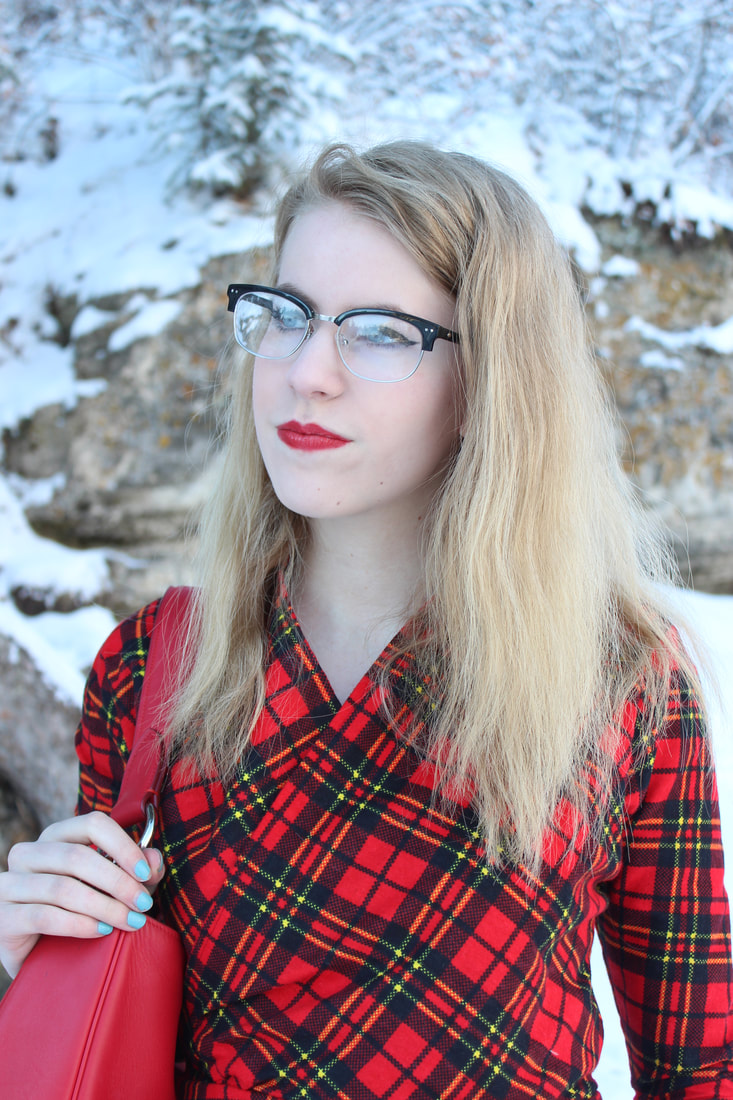 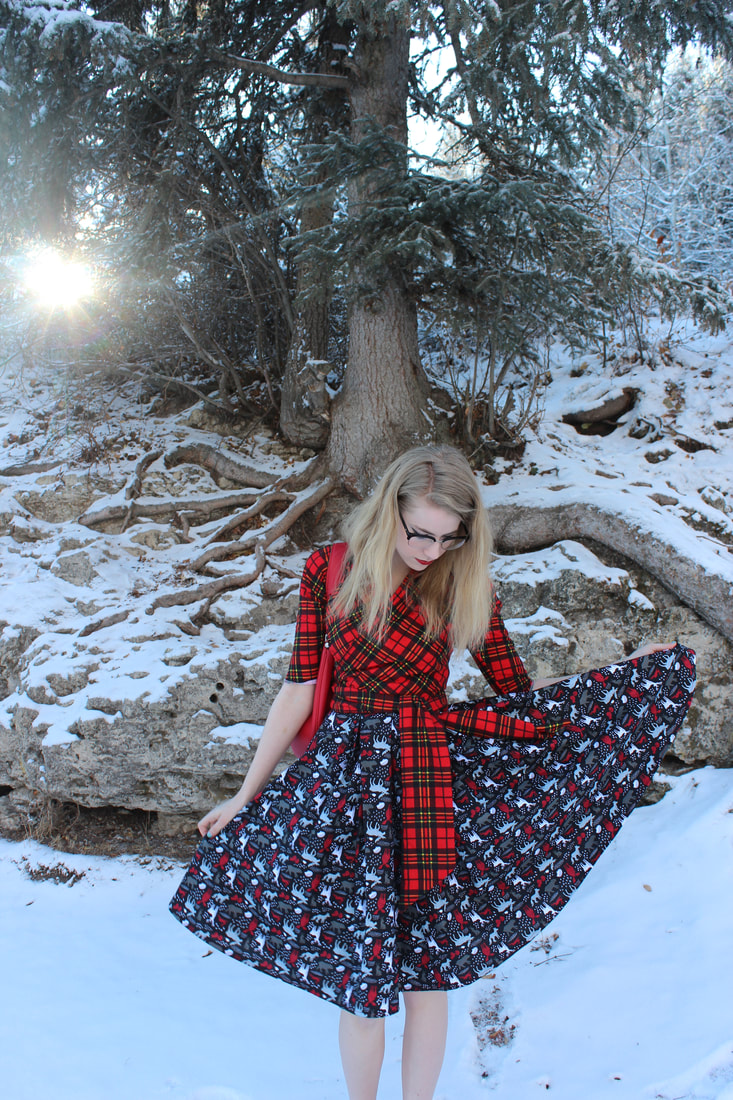 The blouse is a wrap blouse from the same pattern as the skirt. I chose a plaid flannel to make it, since I have been running out of warm and pretty shirts to wear to school lately. The skirt is the sweetest cotton print, with animals on it. It ended up being very Canadian! I think this skirt will be worn on Canada Day this summer. 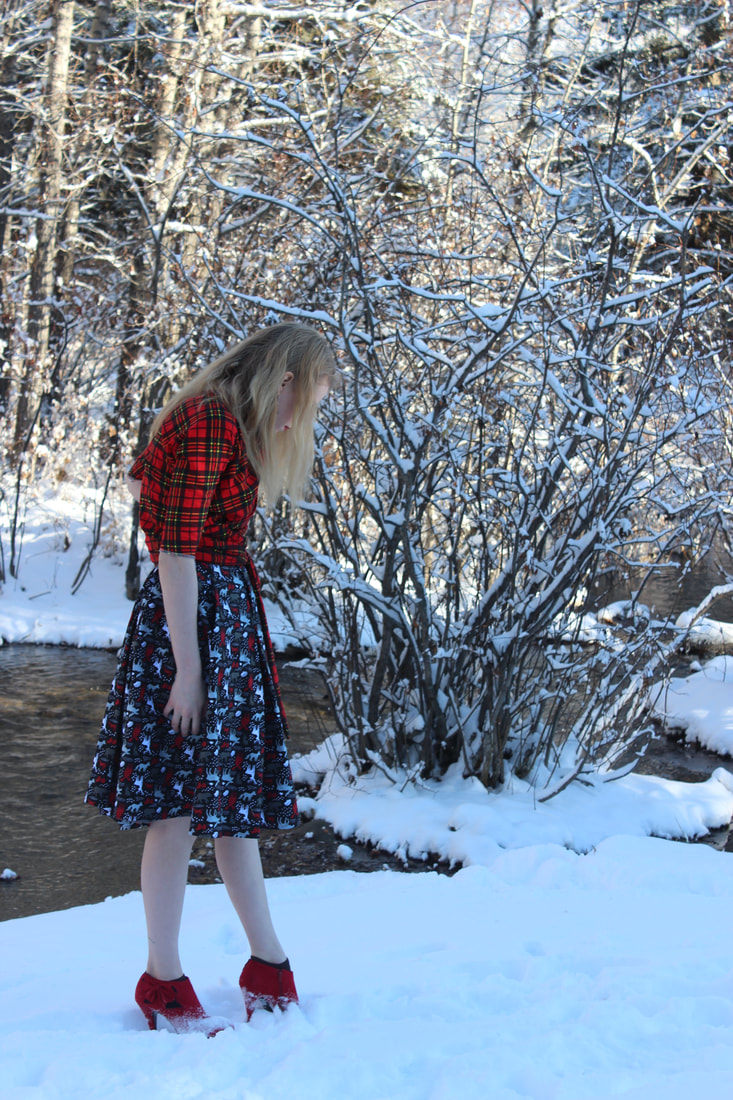 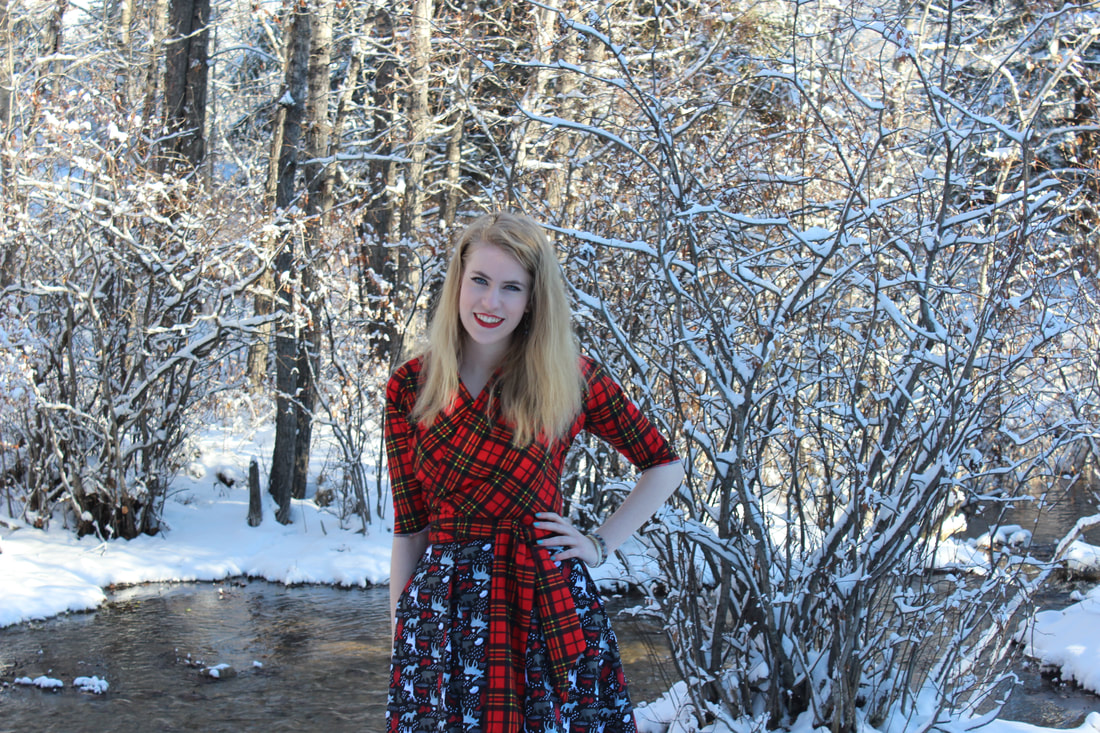 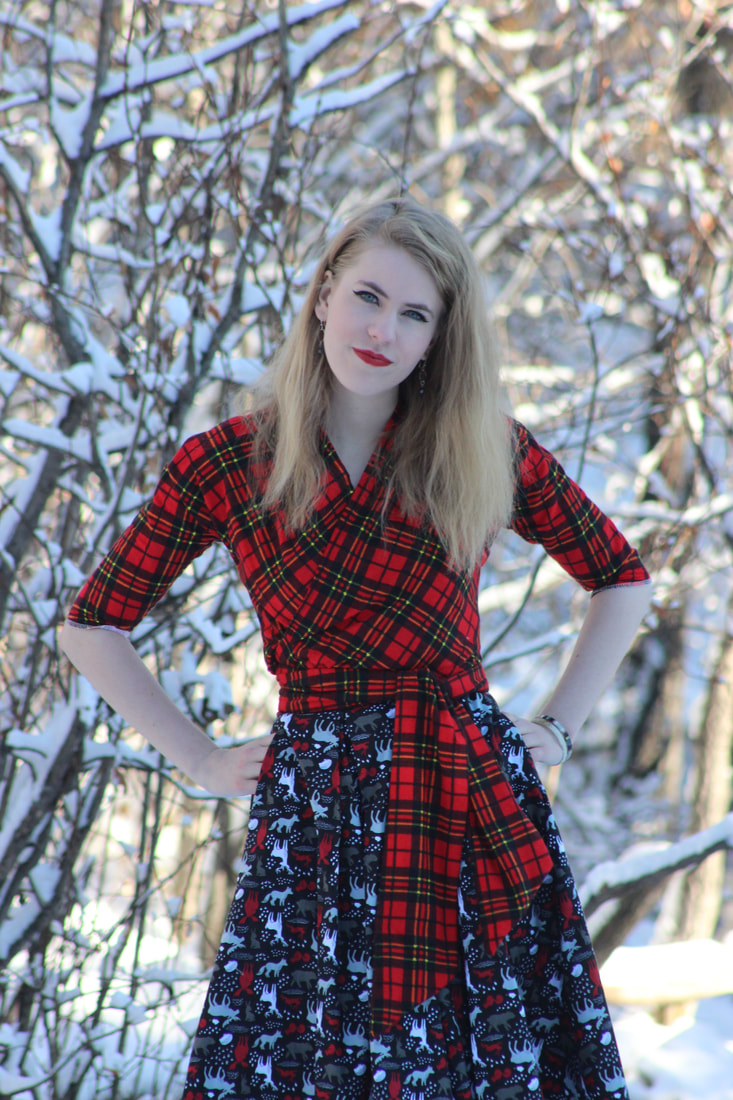 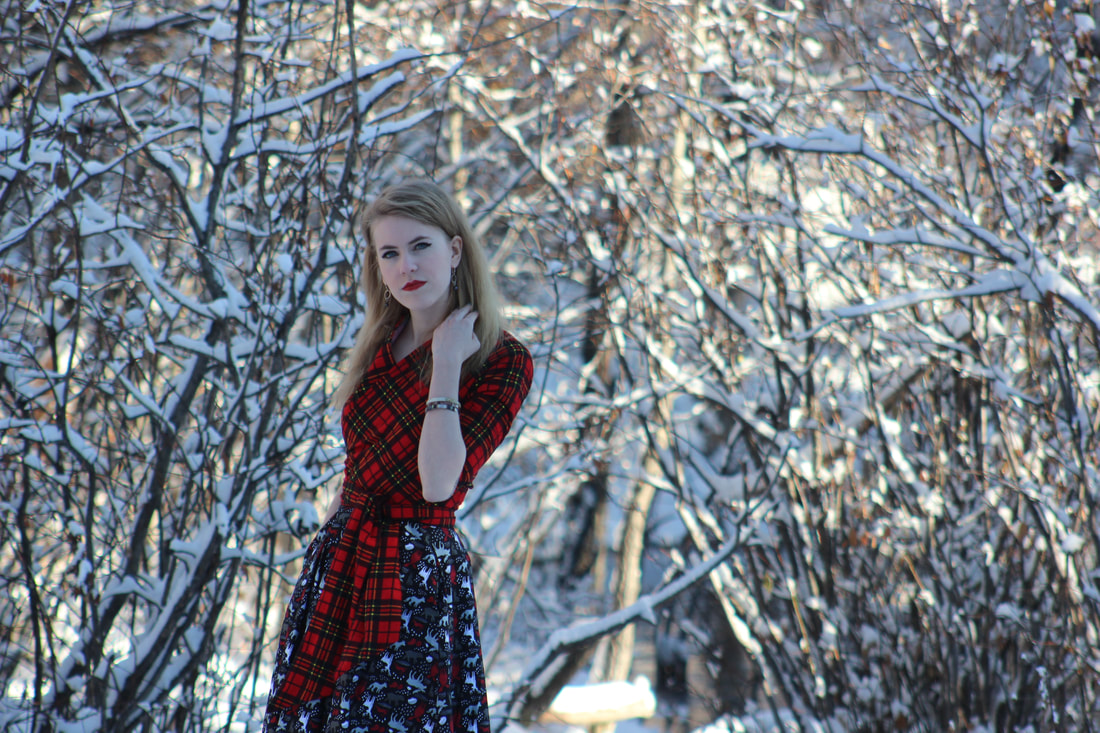 I have been wearing a ton of 50's styled outfits lately, so I have already worn these pieces out. The skirt needs to be taken in slightly (you can't really see in the photos, but it will be a quick fix), but other than that I am thrilled with how it turned out! 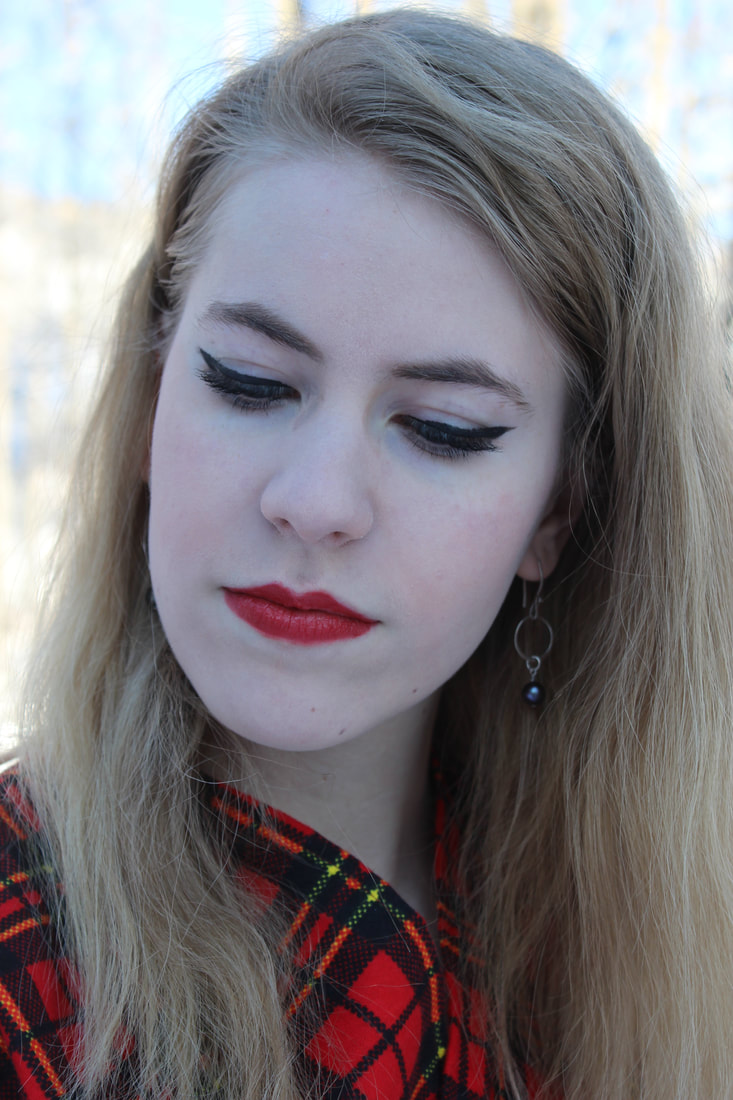 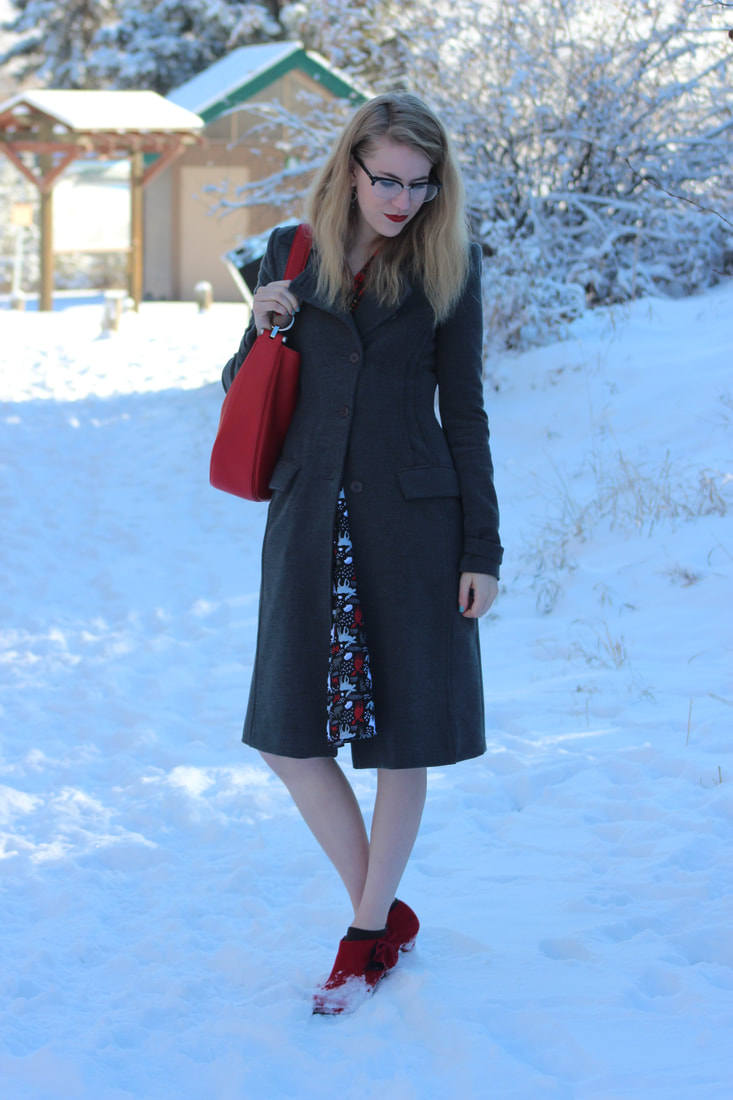 ~K
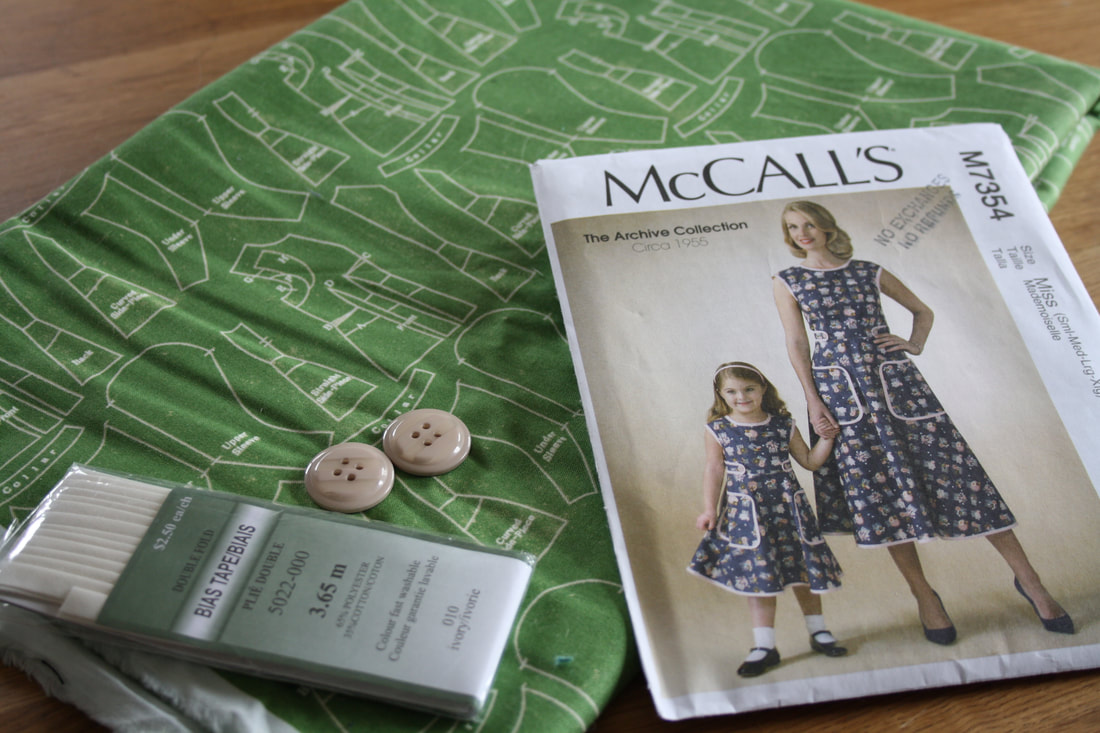 I recently started school, so I have been a little bit busy. While I am loving school, and learning tons of new and helpful things, it has been quite stressful getting started so the blog has been paused. Now that MakeFashion is done, and I have gotten used to my new schedule, I have lots of plans for the winter season! 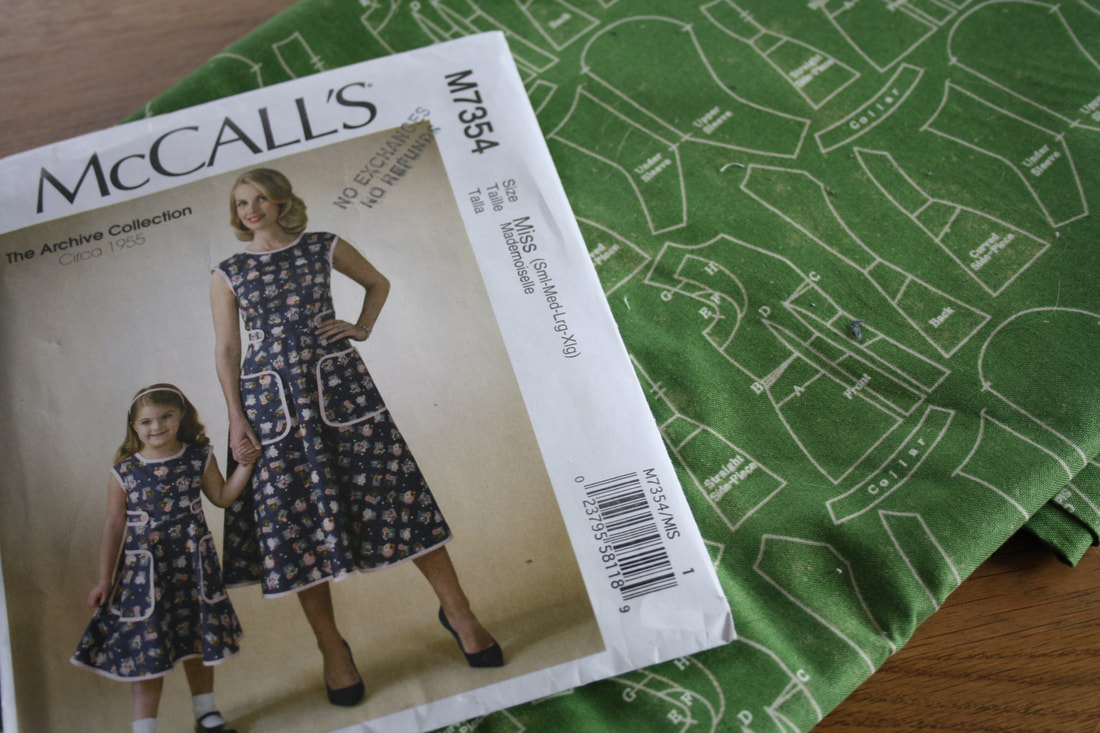 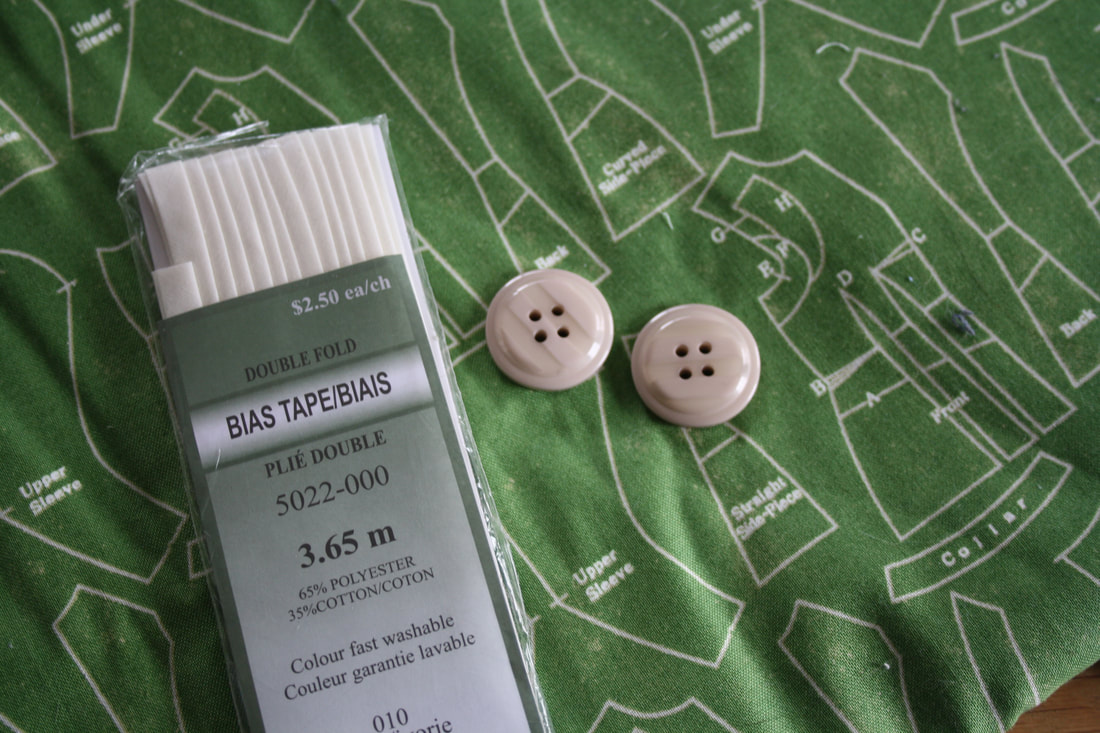 After a trip to Fabricland a while ago, I am filled with inspiration! The first thing on my list is something that I have been wanting to make for a long time- a kitchy, 1950's wrap dress. I picked up the McCalls pattern M7354, and a fabulous printed cotton. I will be binding the dress with cream bias tape, and picking out two cream buttons to finish it off. 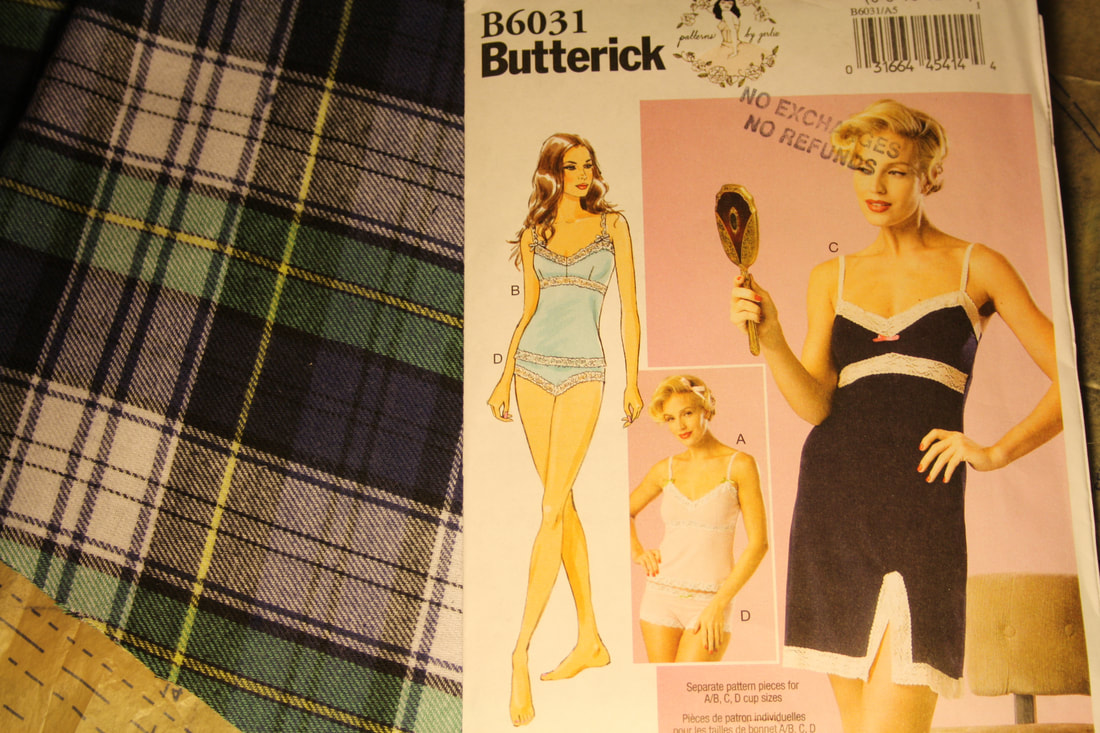 The second pattern that I picked up is a pattern that I have admired for a very long time, and now that I am confident enough in my sewing skills I am ready to make it! I am going to do a trial run with a plaid flannel to make myself a night gown, and then I will make myself a few slips to go underneath my dresses. 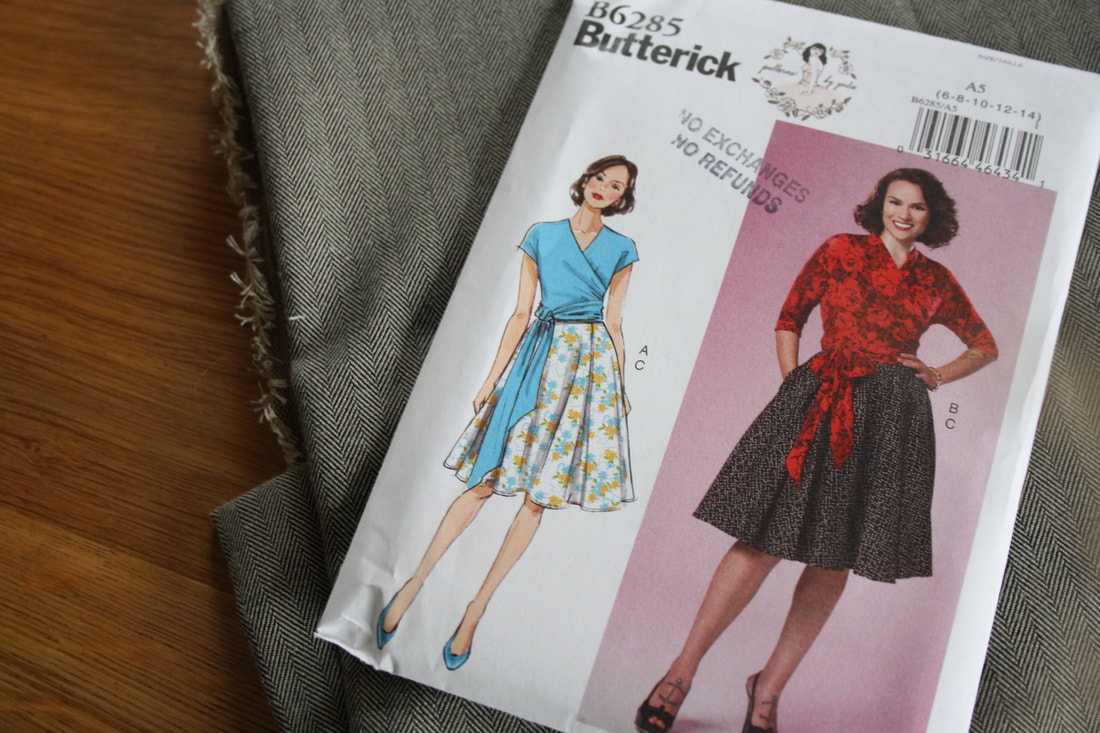 I am so excited to make the wrap top out of an anatomical heart print I have always been a huge fan of Patterns by Gertie, and I have used a few of her patterns before, so I did not hesitate to get a few more of her patterns! The first one here is a skirt and blouse pattern. I am making the skirt out of some left over wool from a 1940s styled dress, and I haven't decided what to make the shirt out of quite yet. I also got a stunning boat neckline dress pattern with a V back. This dress can be made as an A-line or as a pencil dress, and I am thinking of making the pencil version first. I may make it out of some left over wool from my Bomb Girl Trousers, but that is yet to be decided! I have so many different fabrics that I think it woulds be fabulous in. Another Gertie pattern that I grabbed is for petticoats! This is thrilling, since I have been wanting to make myself a petticoat or two for ages. The more interested I get in 1950s fashion, the more that I need (okay, maybe not need... but really want!) a petticoat to underneath all of the full skirts that I have. The last one I am extremely excited for (okay, I am excited for them all, but this one is pretty good). It is a Sabrina style dress with a pencil skirt and full back. I am planning on making this out of a burgundy silk dupioni. I was originally saving this dupioni for a natural form era dress inspired by Crimson Peak. I still would like to make a dress like that, but it will be out of a different fabric. 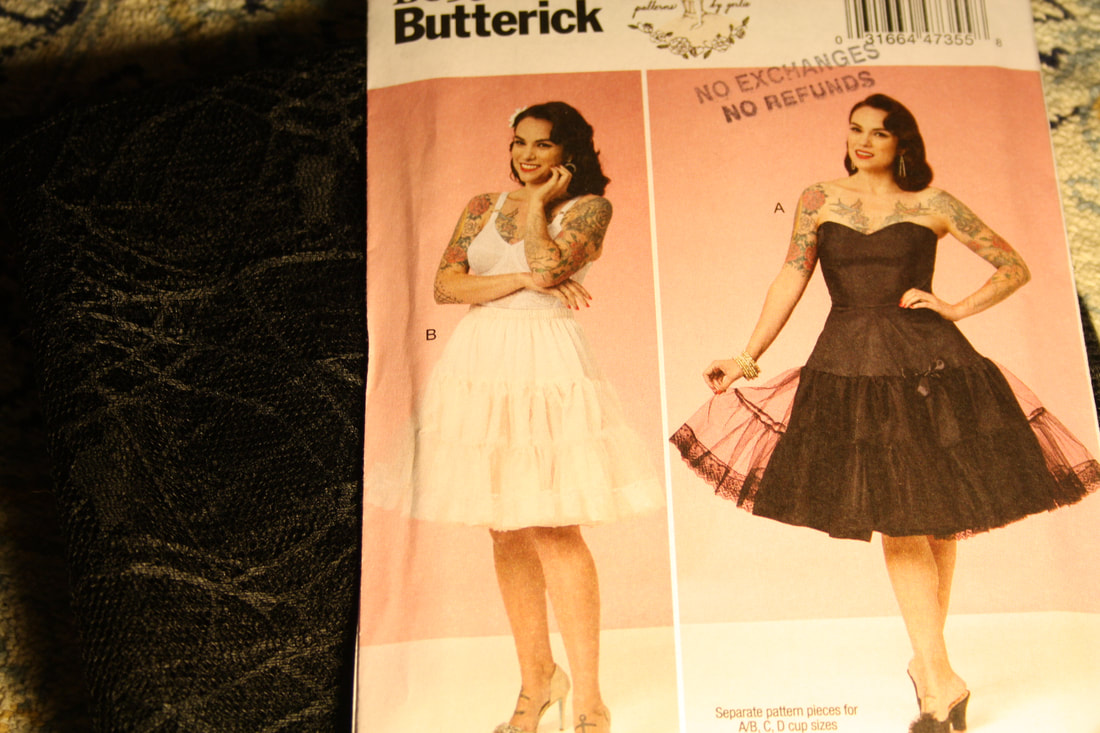 I won't be using this netting for the petticoat (although that would be pretty fabulous), but I think I will use a turquoise netting 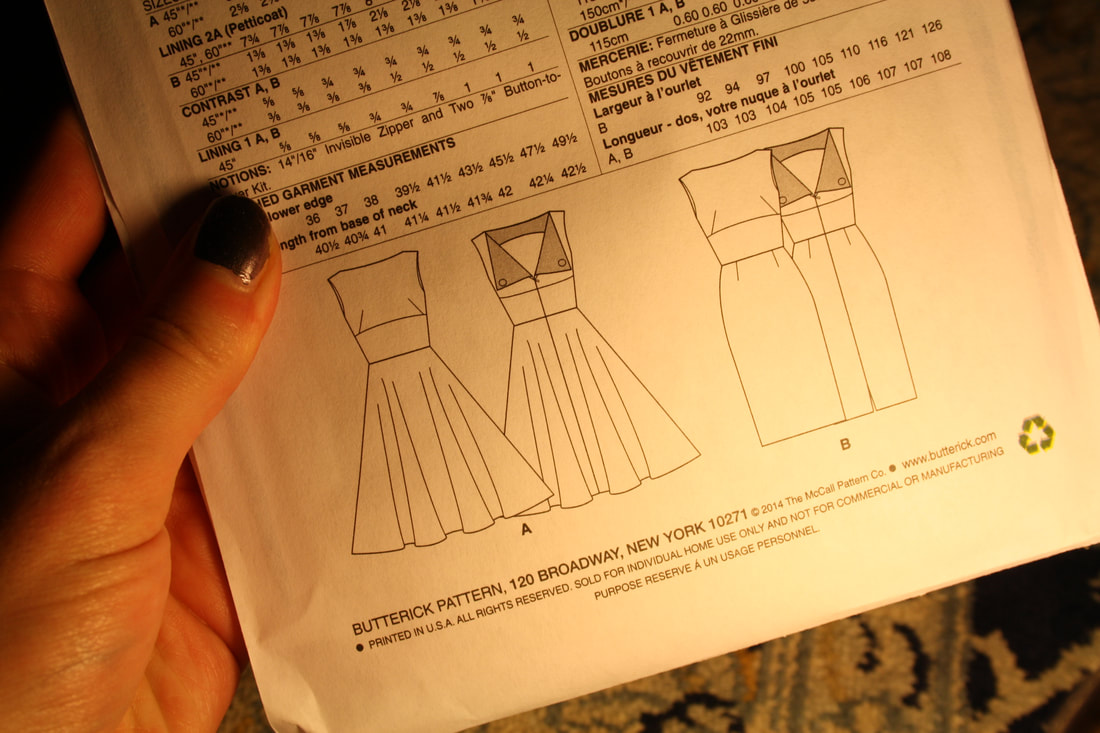 The boat neck dress with V back has options for a circle skirt or a pencil skirt  I am so excited to make this Sabrina styled dress! The last pattern that I picked up is the 1890s pattern from Angela Clayton! I absolutely love her blog and youtube channel, and I was so excited when her first pattern came out. I am hoping to make a jacket for myself with this pattern, and at some point I think I will be needing an 1890s ensemble... 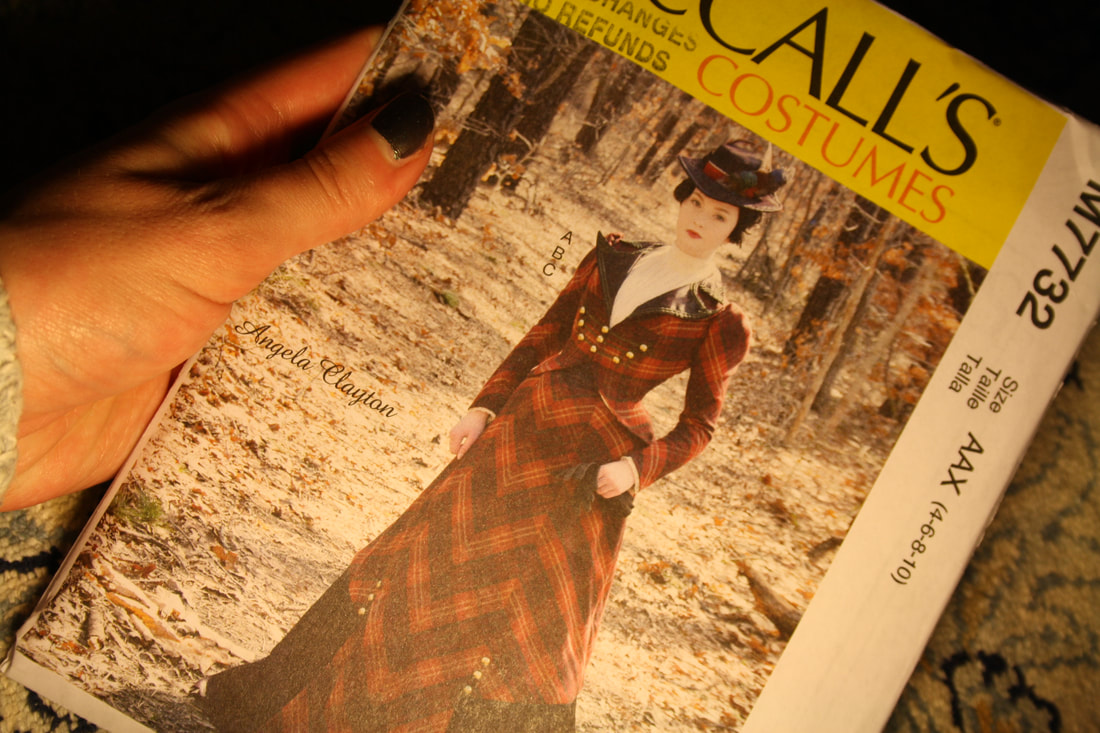 Thank you for reading, and I hope that you are as excited about all of these ideas as I am! ~K
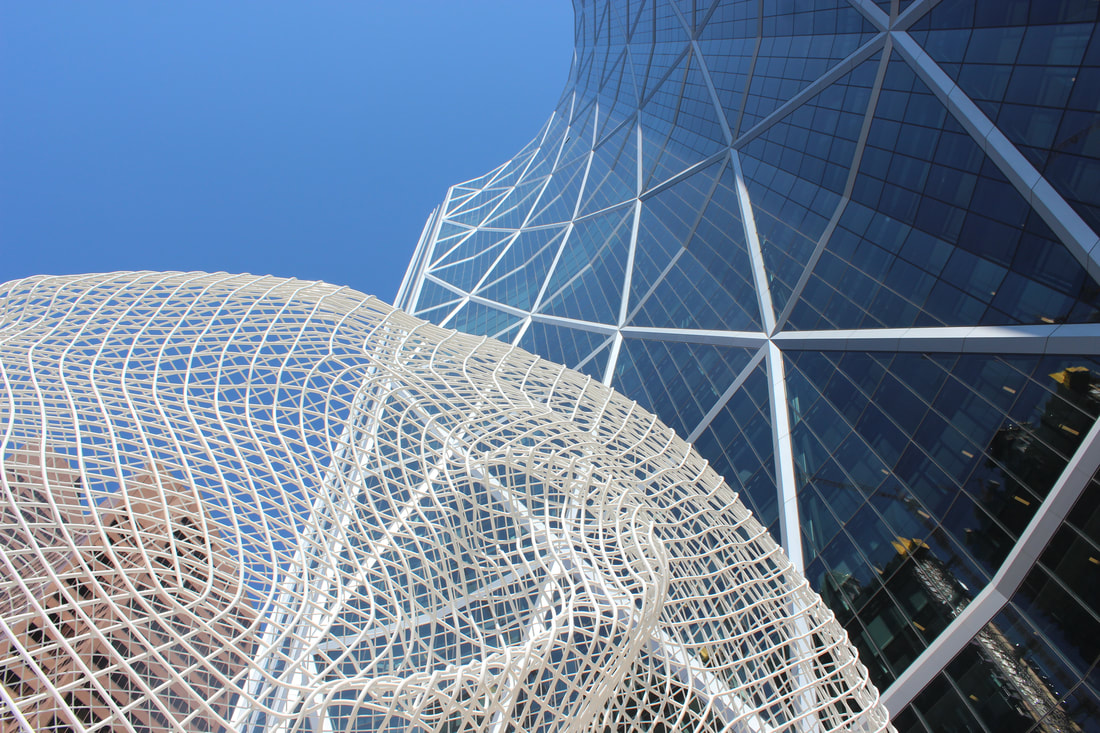 I absolutely love the movie The Man From U.N.C.L.E. from 2015, and I especially love the costumes. The character Gaby, played by Alicia Vikander, has the best trendy 1960s outfits throughout the movie, along with fantastic hair and makeup. After seeing the movie a few times (like I said, I very much so enjoy this movie...), I decided that I needed to make myself a dress like hers. I ended up finding a fantastic vintage pattern by Simplicity, and decided to do a classic coloour block for this dress. I chose green and white because of this dress that she wore in the movie. 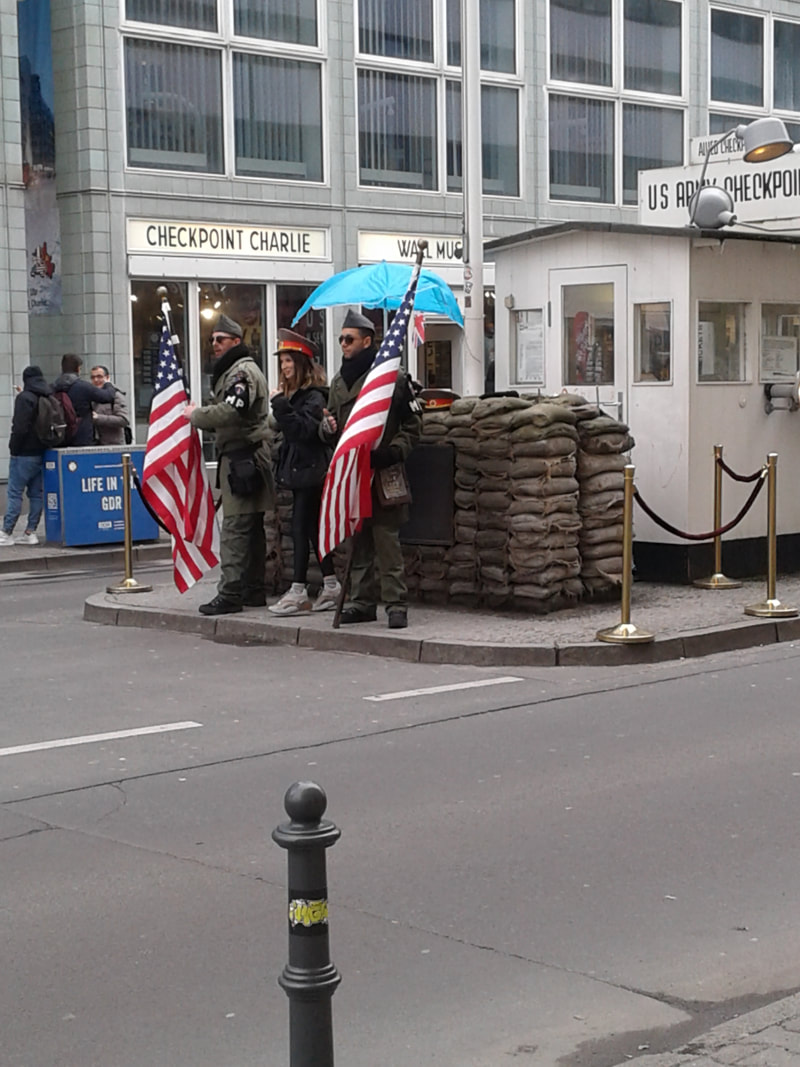 Checkpoint Charlie with the Mauermuseum behind it. The museum looks small from the outside, but it is massive inside and has tons of information! 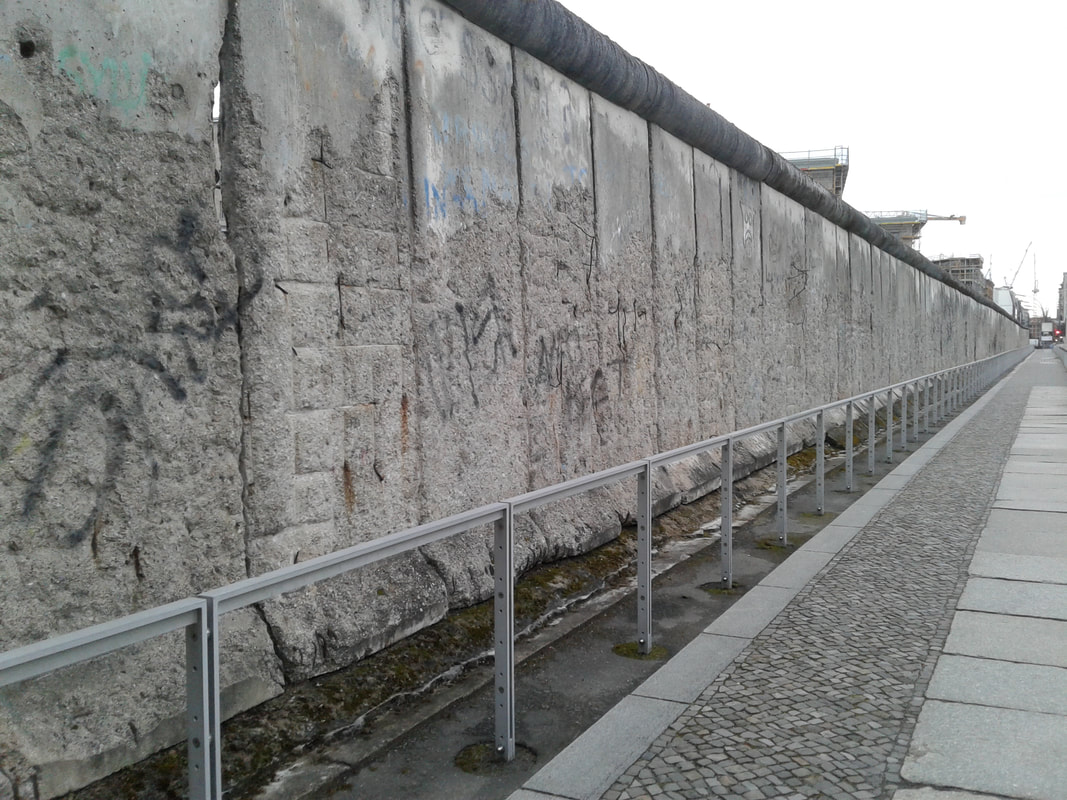 A portion of the wall left standing outside of the Topography of Terror 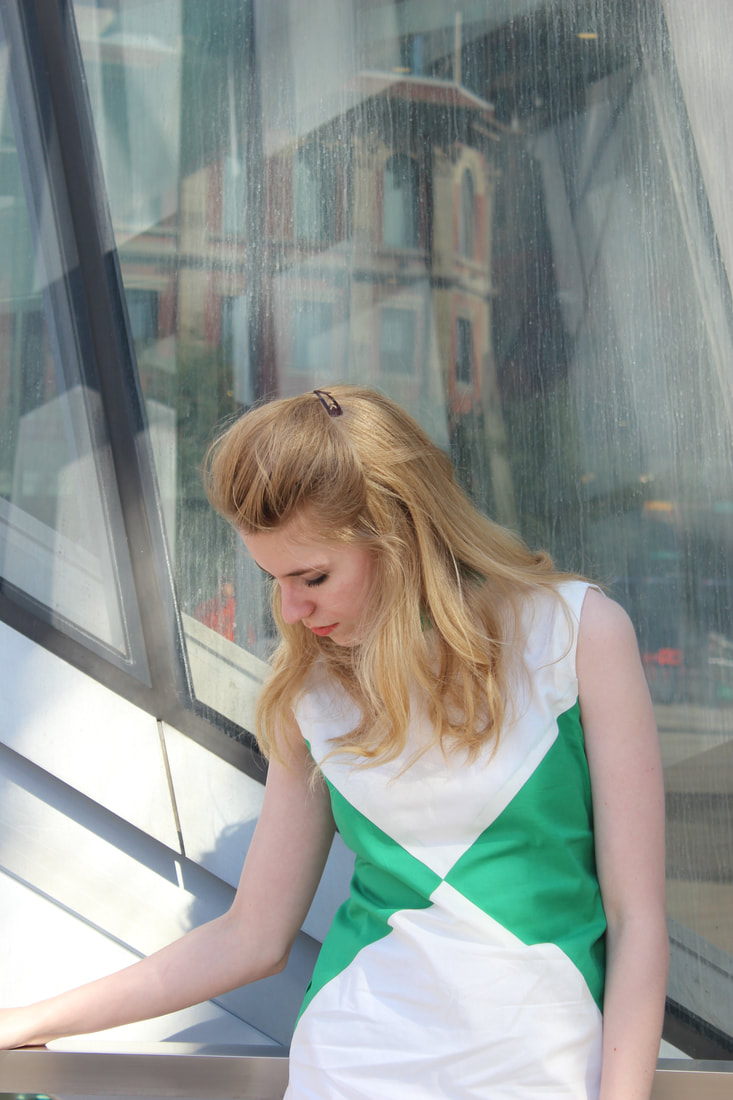 I also wanted to make this dress because of my growing interest in the Cold War. After going to Germany last year and seeing the Mauermuseum (at Checkpoint Charlie), I learnt so much more about the era after WW2, and it made me even more interested in not only the politics of the time, but also the fashion. I also recently found tons of olds family photos of my grandma in the 60's and 70's, and she wore so many beautiful dresses! My grandmother was very trendy, so she was always wearing the newest style! She has tons of photos in Go Go boots and mini skirts. 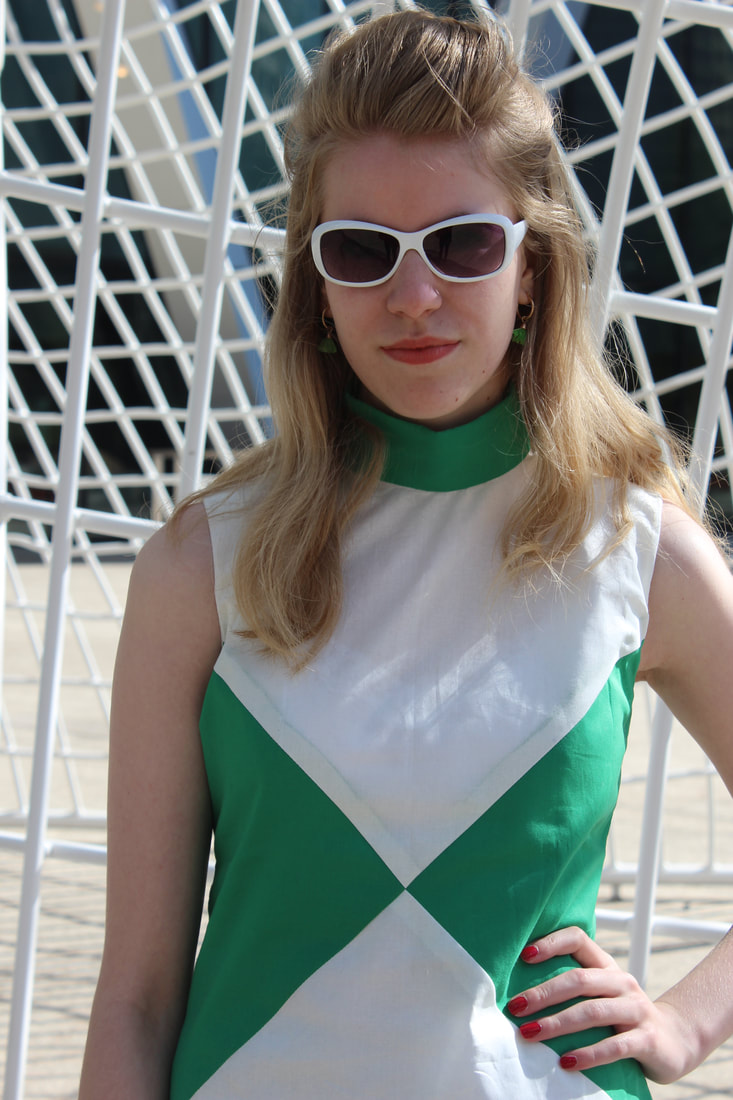 The Cold War is a very interesting (and scary) time, and I was especially interested in learning about the Berlin Wall. The Mauermuseum also has a fascinating history since it was actually set up very soon after the Wall was built. Founded by Dr Rainer Hildebrandt, he thought that it was important to talk about the non-violent fight for human rights. He chose to talk about that directly beside an affront to human rights. The museum grew as the Wall stayed up, and has been updated to include what happened after the Wall fell, as well as more recent genocides and affronts to human rights. 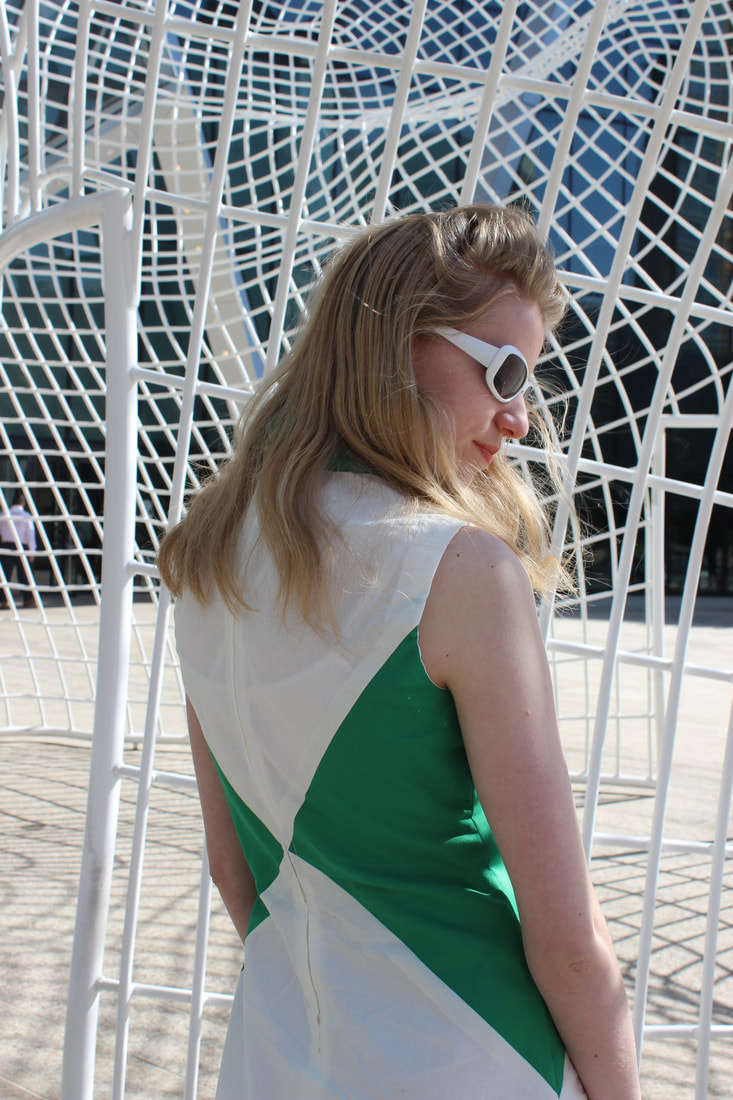 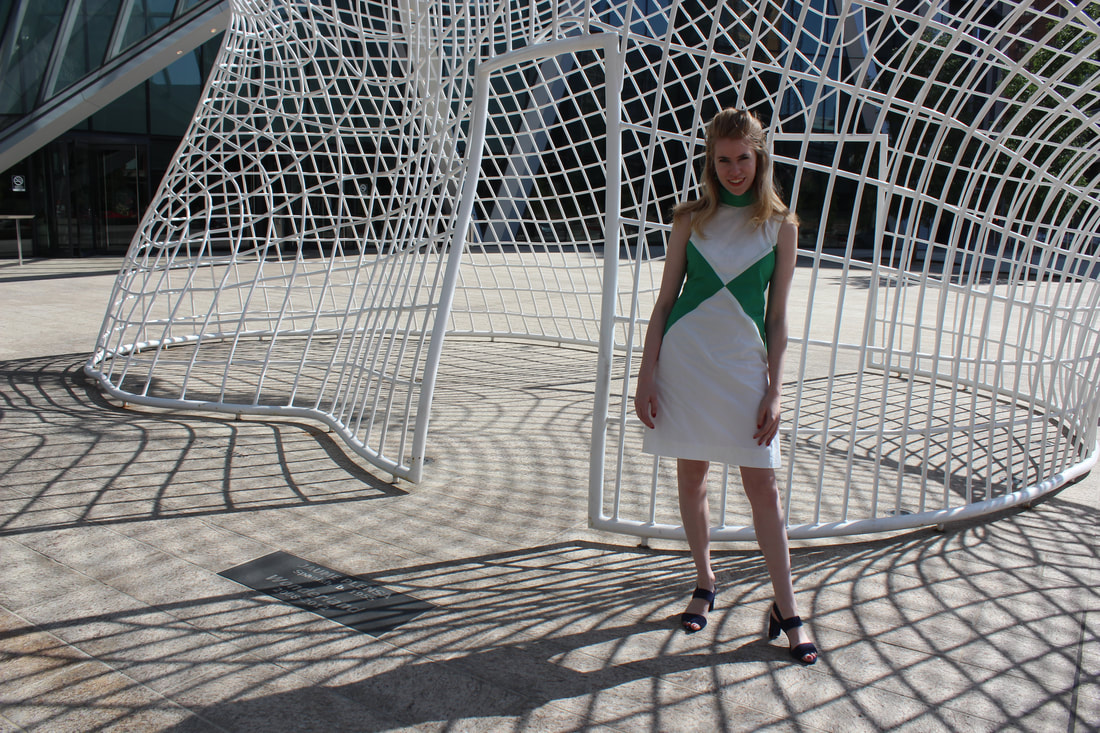 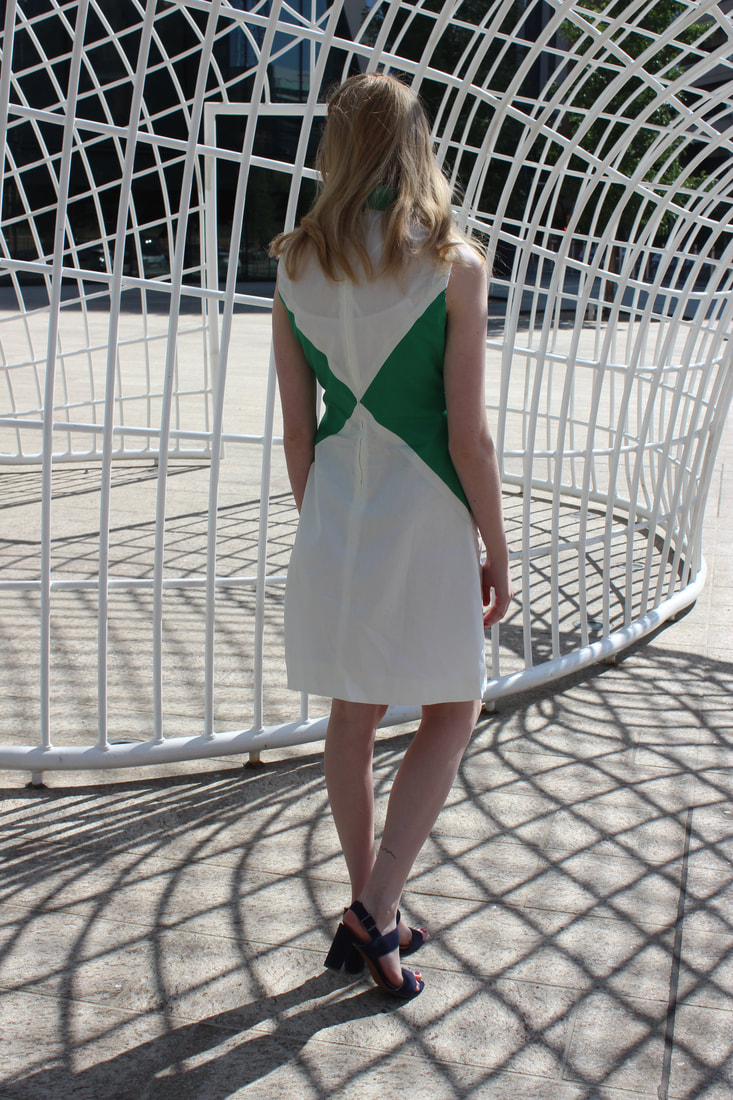 The museum has many artifacts such as cars, a hot air balloon, and a mini submarine, that show how hard people worked to get rid of the wall, and to get around (or through) it. Many people helped East Germans escape to the other side, and there are so many brilliant stories. 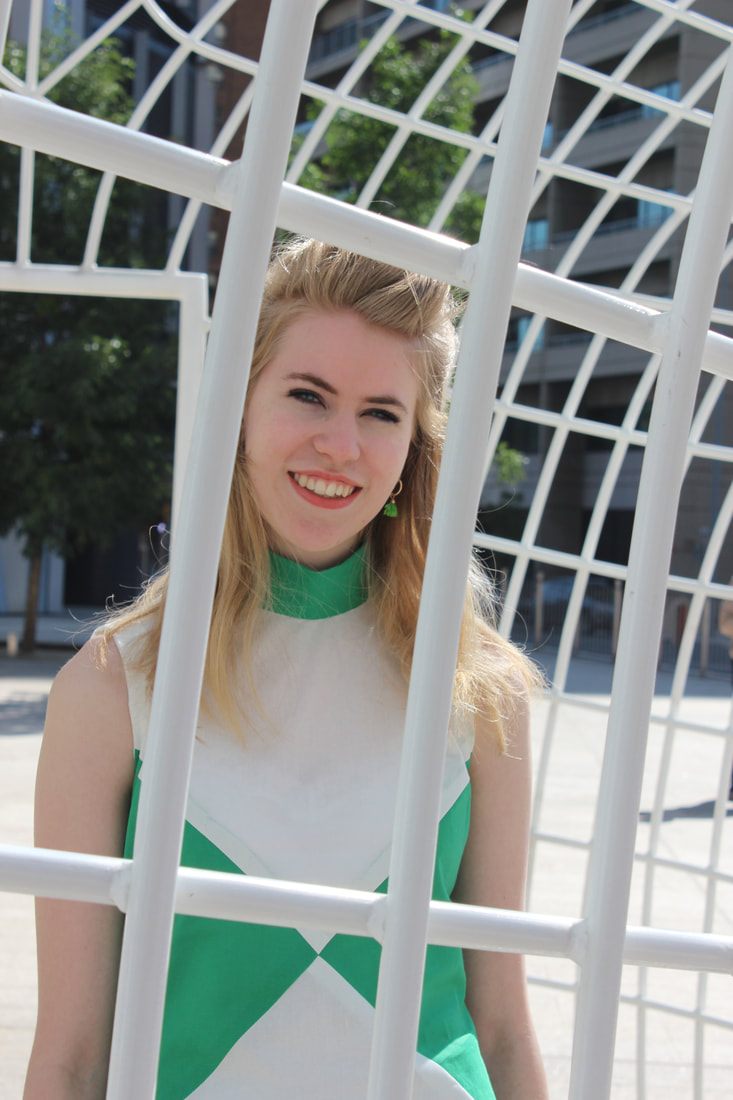  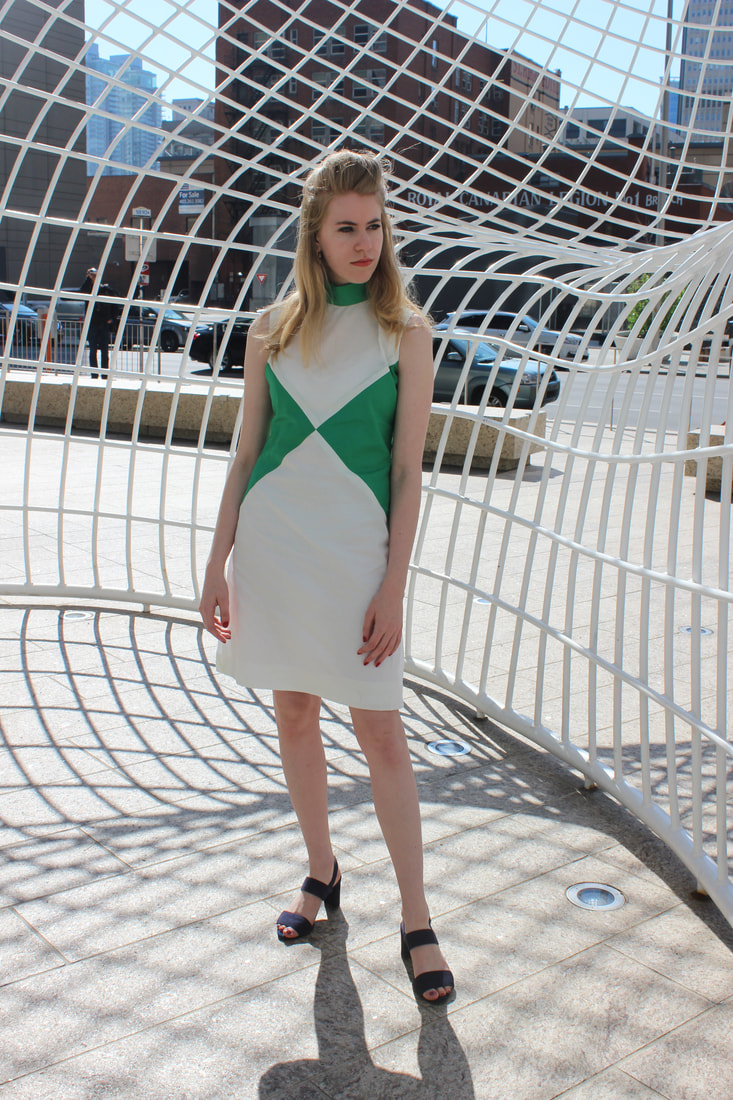 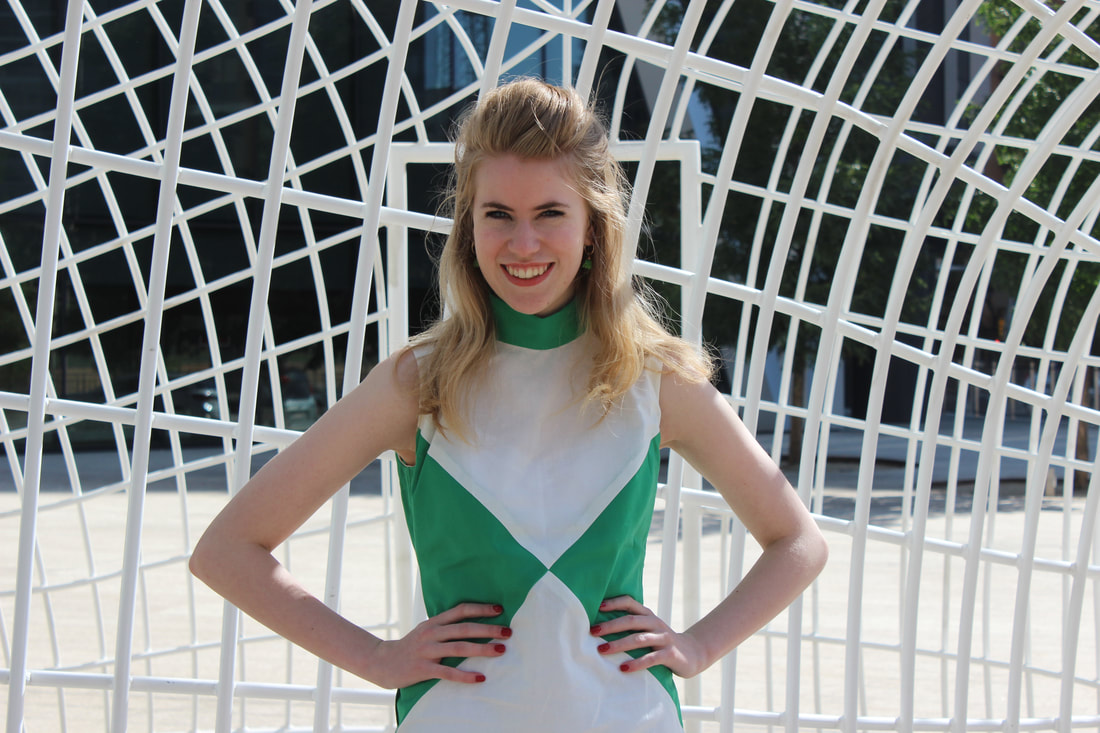 The building of the wall started on August 13th of 1961 by the GDR (German Democratic Republic, which is East Germany). The people living in the GDR had been revolting for a long time. At the end of the WW2, the US, Britain, and the Sovient Union split Germany. The country was split into 3 zones with Berlin in the Soviet section. Berlin was also split into zones, with the US, UK, and France taking the West side of the city and Soviet troops controlling the East. When the tensions arose between the countries, the Soviets decided to block off the roads, rails, and water access to West Berlin. Starting in 1948, they hoped that the other countries would be forced to give their section to the Soviets. The response by the UK and US was to airlift food, fuel, and water into Berlin from airbases in Western Germany. At the height of the airlift, planes were landing every 45 seconds at the Templehof Airport. By 1949, they had won this crisis and the blockade was lifted. In 1953 the people of East Berlin had a revolt that was stopped with Soviet tanks. The Soviets struggled to keep their side of Germany because of their cruelty and lack of supplies (East Germany was starving).  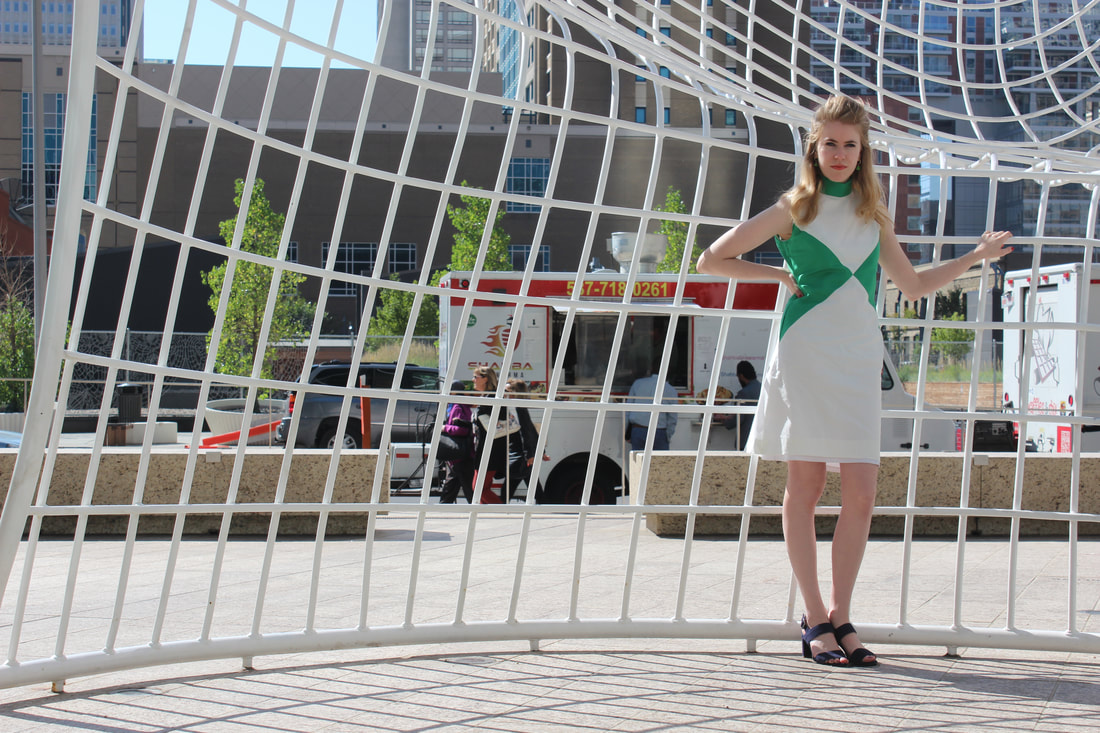 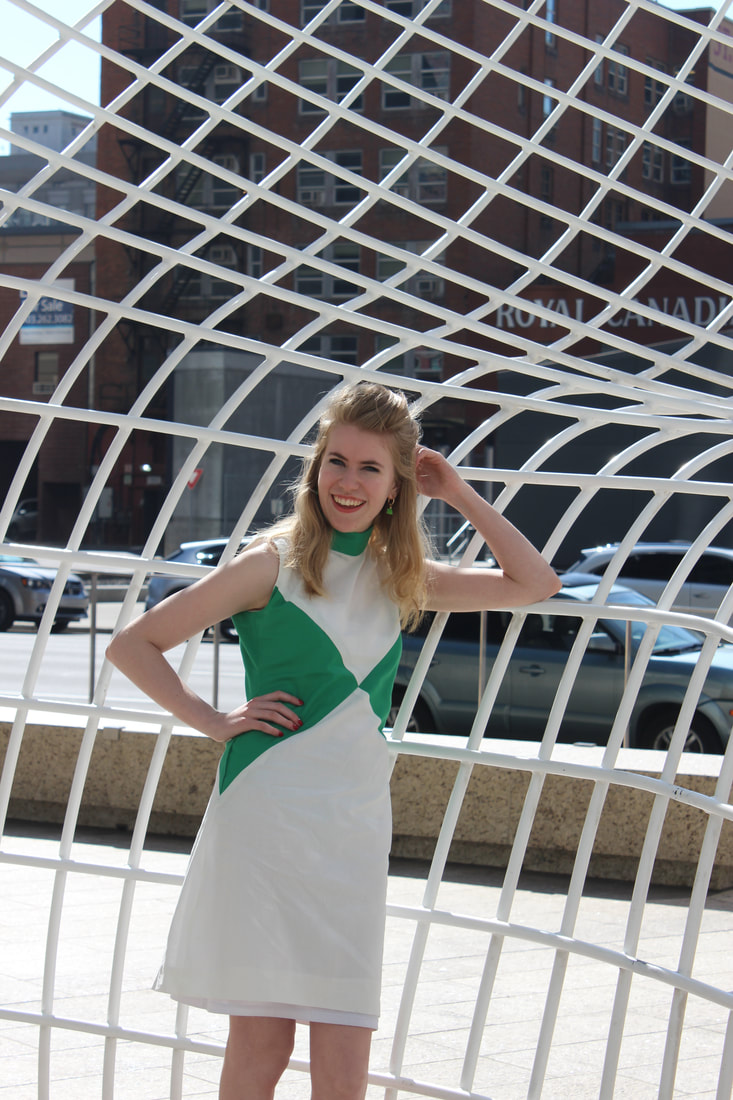 Checkpoint Charlie is the most widely known checkpoint between East and West Germany. Many demonstrations were held there, and there were many successful escape attempts there. While the wall was up (between 1961 and 1989) more than 5000 people escaped across the Berlin Wall. The longer the wall was up, the harder it was to cross. One woman was smuggled out in the seat of her boyfriends vehicle (the cut a hole for her to sit literally inside the seat, and she almost suffocated in the small space). People also got through in speakers, over on hang gliders with a Trabant motor, with hot air balloons, as well as under in tunnels. The most successful break through was in a tunnel when 57 people made it through in two nights in 1964.  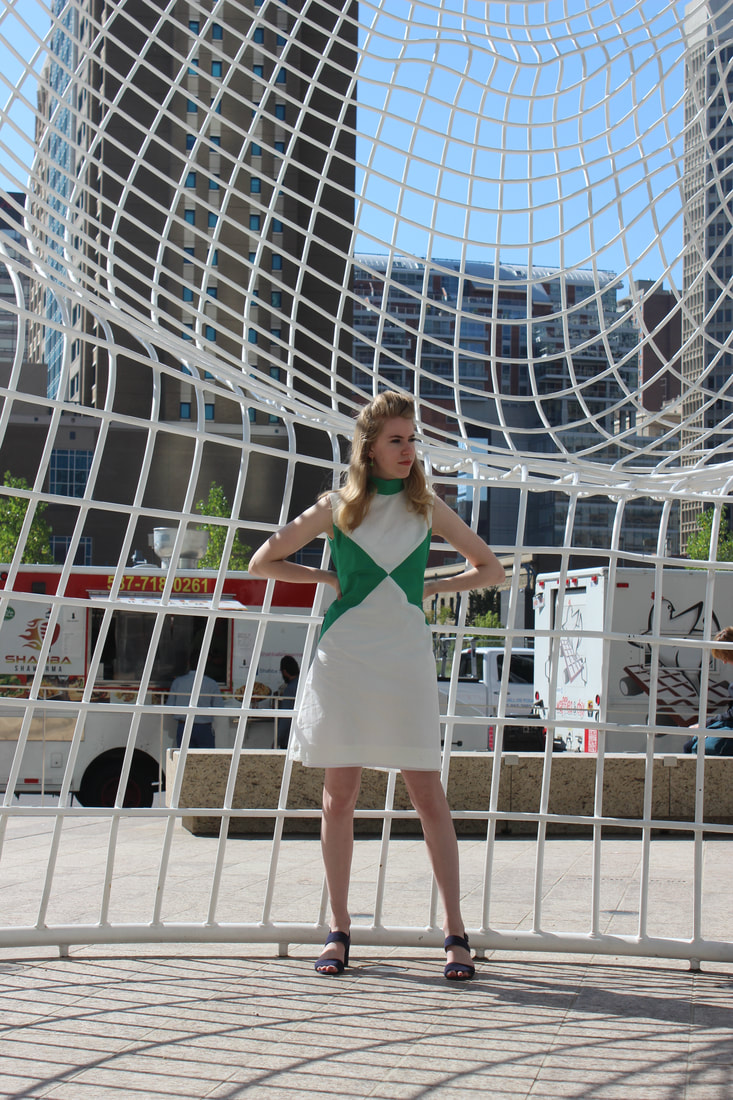  There were also many unsuccessful attempts, and many people died trying to get to West Germany. In 1962, a man named Peter Fechter bled to death. He was shot by Soviet guards and after 45 minutes of agony with no help, passed away beside the wall. This started a huge protest when onlookers could see and hear him, but were unable to help because he fell onto the wrong side of the wall. 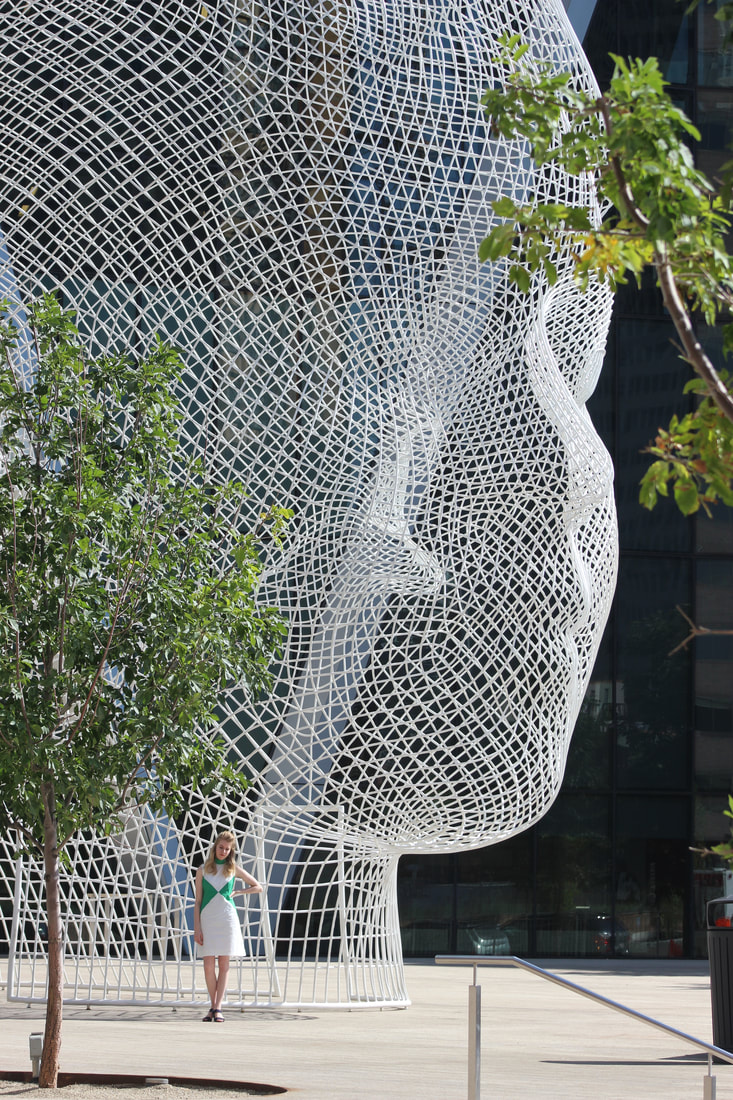 I think that this is a hugely important part of history to learn about, especially since it is so close to us (the wall was only taken down on Novemeber 9, 1989).  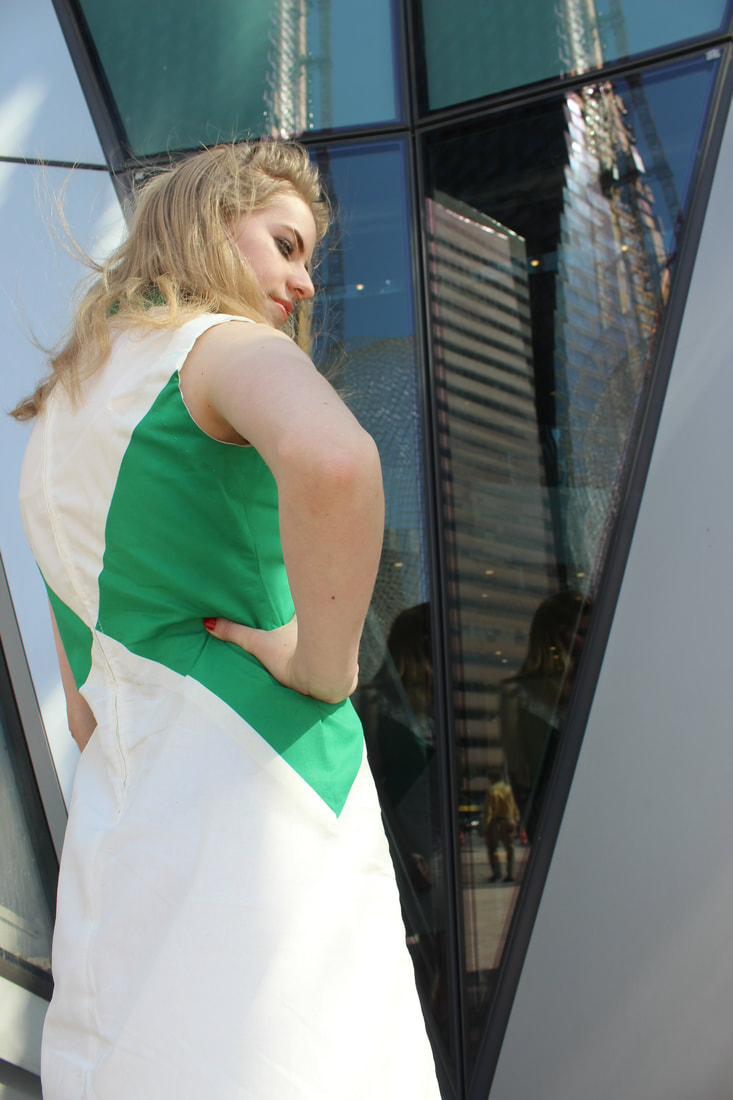 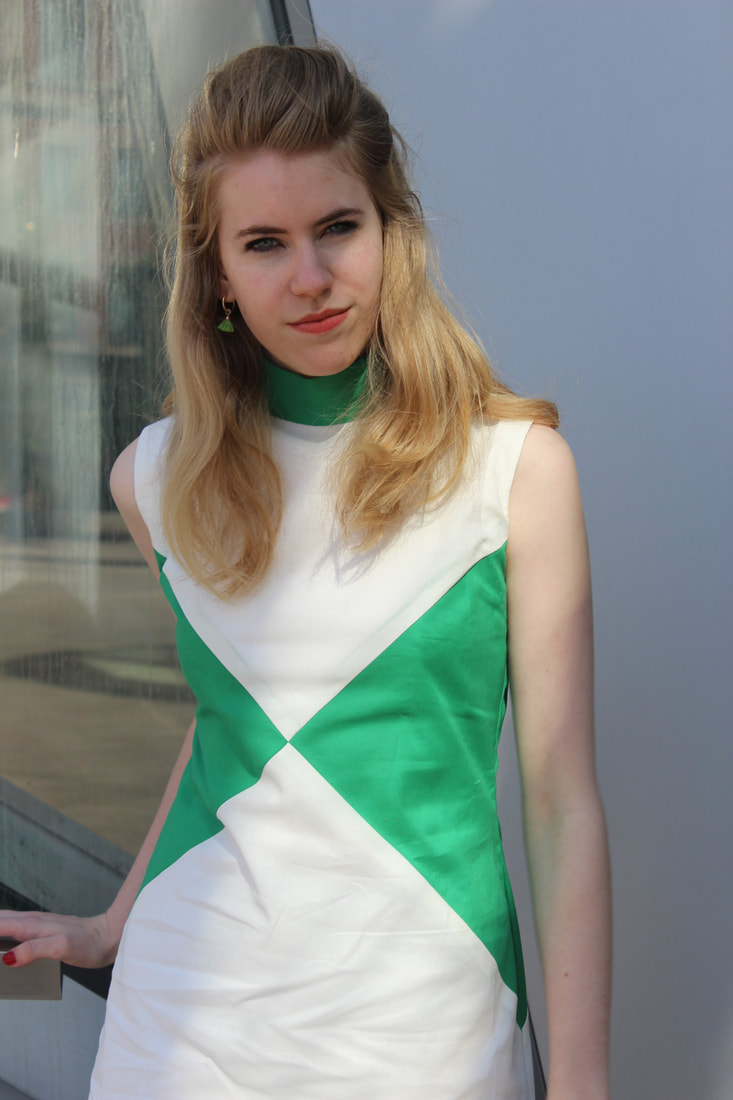 To learn more about the Wall and its history, the website for the Mauermuseum is here. You can also hear more about the Berlin Airlift through this website here. Some other movies and books about the era that I found very interesting are Bridge of Spies (with Tom Hanks), Stasiland: Stories from Behind the Berlin Wall by Anna Funder, Wings of Desire (released in 1987), and The Spy Who Came in From the Cold by John le Carre. If you have any more to add to the list, let me know! 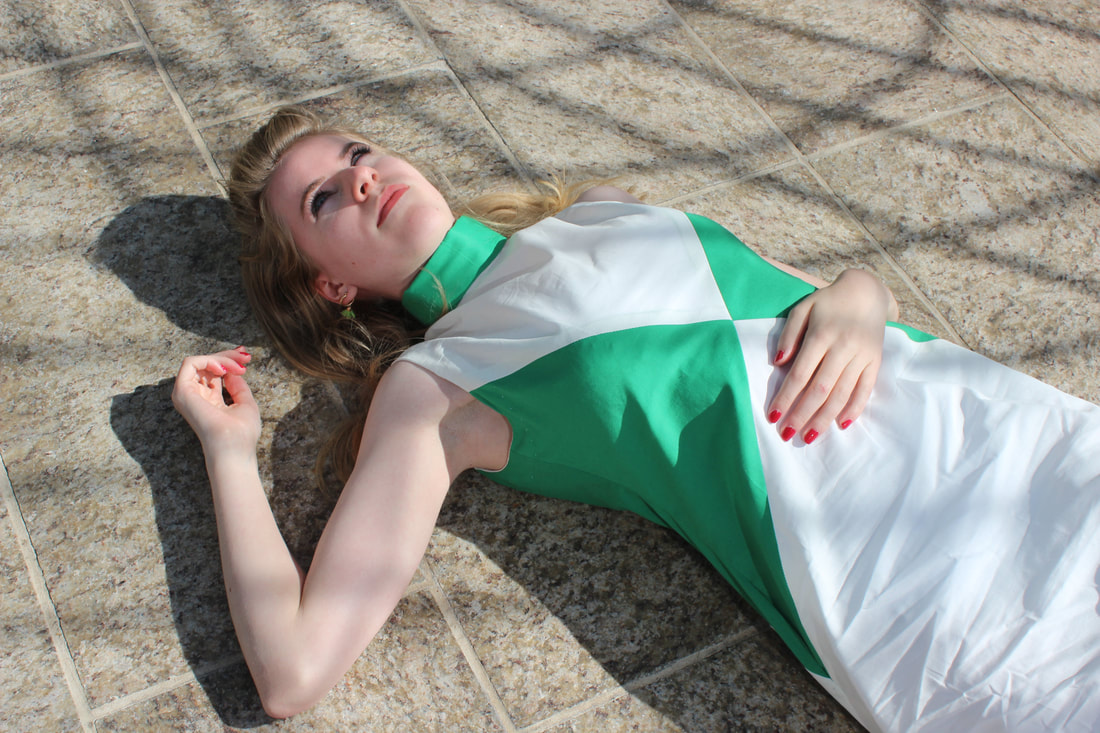 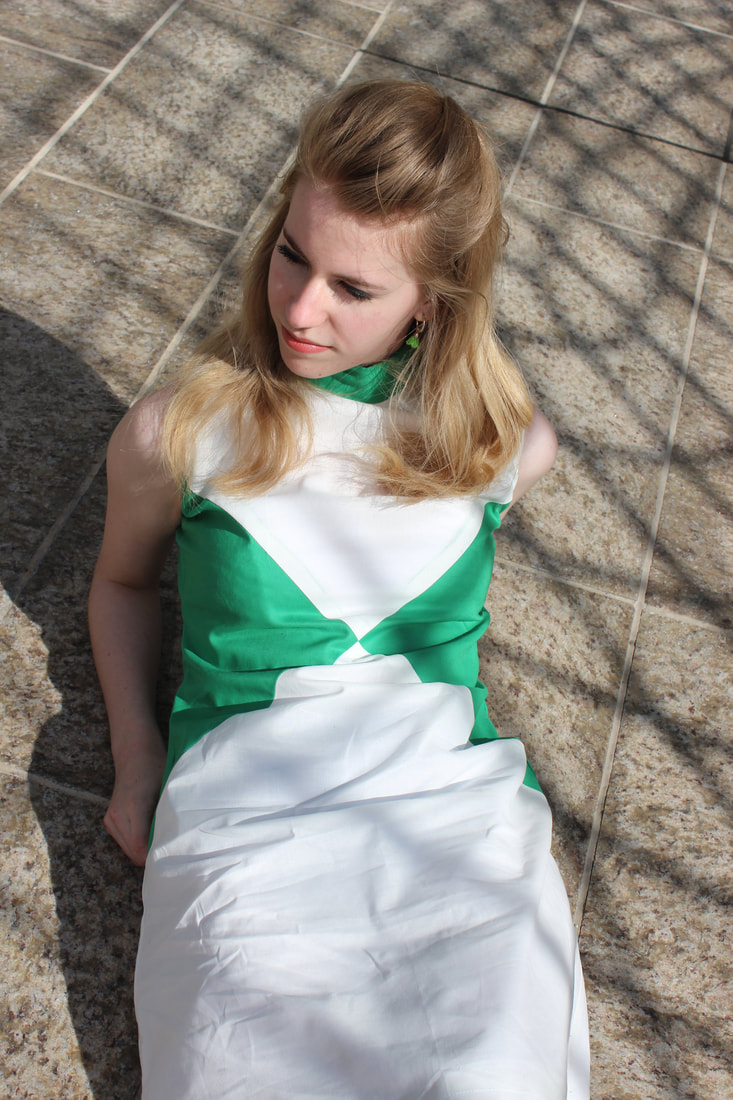 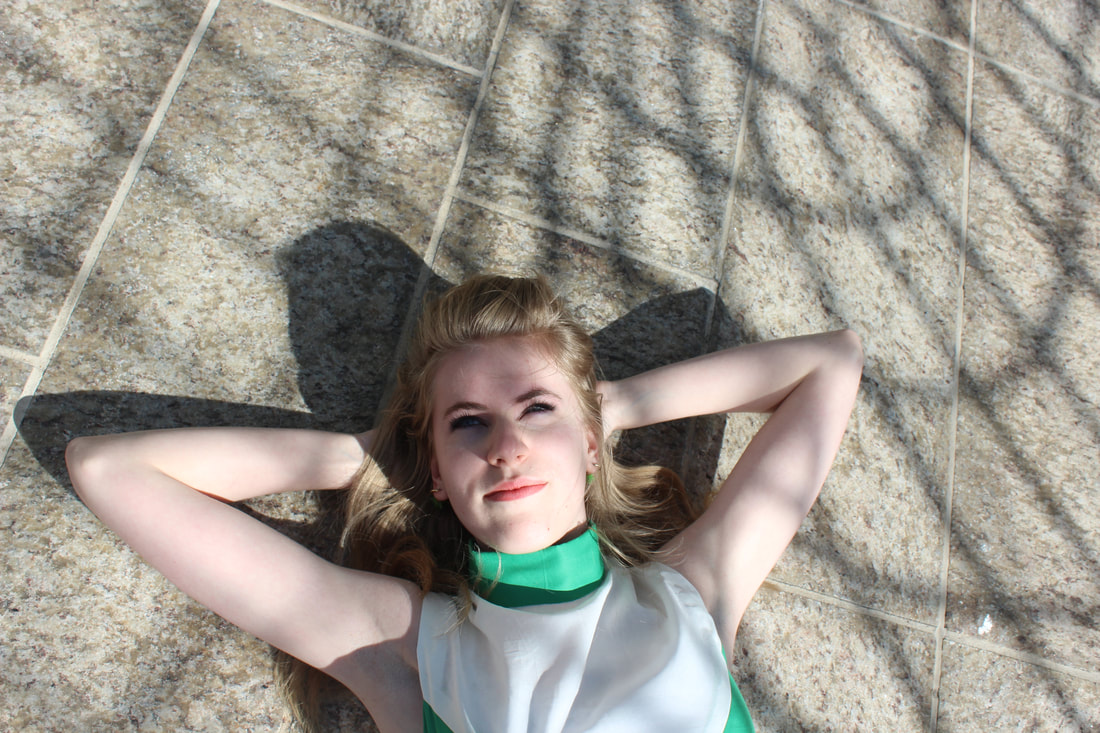 ~K The photos are taken at the Wonderland Sculpture (which us locals call the Big Head... creative, I know) outside of the the Bow Building. 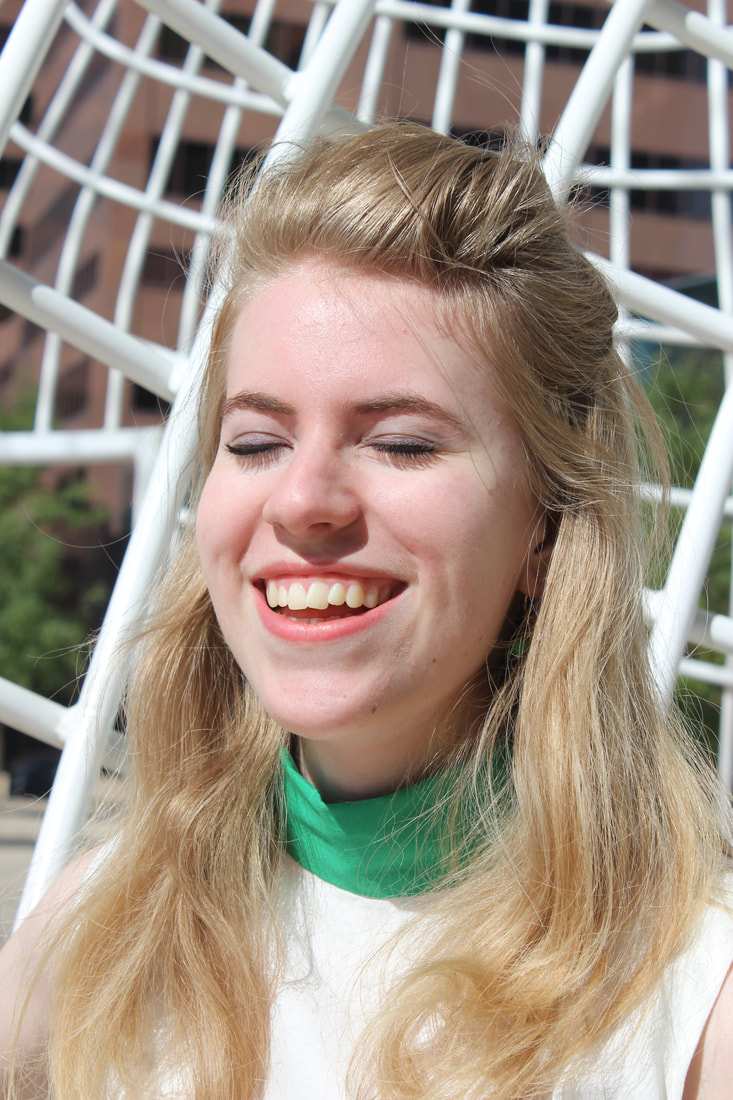 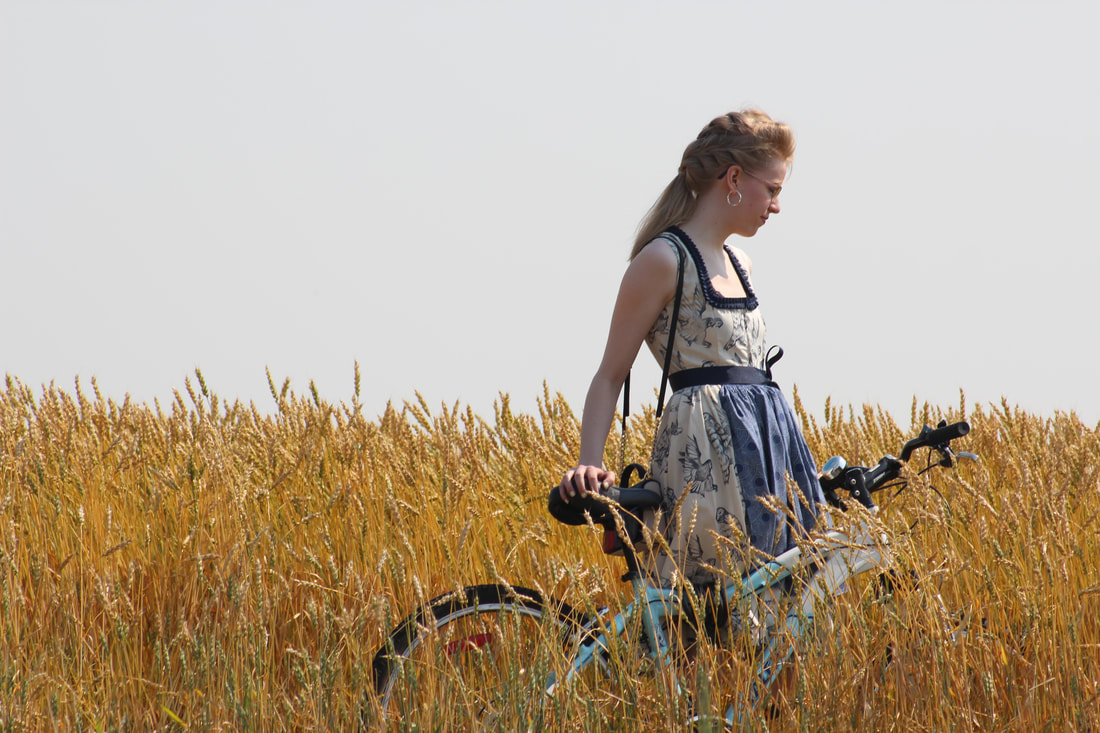 After making my last dirndl (made using this pattern), I liked wearing it so much that I decided to make another, just with a few different details. 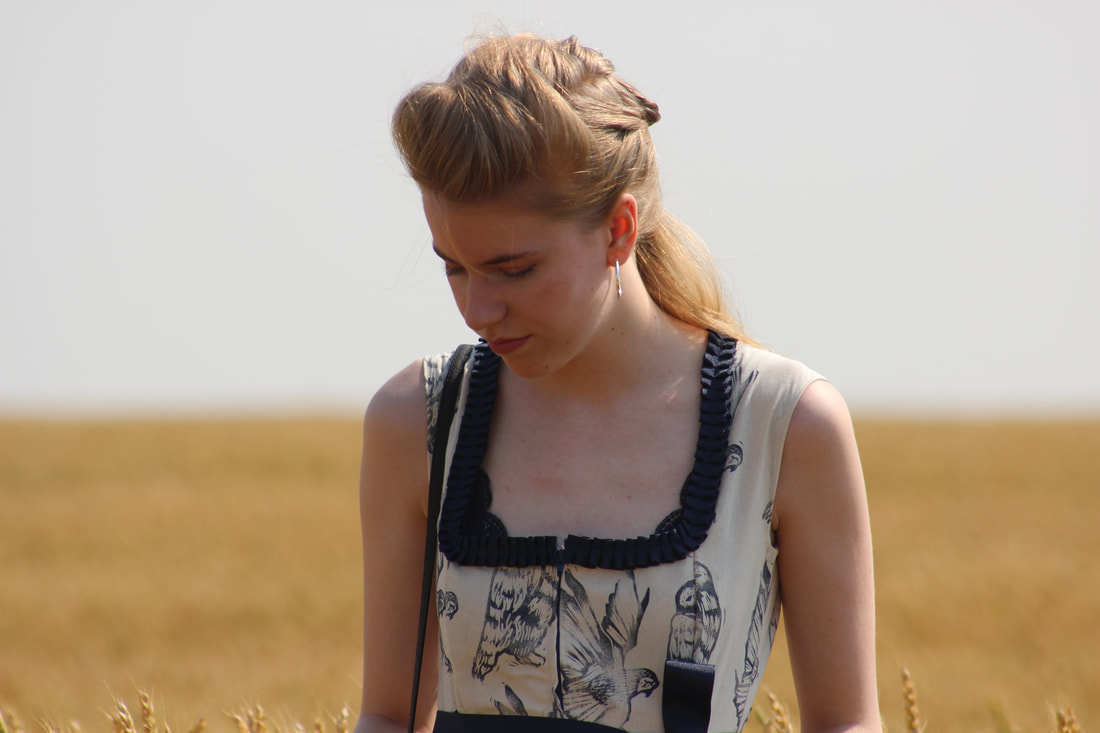 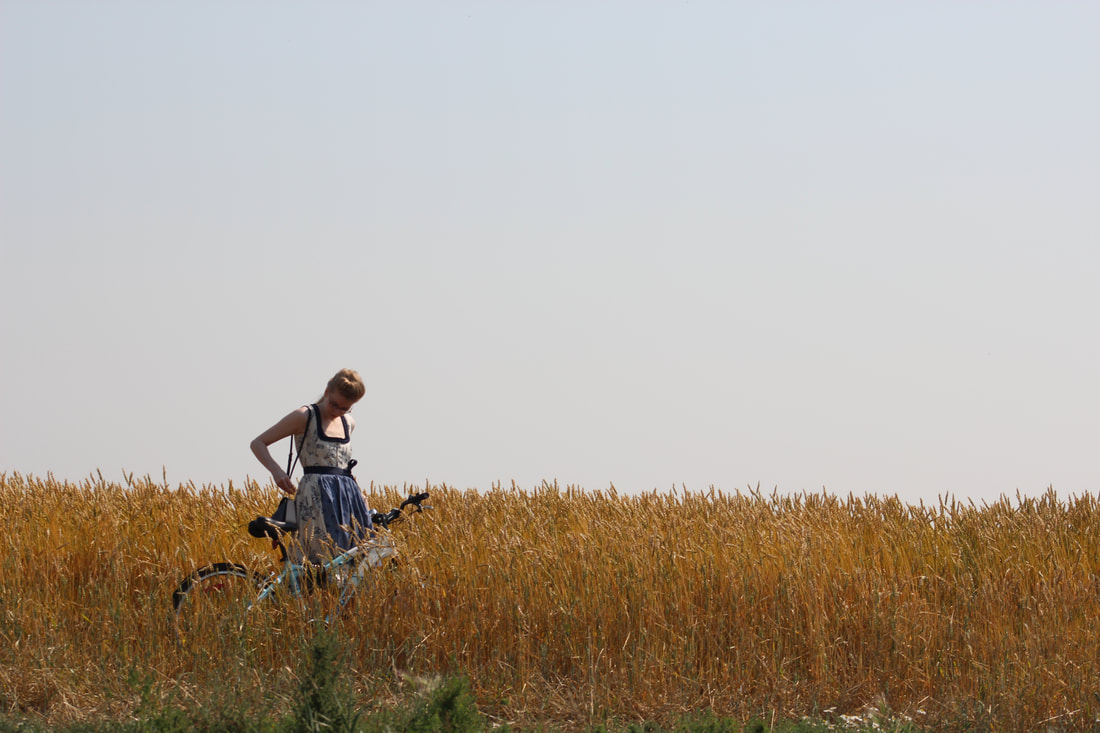 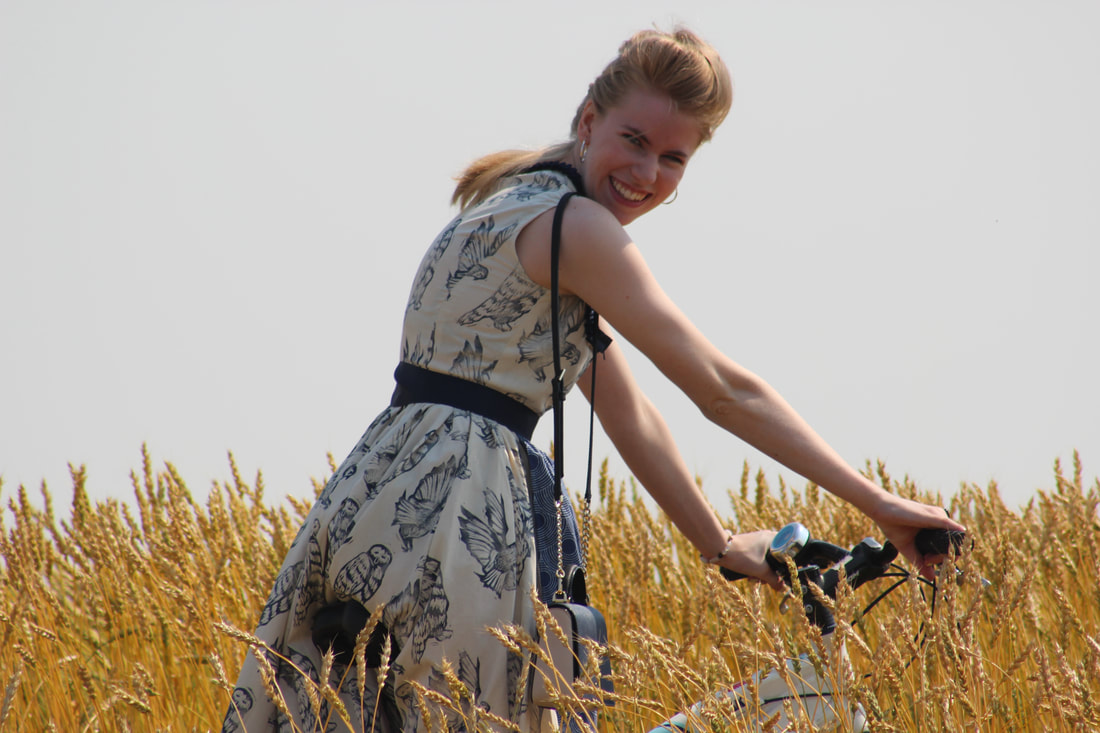 The print is my own on muslin, three different owls with a navy fabric ink. There are so many beautiful dirndls, with different necklines, skirt lengths, and trims. One of my favourite trims is box-pleated ribbon, so I decided to do that one this one. I also took away the bottom ruffle, the sleeves, and shortened the skirt a bit. I decided to take the sleeves off to give the option to put blouses under (very common in classic dirndls so you have the chance to change the look, as well as make sure that you don't have to wash the dirndl too often, just the blouses). At some point I would like to make a lace blouse to put underneath as well. 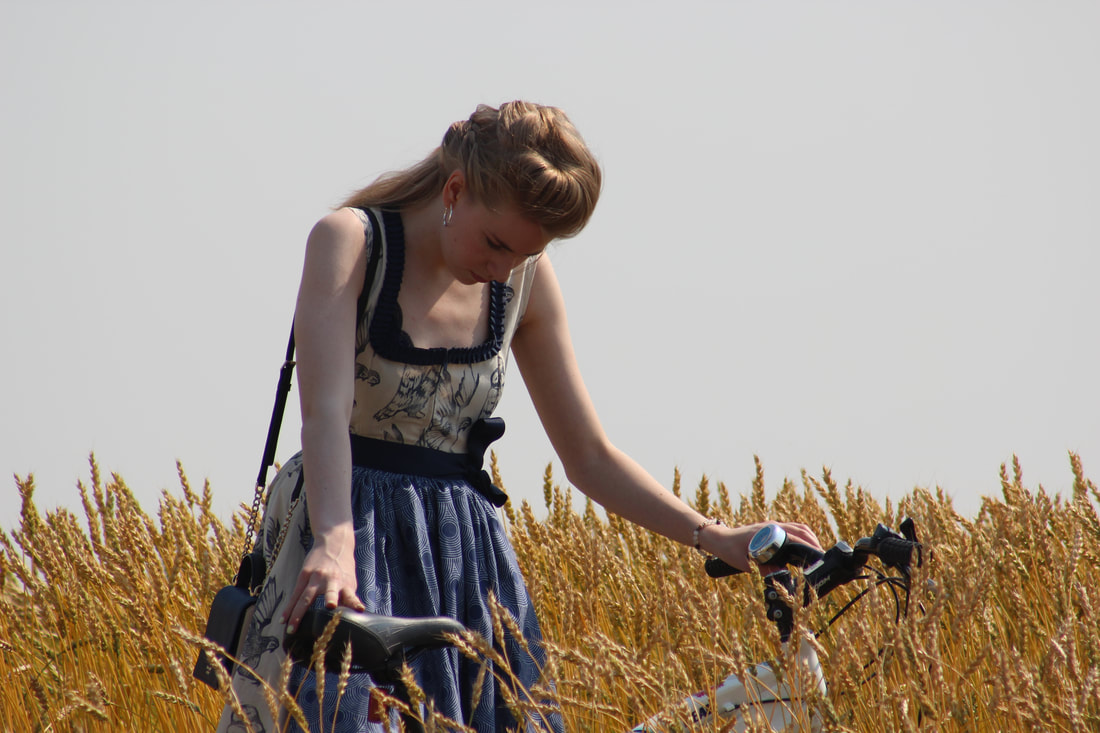 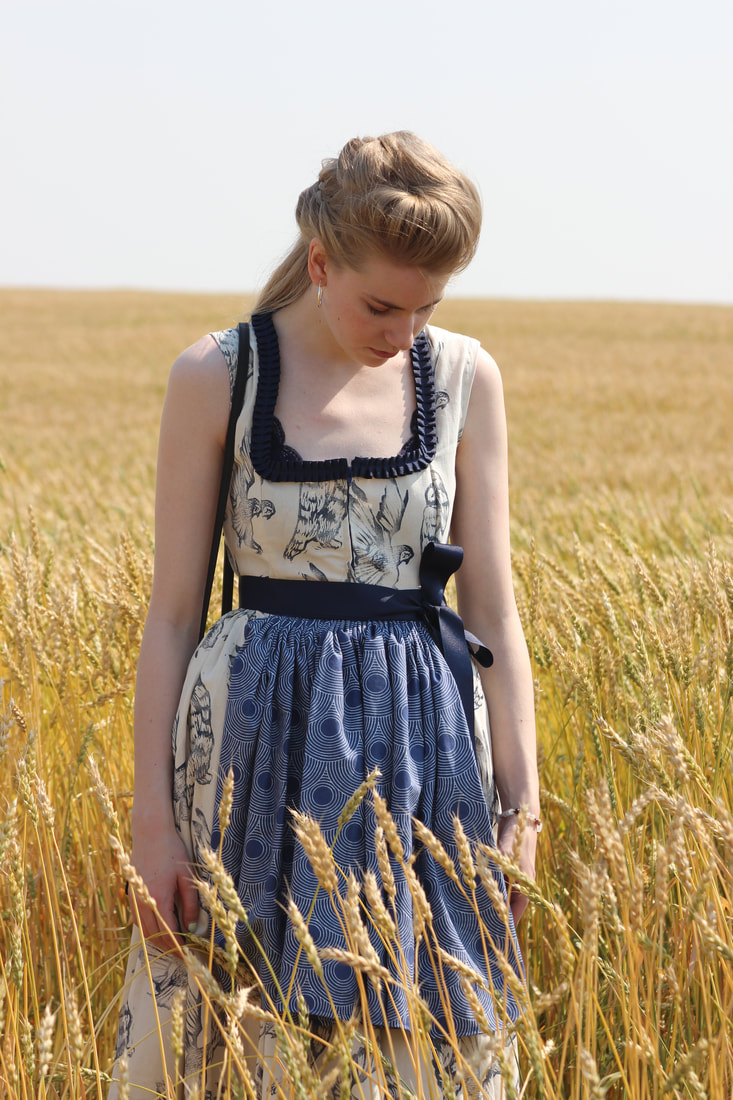 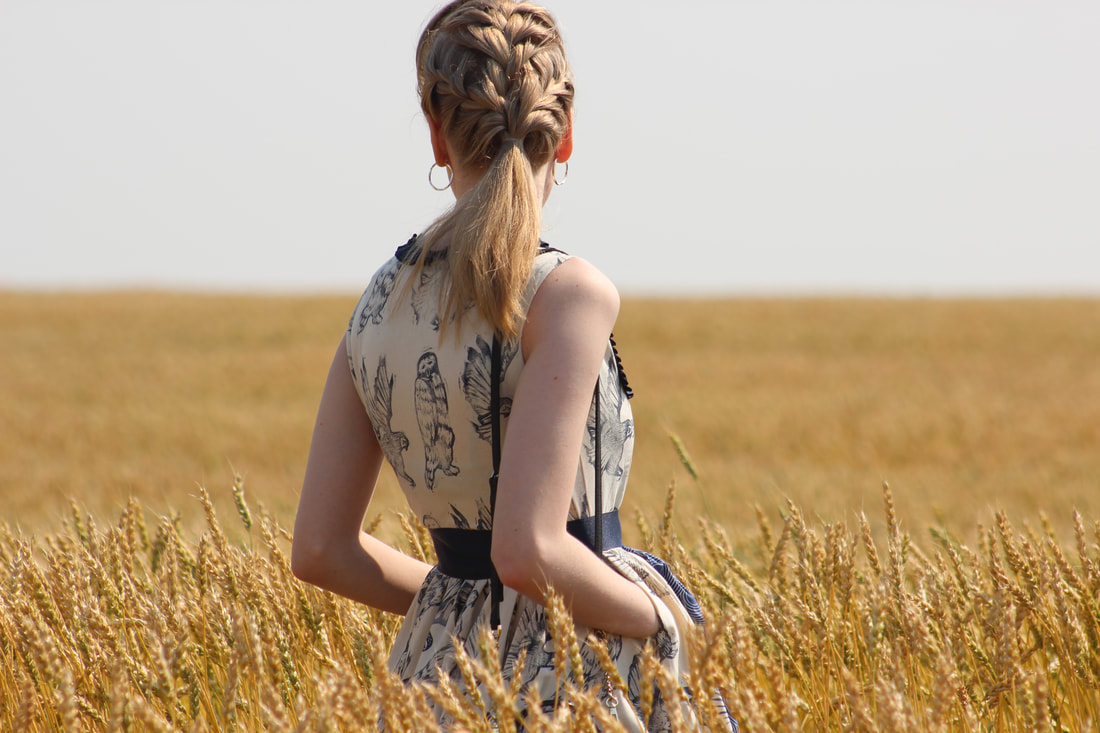 I also made an apron to put with the dirndl. I chose a wide ribbon that matched the one on the neckline for the waistband, and cartridge pleated quilting fabric. Cartridge pleating is one of my favourite ways to gather fabric, I love how much volume it gives as well as the way it looks (very neat and tidy!). I based this dirndl off of many examples that I saw while in Germany. 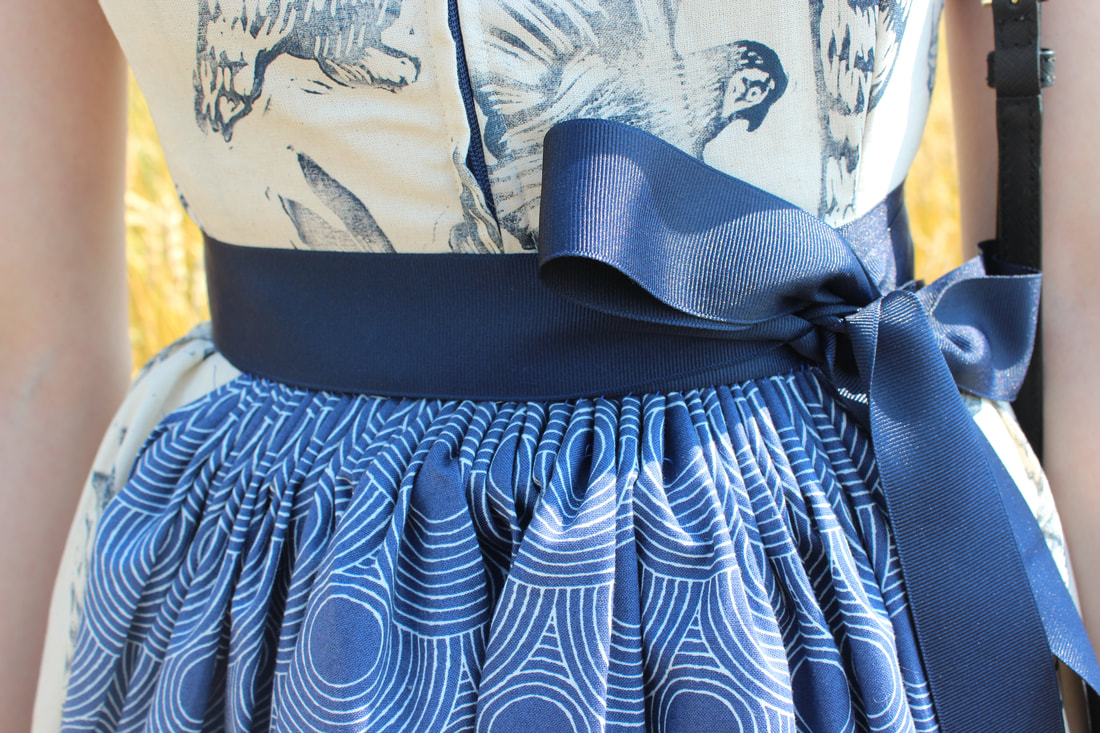 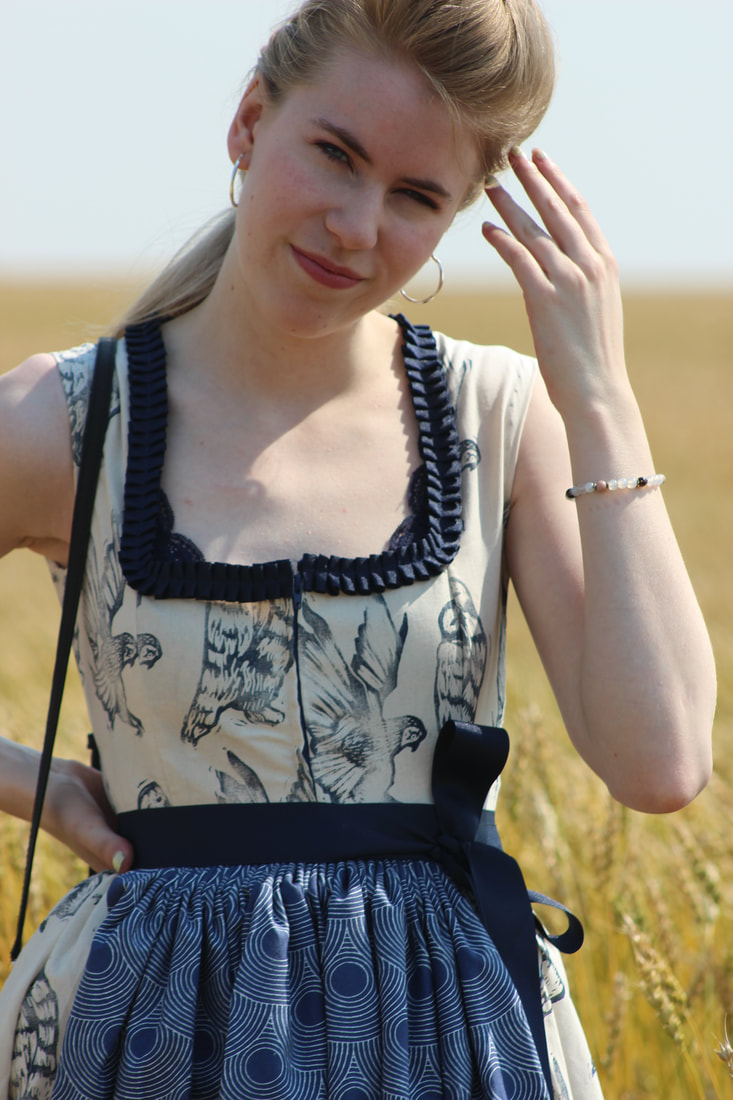 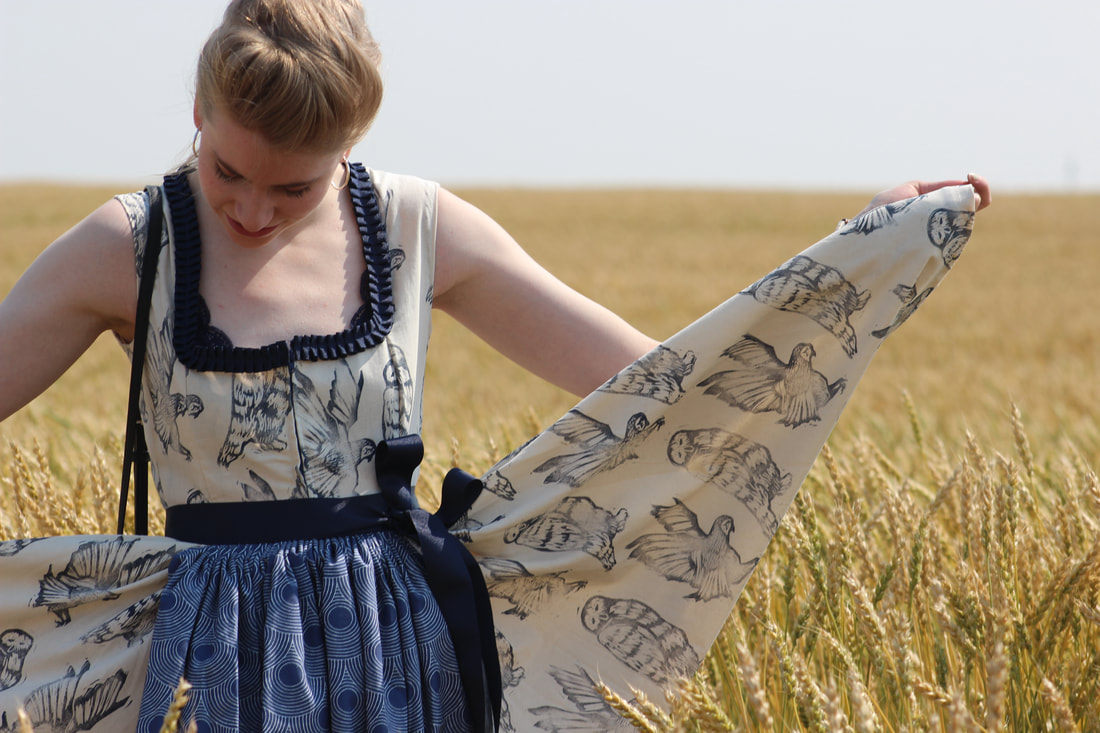 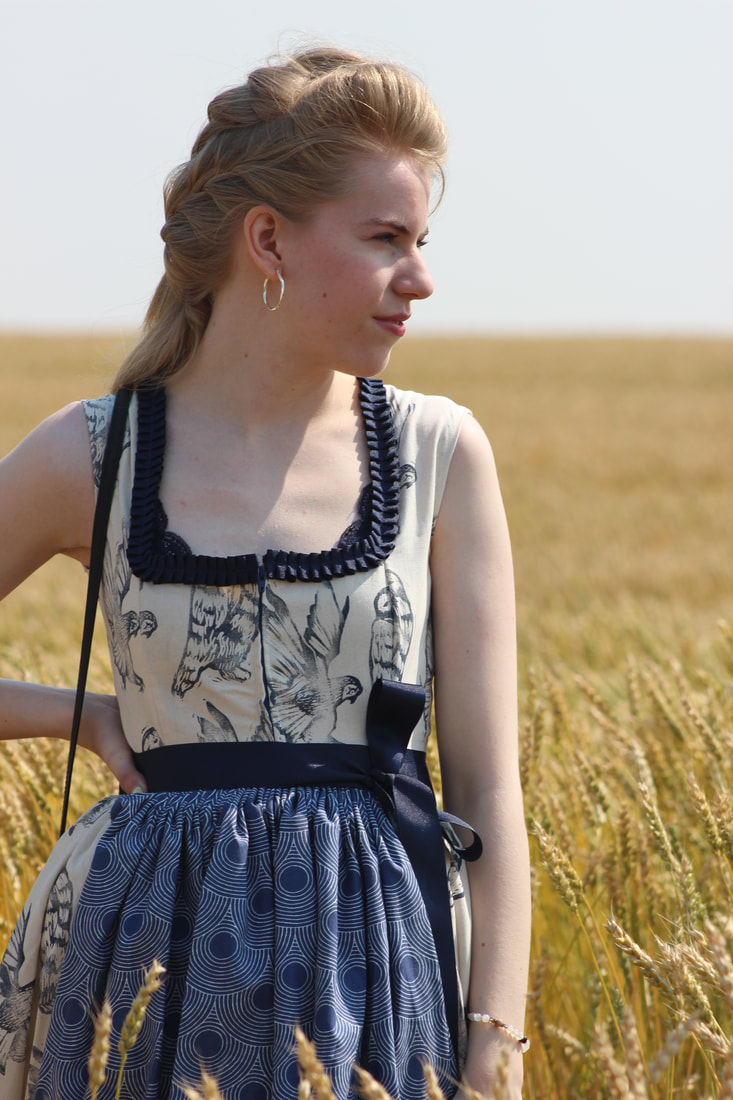 When visiting my family in Wettmar, they had a video of the people living there in the 1950's. The video was just a home video of real life in Germany in the 50's and 60's, and lots of the ladies who were doing yard work and house work were wearing dirndls! There was tons of variety of fabrics and styles that they wore, and every age wore them (except for some of the fancier girls who were wearing pencil skirts and heels). I loved this, and wanted to make a bit of a contemporary version for myself by making my own print. 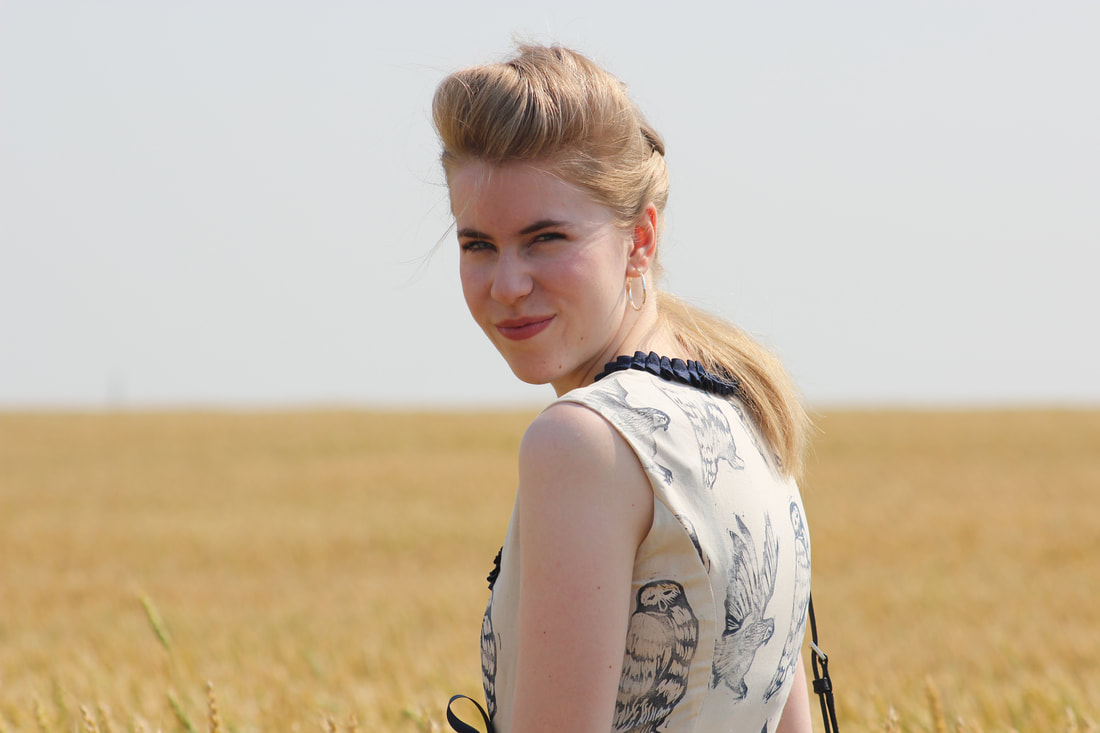 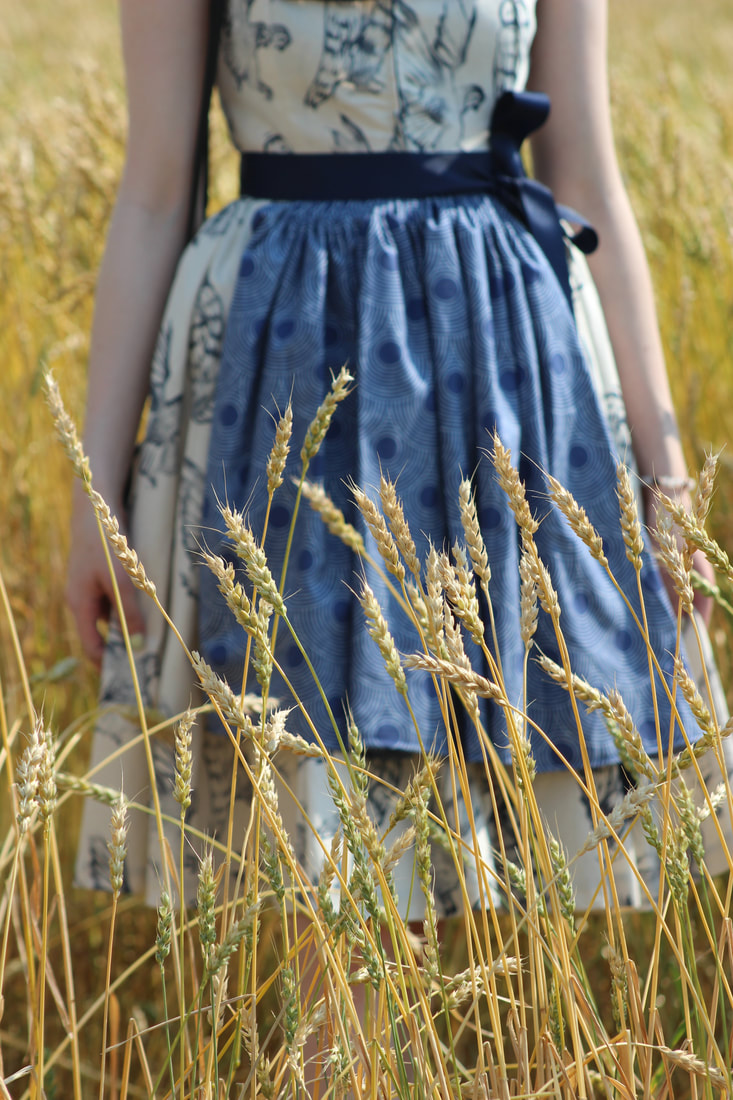 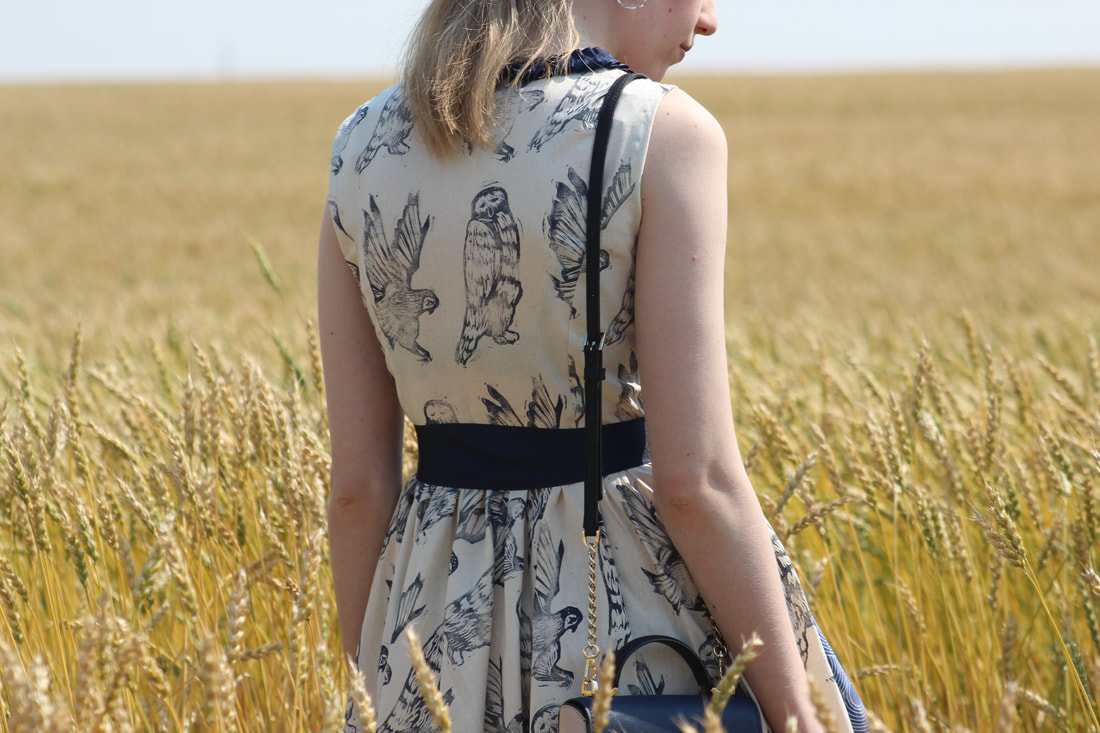 The interesting thing with dirndls is that they can be used in every circumstance. For every day work, the sleeveless ones are great so that you can have multiple plain blouses with different sleeve lengths to wear with it. That means you don't wash the dress as much, so it lasts longer. Blouses are easier to wash and cheaper to replace. The aprons are also a good way of being able to wear the dress multiple times. In fancier situations (even weddings!), they are able to use lavish silks and brocades, put on nice trim (including embroidery), and wear lace blouses or add fancy sleeves. They also lower the neckline and either shorten the hem, or make it floor length. They also add beautiful silk or lace aprons. 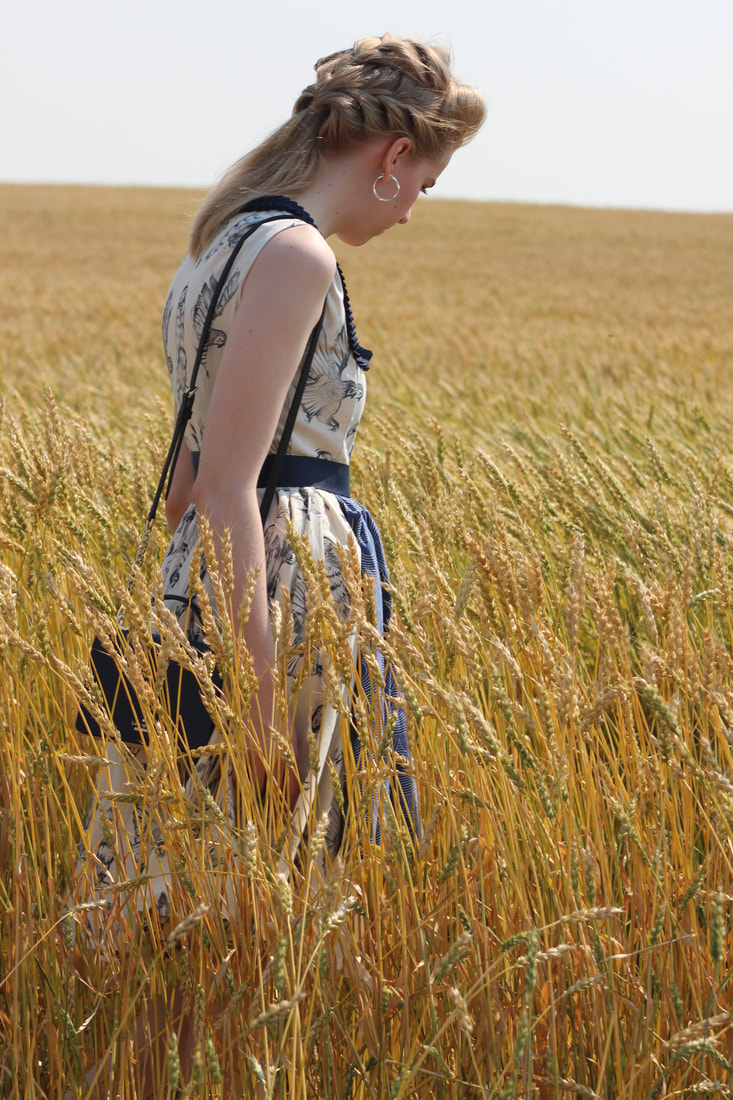 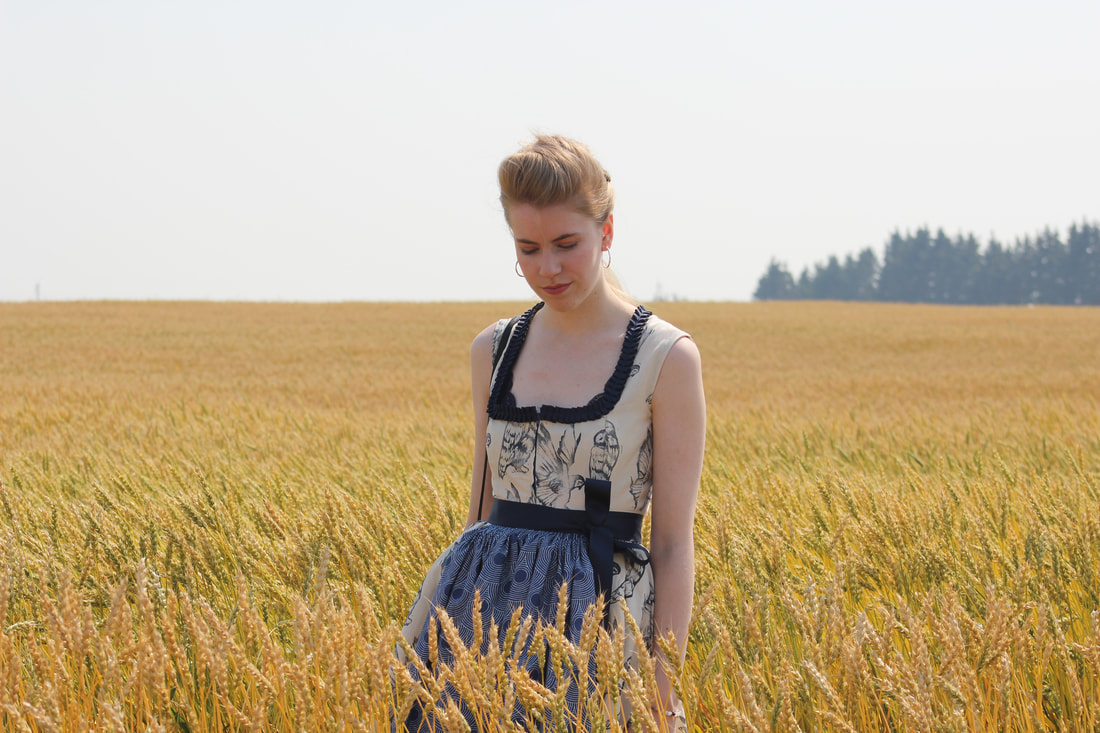 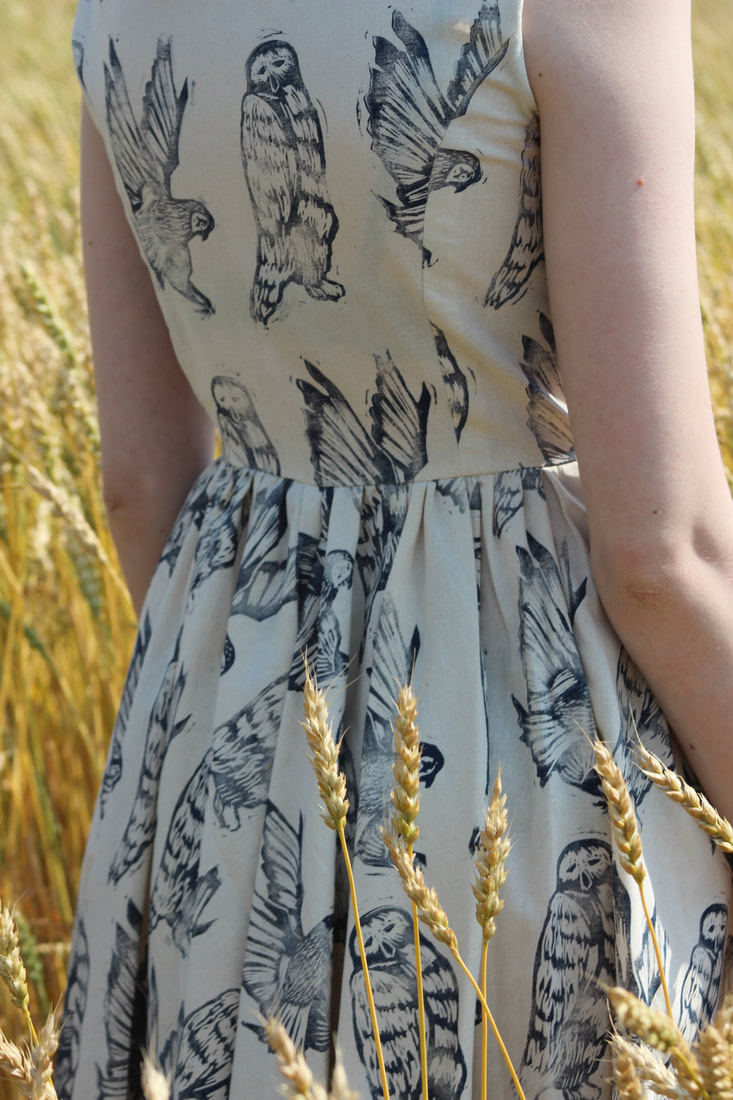 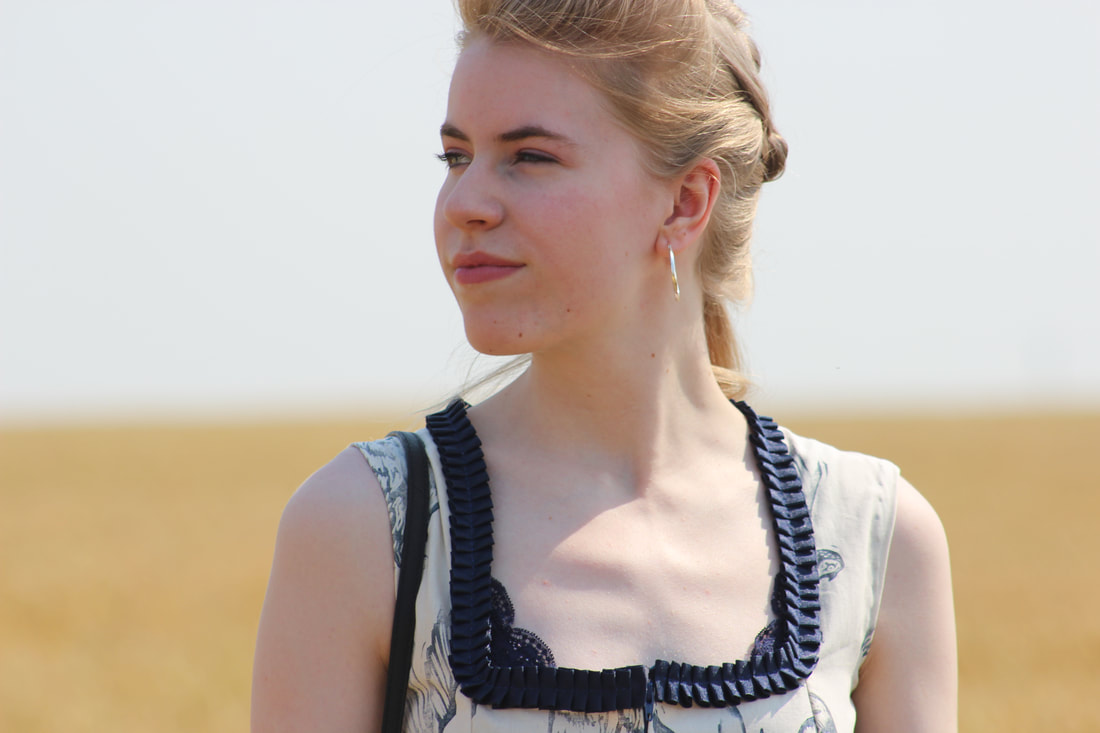 Since I wanted mine to be better for every day, but still be able to dress it up, so I made mine out of muslin but made it sleeveless so it depends on what I wear underneath and what shoes with it to dress it up or down. 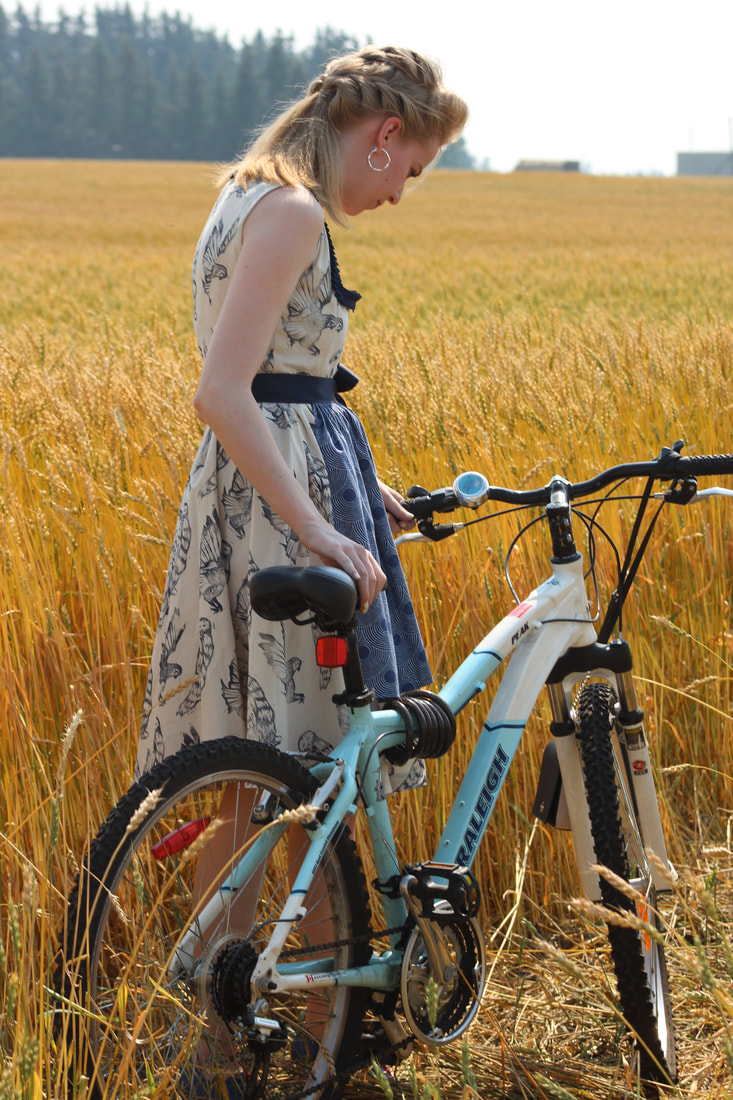 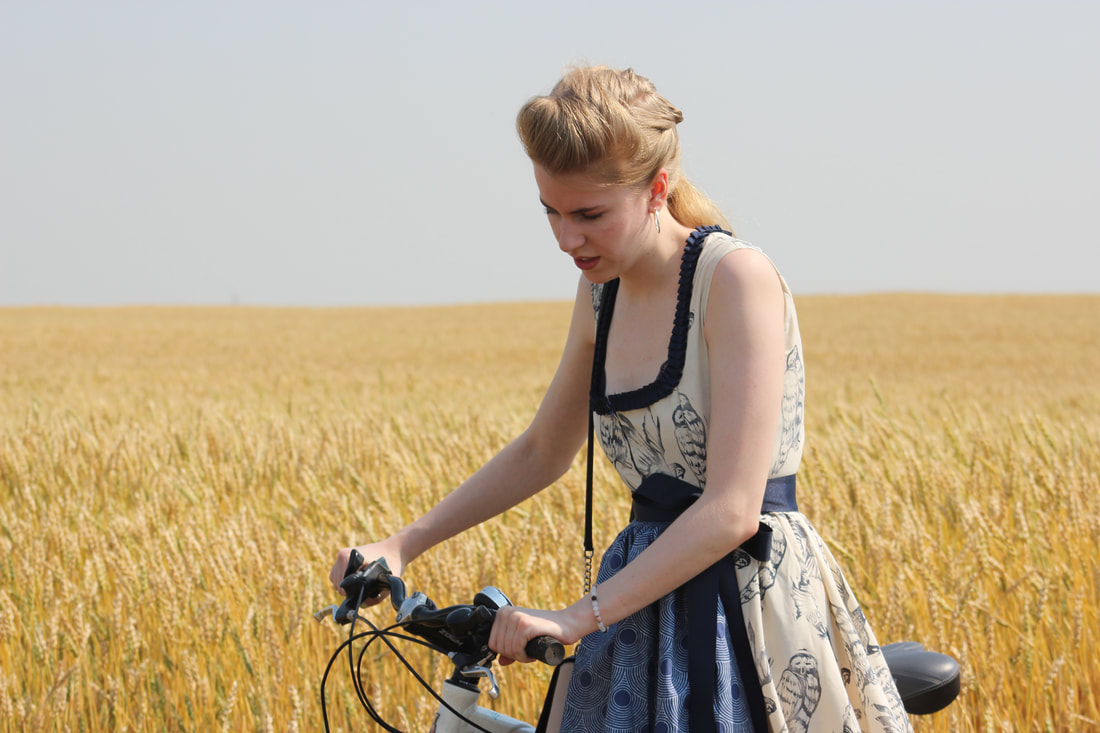 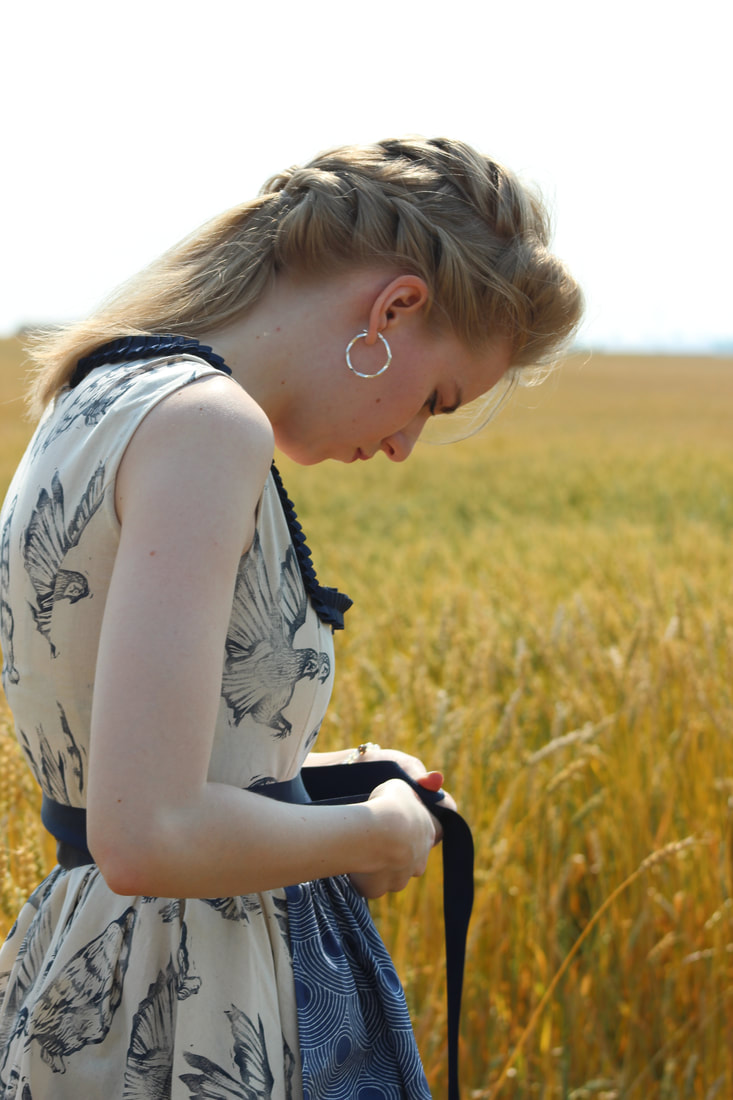 These pictures were actually taken at the industrial part of our city, funnily enough! As you can see, we live in a pretty agricultural area, so farms are sometimes right in the city. If you turn around, however, there are factories! 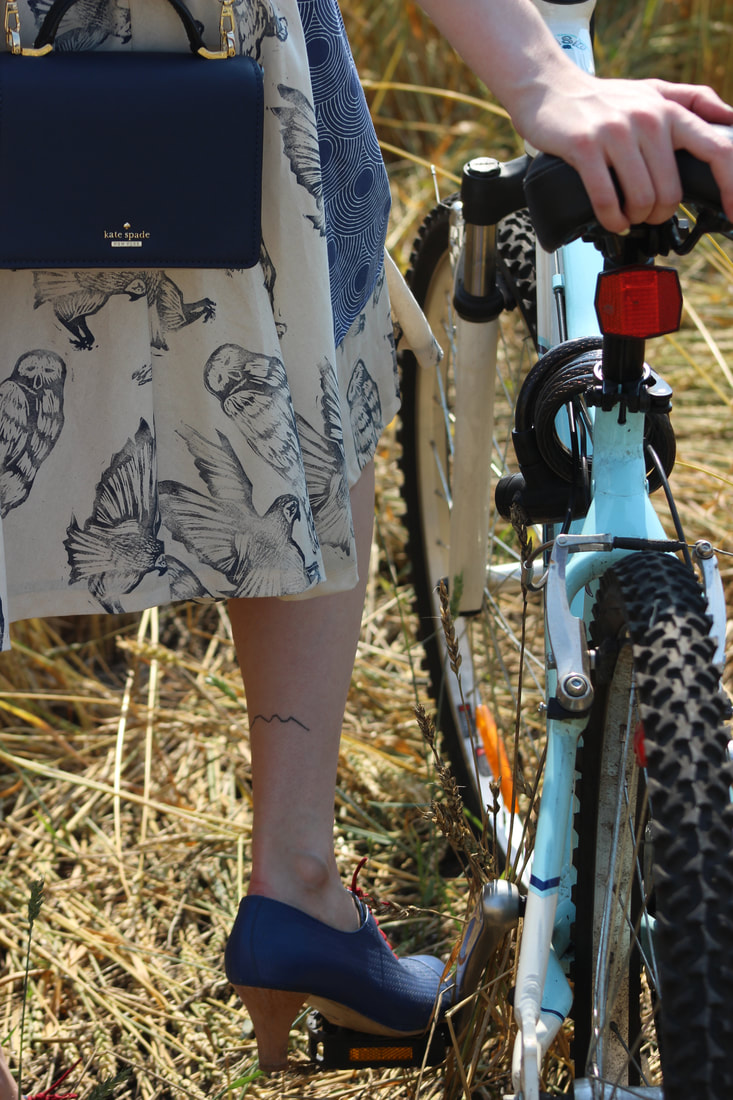 Shoes from DSign Step, purse from Kate Spade, and my mountains tattoo! 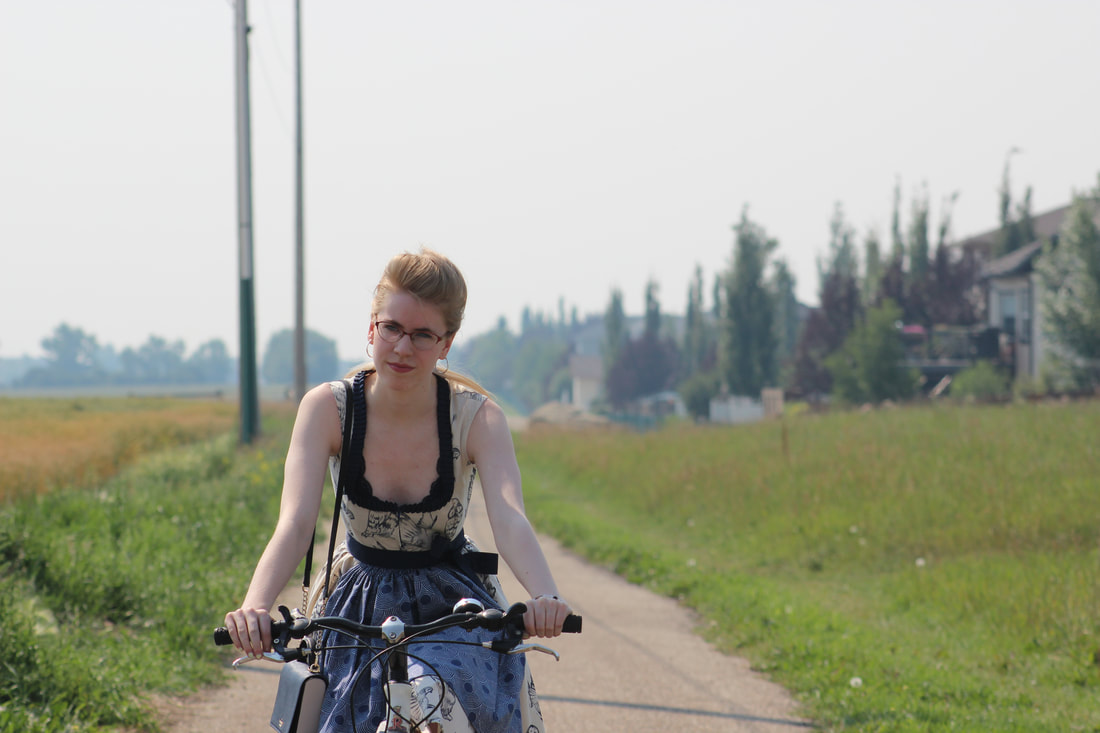 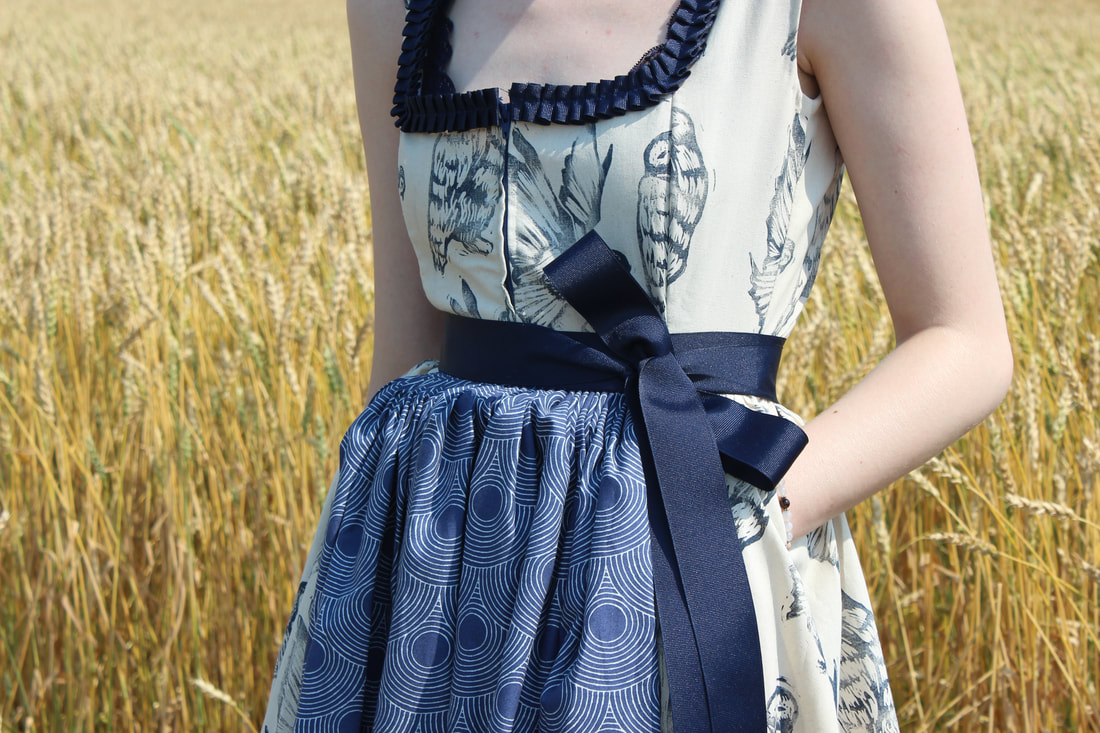 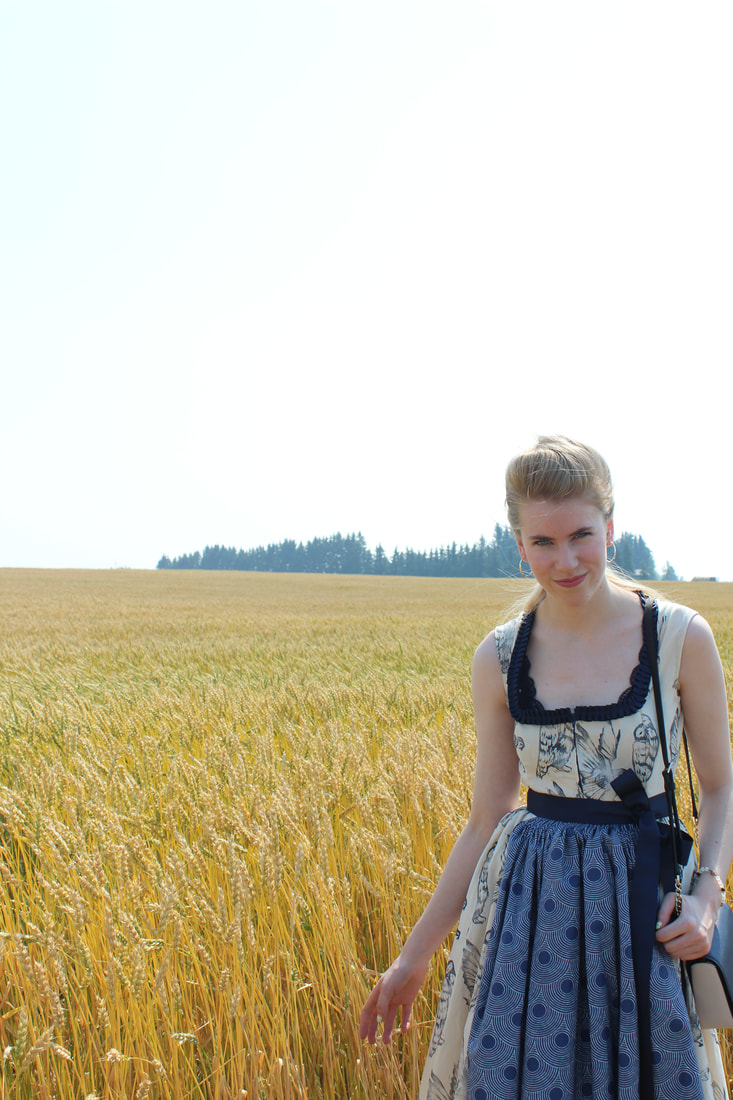 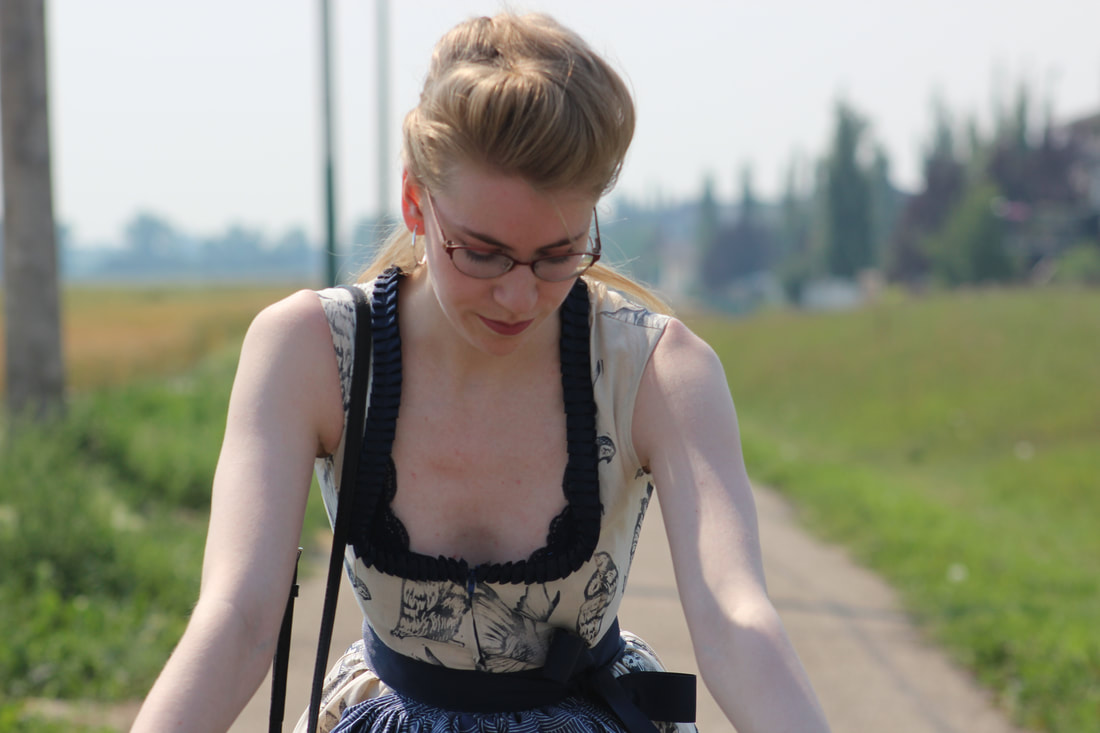 If you want to see some modern day companies who make beautiful dirndls, Lena Hoschek is well known for hers, and I also love this company. Thanks for reading! ~K 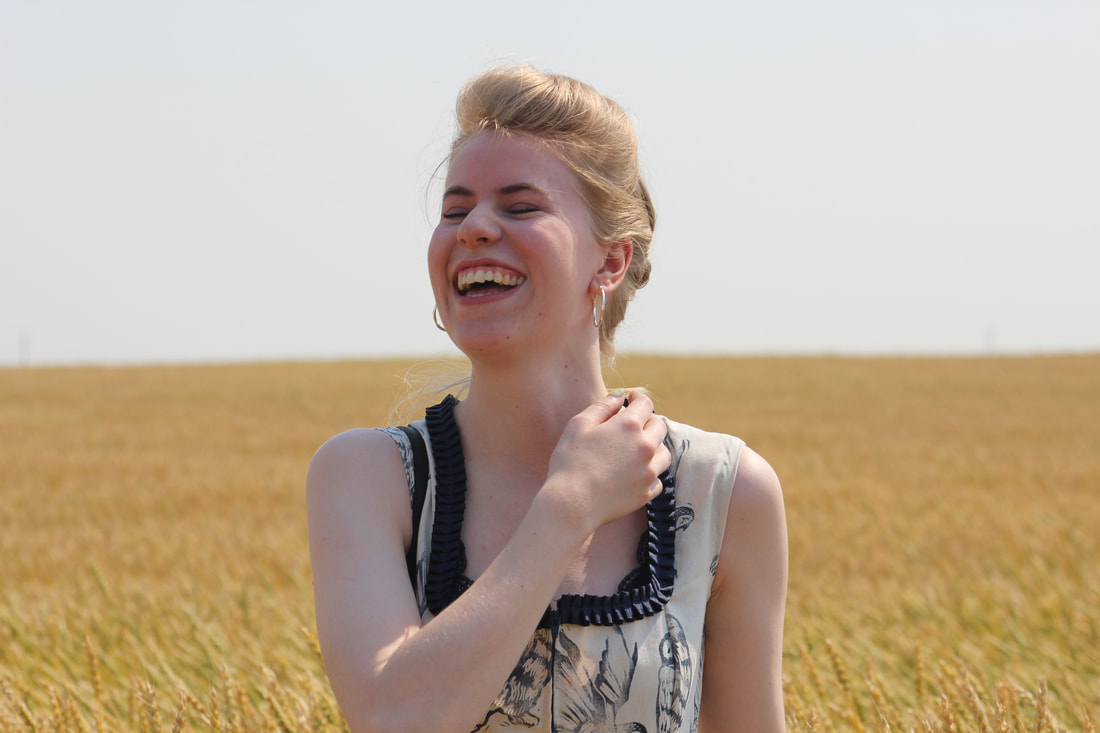 |
EtsyArchives
April 2020
Categories
All
|
 RSS Feed
