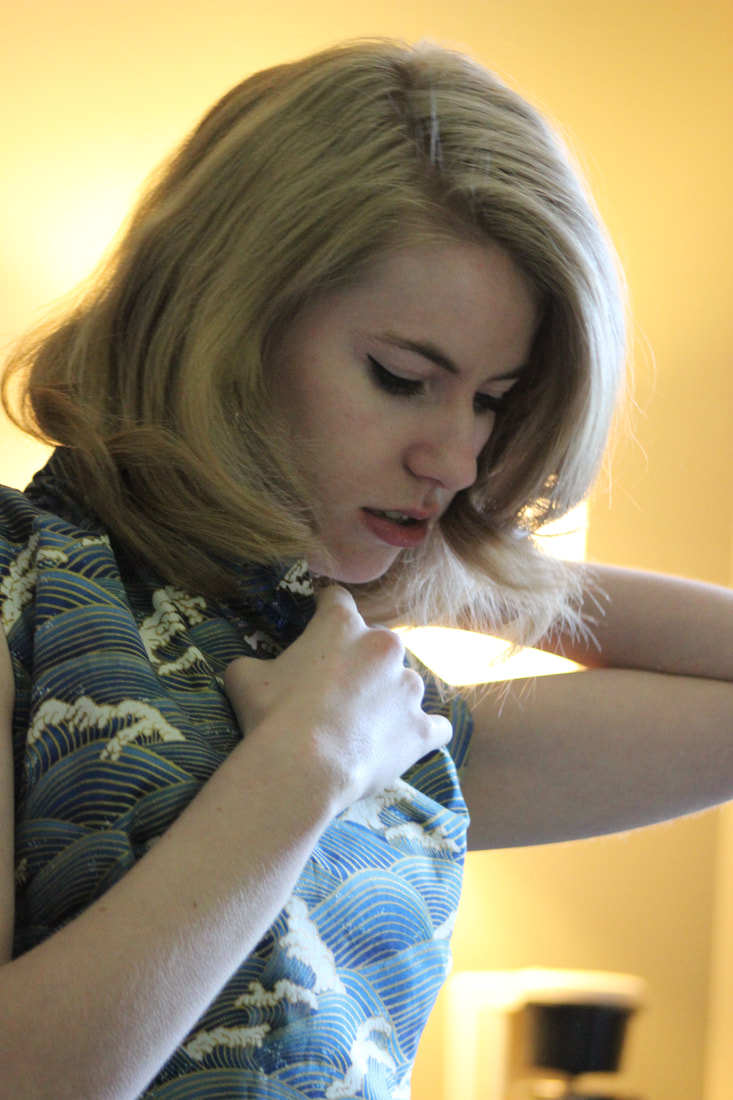
 I realized quite a while ago that while I have posted multiple photos of this dress on my instagram and made a video for it, I never actually posted all of the photos that we got in Banff! Since I have time on my hands now, I thought that this was a perfect time to catch up. This dress was made from a beautiful quilting cotton with hints of gold in it, and I used a Patterns by Gertie sewing pattern for it, with a few adjustments for fit.  The wave dress is one of my favourite dresses that I have made myself, and one of the ones that I wear the most. It is from the same pattern that I made my Su Li-zhen dress with, and I love how comfortable it is in cotton. I loved the photo shoot a little bit less... not because of how it turned out (Banff is one of my favourite places to go, and I love the mountains in the background of these images), but because of how cold it was! This is obviously not the first time that I've worn a dress for warm weather during Canadian winters for pictures, but this one you can really tell thanks to the 'arms very close to my body at all times' pose that I used. 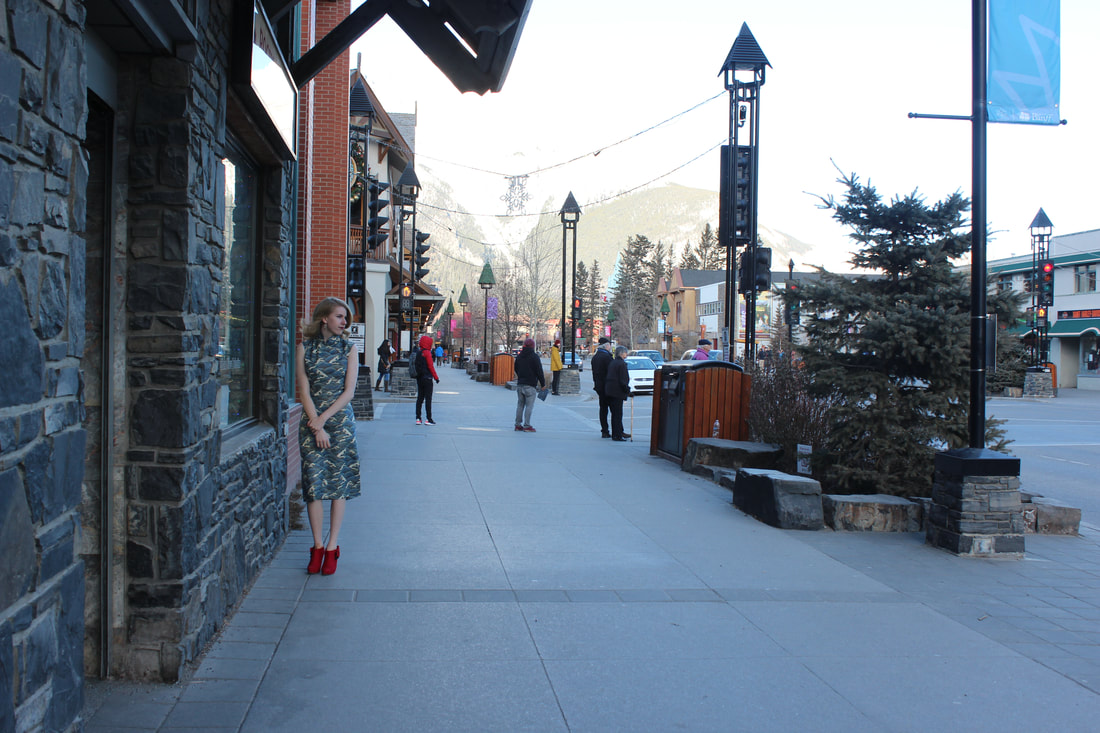 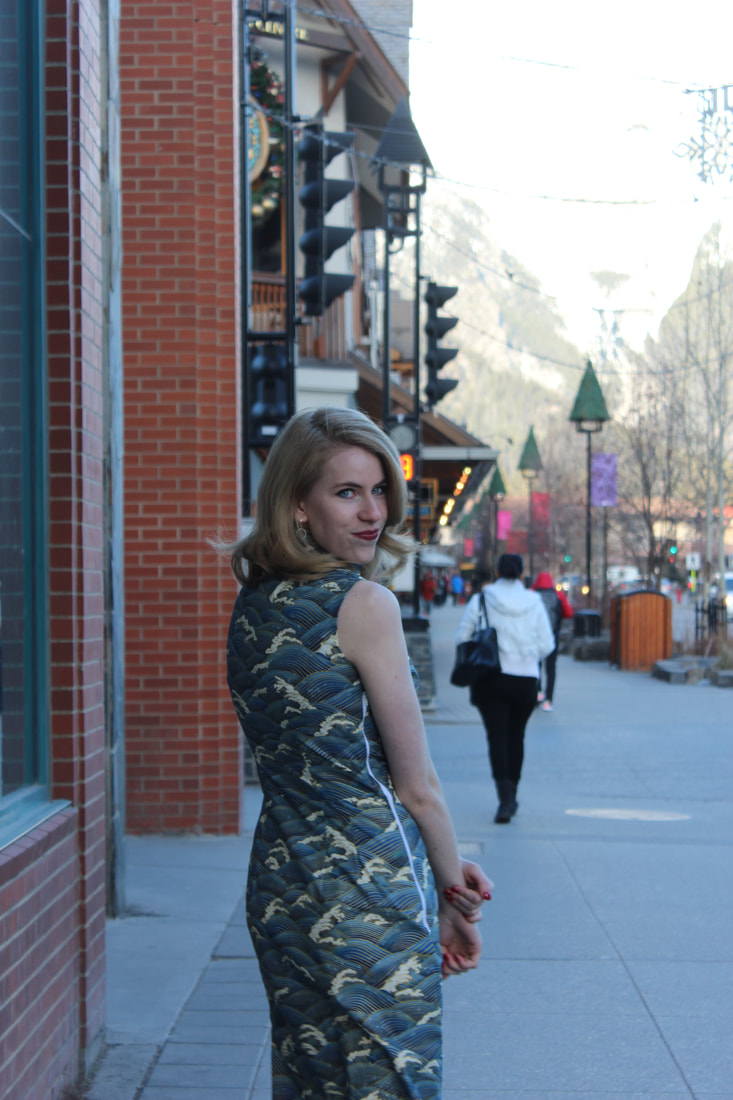  We go these photos at the same time as my Green Rococo era dress, just earlier in the day. Funnily enough, that last time that I was in Banff was just before everything happened with the pandemic, so it has been very nice going through these old images! 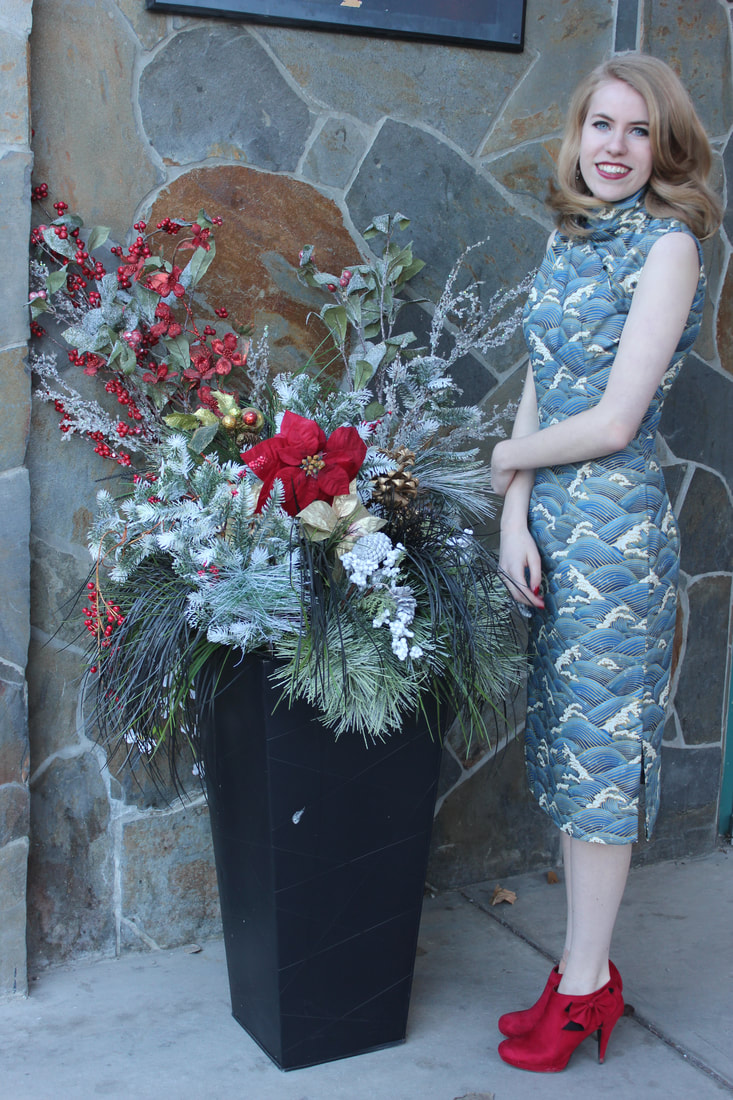 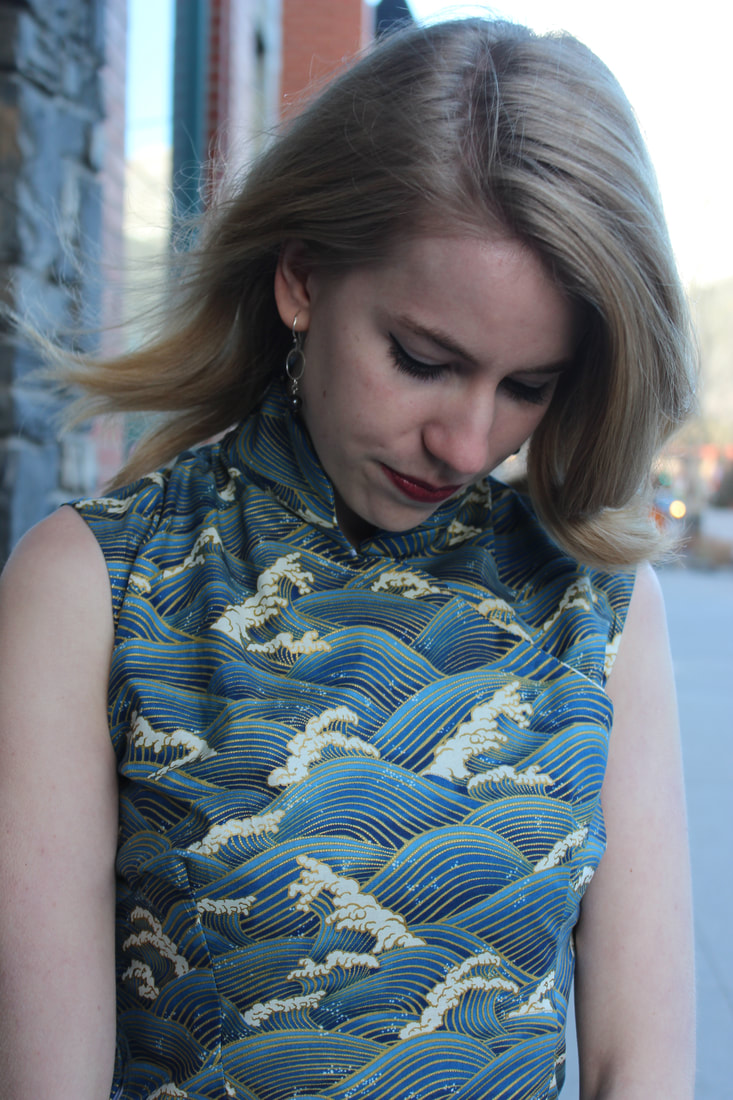 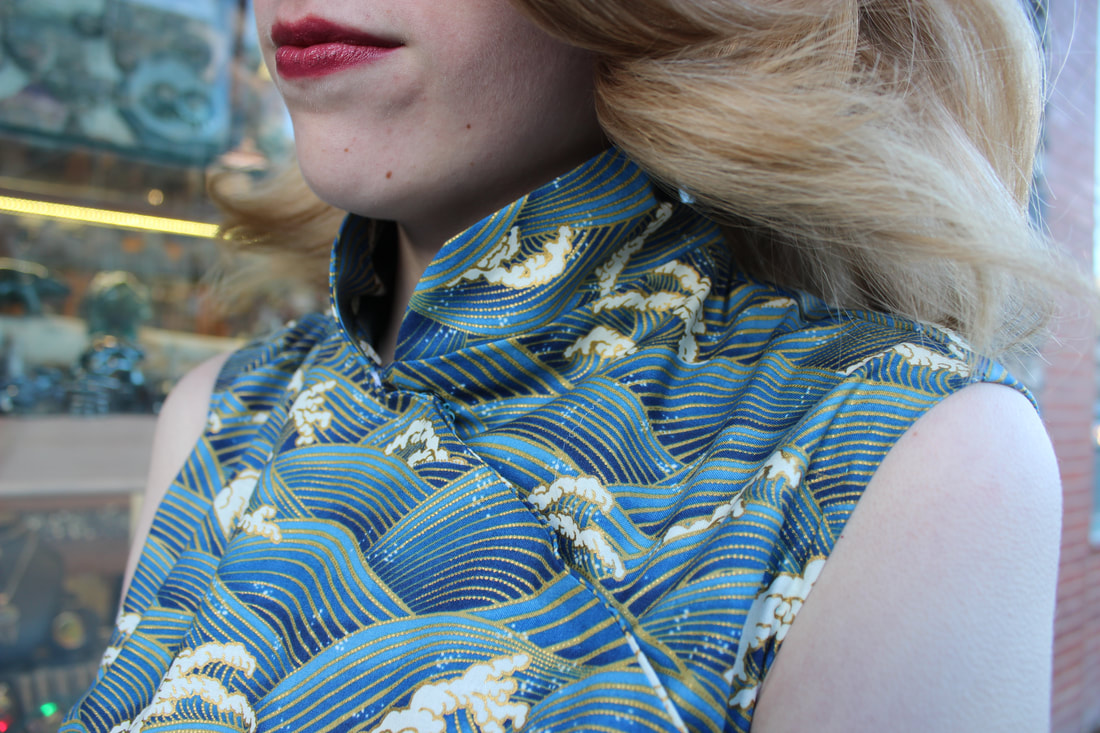 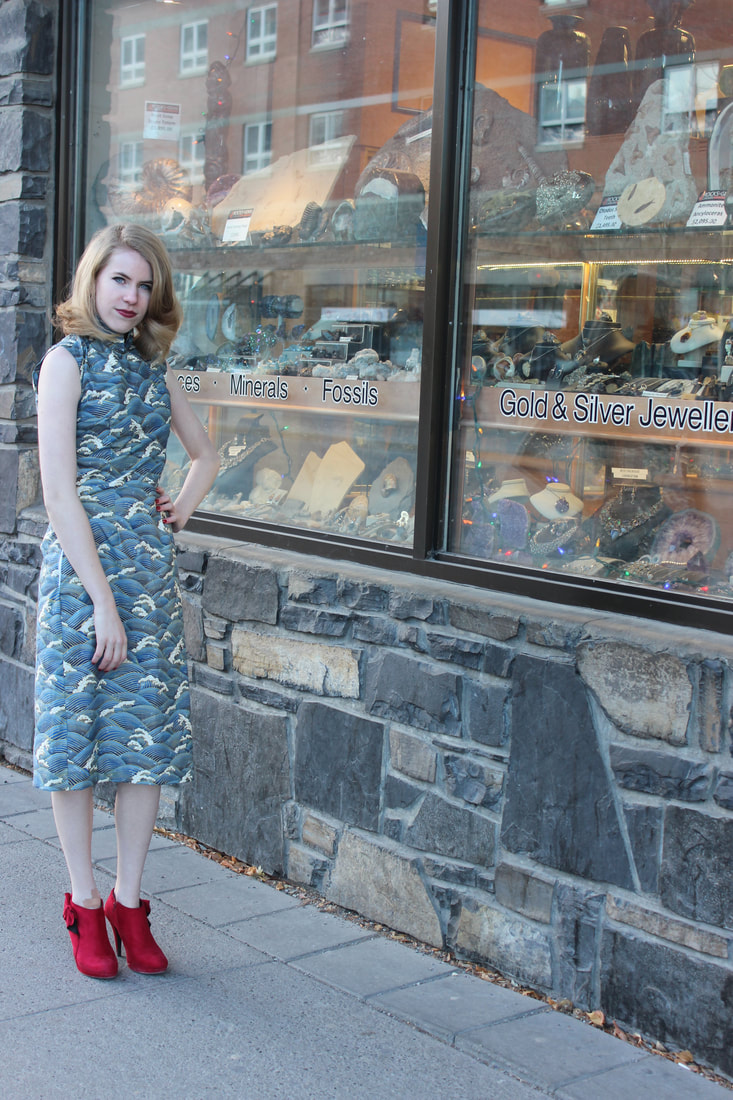 ~K 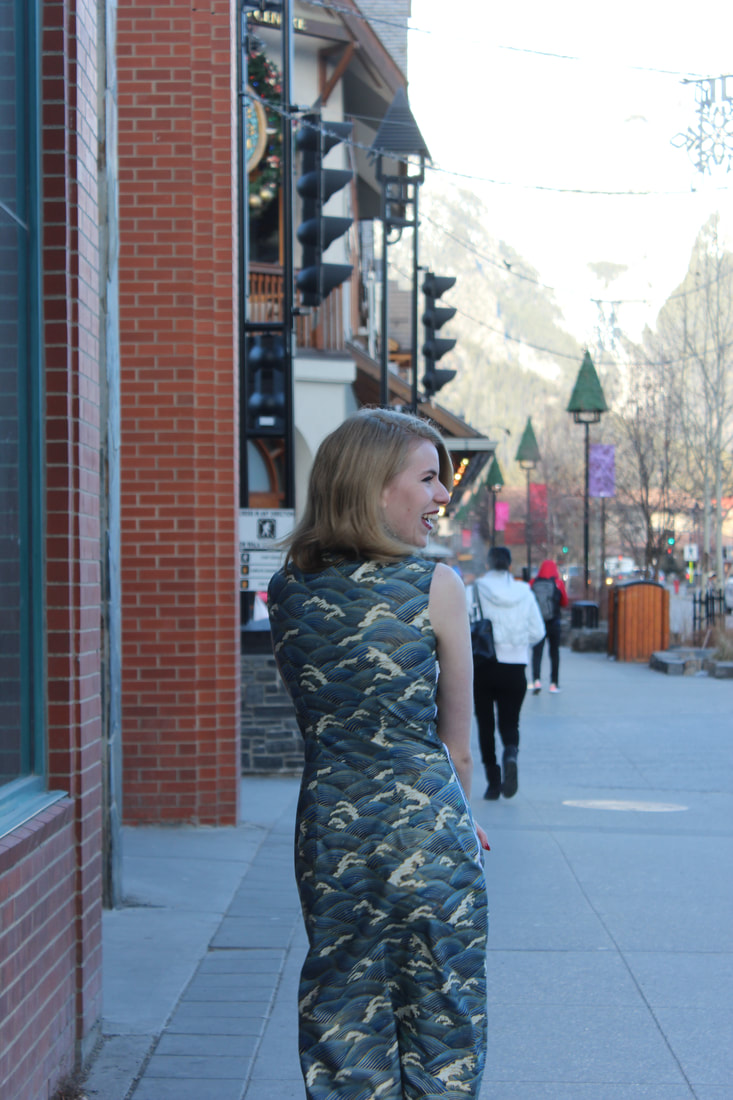
0 Comments
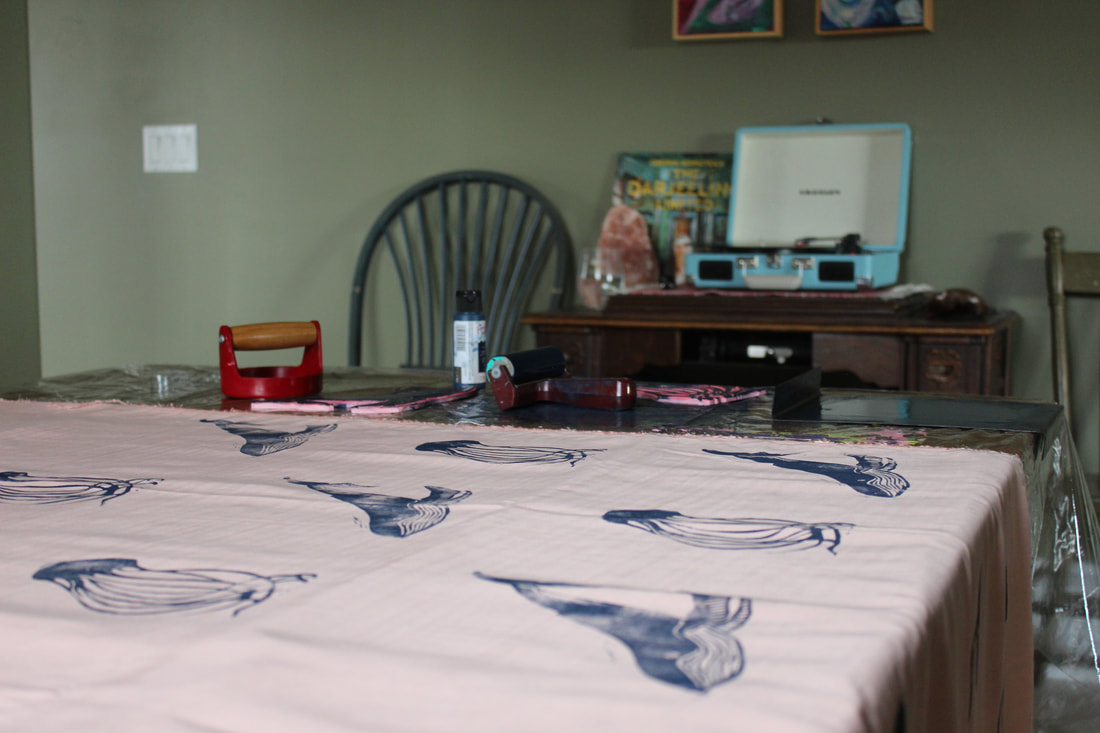
The past week or so has been stressful and strange for everyone. My university classes have been moved online, which means that I have a great deal of time in my room that can be used for sewing! It has been a bit difficult getting used to the new format of living, but I am very lucky to have lots of hobbies that can be done inside. About a month ago, I decided to start a new collection, so I have been hard at work on that. Thankfully, I have almost all of the fabric that I need! 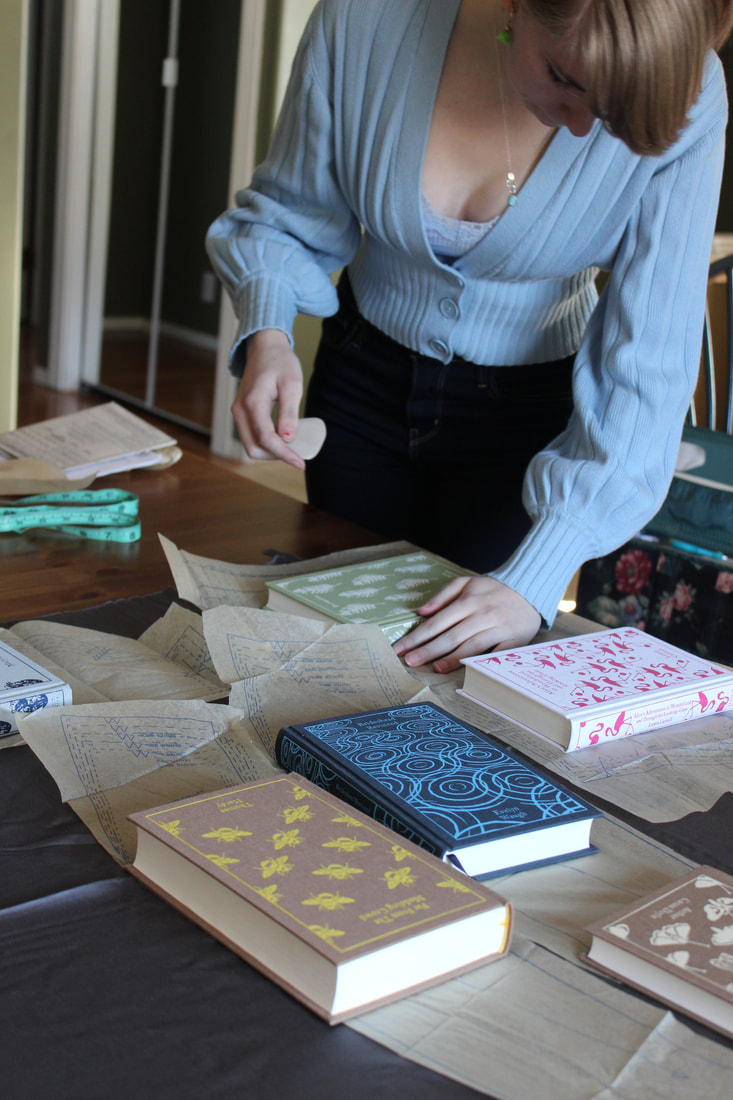 Cutting out from a stunning charcoal bamboo rayon 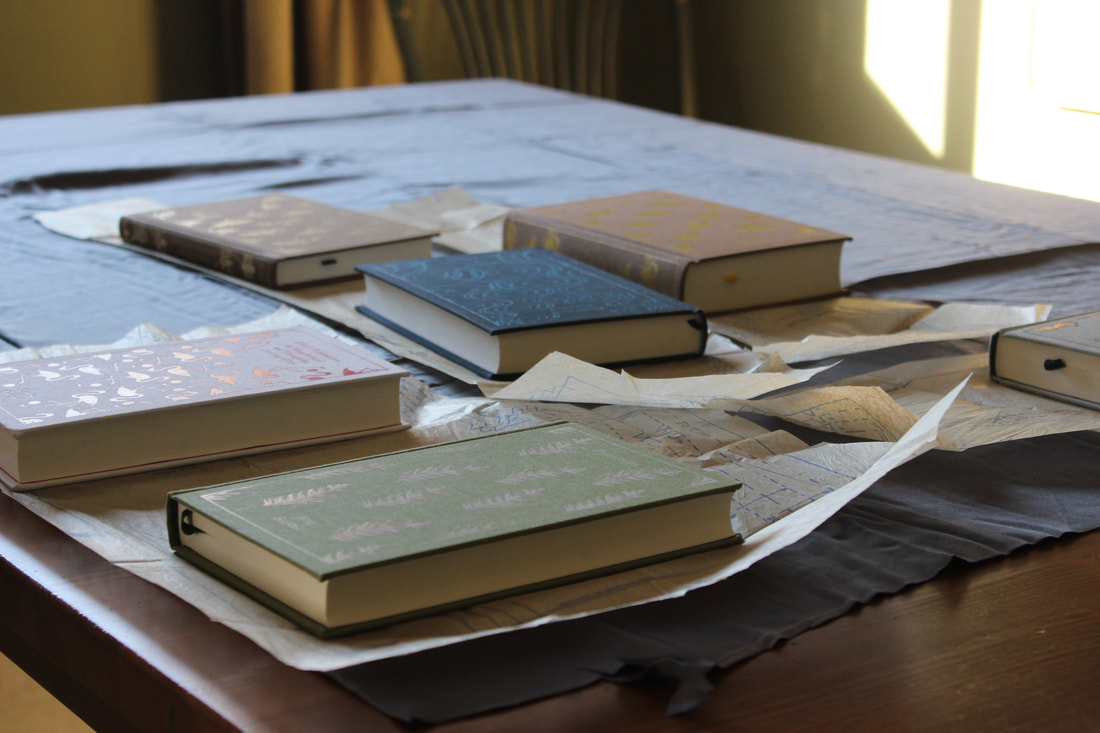 Using books as pattern weights Creating a collection needs a lot of time and work, starting with the designing. I want somewhere between 15 and 20 looks, which can be up to 40 pieces depending on how many pieces each look needs (piece=one piece of clothing, such as a shirt or skirt. Look=multiple pieces put together to create a whole outfit. Can be one piece, can be multiple). I am focusing more on dresses, for two reasons: one) because I love dresses, and two) because that cuts down on how many garments I will be drafting and sewing. I have firmly decided on 10 of my designs so far, and am currently searching for inspiration for the remaining ones. I have had people ask me how I come up with designs, and honestly I don't have a great answer for that. The inspiration comes from absolutely everywhere - Pinterest, people on the streets, beautiful buildings, movies, music, quilts, books, and everything else that I come in contact with. Most of the process is daydreaming, with bits of frantic drawing and writing to ensure that I won't forget the idea. Drawing isn't my strongest suit, and it isn't my favourite thing to do. Half of my designs are drawn out, and half of them are just written down with lots of description so that I know exactly what I was thinking about. Writing down design ideas is actually helpful when I don't have a pen and paper with me as well, since I am just able to write it down in my phone. 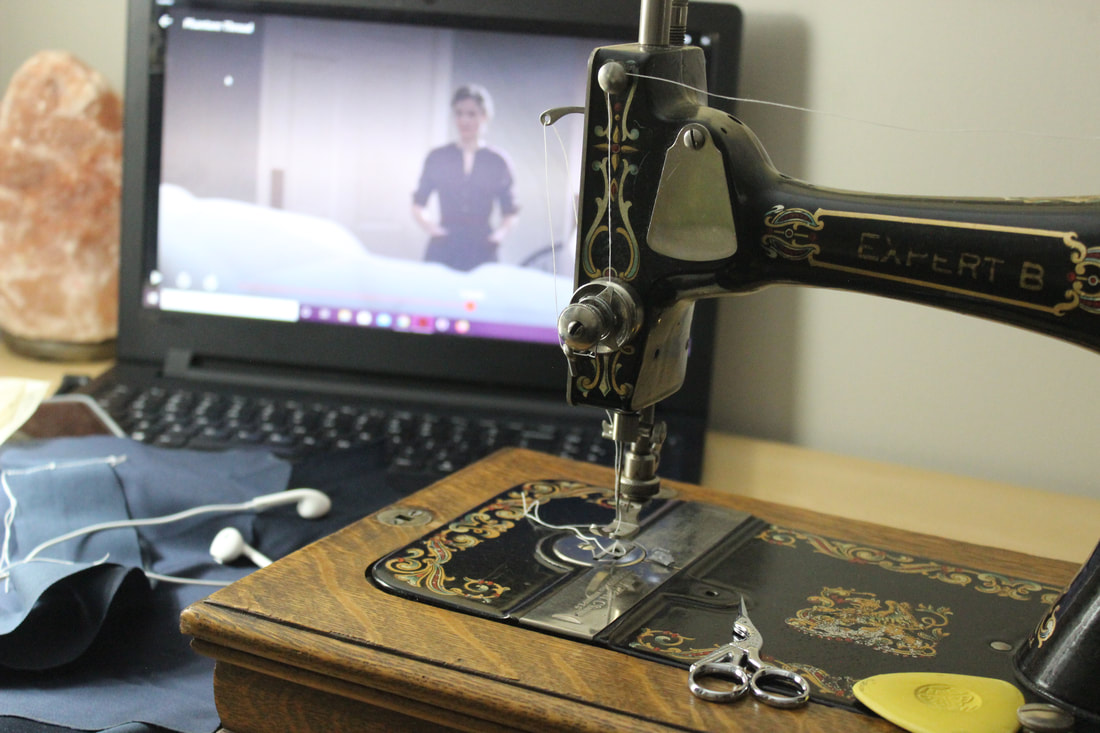 This entire collection is being sewn on this beautiful antique, hand-crank sewing machine. It takes a bit longer, but it makes the dresses feel so special! 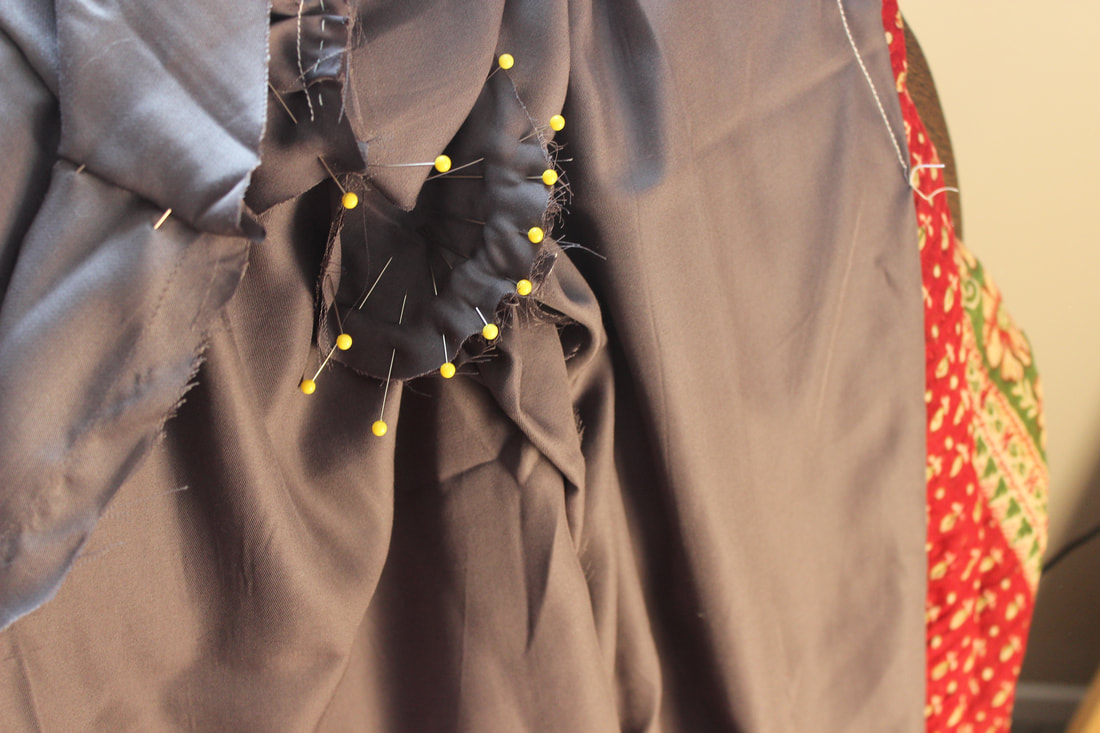 A peak at one of the garments for the collection. The next step is drafting. One of the best skills that I learnt last year at fashion school was pattern drafting! I have so much fun with it, and it is so satisfying to make something completely, utterly from scratch. I often alter the patterns that I use when they are pre-made, but I have so much more freedom just being able to make my own. Pattern drafting includes lots of math and rulers, so it can be a bit tiring on the brain. I try to spread out my pattern drafting so that I don't get sick of it, so I often have a pattern on the go while I am cutting out a different garment and sewing another one. This also makes the process more fun for me, since I can choose what I feel like working on for the day depending on my mood. However, not every part of the pattern can be drafted. I love being able to drape parts of patterns, since it gives me a lot more creative freedom (and lets me do a little less math). Draping is also fun to get videos of, since the garment changes so quickly when it is draped. 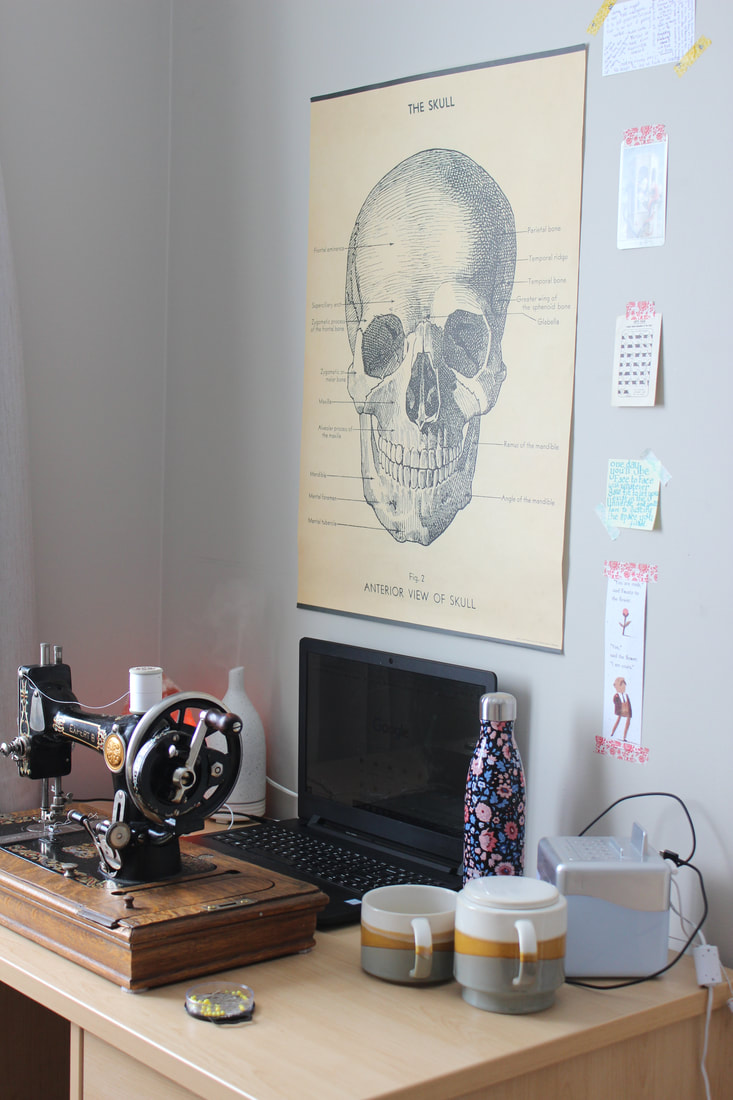 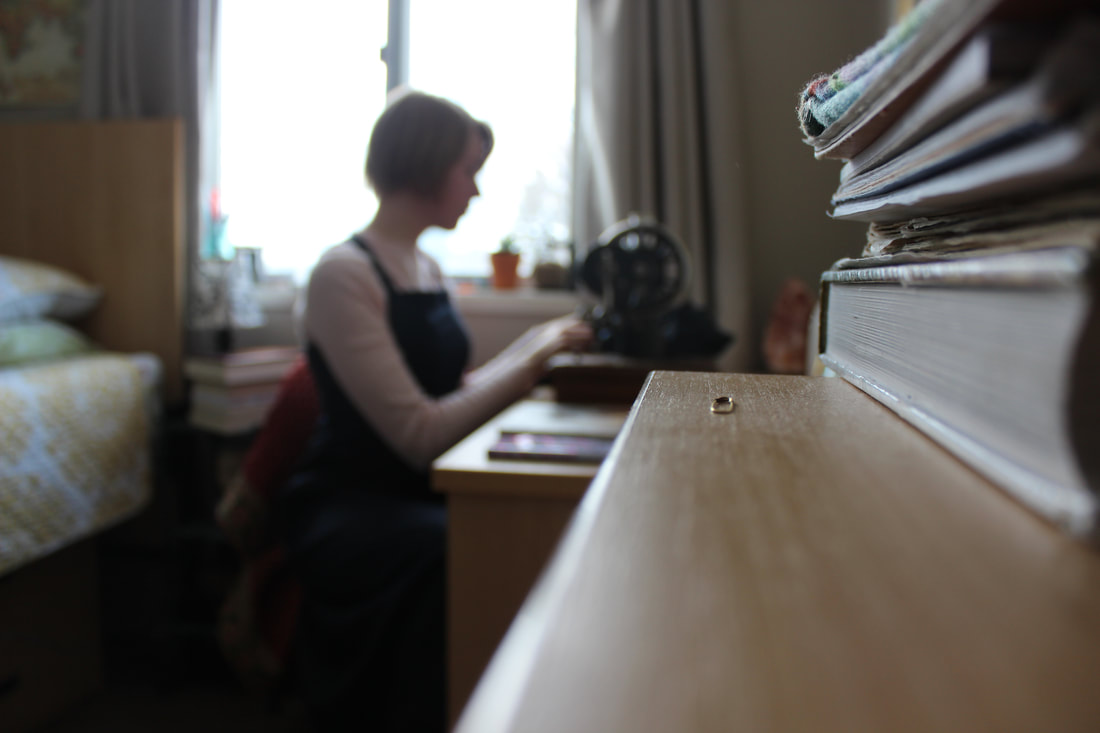 There are many other steps that are included in the process of making a collection (loads of planning for various things, organizing, fittings, adjustments, constant ironing, etc.), but one of the most important ones is the actual sewing! All of the sewing for this collection will be done on my lovely, antique White sewing machine. She is a hand-crank machine, so my right arm is getting very muscular... Obviously this makes the sewing take longer, but I feel like I have fantastic control on it to do some picky work, and the stitches are beautiful. It also makes the collection feel just a little more special to me:) 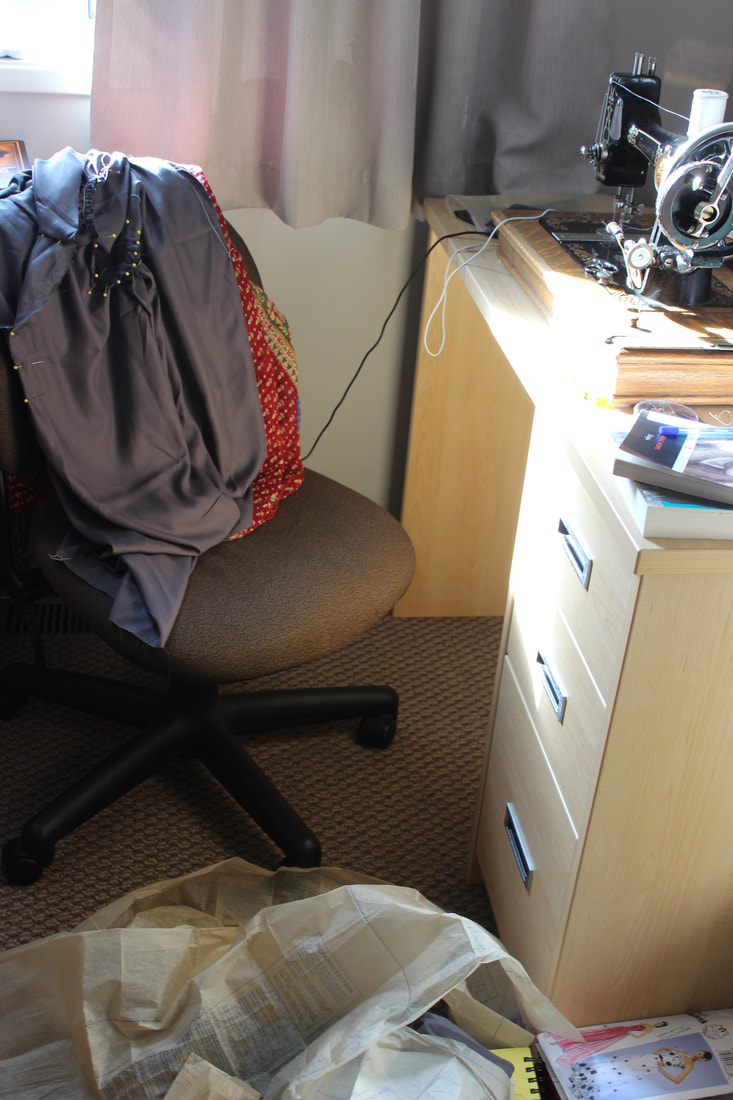 Every surface gets used when I'm sewing... So here is a sneak peak at the new collection! I will be putting up more information about it as soon as I have more ready to go, and I am video-taping the entire process so you can see it all come together once I'm done!
The collection is made mostly of eco-friendly materials, and using couture methods. What are you doing to keep your spirits up during self isolation? Any good movies I should watch? ~K 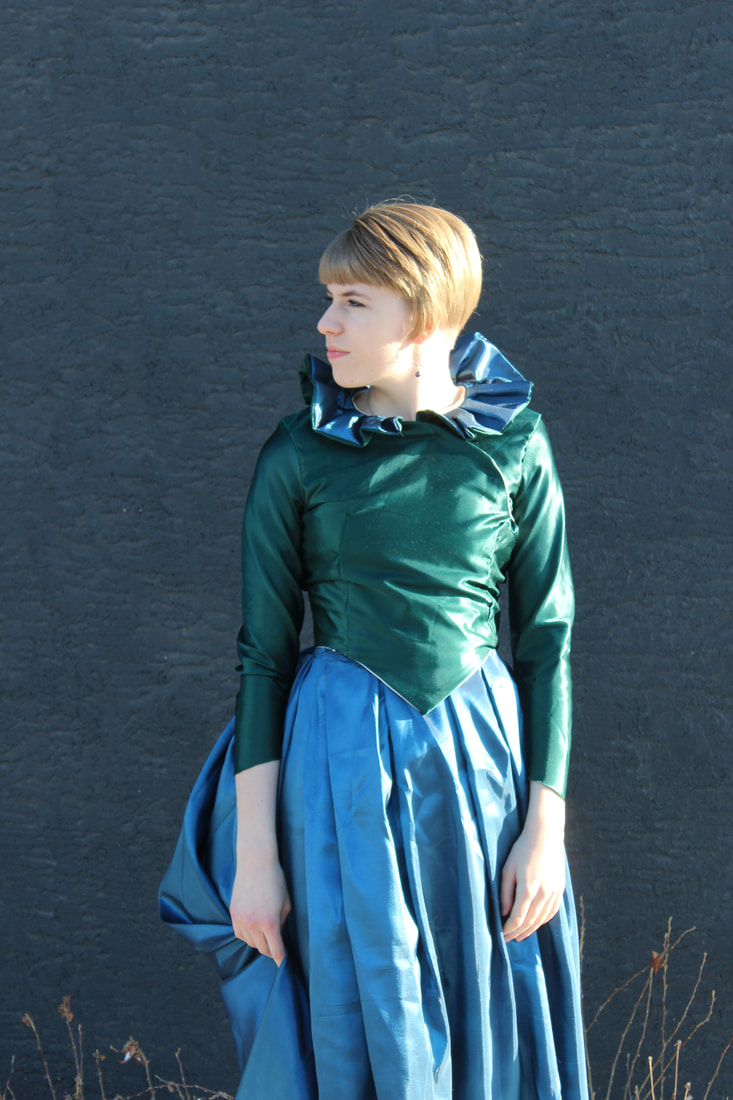 This dress ended up being a much larger project than it ever was supposed to be. I started designing it a year ago, when I made my red bustle dress. The plan was to make 3 different bustle dresses, each with some modern details. The red one was inspired by Alice in Wonderland, and ended up looking quite Russian (thanks to the blizzard that we did the photo shoot in). This second one was inspired by Long Susan in the BBC series, Ripper Street. I am perfectly aware that the costumes in Ripper Street aren't historically accurate, but I have loved the jewel tones and black lace in them right from the beginning. In my 2018 year in review post, I mentioned that I had started a second bustle dress and it was a goal of mine to finish it this year. Well, I did finally finish it! The poor outfit sat on my To Do list for an entire year, and I had to drag it to university with me, but I finally got the motivation to put together the bodice and hem the skirt this month.  The photo from my 2018 year in review post. At this point the front of the bodice, the collar, and the skirt had all been draped. This dress had a completely different plan for it before I started draping it last year. When I first came up with the collection, this was going to be called the Bug Dress, and it was going to have flowers and bugs on the bustle, which is why I chose the teal and emerald fabrics. I didn't want it to be too obvious, just small details that you would notice if you looked closely. However, once I actually got the fabric and had draped the skirt, I played around with placement and found that I liked the dress plain more. That is when it started to be the Long Susan dress. She often wears jewel tones, and her wardrobe was a huge inspiration for this collection (if you check out my pinterest board for this collection, there are quite a few pictures of her). Long Susan is a proprietress of brothel, which made me think of the most common dark side of the Victorian era- prostitution. This wasn't just a Victorian thing, its been a part of life since the dawn of civilization. What the biggest issue with prostitution (specifically in that era) is the treatment of the people in the field, and also the danger of it. 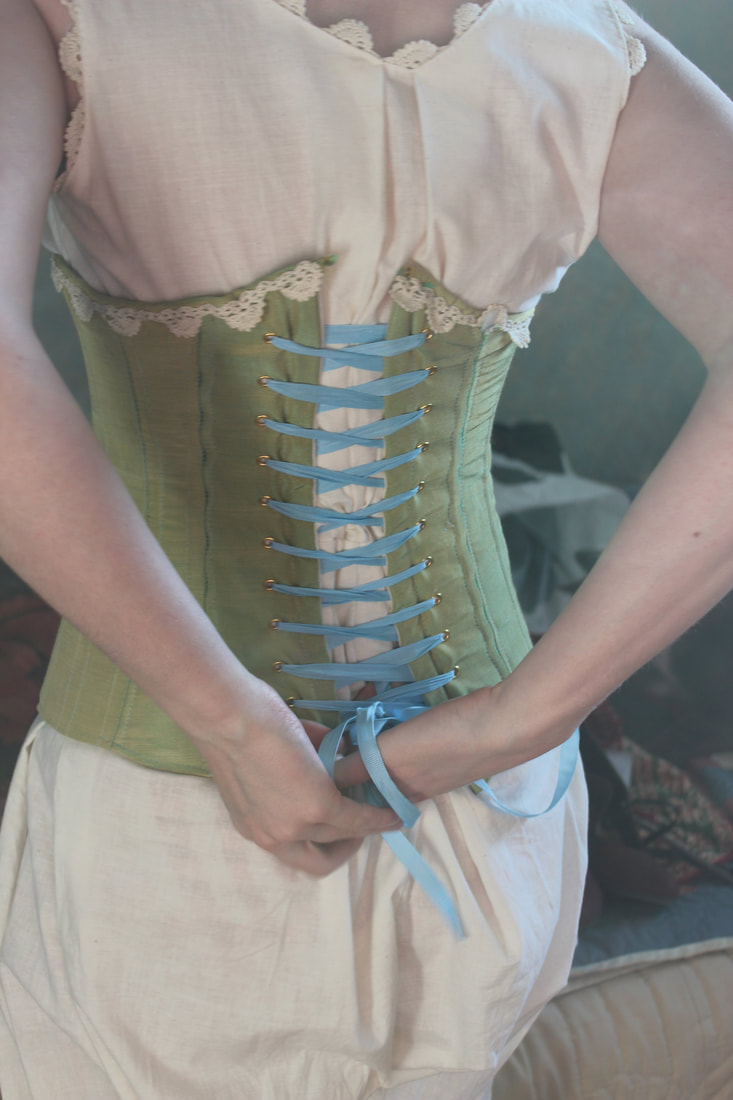 The first layers when getting dressed in the bustle era: my combinations (basically a combined pair of bloomers and chemise, a soft muslin layer to go between the skin and corset), and my taffeta corset that I made a few years ago and desperately needs an update. 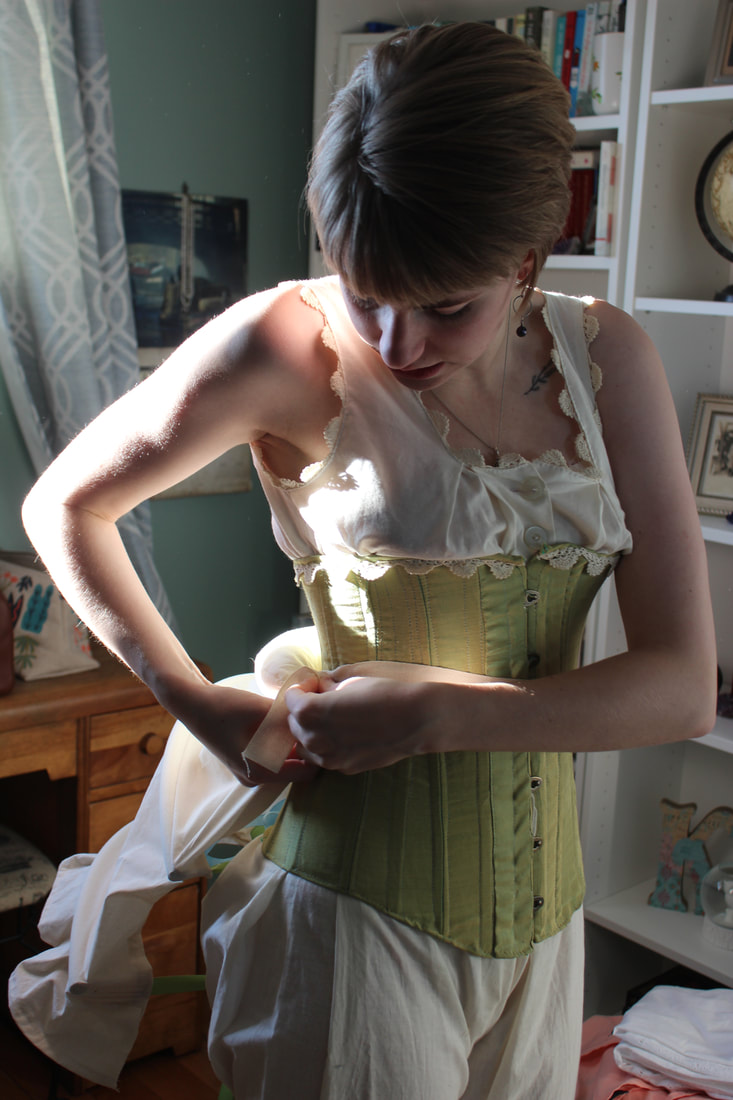 Next: the bustle cage! This is a boned garment that is collapsible for sitting. Mine has a little bum pad at the top to round out the shape. Bustle cages from the 1880's come in many shapes and sizes and can be really stunning 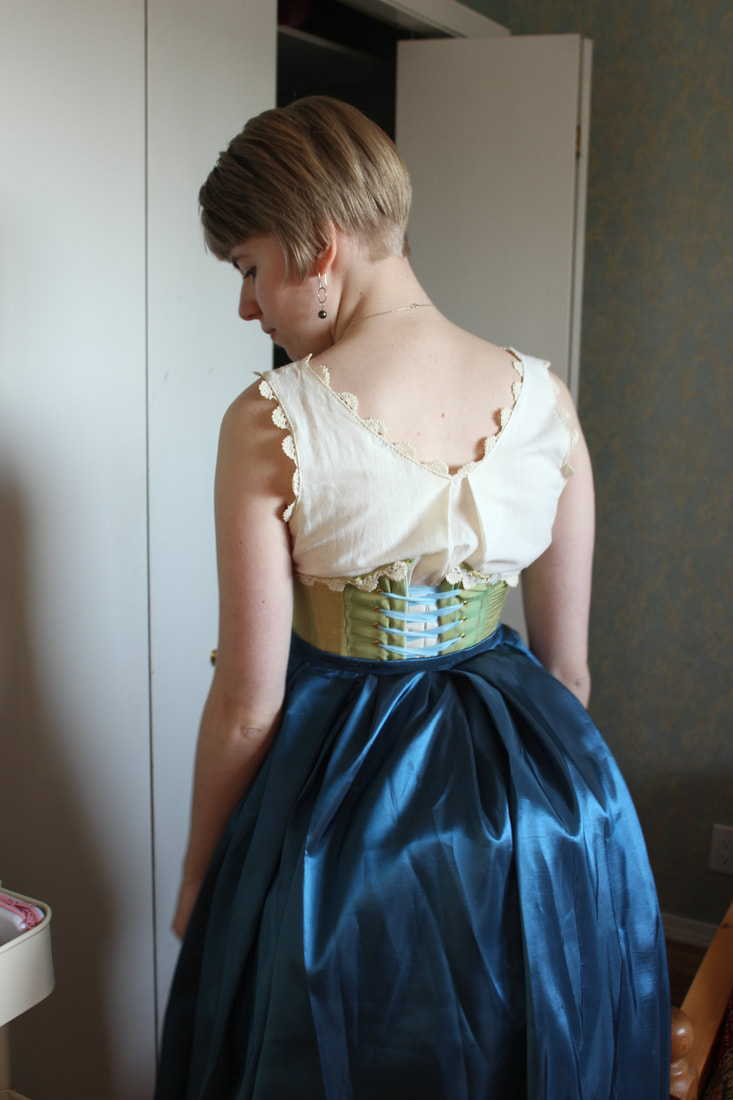 There were the obvious dangers (syphilis and other diseases), but there was also the issue of harassment. Harassment came from the police, men who visited them, people who did not agree with their trade (wives of devoted customers, or people who had different morals). When it comes to the 1880s, there is also Jack the Ripper. Everyone has heard many stories (maybe from Buzzfeed Unsolved, or from books, etc), but when it comes to what actually happened it is difficult to get details that have not been sensationalized. There is also the issue of a very corrupt police force. The police force didn't start until 1829 when Englands Prime Minister Robert Peel with the Metropolitan Police Act. This was the start of the nicknace 'Bobbies', or 'Peelers'. The latter did not stick for as long as the first. There were other police forces before this, but they were the same as the police now- Glasgow had a tax funded force started in 1800. They had many duties which included fire fighting as well as being police officers. Ireland also had a force that started in 1822, which became the Royal Irish Constabulary in 1867.  Next layer after the petticoat: the skirt. This is made out of a cheap but pretty synthetic fiber. It makes the loveliest swishing sound when walking, but it's an awful fabric to work with. 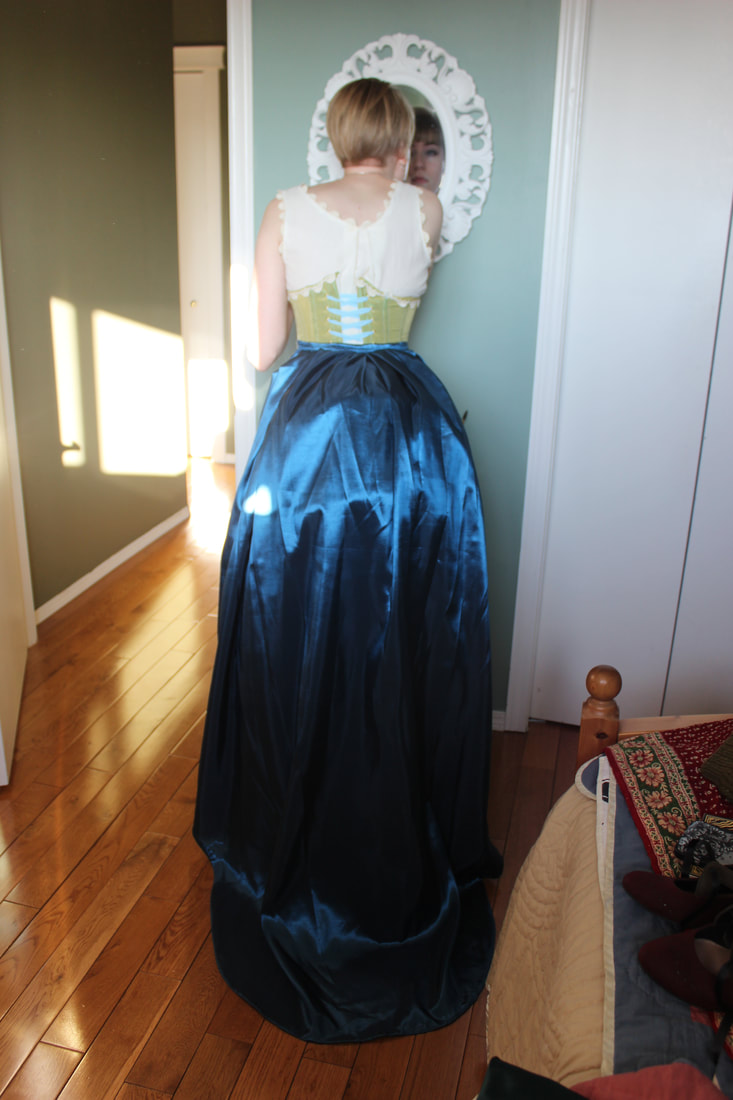 The skirt is shaped so that the front is a bit shorter for ease of walking and the back extends into a train. When the Metropolitan police were set up in London, there were 17 divisions controlled by 4 inspectors and 144 constables. The headquarters was Scotland Yard. Most counties however kept their Parish Constable, since the police were widely distrusted for a long time. It wasn't until 1839 that the Rural Constabulary Act came in and forced the English counties to have a paid police force. Though the force was organized, there was still not one style of policing that was used throughout the country. In 1855 there were only 12 000 policemen in all of England and Wales. The force was not government regulated until 1856. The CID (Criminal Investigation Department) was created later, and police detectives were brought in in 1878. Detectives relationship with journalists is what eventually got the masses to accept them as necessary and not spies, as they were originally thought to be. The Jack the Ripper case caused huge problems with the police force, since it turned people against the police. 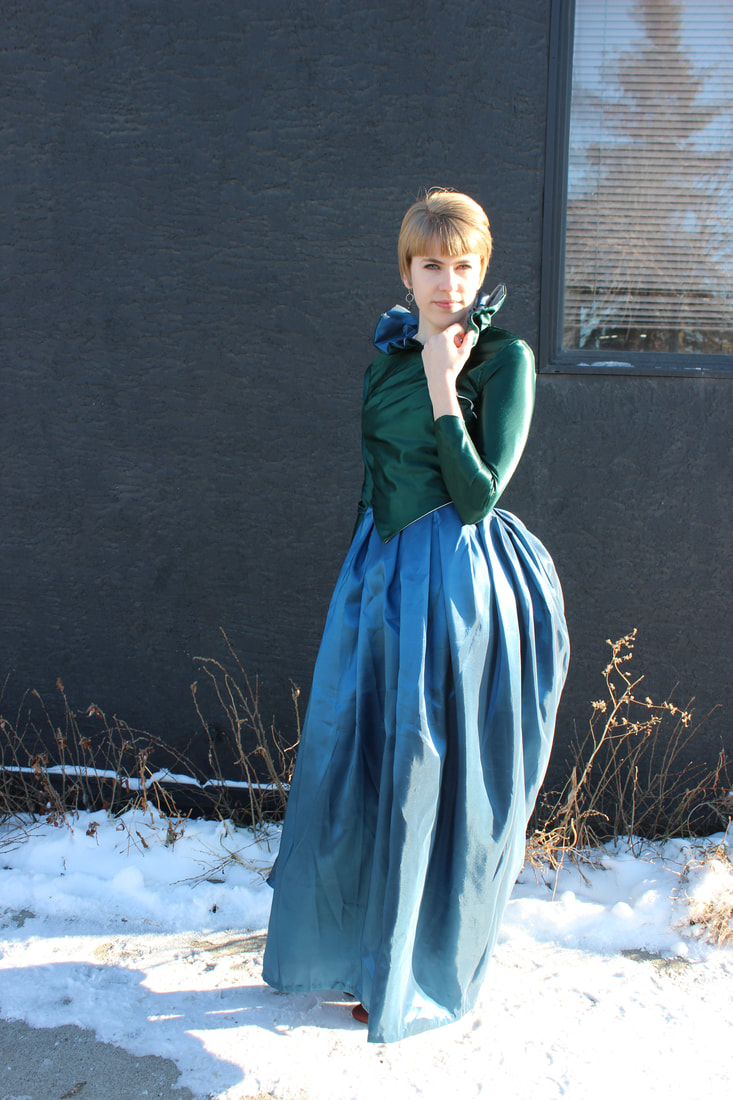 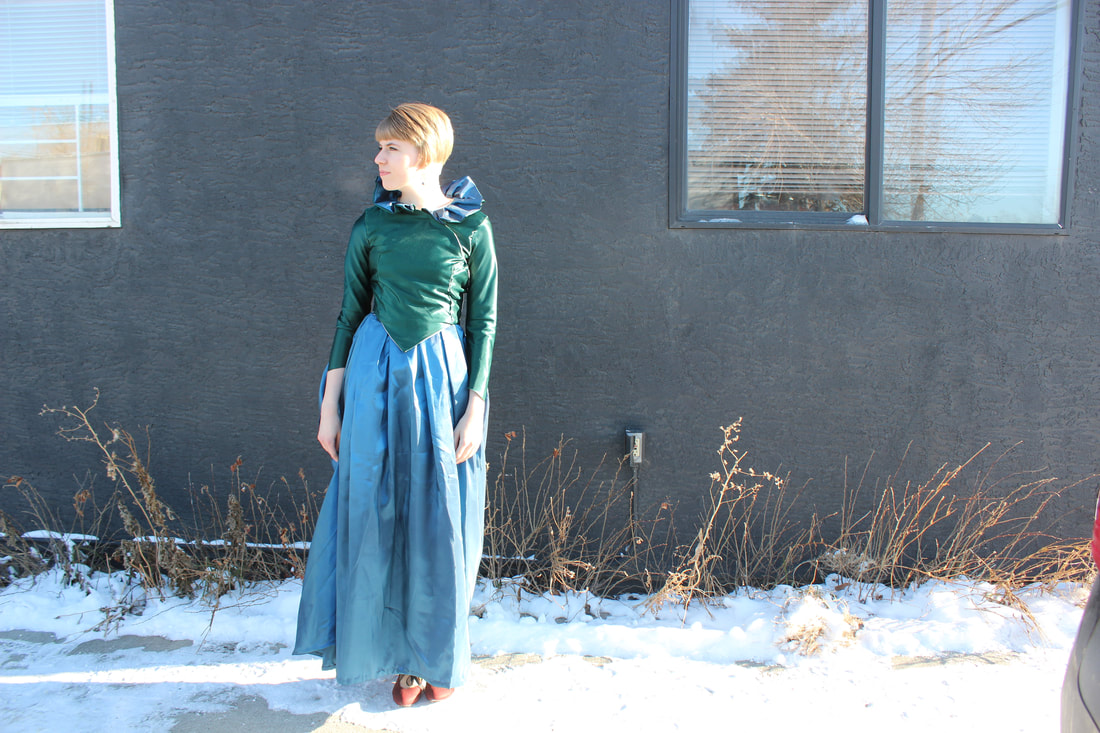 Those who have seen Ripper Street will know Edmund Reid. Inspector Edmund Reid of H Division was a real person, who was in charge of H Division's CID. He rose quickly in the ranks of the police force, and ended up being moved to H Division to replace Frederick Abberline in 1887. Abberline had been moved to Scotland Yard, but later returned to take charge of the murder investigation for the Ripper. Before Abberline came back, Reid lead the inquiries of the first two known victims- Emma Elizabeth Smith and Martha Tabram. He was present for four more of the investigations that were thought to have been done my the Ripper and also for the Pinchin Street Torso case. While Abberline is often known as the lead for the investigation, it turns out that Reid was just as involved. No matter who investigated the cases, no person was found to be the Ripper. This is a case that attracts many conspiracy theorists, but when it comes to getting actual facts, it can be difficult. What is known is that there are five murders attributed to one person. Each of the victims were prostitutes, and each were horribly mutilated except for one (Elizabeth Stride). There are other cases that are thought to have been done by the same person as well, but it is not confirmed. Martha Tabram is often thought to have been the first one, but Annie Chapman is the official first victim. While there is much speculation about the psychology behind the crimes, there is nothing substantial to most ideas, since there is so little information behind it. This is the most famous case of prostitutes being victims of crimes, but it is far from being the only one. What makes these crimes so terrible (apart from the obvious) is how people have used and sensationalized them to turn them into a marketing ploy. Whitechapel (which once was the worst part of the city) is a shrine to the murders, with Jack the Ripper tours and memorabilia. It is forgotten, or sometimes ignored to make such topics easier, that the victims were people, and that they had gone through horrible things. Prostitutes at the time did not just have to worry about a serial killer (which they did), but also about brutality against them quite often. Women who had a 'mistress', someone who owned a brothel, were actually luckier than those who just sold themselves on the streets. They had a home and a room to sleep in, as well as food. They also had people who would look out for them, since many brothels had some form of guards to keep an eye on rowdy customers. 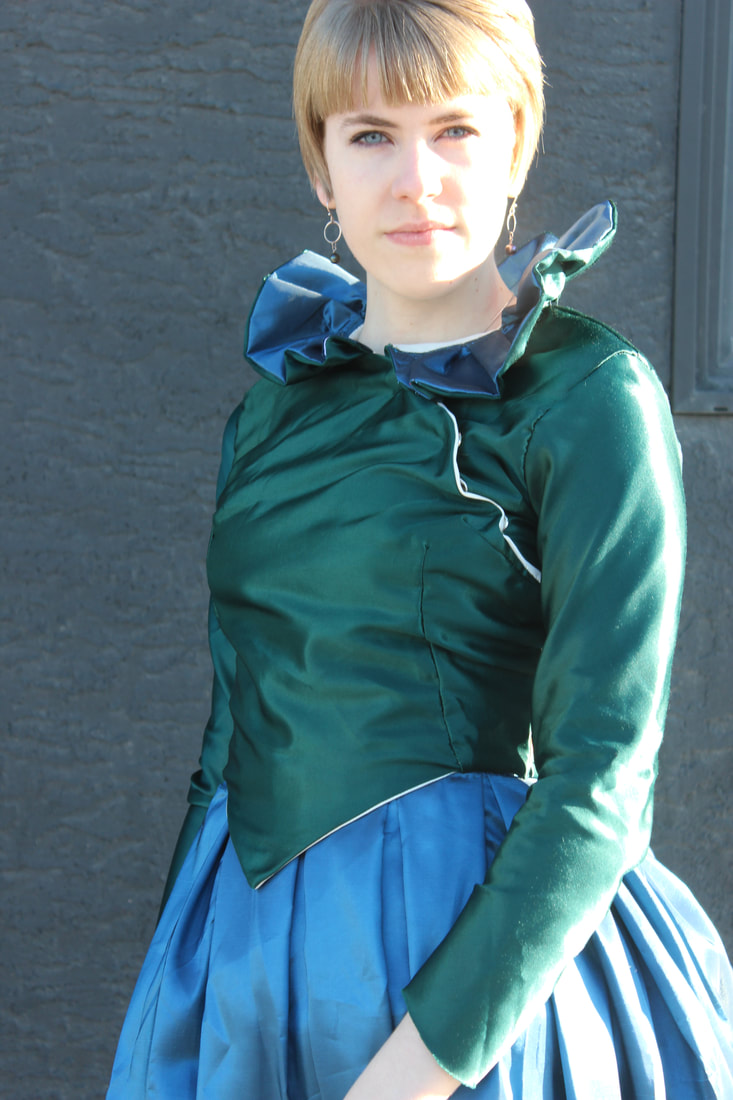 All photos taken outside of nvrlnd (check out my last post for details about that, and the tintype that I got while wearing this dress!) 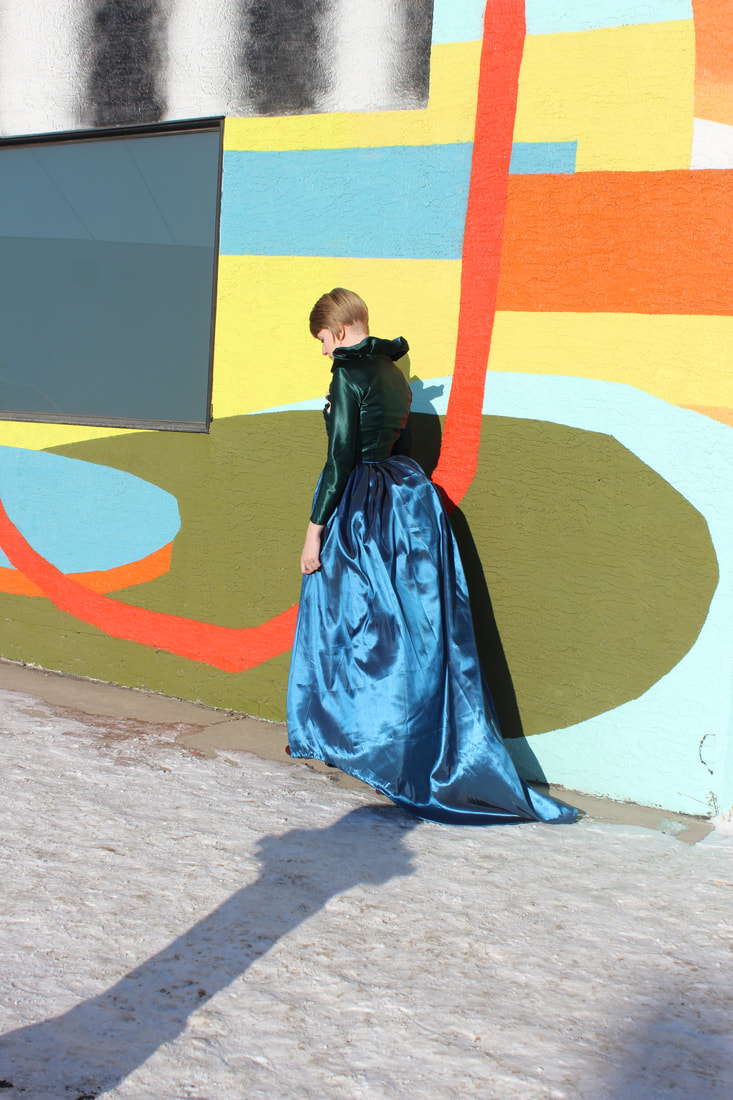 Another side of this dark part of history that is swept under the rug is how many very young people were either sold or taken in by such houses. Male or female (we do like to forget that there were male prostitutes then, but they had to deal with just as much disease and brutality that the women did), having a young person as a part of the household was very common. This also brings up another form of prostitution, however not a consenting version of it. Kidnapping people, normally girls, to sell or bring to other places (sex trafficking, something that still happens), reached a fever pitch in the 1880s. In 1885 and 1912 the beginnings of modern anti-trafficking regulations were created. The regulation from 1885 was created in response to a rally in Hyde Park in the August of that year that demanded the outlaw of white slavery (the term 'traffic' only replaced 'white salvery' in 1921), and for the age of consent of girls be raised. The act made it an offence to kidnap “any girl or woman under twenty-one years of age, not being a common prostitute, or of known immoral character, to have unlawful carnal connexion” (Criminal Law Ammendment Act of 1885). By adding in that they must not be a prostitute or have immoral character, it excluded any woman who might be seen as promiscuous. This put up a divide between a victim and a prostitute, though both would be victims if they were taken by a trafficker. This is not the only law that set aside the rights of people, especially women, who were in the business or seen as not respectable. These laws also made immigrants seem like the 'bad guys', furthering the racism that Whitechapel (and all of the UK, US, Canada, etc) already struggled with. 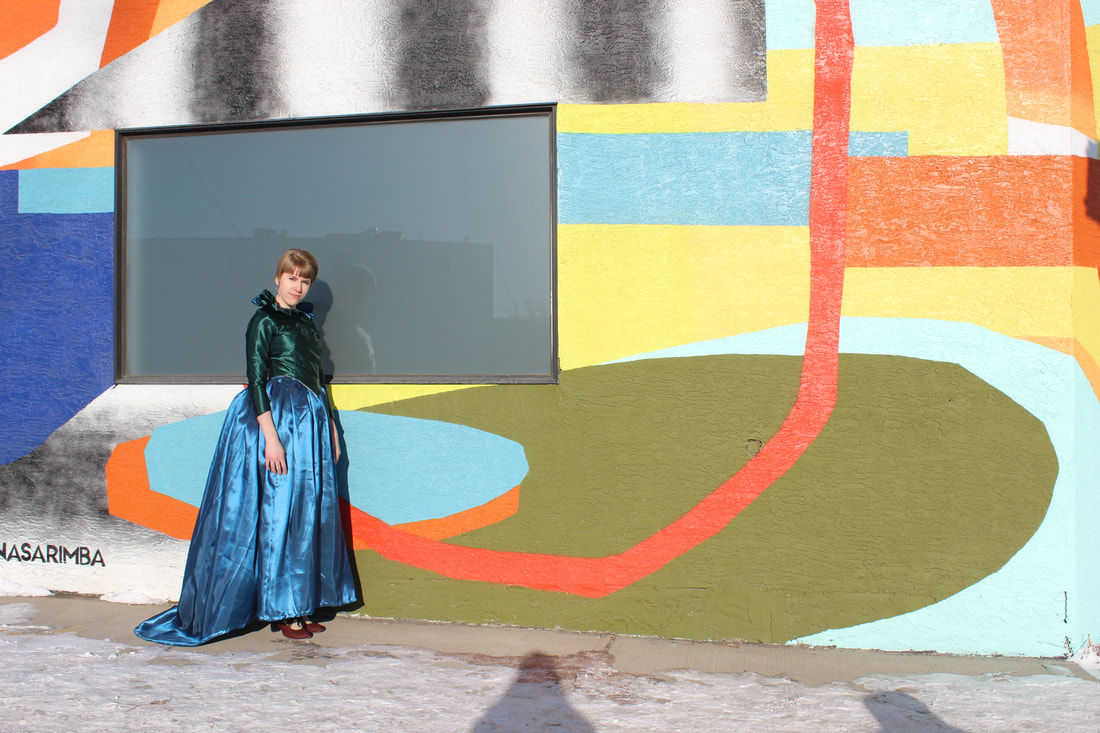 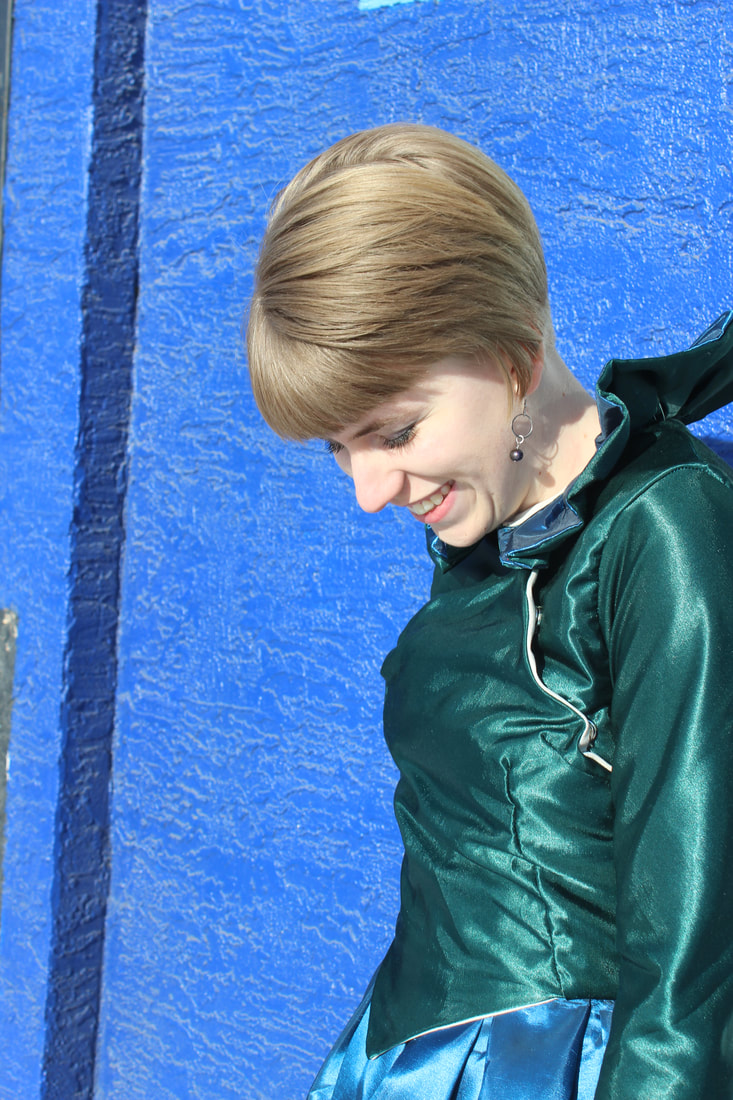 If you want to read or see more about some of the things I have talked about here, I do have many recommendations of both fiction and non-fiction. The book-turned-tv show The Alienist offers up a fascinating and not well known view of male prostitutes in New York, based on a serial killer (that sounds very much like Jack the Ripper) as well as the beginnings of females in the police force. I would recommend the book, but not the show. Obviously I recommend Ripper Street (I know, I talk about it way too much, but the costumes did inspire much of this collection!). The Murdoch Mystery books by Maureen Jennings are also a well done look at the depravity and dark side the the late 1800's. These ones are set in Toronto, and much darker and more based on history than the TV show that we Canadians know and love (though the show is great too, I've been watching it since middle school and I still love it). Out of the Easy by Rita Sepetys is a beautifully done book set in the 1950s in New Orleans with an interesting perspective on prostitution (the main characters mother is a prostitute). If you are more interested in the history of the police force, the BBC has a really great documentary that is available on youtube here that talks about the history of Scotland Yard. There is also The History of the British Police Force documentary available on youtube which I have seen part of and seems very interesting. When it comes to Jack the Ripper specifically, there are tons of books and such about it, although most will not give you very much honest information. I have found this page and this page which have some interesting facts that I do trust, but I would recommend being careful and discerning when researching the cases on the internet since there is a lot of false information. Let me know if you have any documentaries, TV shows, books, or movies that you think I would be interested in! 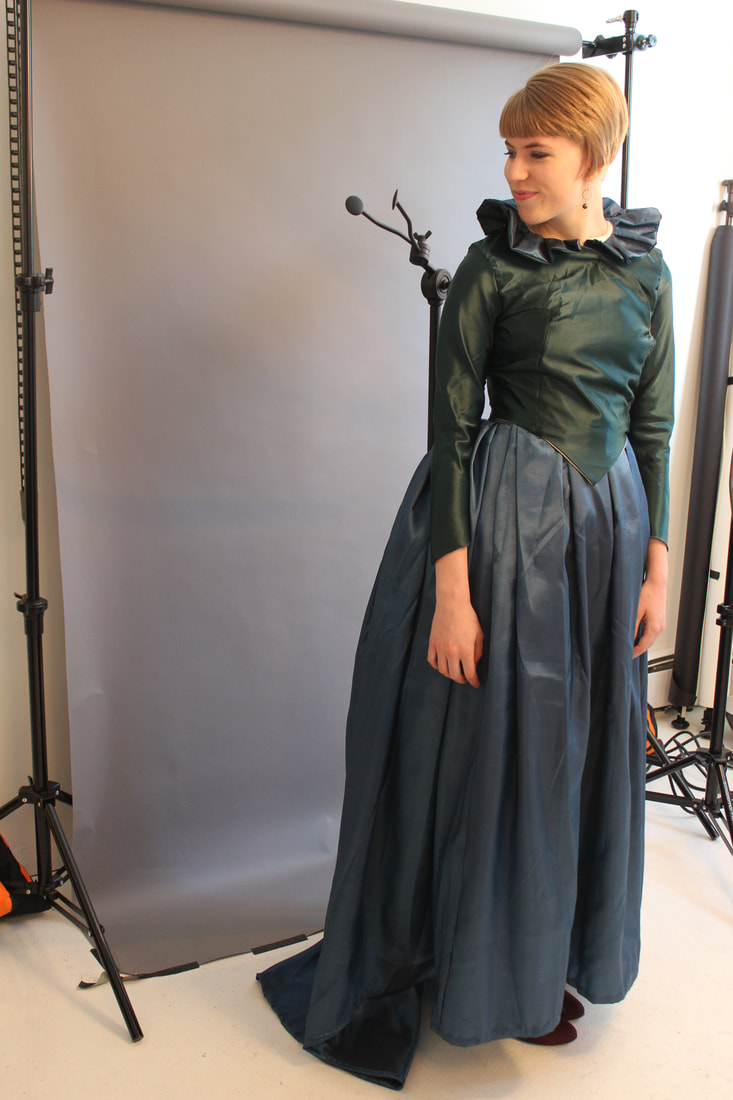 Inside the studio before getting a tintype made! Anyway, thank you for sticking around through the accidental essay that I have written about Whitechapel in the Victorian era! ~K 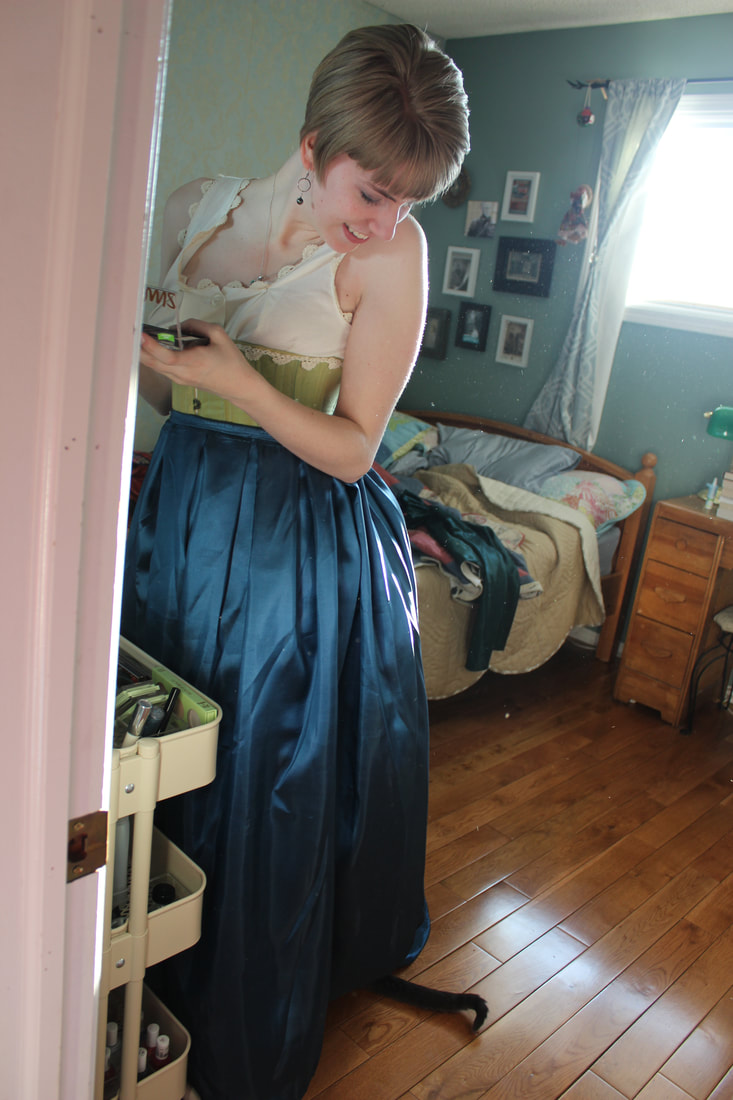 My cat really enjoys bustle dresses and often crawls under them if I stand in one spot for too long Over the past few days I have been spending all of my time working on a new pair of 18th century stays to go underneath the Robe a la Francaise. I used the American Duchess stays pattern as a tentative base, then altered it with the help of extant garments, other historical costumers advice, and a little imagination. Since this project is going to be entirely hand sewn and will take quite a while to complete, I thought that I would make a bit of a step-by-step of how I created them. Please don't take this as a guide to sew your own though, since I'm not focusing on historical accuracy. I just want a mostly accurate shape and a pretty garment at the end of this. 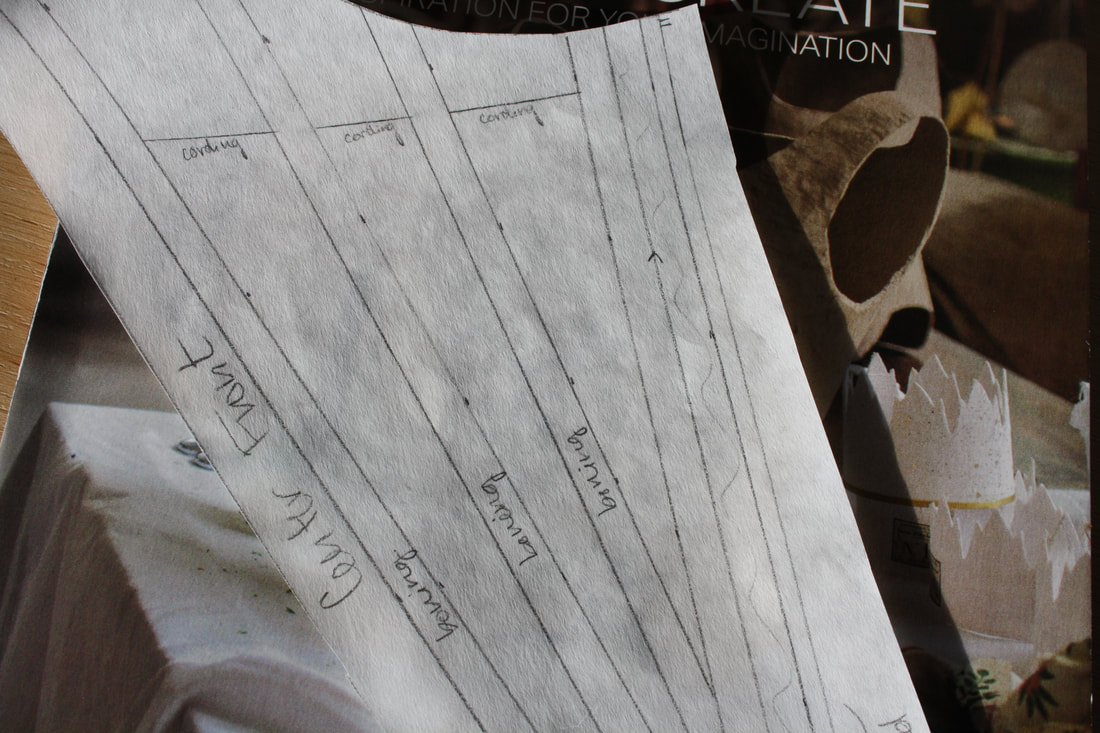 A look at the paper pattern piece of the center front panel  The two back panels of the stays After drafting the pattern on paper and adjusting it a million times to get a better fit (okay, it wasn't a million, but it sure felt like it), I cut out each section for three layers: two inside layers (where the boning will be sandwiched between) and the top silk layer. I then copied my boning pattern onto the inside layer so that I can follow that with my stitching. The boning pattern took me nearly as long as actually drafting the shape of the stays, just because I wanted to make sure that it was both comfortable and efficient. I also wanted to follow a historical example, since seamstresses through history always knew best. It can be pretty difficult to find clear photos of extant stays, but I used this one from the V&A as inspiration, since it doesn't have a front and back lacing. I cut out my front panel as just one piece, so it won't have the option of front lacing. 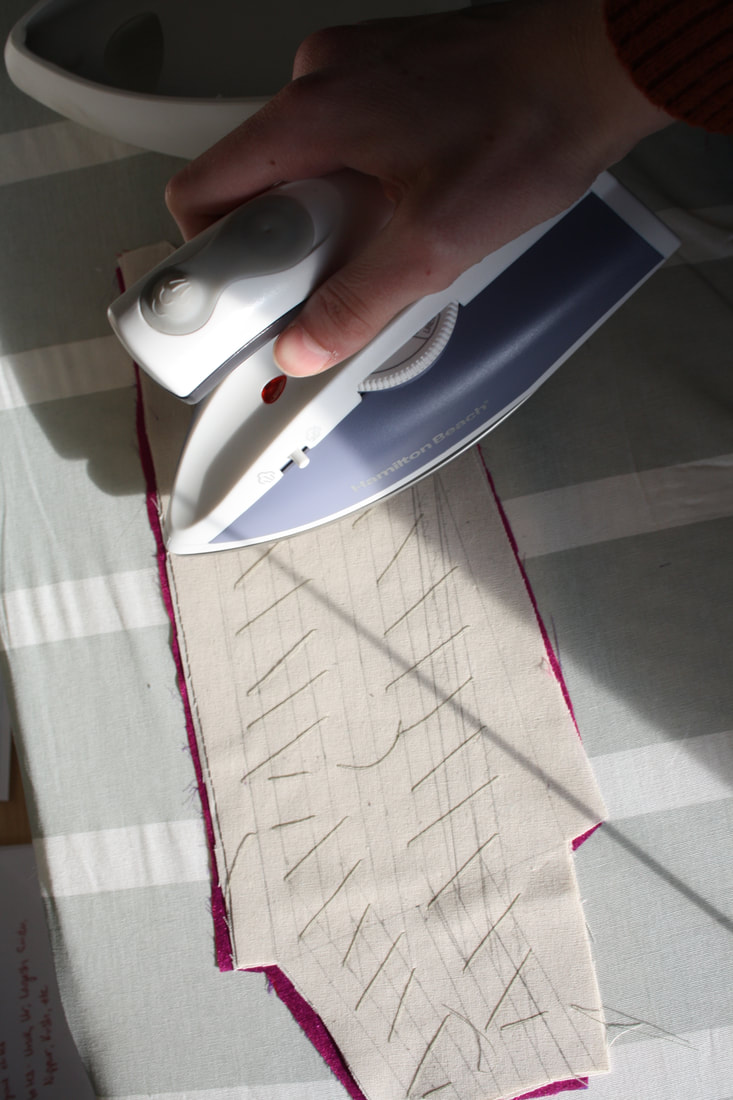 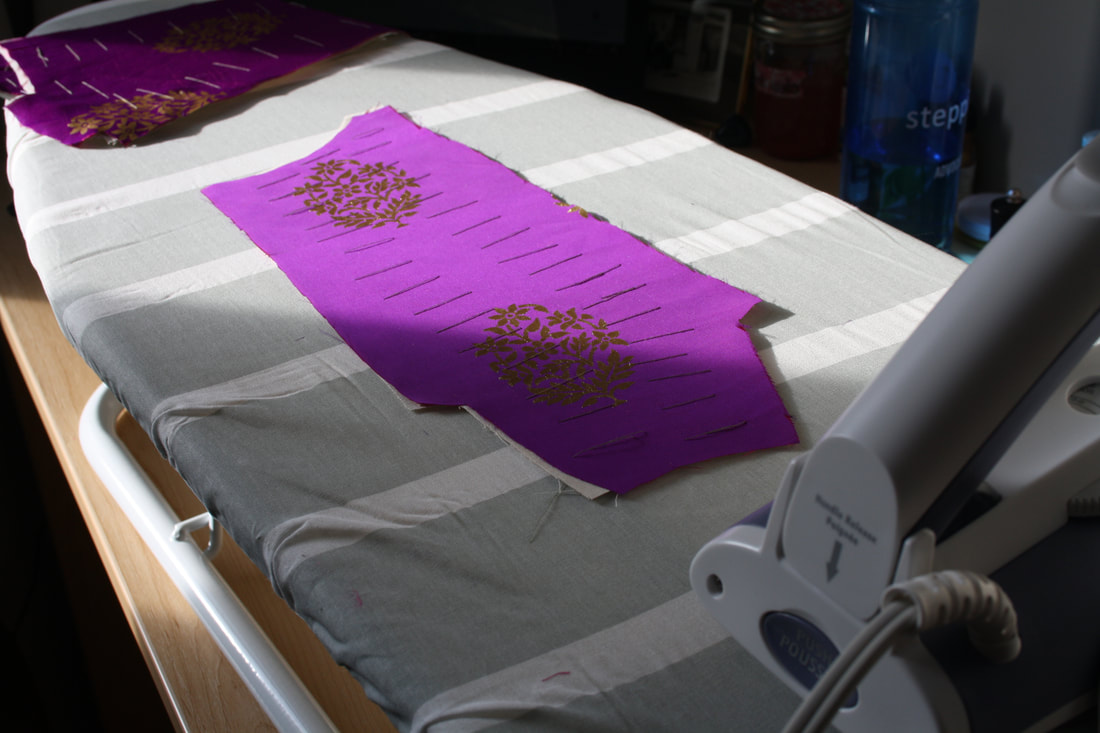 After all of the boning channels are drawn onto one of the inside layers, I pad stitched the layers together. Pad stitching is a type of tailors stitch that bastes two layers together (this is how you attach a non-fusible interfacing). I did this quickly and a bit sloppily, since I just need it to make sure that the layers don't slip while I'm stitching the channels. The sections especially needed it because of how slippery the silk is. I then ironed everything before I started any of the real stitching. 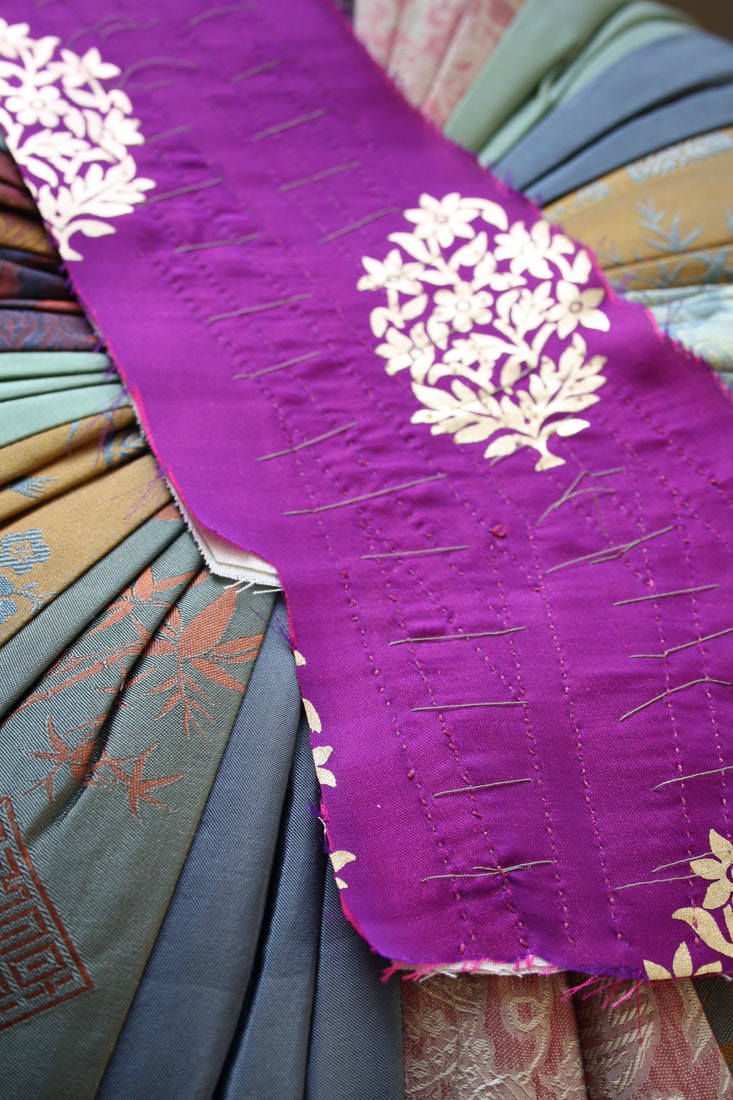 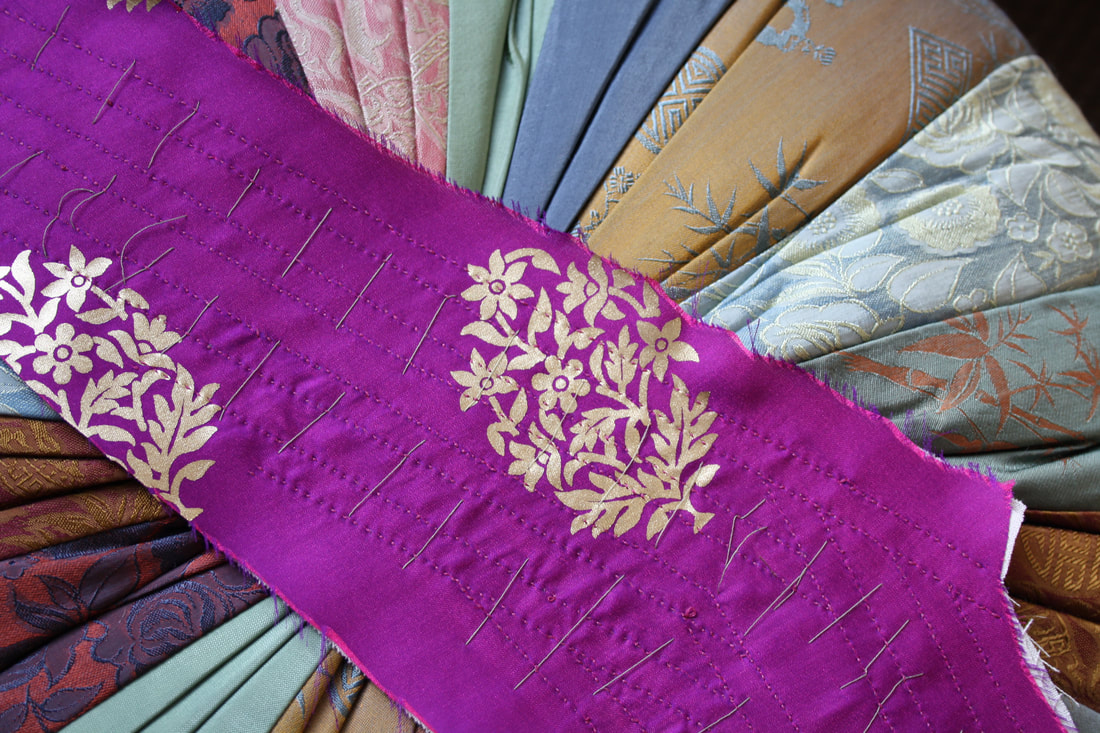 The boning channels in one panel entirely sewn up, but with the pad stitching still in. I will be removing that in a while. Now it is finally time to start on the boning channels! This could be a very tedious process since it is just a running stitch down all of the lines you drew for your boning channels, but I actually really enjoy the process. So far I've watched Crimson Peak, some Ripper Street, and Marie Antoinette while working on my sewing! 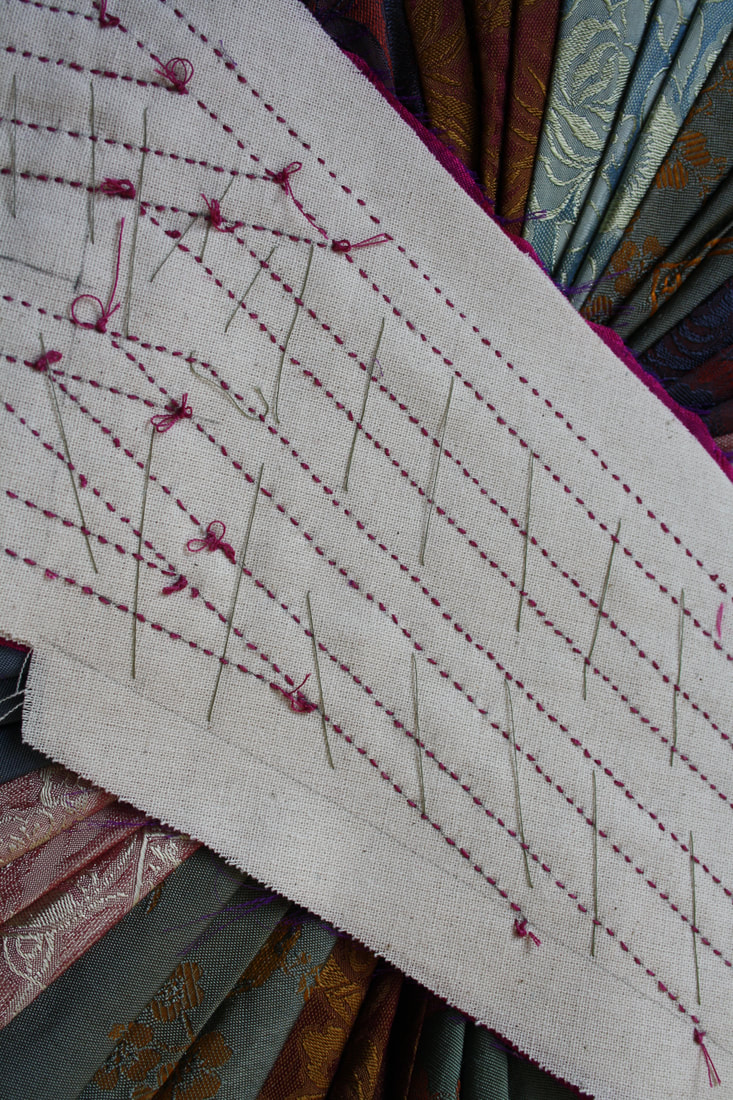 The finished panel from the inside (this will be covered with lining near the end of construction) Before I sign off, I thought that I would talk through a bit of my thought process behind the decisions I've made so far in the process. To begin with, I am including the top layer while sewing the boning channels because I want to see the stitching from the front. I have seen some more decorative stays where the top layer was sewn separately and then attached after the bones were put in, but I love the texture of the stitches and want to be able to see that once the stays are done. Another thing that I would like to mention is my choice of silk that makes up the top layer. I am very aware that it isn't historically accurate (though it does have a vintage flair to it). I decided on this one for a few reasons: one is that I only had a meter of it, so it was the perfect amount for a project like this. Second, I want the final piece to have a bit of a modern Marie Antoinette style, and I thought that this would be a great way to achieve that. Thirdly, I just really like the colour and how it looks! ~K
 If you have ever looked at my About page, this photo is from when I was 10 years old. I was wearing my 'Prairie Dress' (made for me by my grandma and inspired by Little House on the Prairie. I lived in this dress for years) and sewing in the garden. If you look at the bottom, I was making one of my little dolls. This is one of the questions that I get the most when people find out that I am a seamstress. This and 'when did you start sewing?', both of which I will talk about in this post. A few days ago my mom found my old blog. This discovery has delighted me to no end. It's a great deal of fun to see how I started, as well as how I wrote when I was in middle school and running a little blog. Yes, I started writing a blog when I was in middle school. My original blog was called 'Kate and Kompany', and it was about the little art dolls that I started sewing when I was seven. Along with that, I post bits about making little clay dolls (of which I still have a few) and playing around with scrapbooking.  Name: Autumn the Butterfly Faerie (I was 12. I had just read the Spiderwick Chronicles. According to the little story she came with, her favourite flowers are Daisies. Each of my art dolls were made with scraps of mostly quilting cottons that I was given by my grandma's and anyone else who sewed that we knew. They also had names and little stories to go along with them. I think that was the part that I enjoyed the most - I have always enjoyed finding interesting names and writing little stories. All of the dolls are inspired by history (not much has changed, hey?), and some of them are mermaids and faeries. I started writing the blog in 2011, when I was 11 years old. It doesn't have tons of posts, but I did keep it up for 3 years!  Antoinette, inspired by Marie Antoinette. There was a 'Royal Diaries' book about Marie Antoinette, and I was completely fascinated with the entire era. The pattern for the actual doll bodies was from a wreath, interestingly enough. It was a fall wreath pattern, if I remember correctly, that had a little witch or something attached to it (kind of like this pattern). My mom would make the body and legs for my on the sewing machine, since I wasn't comfortable on the machine yet, and I would do everything else. I enjoyed it immensely, and this is how I spent a lot of my spare time. I also sold some of these dolls to people around Airdrie (as you can see, Airdrie is a very supportive city).  Elizabetta. My mom used to crochet the teensiest little caps for them for winter so they wouldn't get cold. It's always fun to look through the things that I've sewn to see how much I've learnt, even just over a few months. Seeing this, with the very beginning of my sewing was so fun for me. If you would like to check out my middle school blog, it's still up here. Enjoy the ramblings of a 12 year old me!
~K We made it! This is my last details post of my eco couture collection that I designed, drafted, and sewed for the Future Oceans Fashion Show that was held in Victoria, BC on Canada Day (anyone sick of hearing about this event yet?). If you want to read and see more about the event and the other garments that I created for it, you can check it out here. For the sake of not repeating myself a million times and making each post longer than necessary, I'm going to assume that you know about Future Oceans and go straight into talking about the last two garments in my little collection. 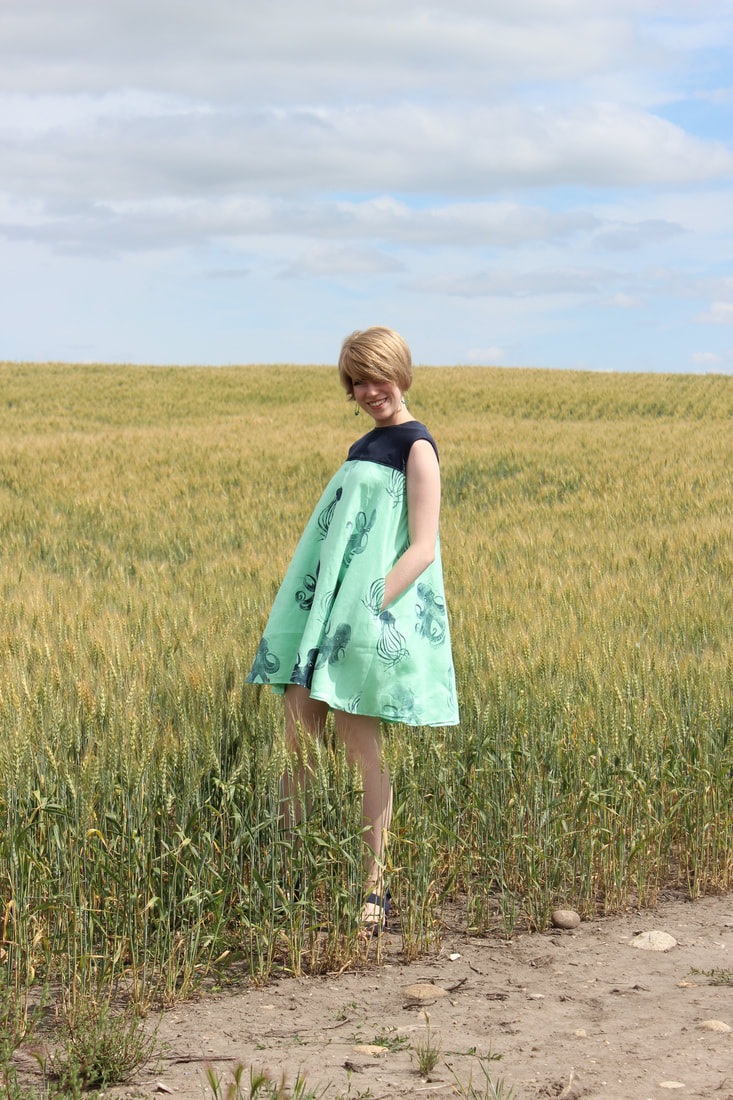 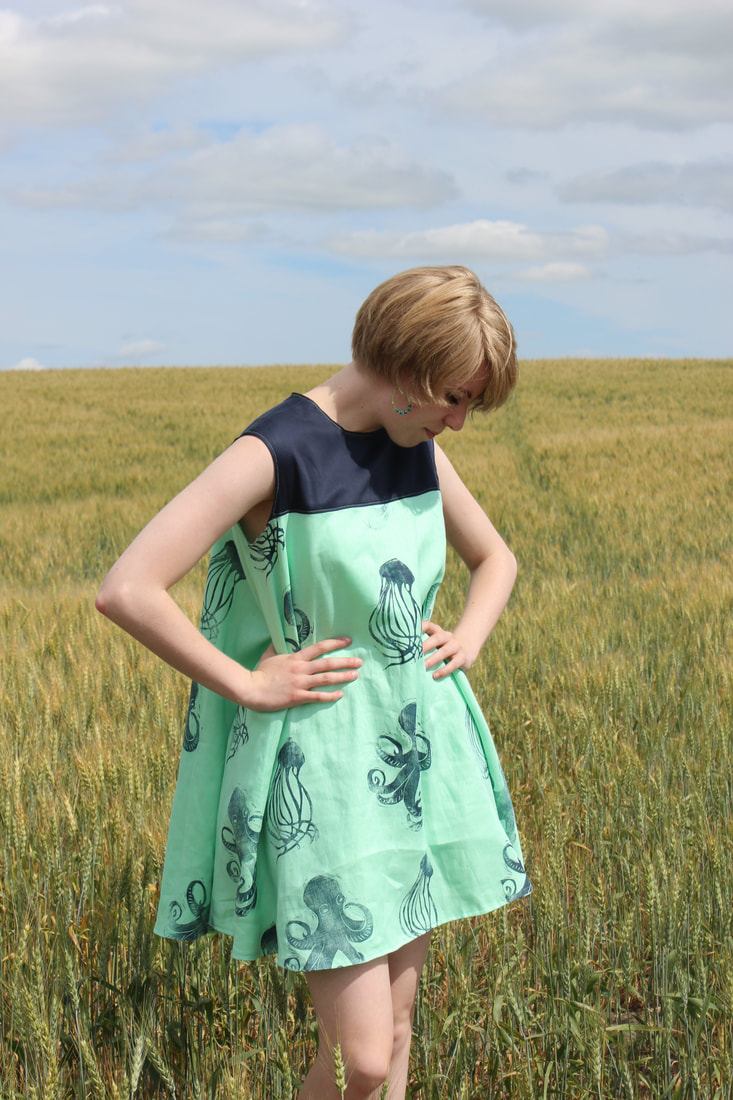 The first dress I'm going to talk about today is the first dress that I actually created for the show. I designed all of the dresses in the winter, but I didn't start patterning or sewing any of them until May. I'm not sure if I was procrastinating or if my reasoning is solid, but I chose to avoid creating any patterns until I got the fabric in. I bought my fabric from a sustainable material brand that is run out of Canada, but it still took a bit for the fabric to arrive. It was insanely exciting when it did come in, and I was hit with lots of inspiration to pattern draft after I saw it. The 1960's dress was an easy pattern to make, which is why I started with it. I wanted to ease myself in a bit, and this was a great way to do it. It was also pretty simple to sew, since it's such a simple silhouette. 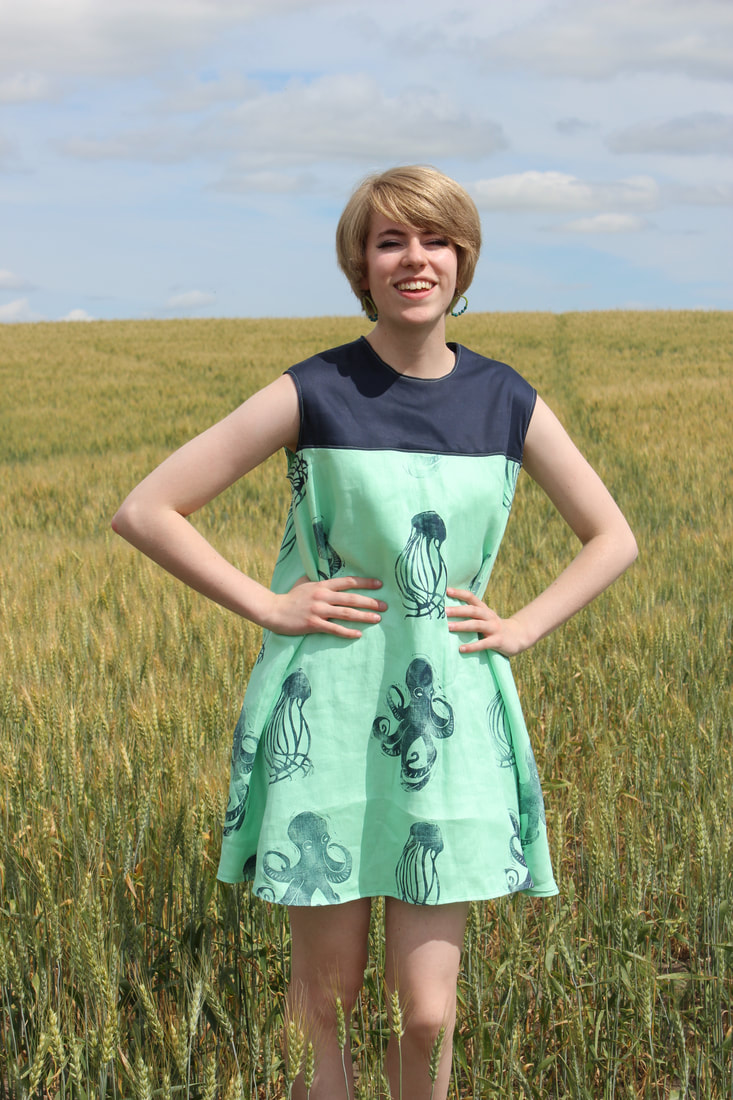 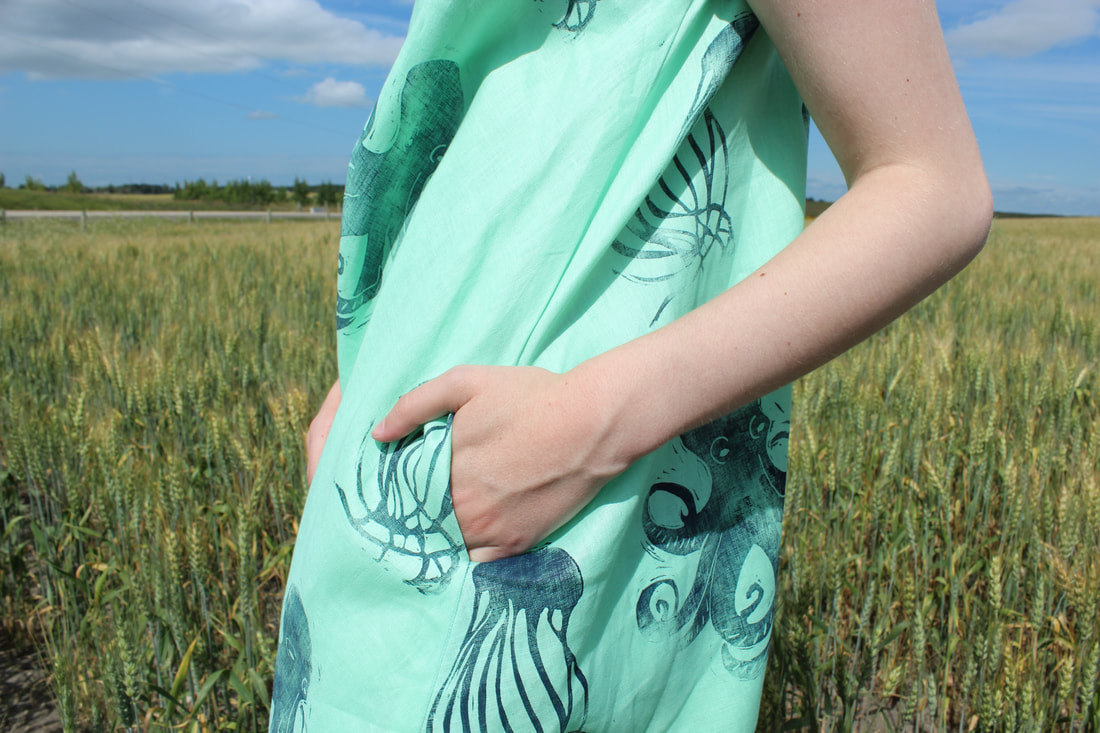 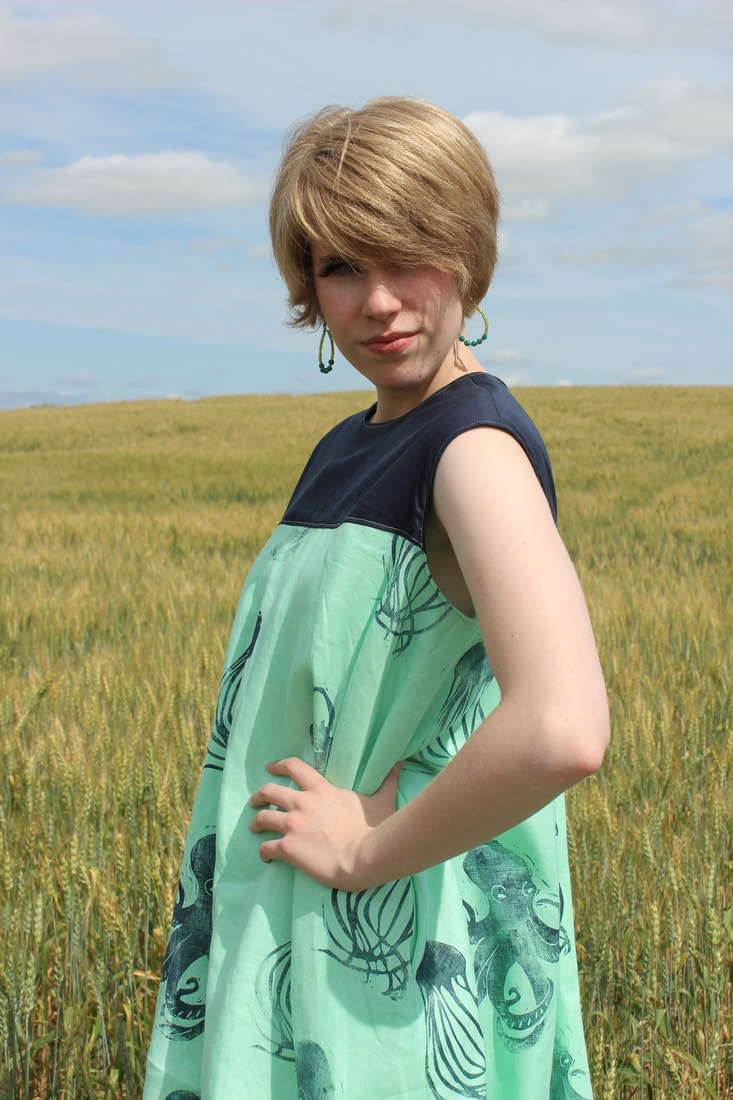 This dress is made out of organic cotton sateen (for the yoke. This is the same sateen I made the 1940's dress out of) with a sustainable linen. This linen is so floaty and wonderful to prance around in. The entire dress is lined, and it features pockets hidden in the side seams. The linen is hand stamped, like almost all of the other garments in my collection. I was inspired by trapeze dresses from the 1960's. It was an added bonus that this shape of dress is very easy to fit to different shapes and sizes, so it was very easy to find models to fit it for the show and the photoshoot the next day. 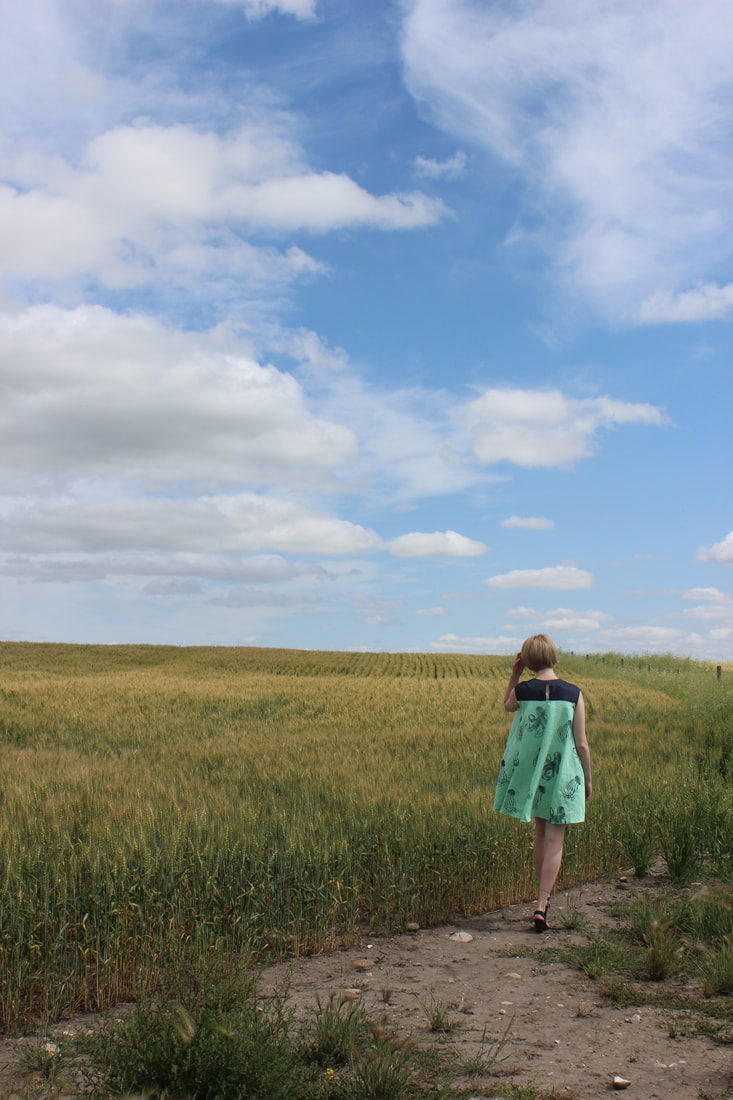 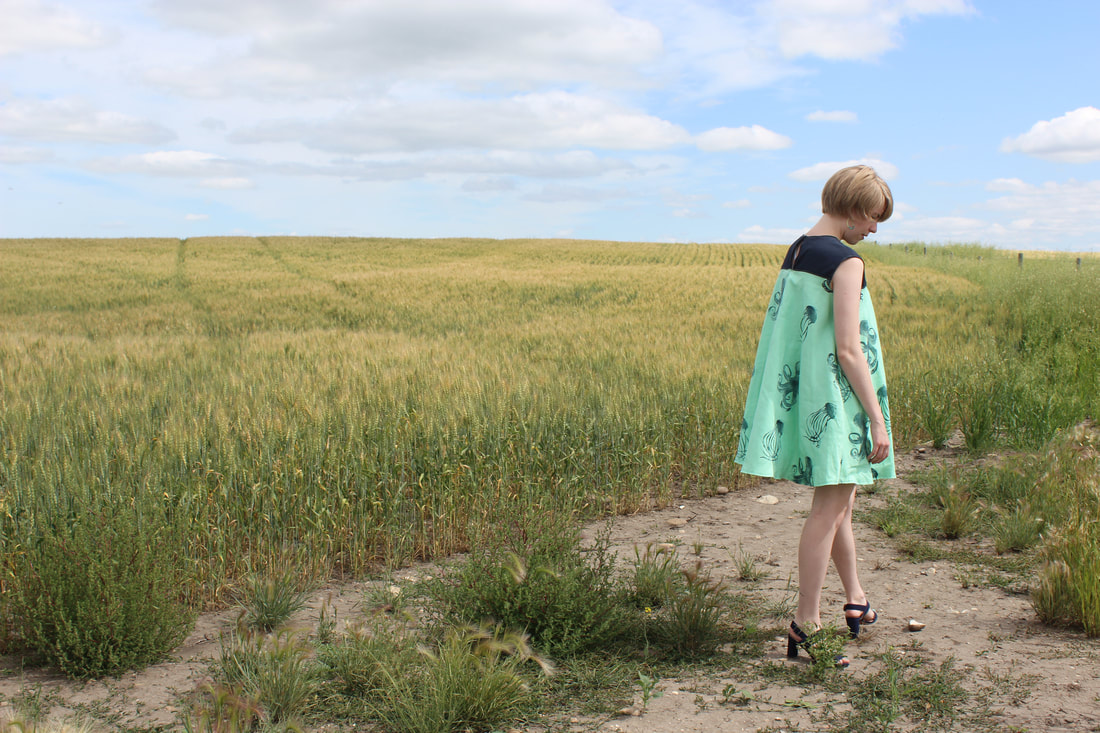 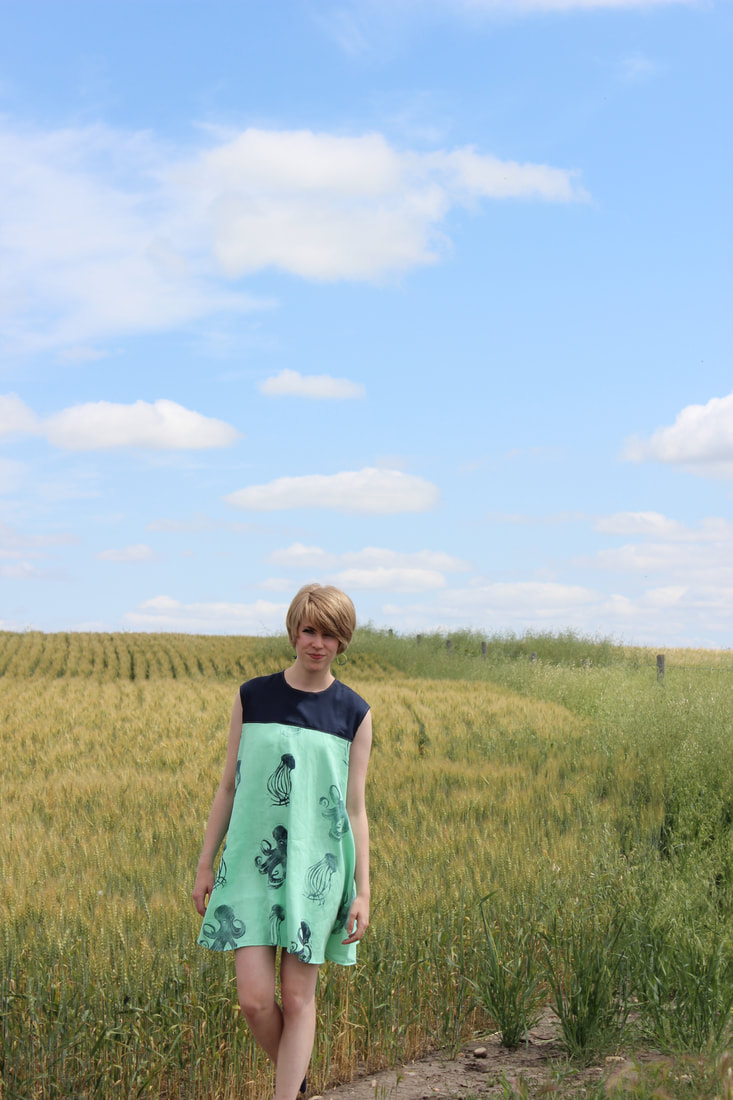 I used to hate 1970's fashion. I can now admit that I absolutely love it now. Blame Wes Anderson. Opposite of the 1960's dress, this is actually the last dress that I made for the show, and it was designed about 5 minutes before I made the pattern for it. The original collection was supposed to start at the 1930's and go to the 1960's, so this dress and the 1920's one were last minute additions when I realized that I had extra time and material on my hands. 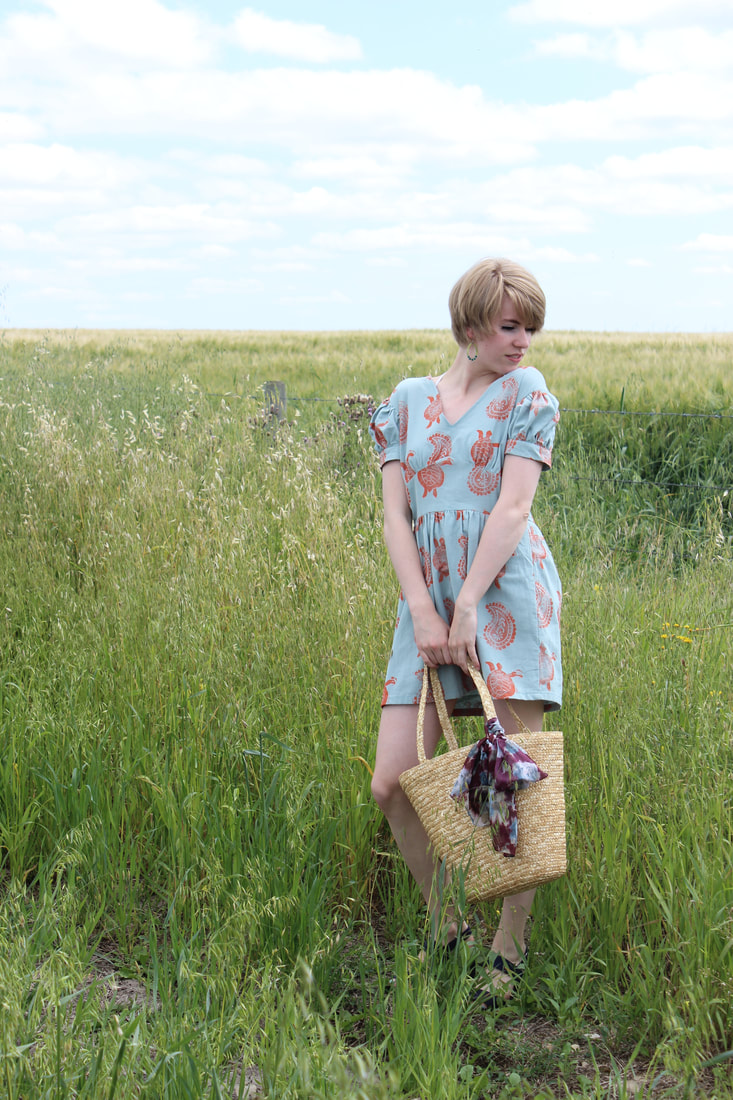 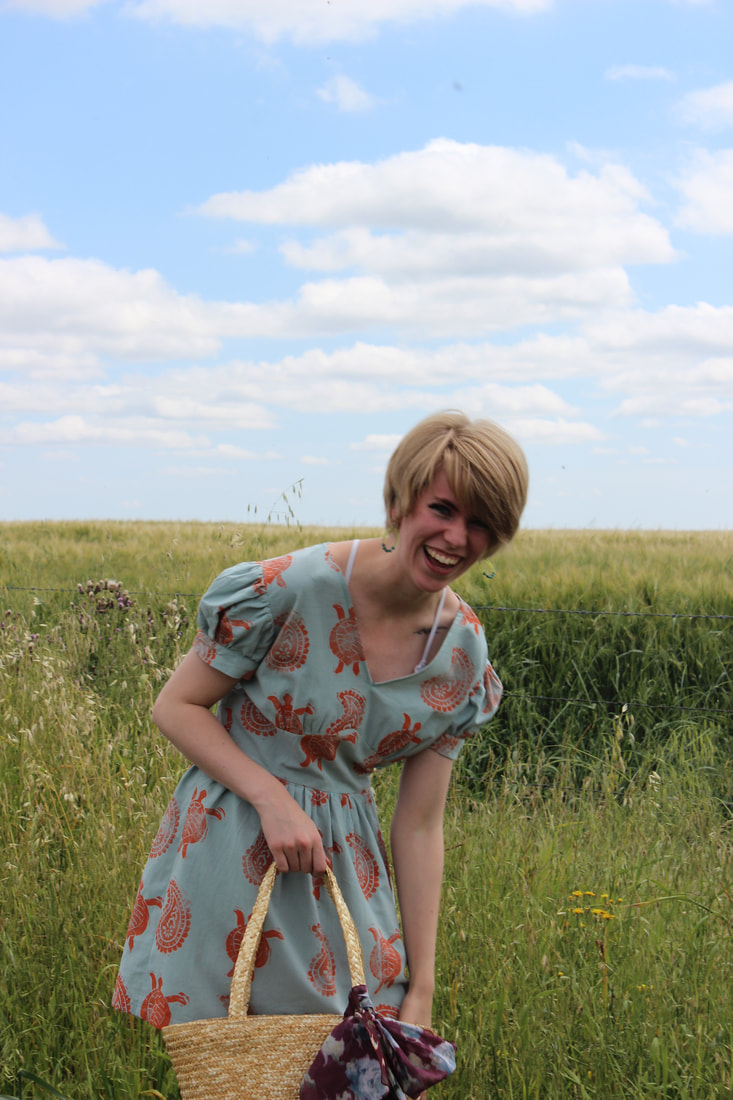 This dress was quick, dirty, and fun to make. The drafting of the pattern was relatively easy and so was putting it together. Printing the pattern on it was tons of fun as well since I got my mom to make me a special stamp for it (my mom is the one who creates all of the stamps that I use to print my fabrics). The pattern is paisley and turtles in a coral on blue cotton gauze. I loved working with the fabric when I used it for the 1950's dress, and it takes fabric ink really nicely. 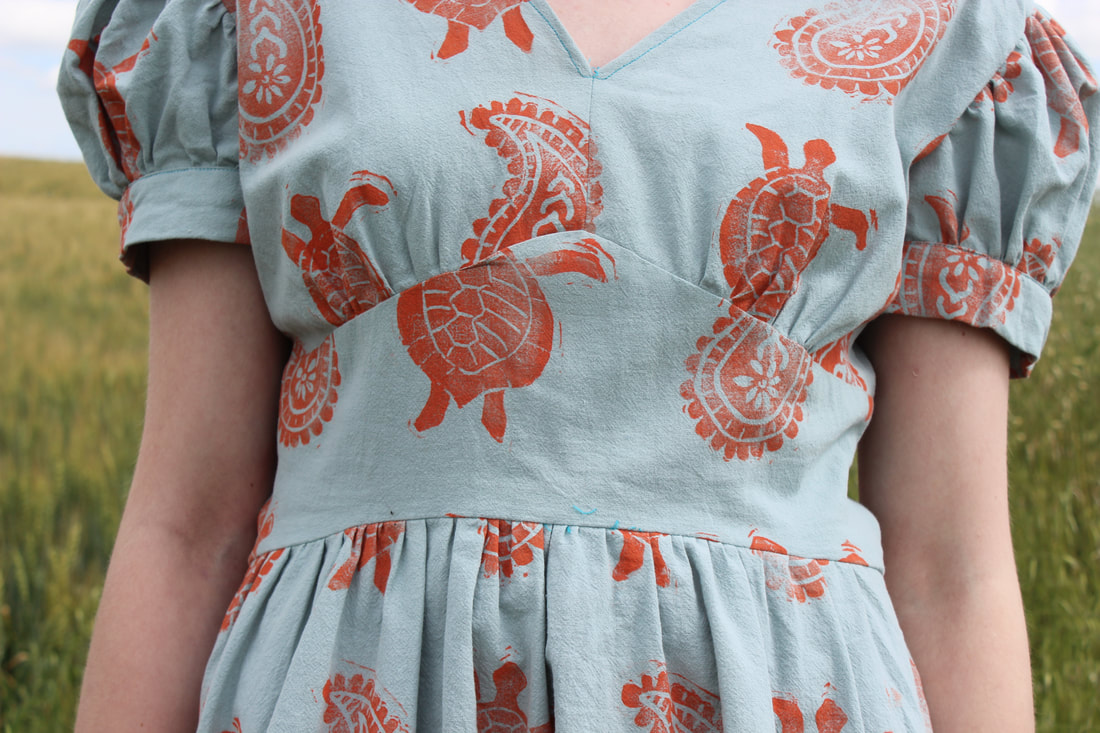 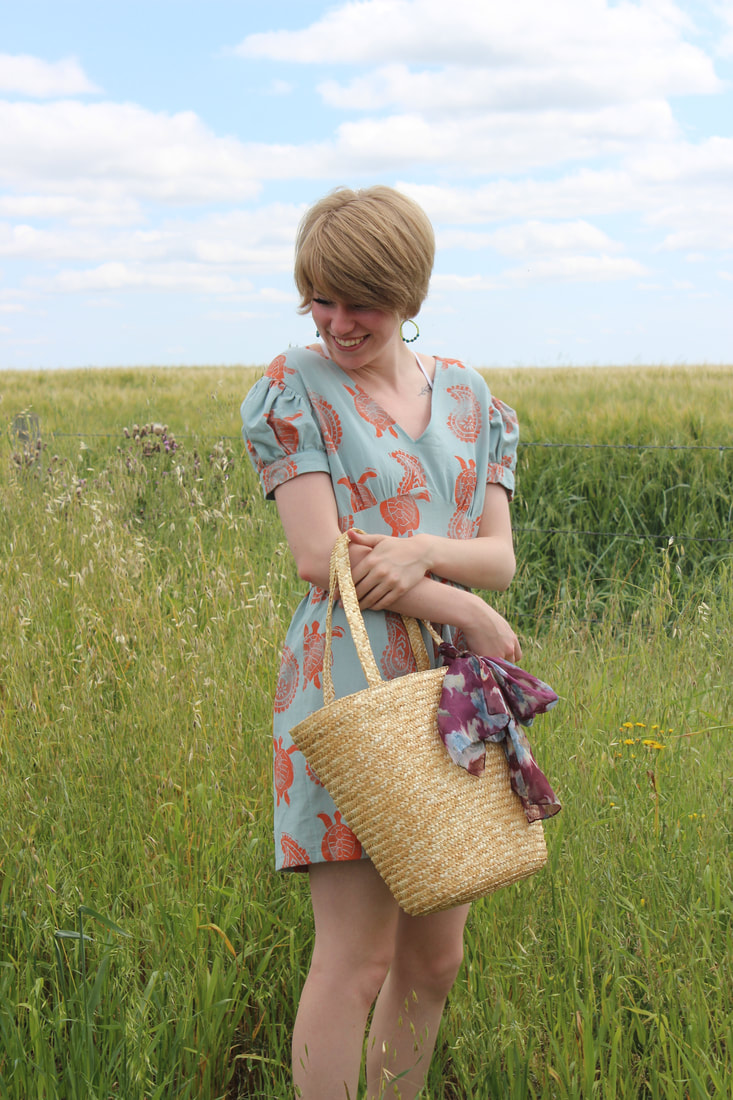 When I thought about making a dress inspired by the 1970's I was torn between making a maxi or a mini dress. The choice was made purely out of convenience in the end - I wanted it to have puffy sleeves, and if I wanted enough fabric to make that it had to be a mini. I had so much fun making this dress, and I'm thrilled with how it turned out. 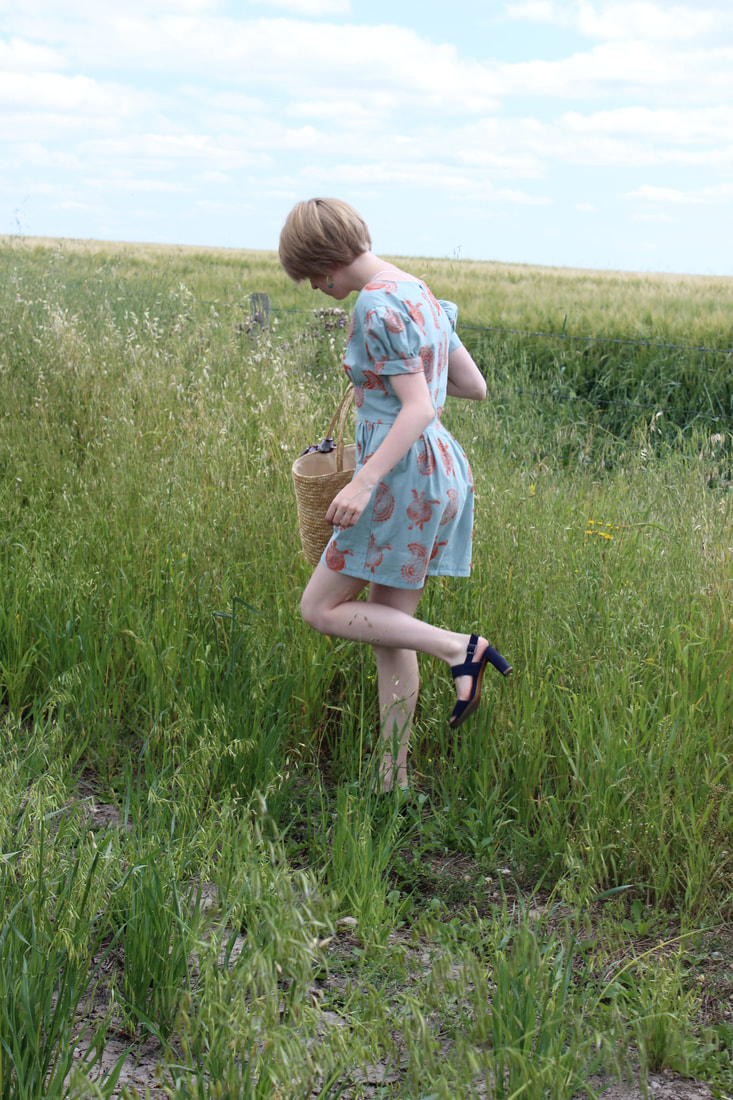 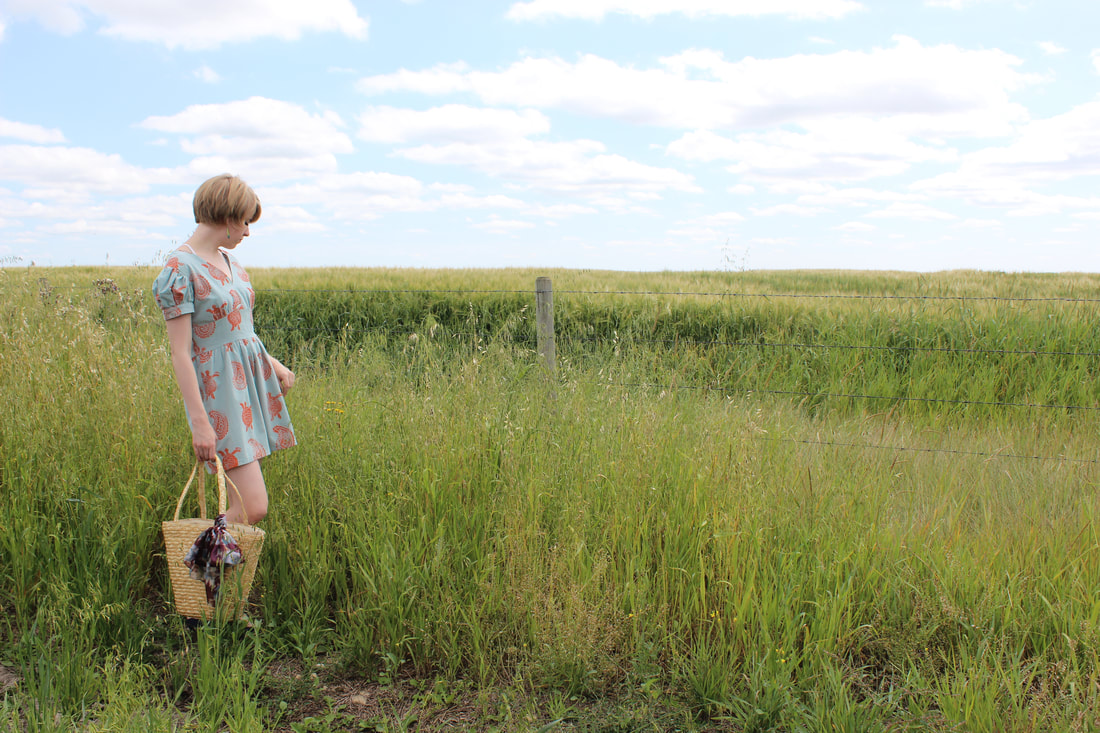 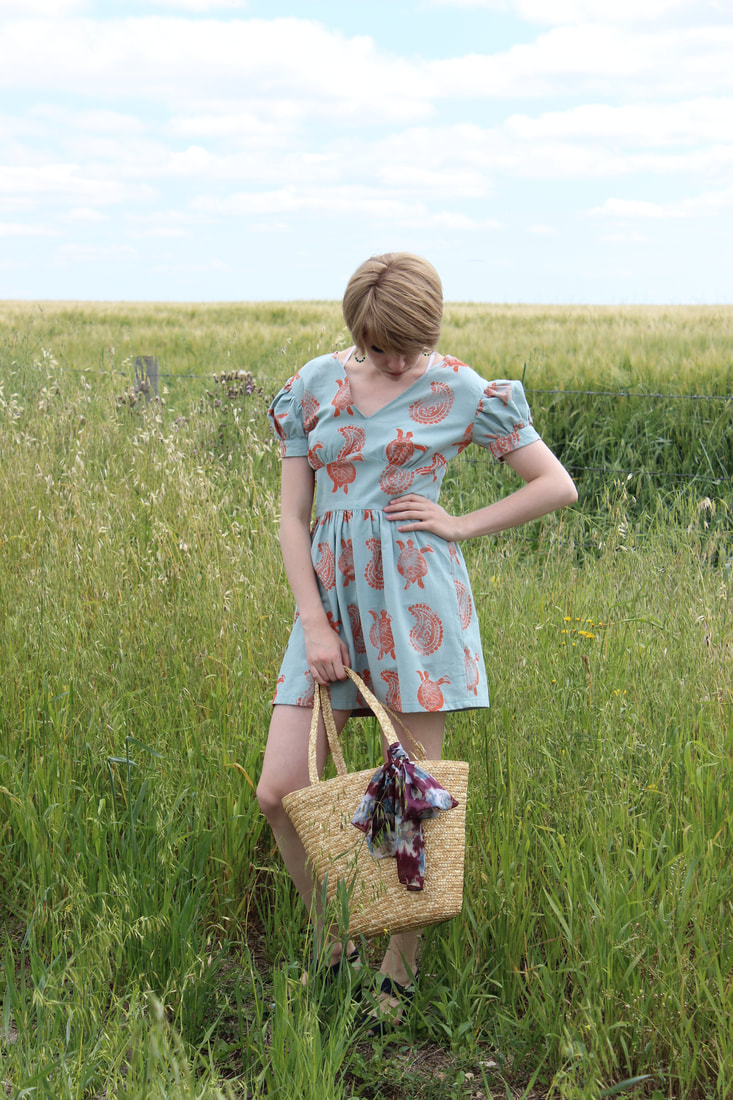 Both of these dresses are currently for sale at the Future Oceans Boutique at the Victoria Bay Center and online at the Future Oceans website! You can order either one of these dresses or a skirt (check them out here) and get it made to your measurements! 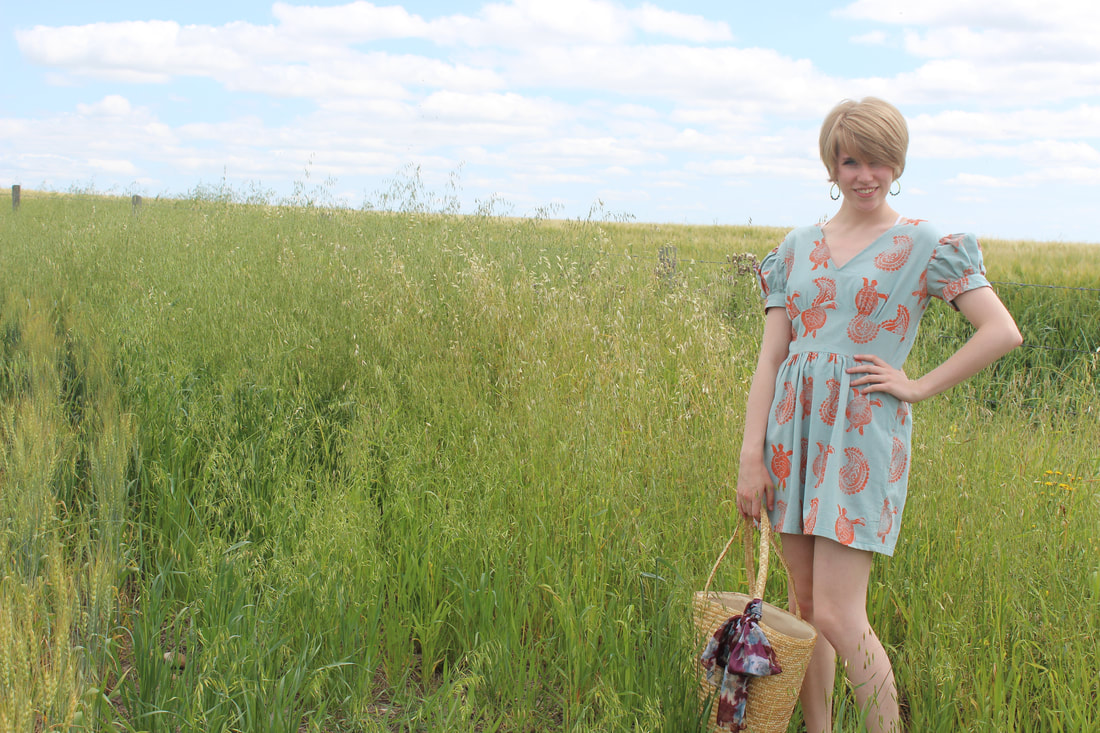 Thank you for your support!
~K Last week I focused on two pieces that are a part of my eco couture collection for Future Oceans. If you want to read more about Future Oceans (the fashion show, the garments I made for it, or some of the process while I was preparing for it) you can see more here. 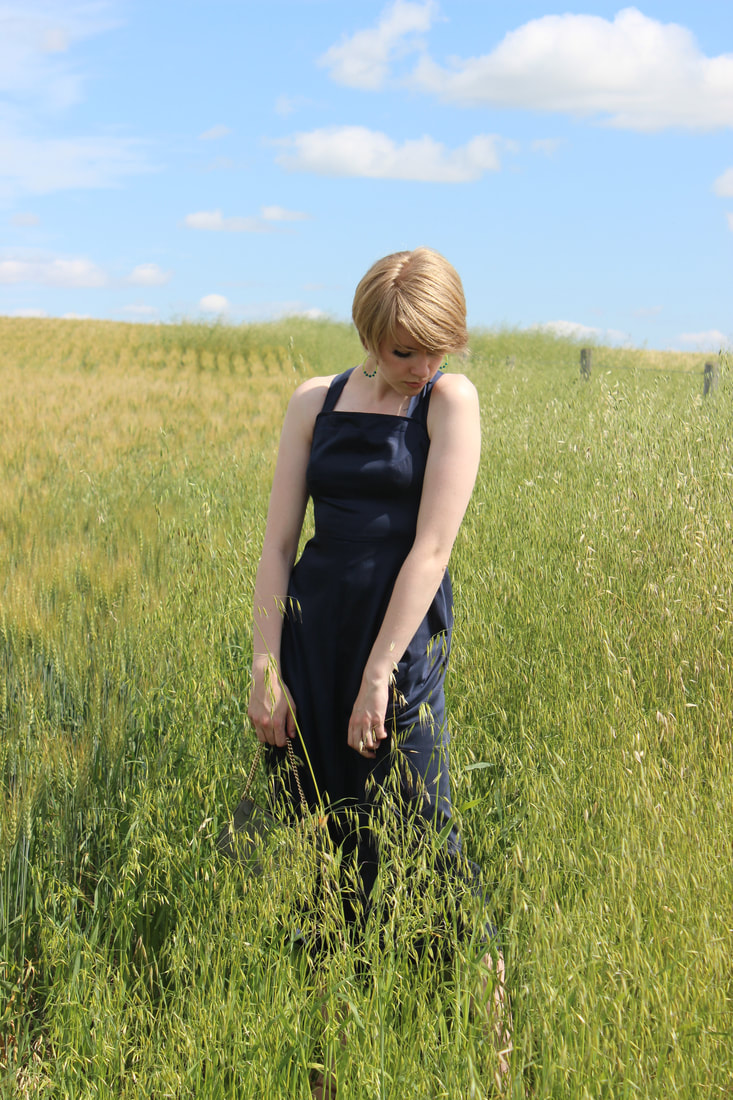 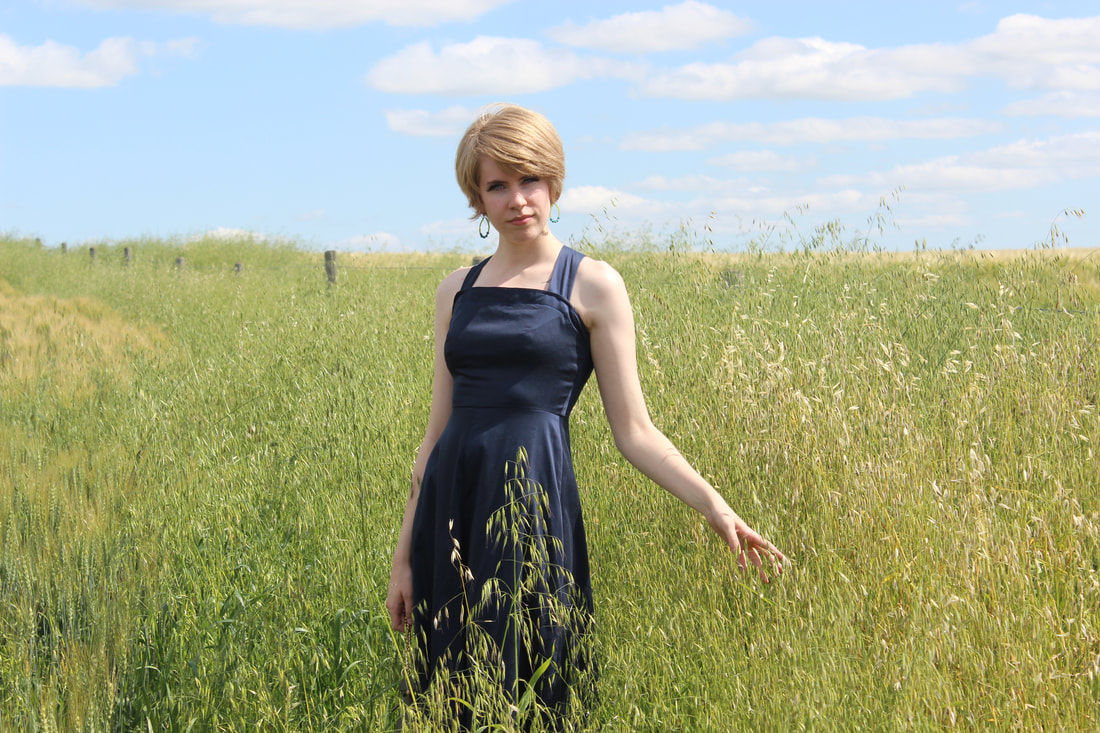 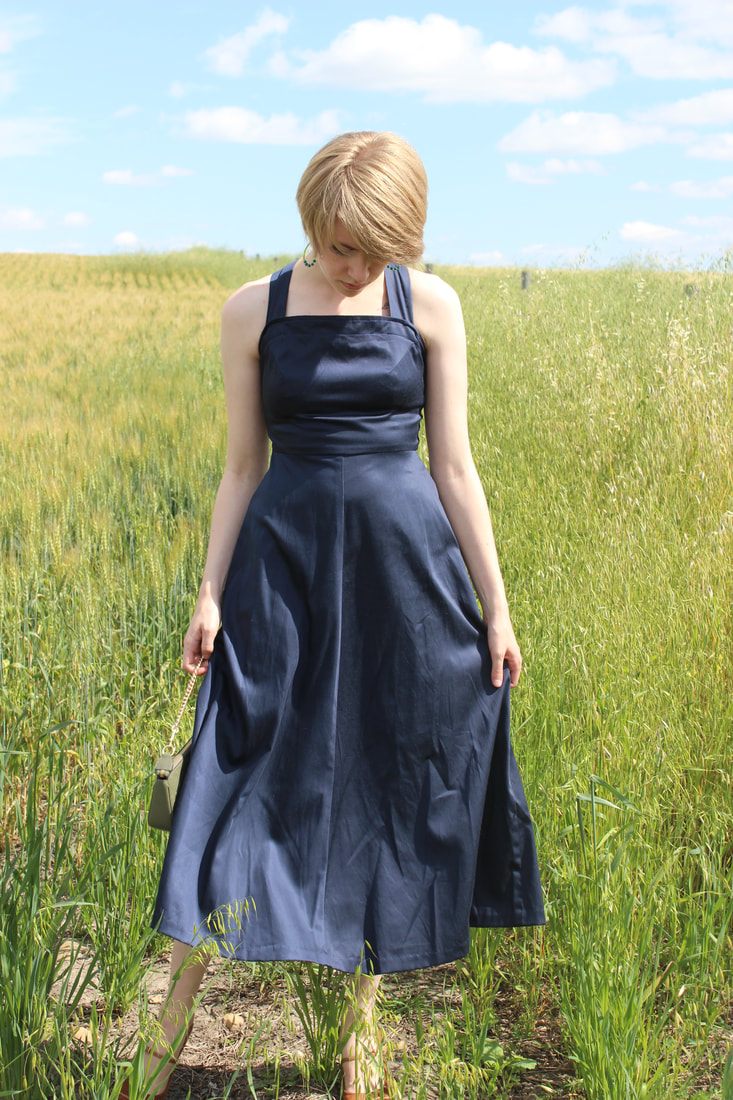 This week I wanted to look at some of the detail and design process for the dresses that I made that were inspired by some of the best decades in fashion - the 40's and 50's. I have always loved the fashion of the 40's, and I've already made quite a few pieces inspired by the era. The thought process behind this dress included much more than just what design elements I liked from the era though, since I had to take into account what type of fabrics were available for me to use, how much time I had to make it, and what kind of shape would be the most convenient to make when I wasn't sure who was going to be wearing it. 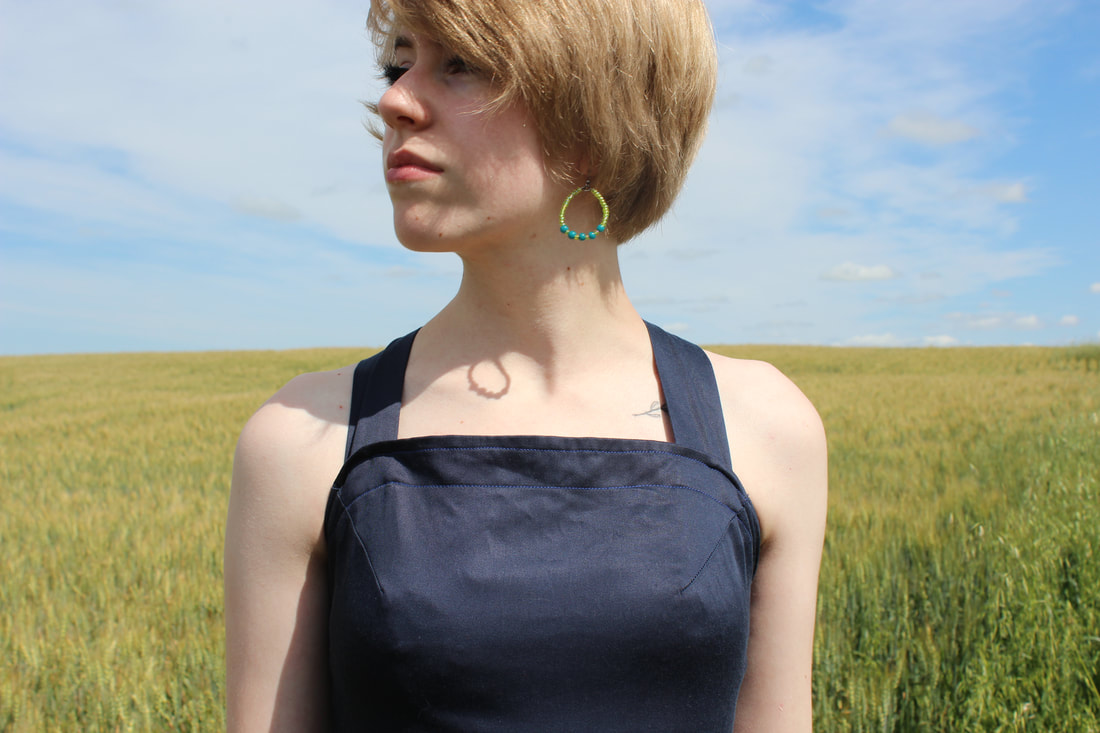 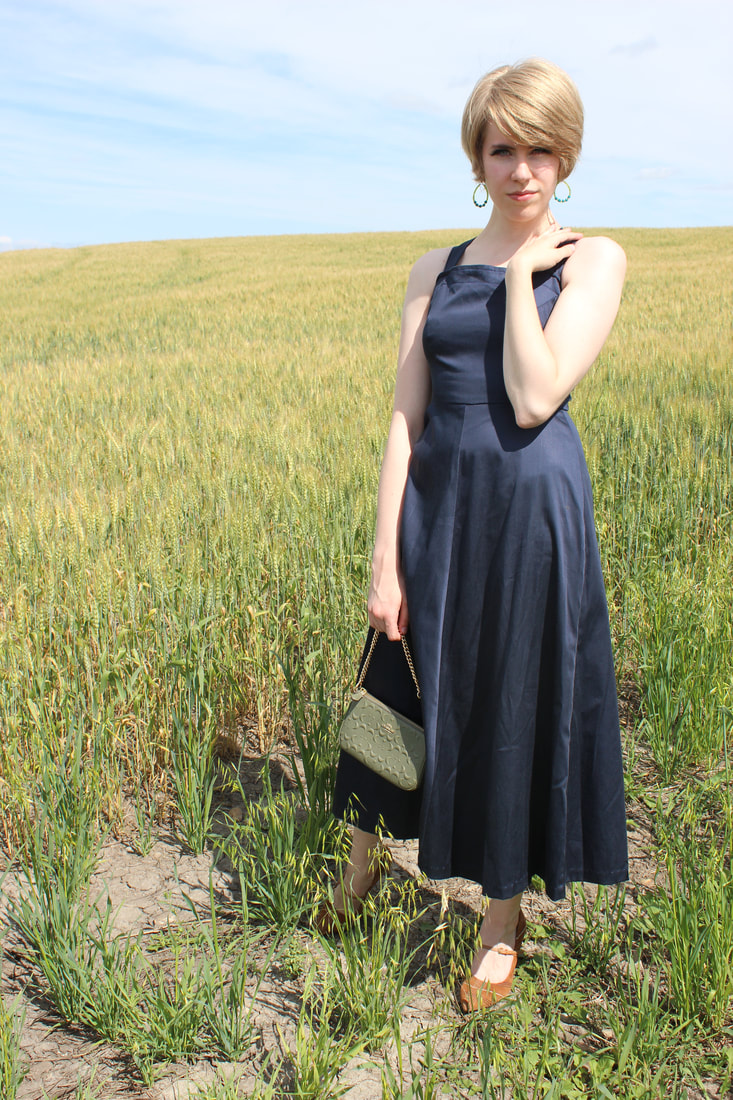 One of the most difficult aspects of designing and making garments for fashion shows is not knowing who exactly is going to be wearing them. Quite a few of the pieces that I chose to make for fashion shows have been designed to be more suitable for many different shapes, and sometimes sizes. This dress was one of the later pieces that I added, meaning that it got tacked on after I finished most of the other ones. I had some time and the material to make something else. Originally, I wasn't sure if we would have time to show it in the actual fashion show, so it was a backup that I might have worn behind stage. We did end up having the time for it, and I'm so glad because I was thrilled with how it turned out. 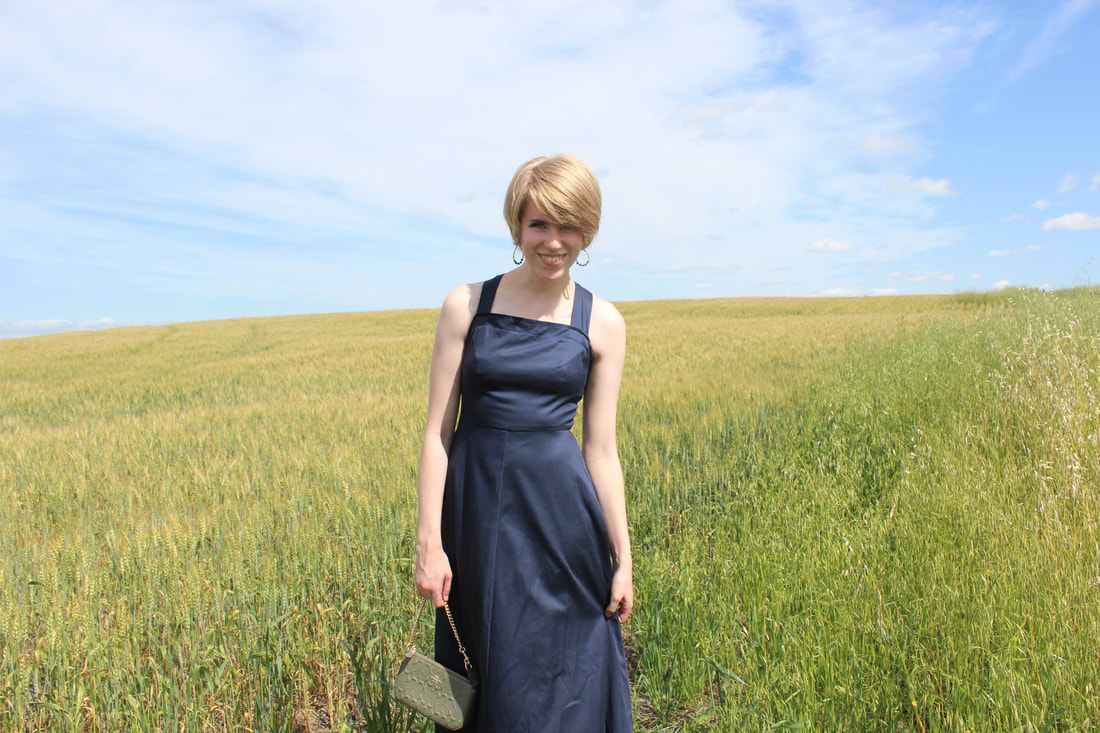 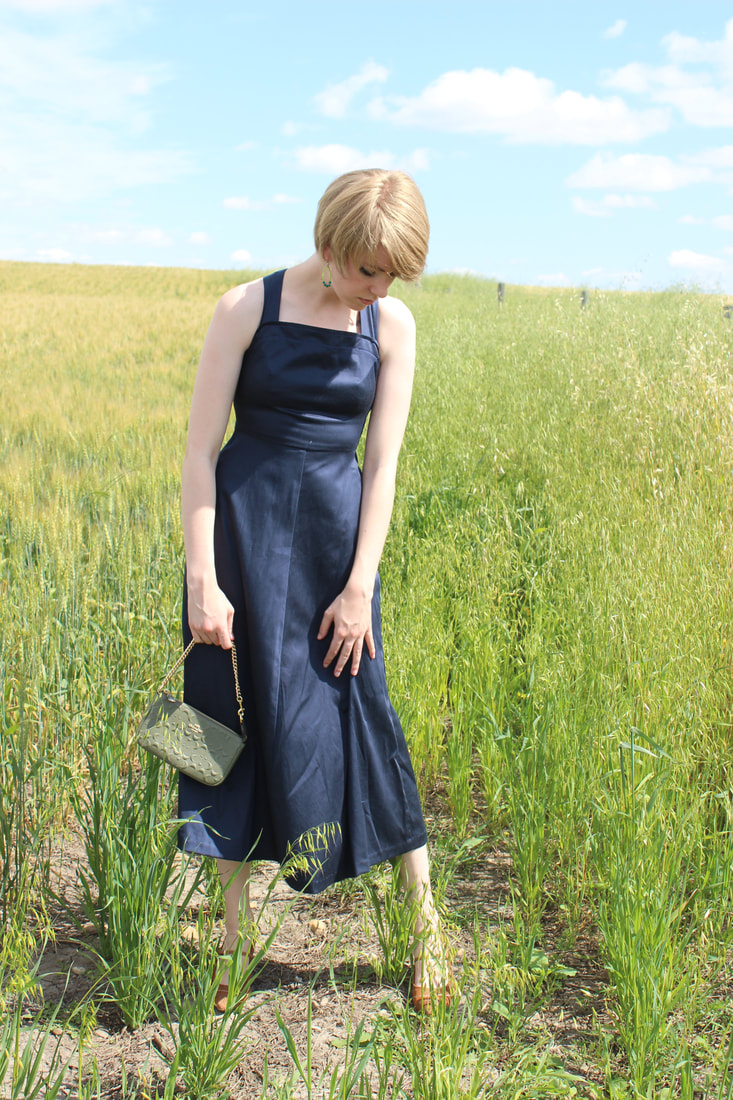 This dress is made using an organic cotton sateen with a tiny bit of stretch to it. Having that stretch made it much easier to fit to multiple different models for the show and the photoshoot the next day. I chose not to have sleeves in the design, since sleeves can restrict who can wear it and make the sewing process much longer. I adore the apron style dresses of the 40's, so I based my idea off of those. I simplified the idea a bit, and I love how it looks. The cotton sateen has a gorgeous sheen to it, and I'm glad that I didn't add any of the ruffles that are often on 1940's apron dresses. It's finished with buttons on the crossover back and top stitching. 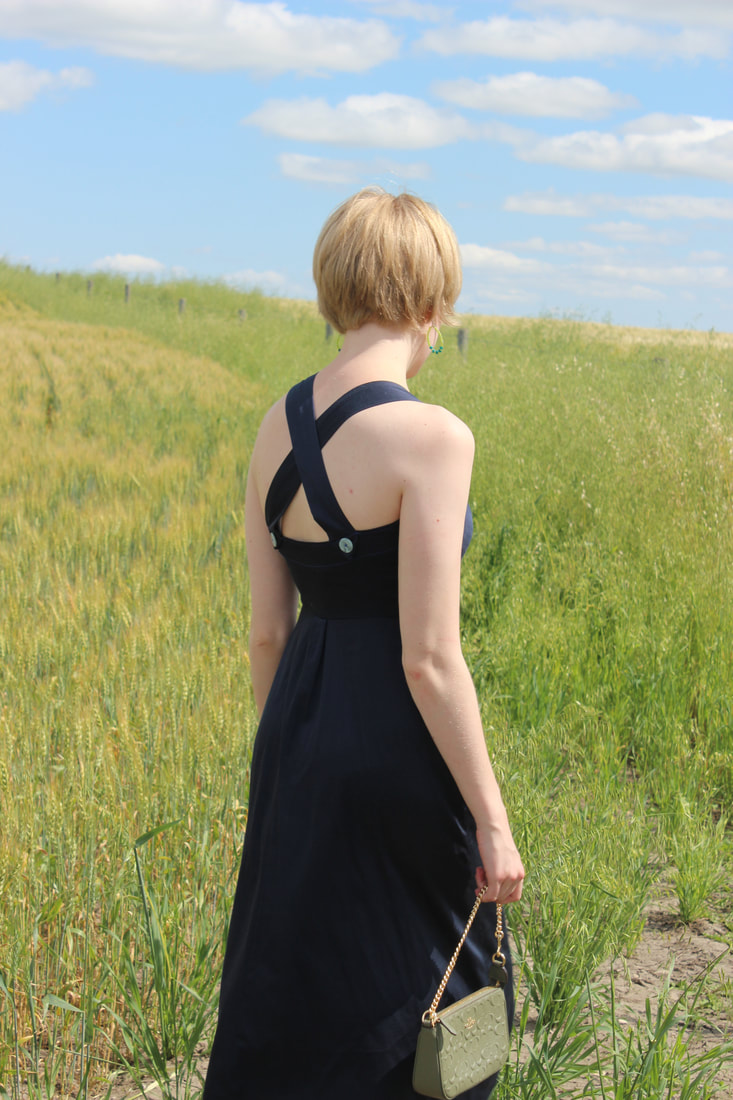 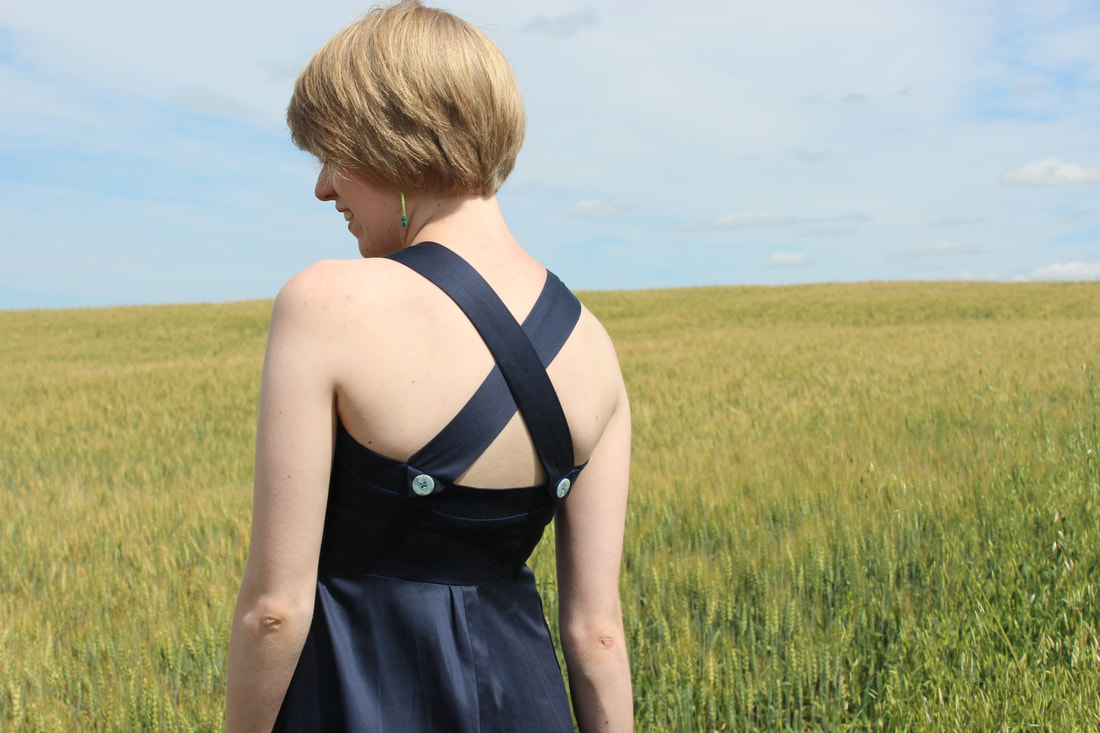 The fourth dress was the first one that I designed way back in January. This is a 1950's inspired summer dress with a front button closure and a tiered skirt. I made a dress that had a bit of a similar style for my Summer 2018 collection that I got photos of in Drumheller (see photos here), and I thought that it was so flattering that I wanted to use that silhouette again. This dress is sleeveless for ease of fitting, has darts and gathering to shape the bodice, and has a fully lined bodice. The hem is hand printed in coral to tie it in to the colour scheme that the rest of the collection has. 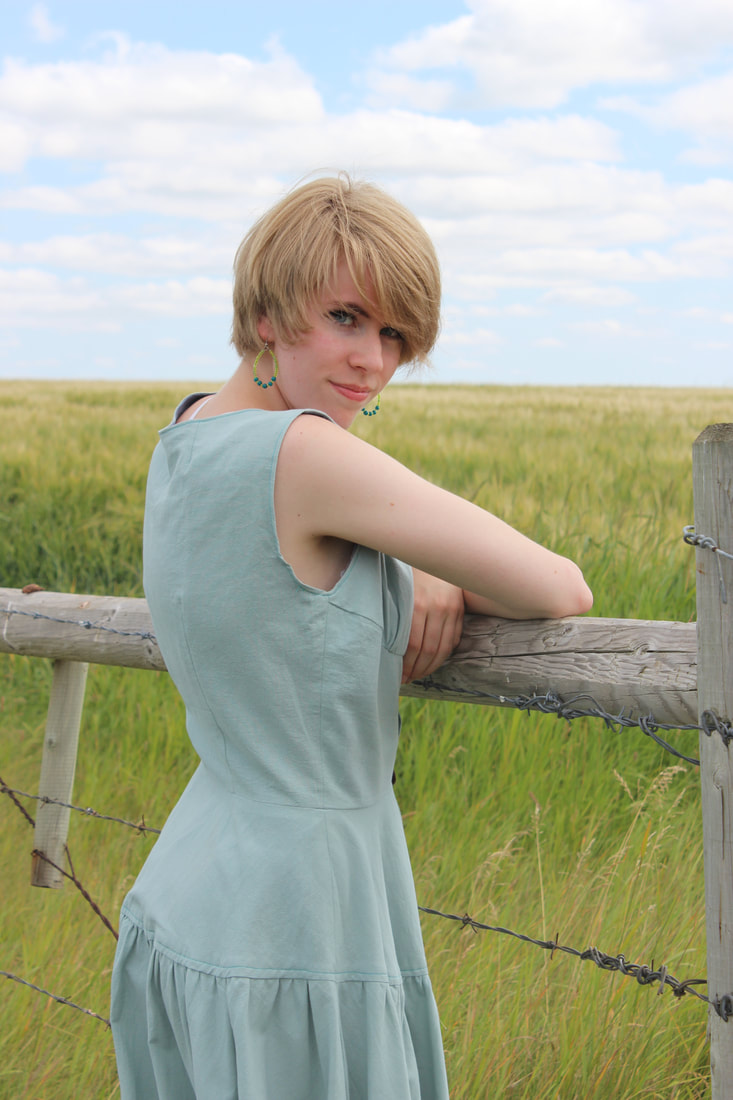 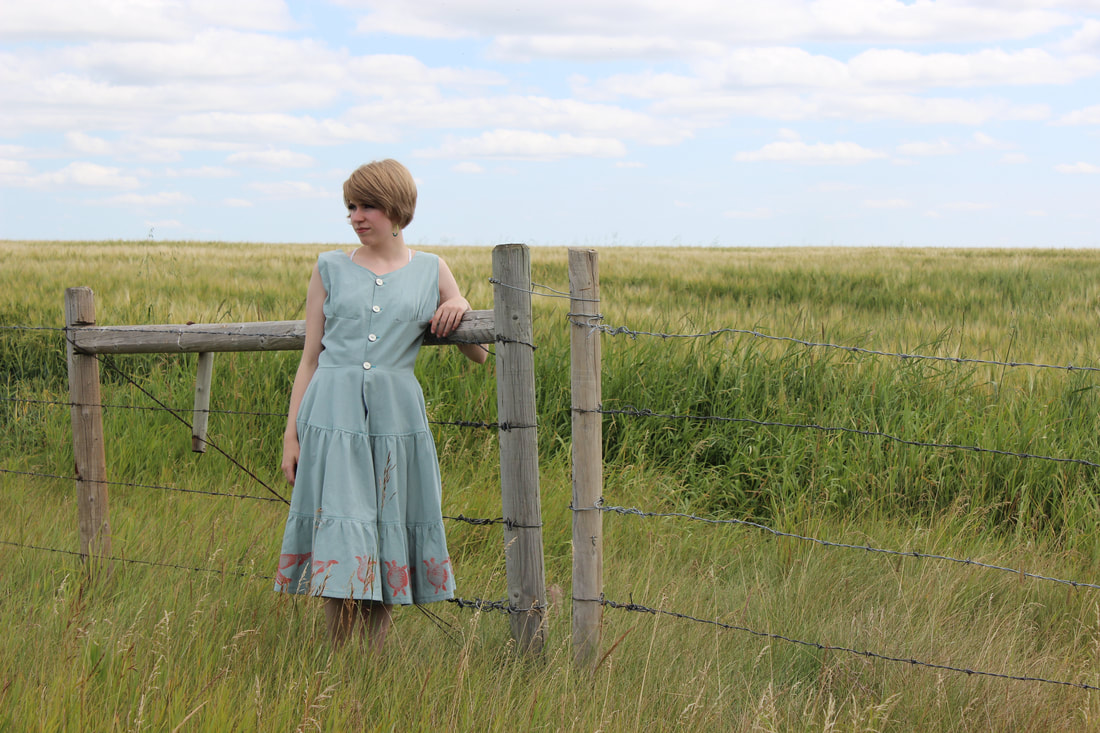  The silhouette of the 1950's is absolutely iconic, and so flattering to pretty much every single shape and size. I wanted that, but I also wanted my design to be a little bit different from the classic shape that most think of when they think of the 50's. I also wanted this to be the sort of summer dress that was comfortable and easy to wear. I used an organic cotton gauze for the dress, and the fabric was an absolute dream to work with. It ironed great and is soft on the skin. The dress is finished with hand made clay buttons. 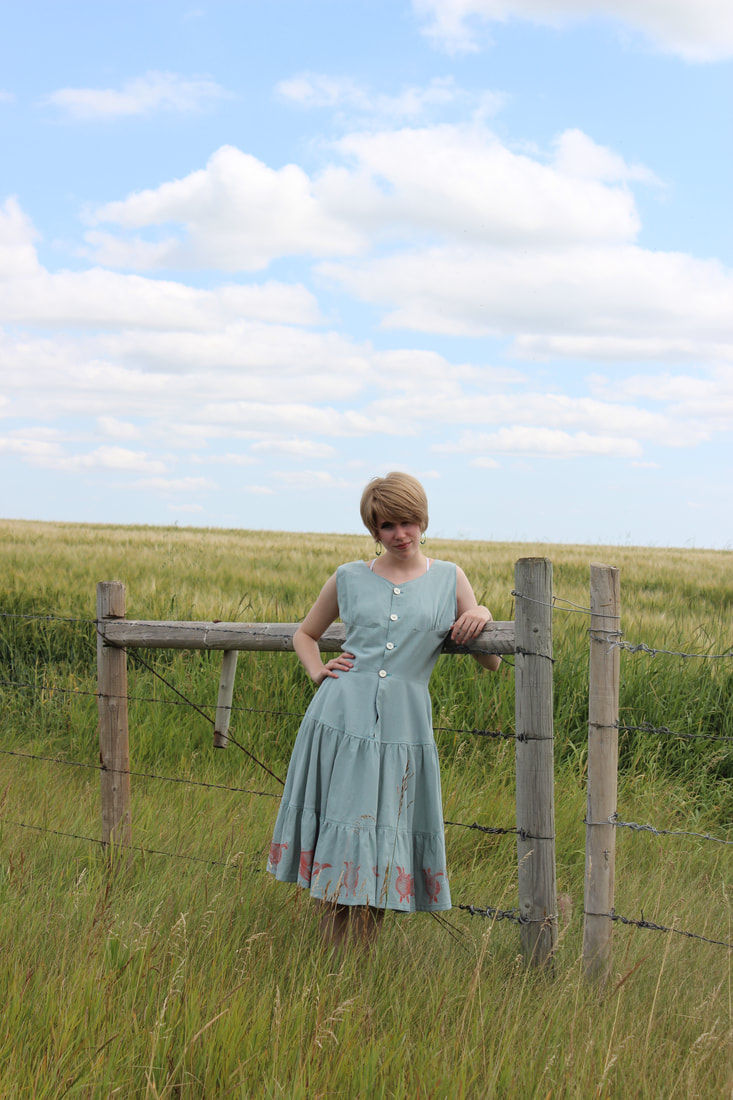 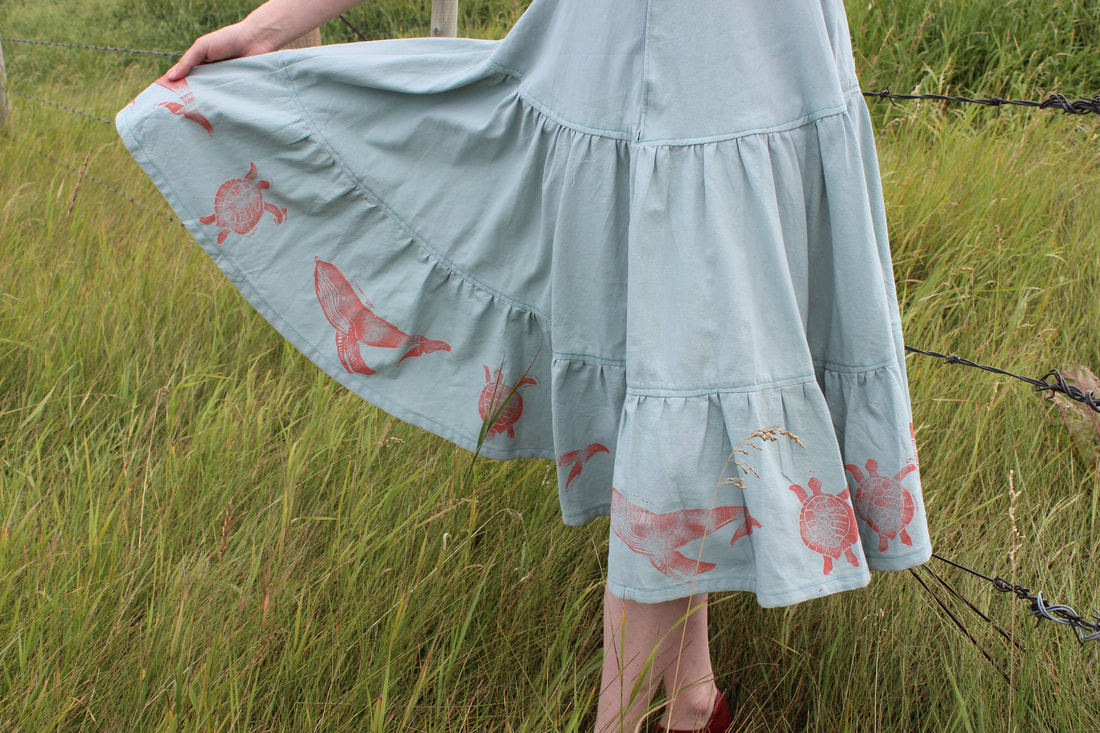 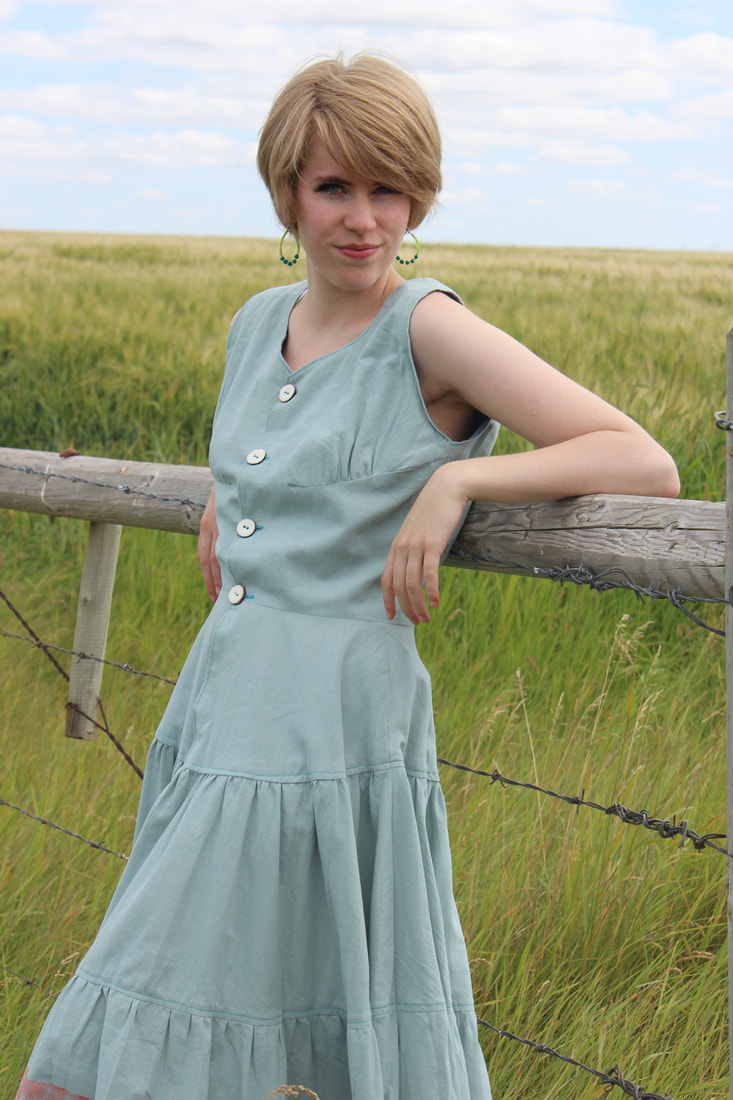 I was so spoiled in Victoria for the fashion show and all of my pieces were photographed by professional photographers the day after the show. If you want to see some of those, check out my instagram here. I will also be posting some of them here once I compile enough of them. Next week will be my last details post of the 1960's and 1970's dresses from my eco couture line. Stay tuned! 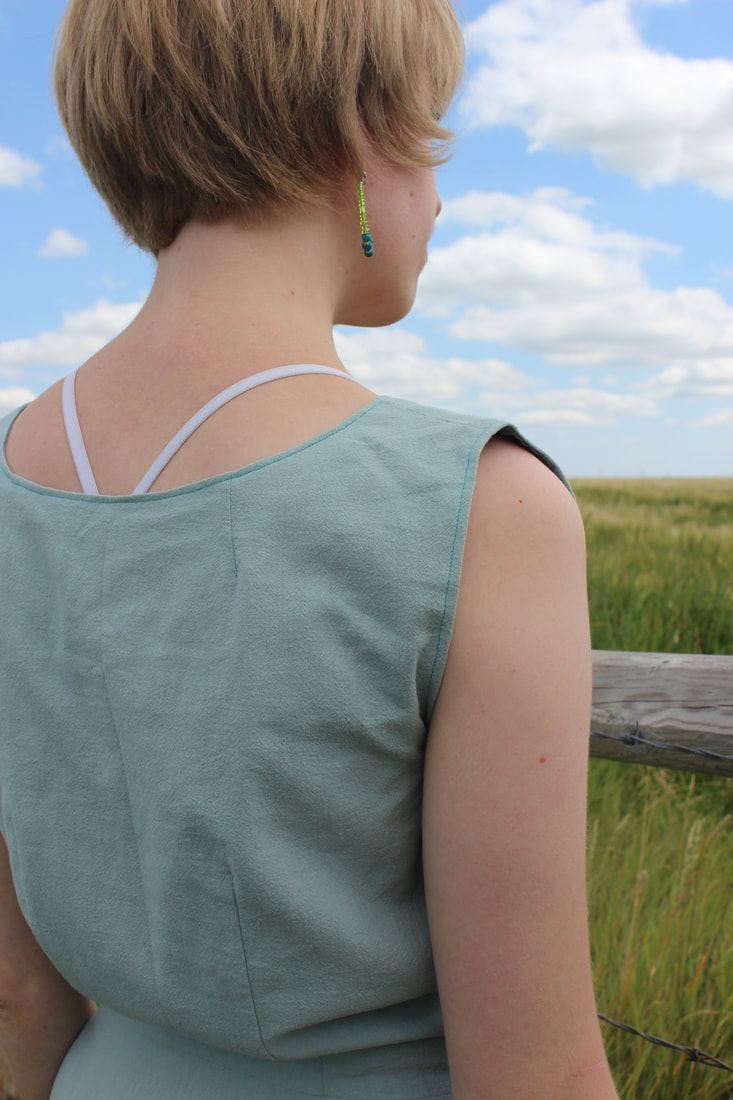 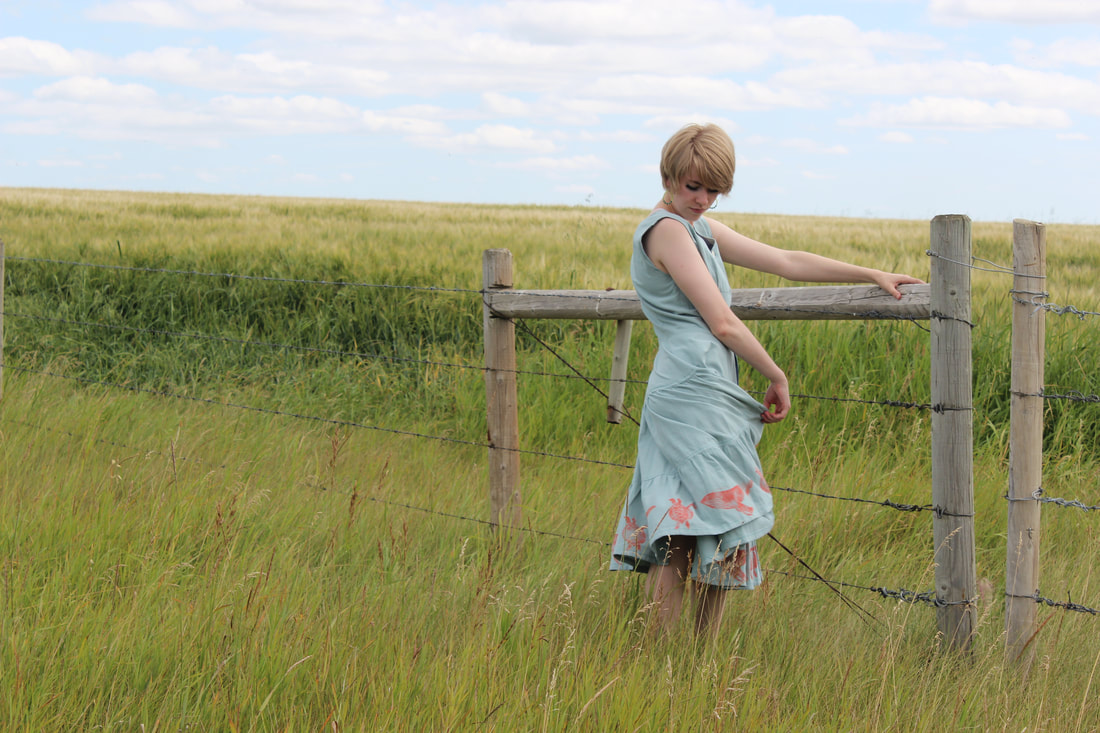 ~K
As I promised last week, here is the first detailed post about my eco couture collection for the Future Oceans fashion show that took place in Victoria, BC on July 1st. If you haven't heard about this before, or would like to learn more about the Future Oceans Fashion Show, you can see my other posts about it here. 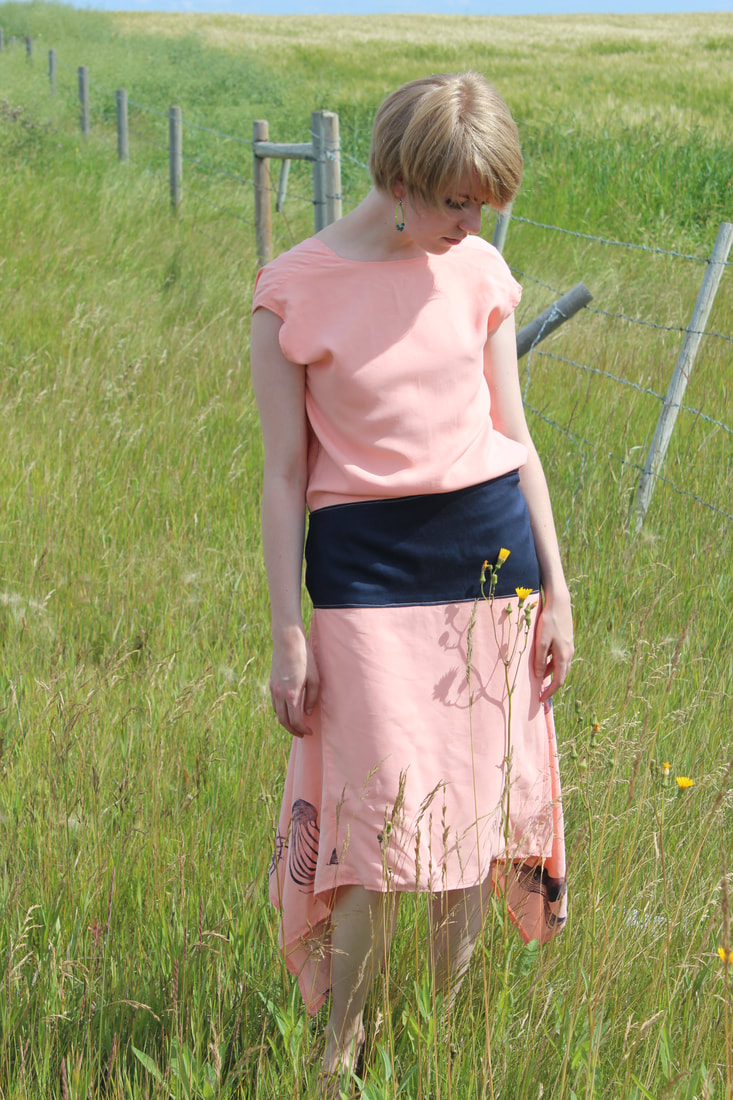 The first garment that I designed for the collection is inspired by the 1920's (which is one of my favourite decades of style). This dress is a drop waisted gown with a deep V back, knee-length handkerchief skirt, and bloused top. The side panels in the skirt are hand printed by me on a TENCEL twill, which is a sustainable material that I got locally, through a Canadian company. The waistband is an organic cotton sateen. 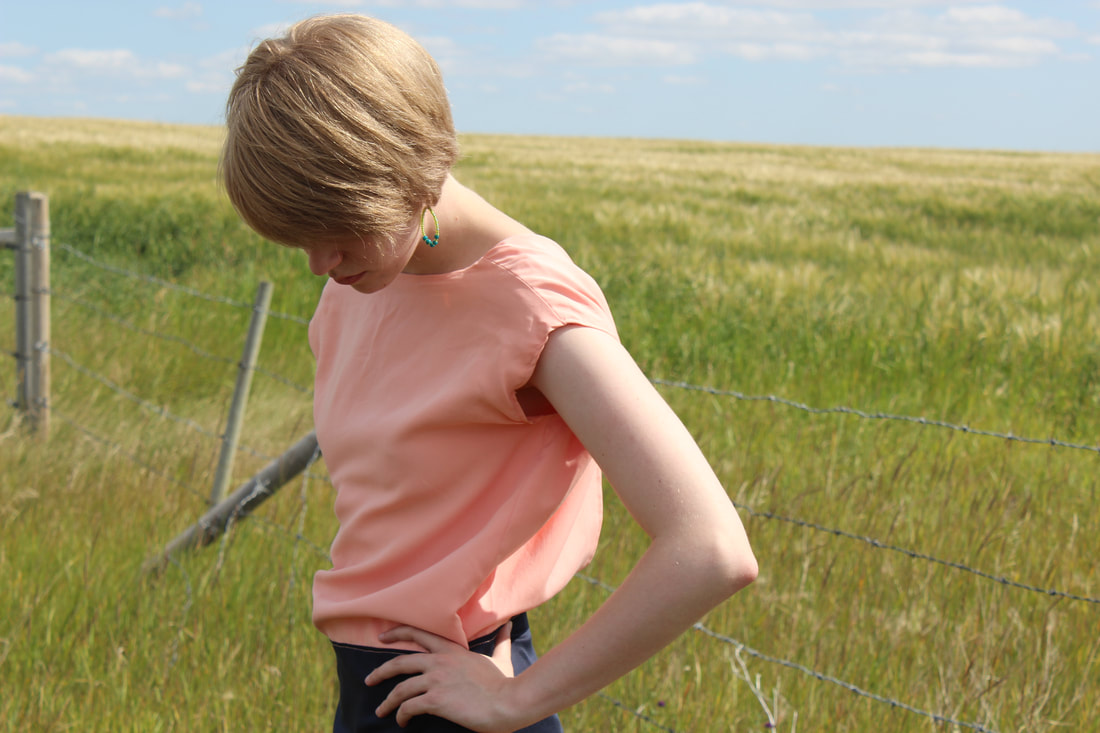  This entire dress is lined and is finished with top stitching. I've always enjoyed the aesthetic of the 1920's, but the shape can be difficult to get and make it look nice. The drop waist style can be really unflattering on a lot of shapes, depending on how it's being accomplished. I spent a lot of time on pinterest looking through extant garments from the era, as well as some modern interpretations of them (from movies and tv shows like Peaky Blinders and The Great Gatsby). None of the garments in this collection are meant to be exact replica's of dresses from each era, but more to harken to each decade. 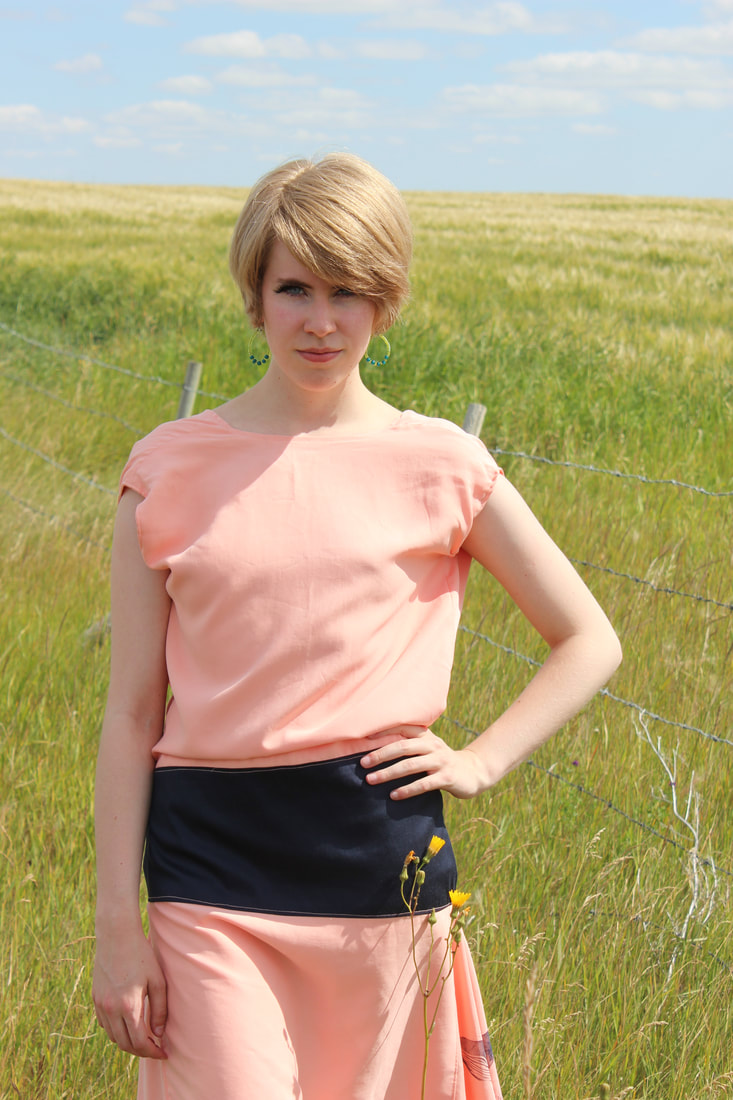 Some of my favourite dresses from the 20's have low backs, so I wanted to make sure to include that in my design. I also love the extra panels that flare out when the wearer is walking. The TENCEL twill has a beautiful drape to it, so I used it for both the 1920's and the 1930's inspired gowns. 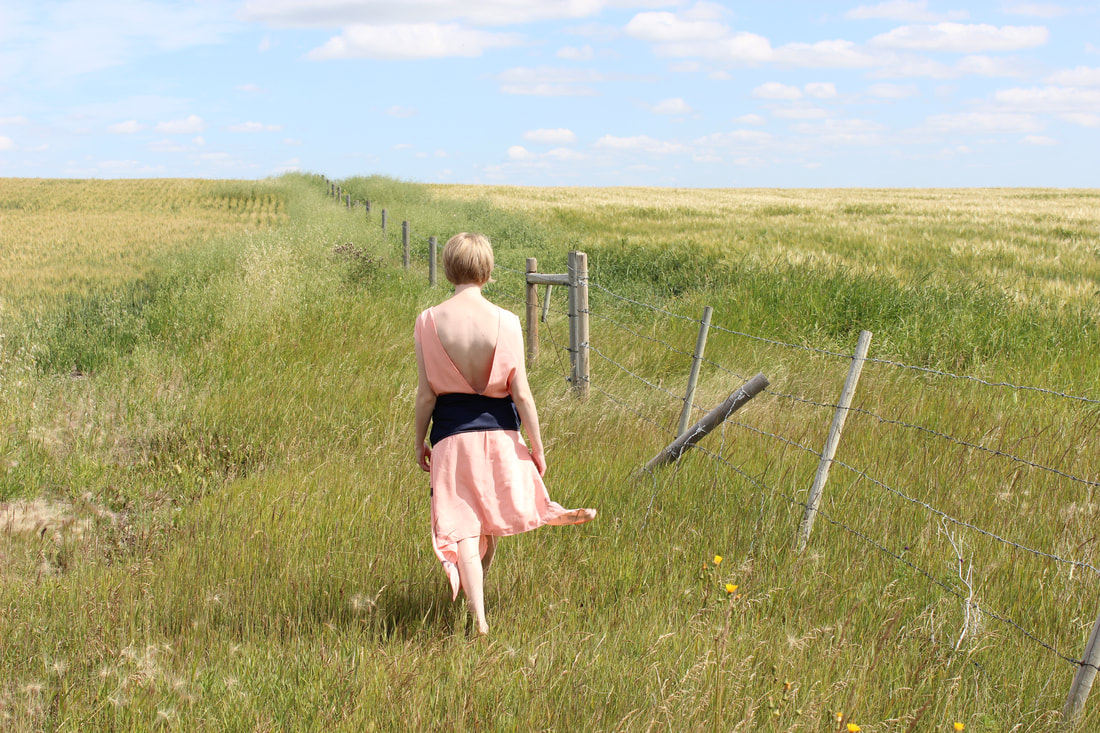 The second dress is inspired by the 1930's. This dress has a boat neckline with a deep V back, wide waistband, pleated over skirt, and thin belt. It's entirely made out of the TENCEL twill, so the whole thing is soft and has a wonderful drape to it. All of the peach sections are hand printed by me. 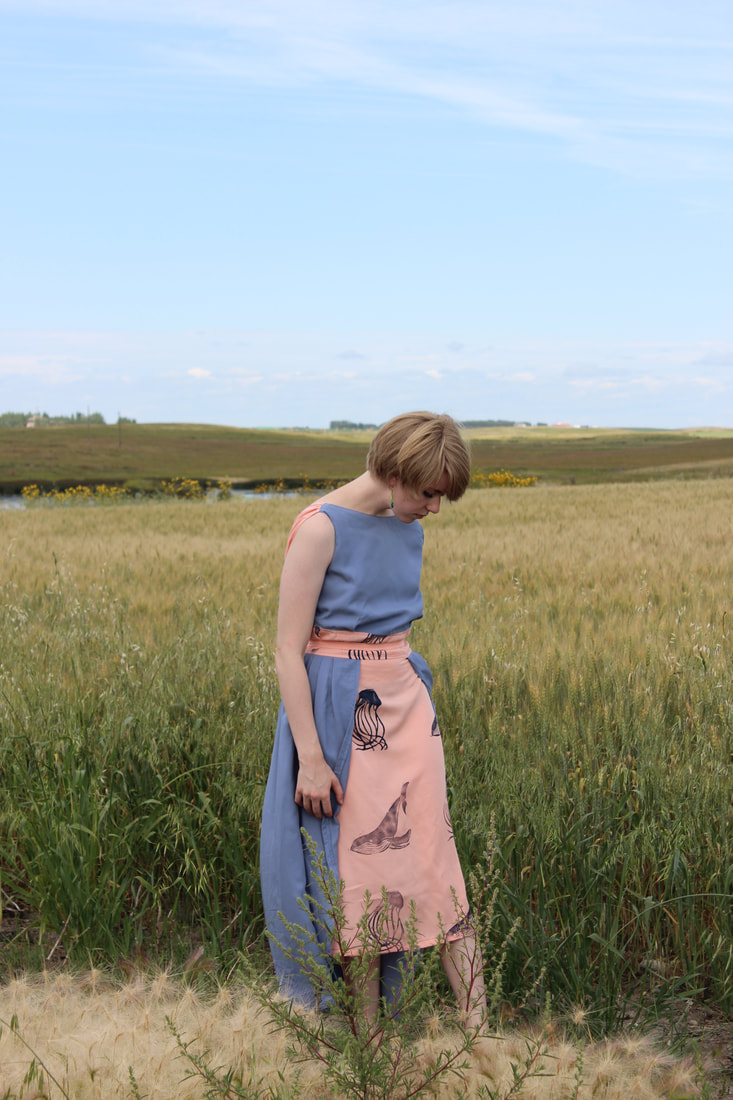  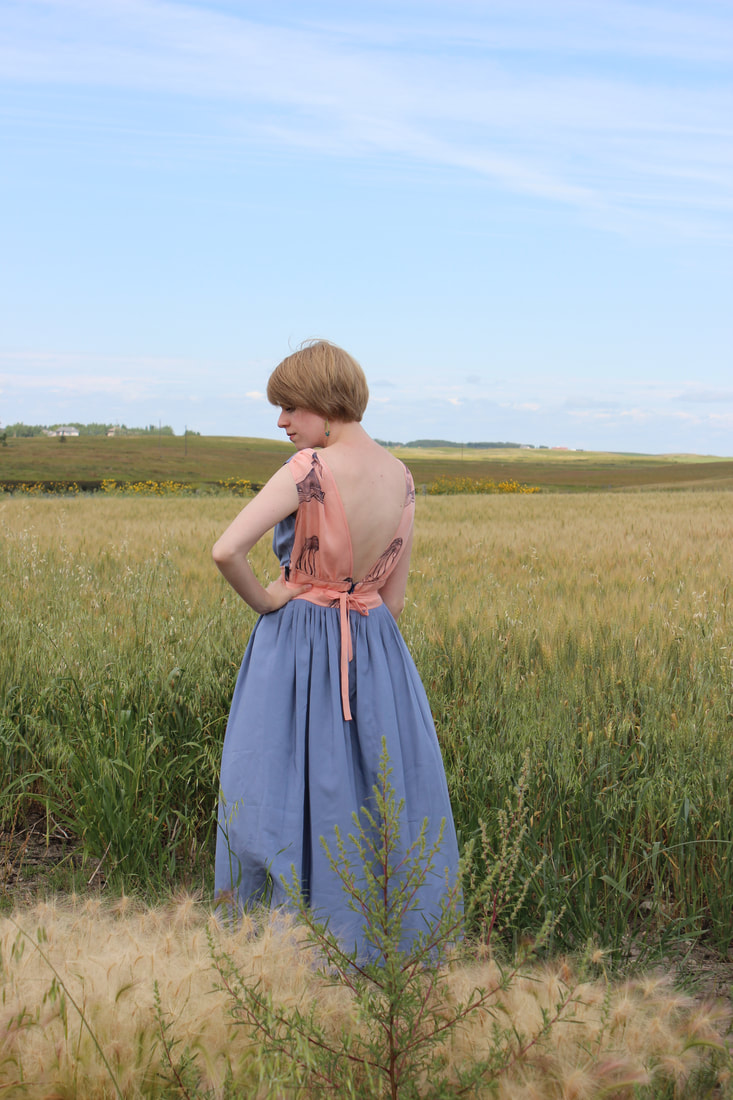 Drafting the pattern for this dress was a fun challenge, as was figuring out how to put it together while also making sure that all of the edges were nicely finished. It took me the better part of an afternoon to draft the entire pattern, and I'm pleased with how it turned out in the end. The bodice is fully lined. 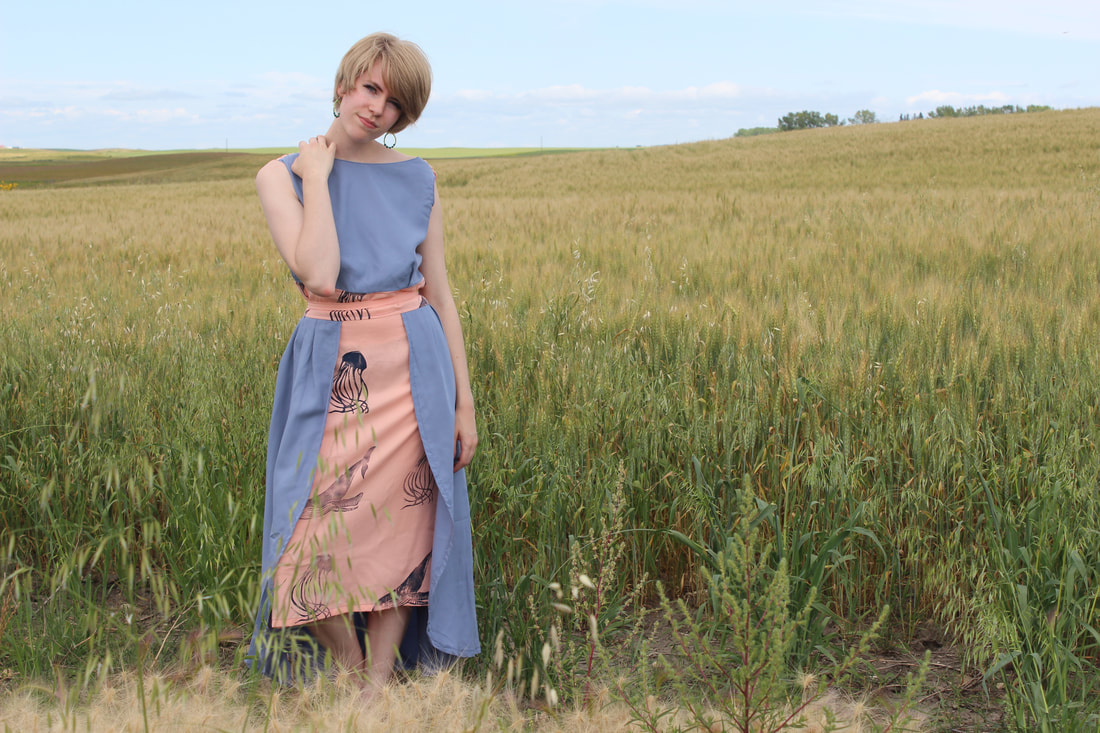 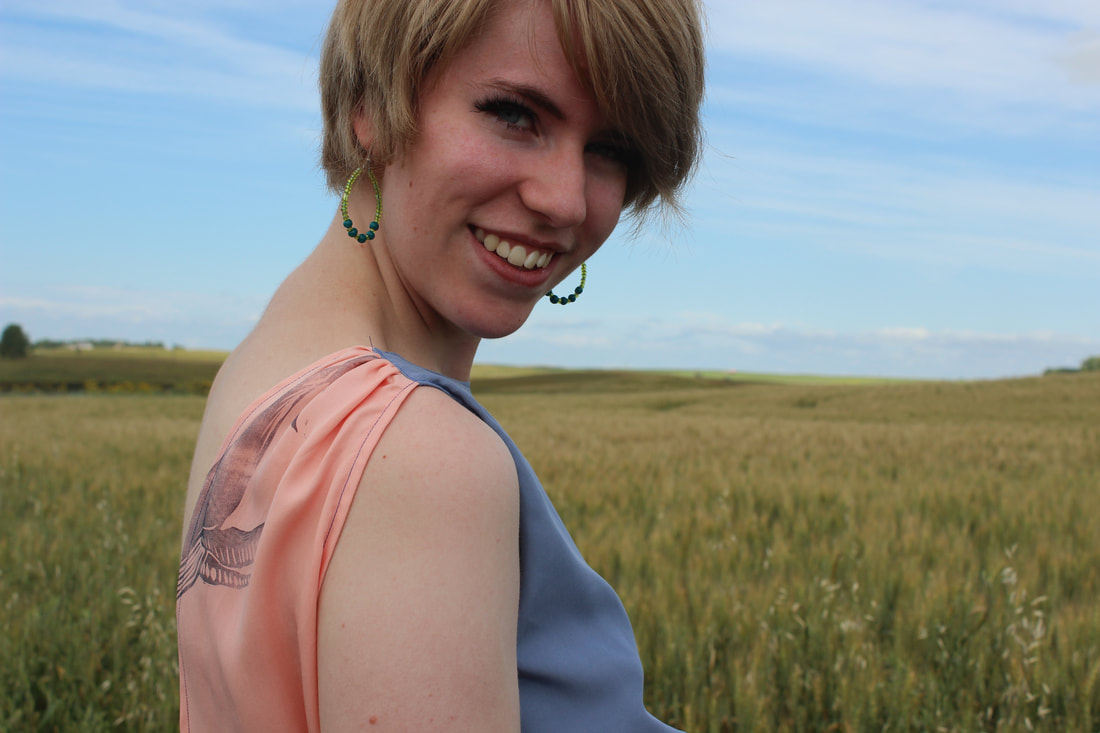 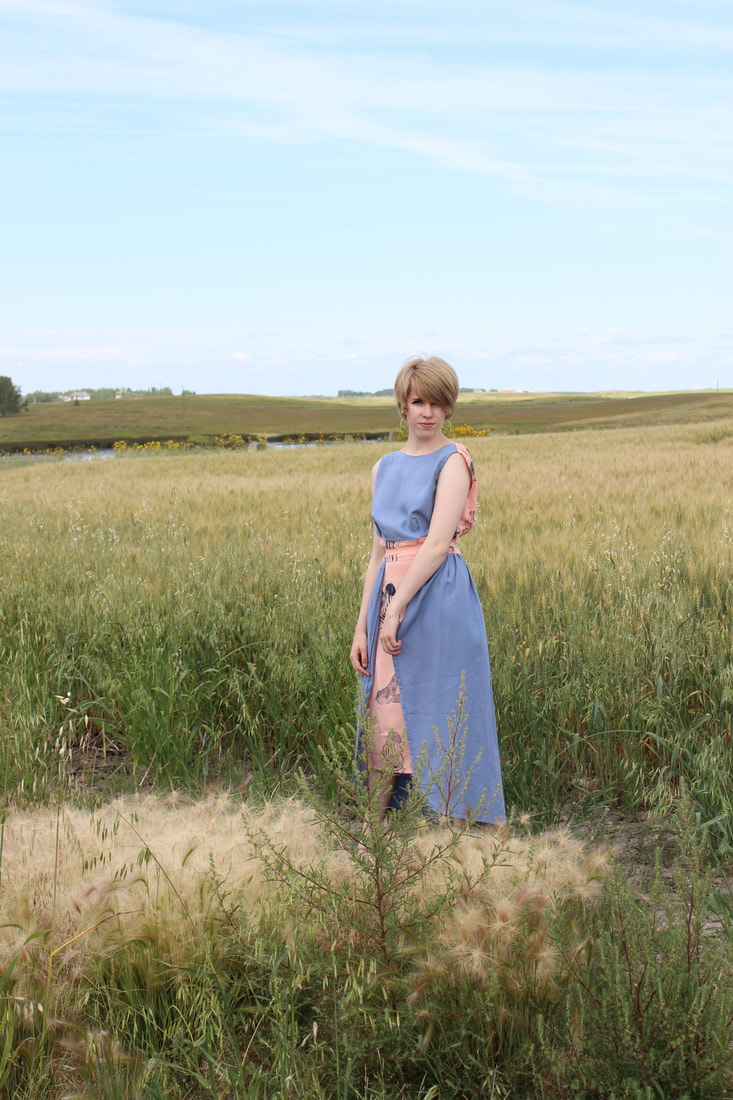 The shaping in the bodice is created from two pleats at the waist on the front, and the back pieces are gathered and meet at the waistband to create a deep V. The under skirt is just a regular straight skirt, similar to what a skirt sloper would look like. I ended up just draping the over skirt instead of patterning it so that I could get as much fullness as I wanted. The hem is shaped to be longer at the back. 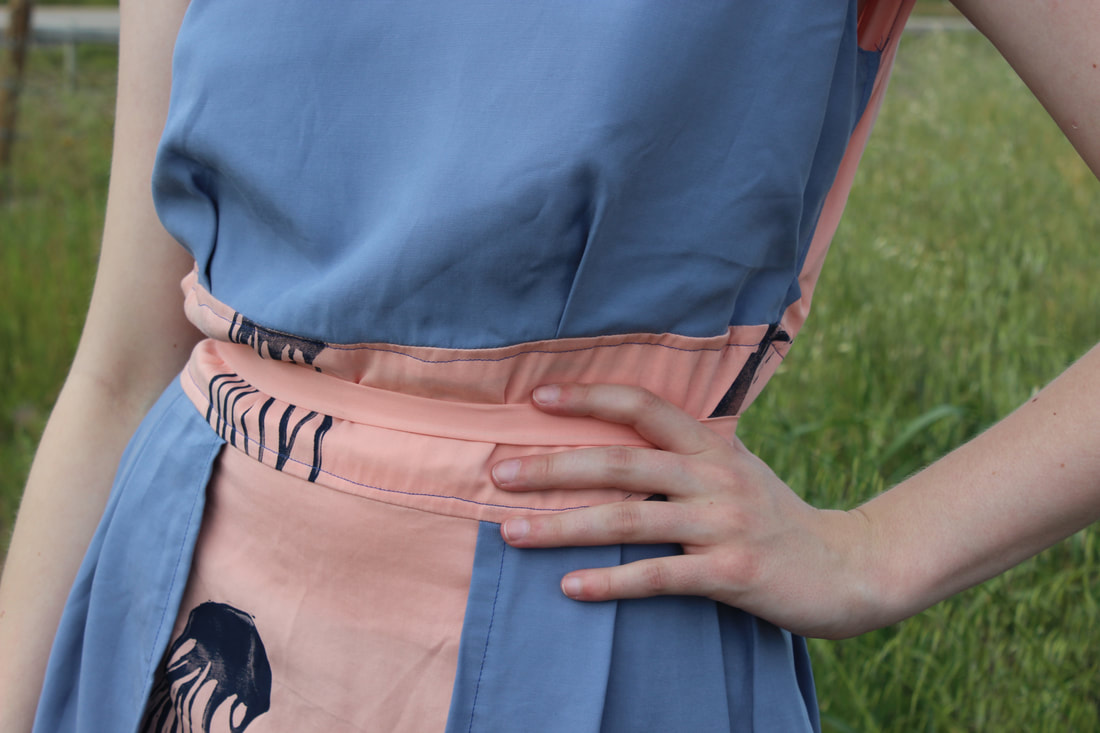 I loved designing these garments, as well as all of the other ones in the collection. Next week I will focus on the dresses styled like the 1940's and 50's!
~K Last month I was lucky enough to be a part of the Future Oceans Fashion show, which was held at the Victoria International Marina in British Columbia on Canada Day. I had an amazing trip (which you can read more about here) and enjoyed working with Future Oceans so much. Future Oceans is a company that focuses and Eco Friendly fashion, which is something that I am very passionate about. The fashion industry is a huge polluter, and knowing that made me lose some of my passion for my sewing. This opportunity came at the perfect time, and I loved the challenge of trying to make beautiful garments that are as eco friendly as possible. I have some very exciting news about the next step with Future Oceans: I will be having 'Fashion on Demand' garments at the Future Oceans Boutique in the Victoria Bay Center through September! The Fashion On Demand will be four pieces that I will be making to measure for anyone who orders one. Each garment was inspired by a different era and hand stamped by me. This first one was inspired by the 1920's, with a low waist and deep V back. Garment number two was inspired by the 1930's. This also has a deep V back, as well as a gathered over skirt. This was the only one that I didn't stamp, and was a bit of a last minute addition to the collection. This is inspired by a 1940's apron dress with a crossover back. 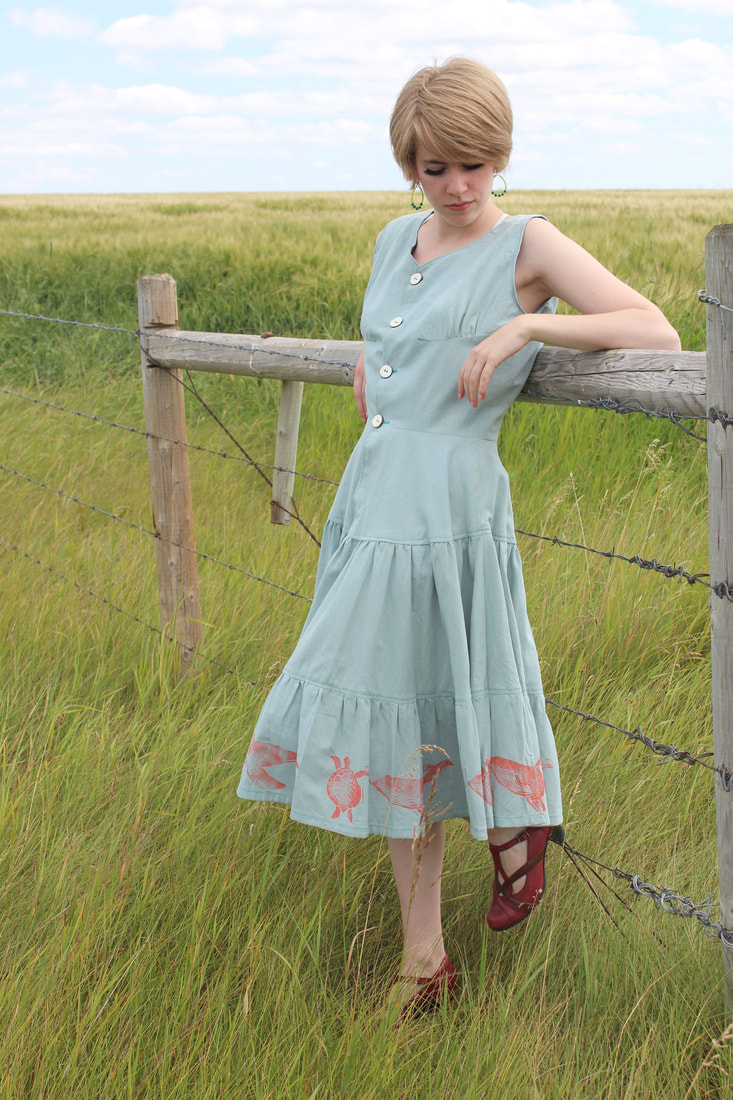 Inspired by the 1950's, this dress has a front button closure and a tiered, mid calf length skirt. This is the first dress that I made for the show, and it's also the most comfortable one! I looked to the 1960's to design it, and it's finished with side seam pockets and is fully lined. 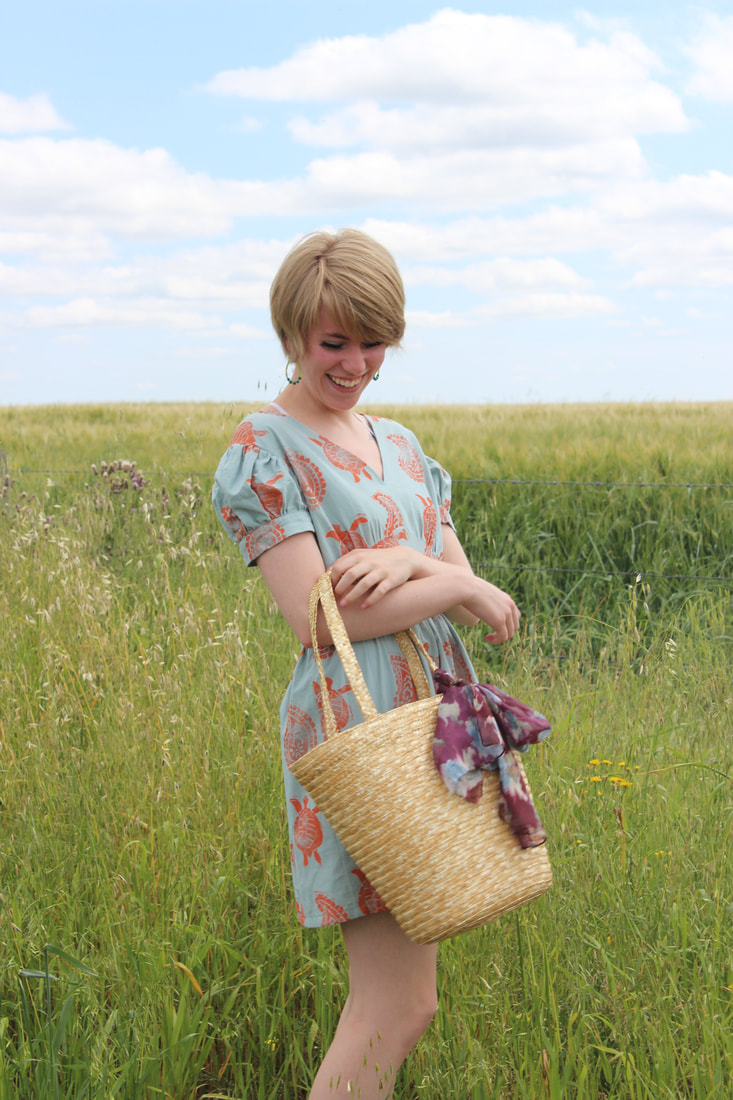 And the final garment in my Eco Couture line is this 1970's styled mini dress, complete with puffed sleeves. This is just a sneak peak of each of the garments I made for the show, so keep tuned for more photos and information!
~K 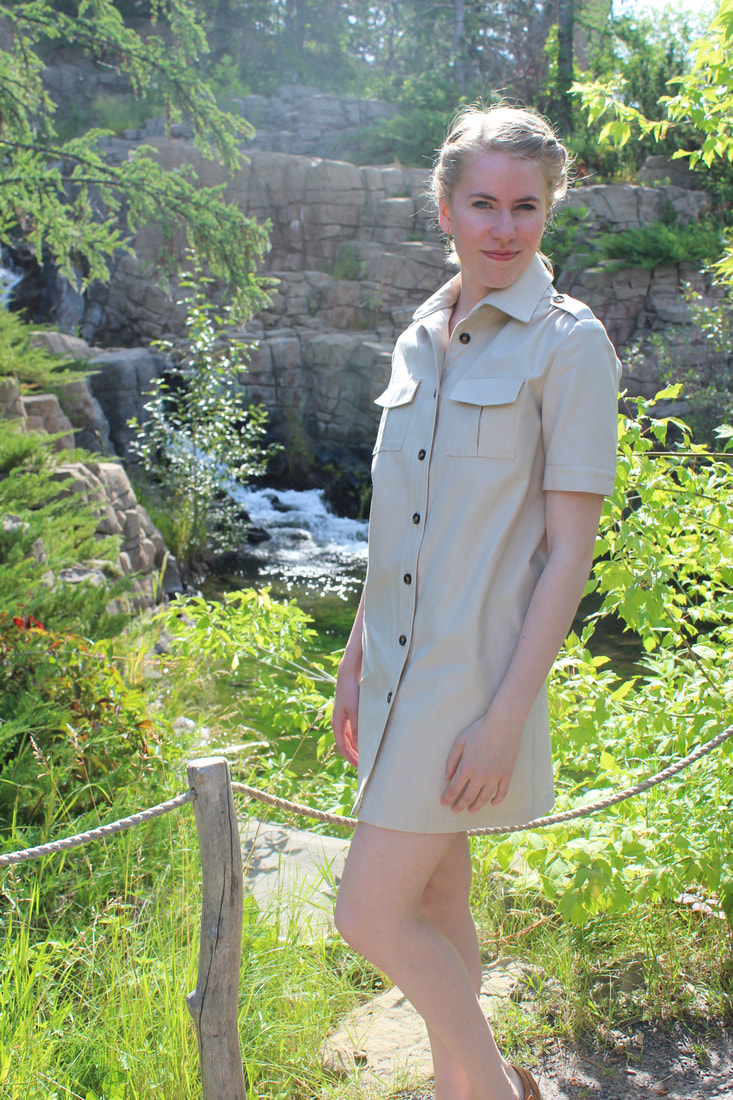 My summer has been pretty hectic (although thoroughly enjoyable), so this is the first time we have been able to go and do a photo shoot for the last project that I made for school. This is a cotton twill shirt dress that I designed, patterned, and created for a final project for one of my college classes this year. 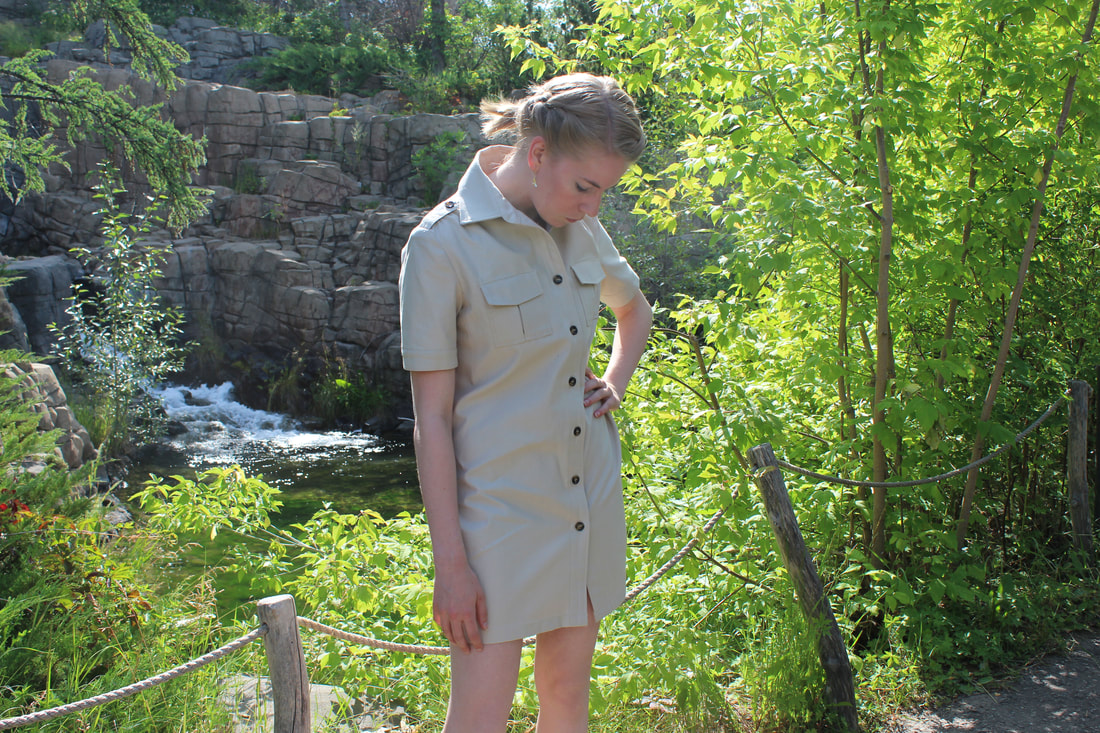 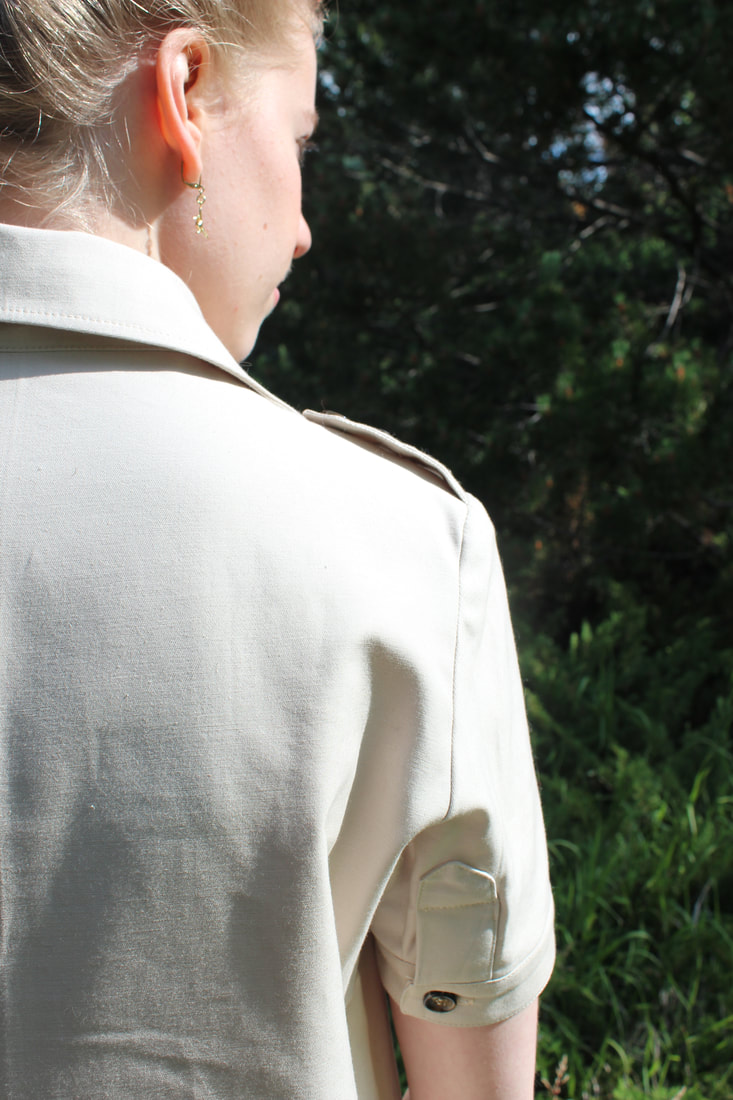 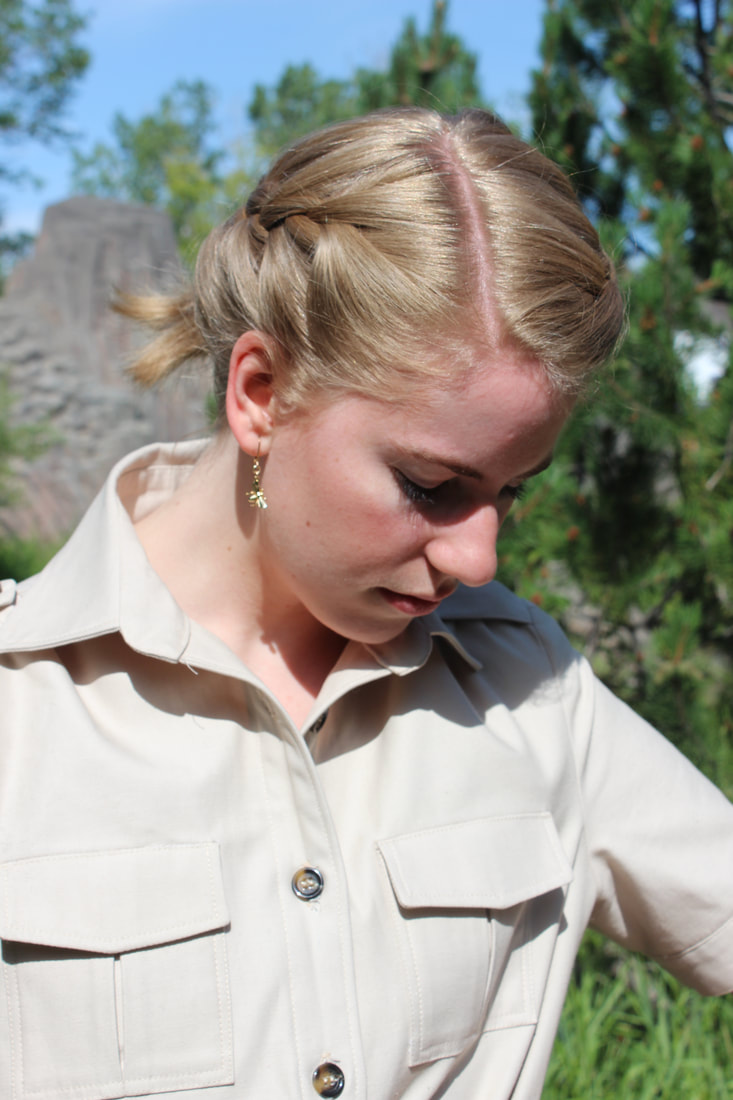 After going to Victoria for the Future Oceans Fashion Show a few weeks ago (post about that here) I had a week back at home to get used to the idea of not having any important sewing projects for the rest of the summer before driving out to Kelowna, BC with my mom and sister. Kelowna is a beautiful city and we spent a few lovely days there, and I got tons of inspiration for a few new projects. After getting back, I've had a few more days to rest and tidy (my sewing room has been looking a little crazy). Today was kind of my last chance to do a photo shoot for a while since I have lazer eye surgery at the end of the week, and after recovering from that I will be driving out to Manitoba to see family. 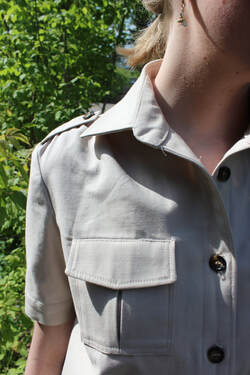 A few of the details in the dress: breast pockets with flaps, a box pleat, and top stitching A few of the details in the dress: breast pockets with flaps, a box pleat, and top stitching Anyway, some information about this dress: I was inspired by military styles as I so often am, but after making it I realized that it also looked a bit like a Safari dress. To go with that theme, we got photos at the zoo. I love animals, so this was a great place to do a quick photo shoot. As I mentioned earlier, it is made out of cotton twill with a tiny bit of stretch to it. It's a pretty simple design with short sleeves, slight gathering at the front shoulder for shaping, and an otherwise straight silhouette. The extra details are what I spent most of my time on when designing it. The dress has cuffs, a two piece collar, button placket, and breast pockets with flaps, box pleats, and top stitching. 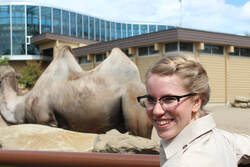 Me looking thrilled but also slightly evil while watching the camels Me looking thrilled but also slightly evil while watching the camels  I'm really pleased with how this dress turned out and you should be able to find it on my Etsy shop pretty soon. 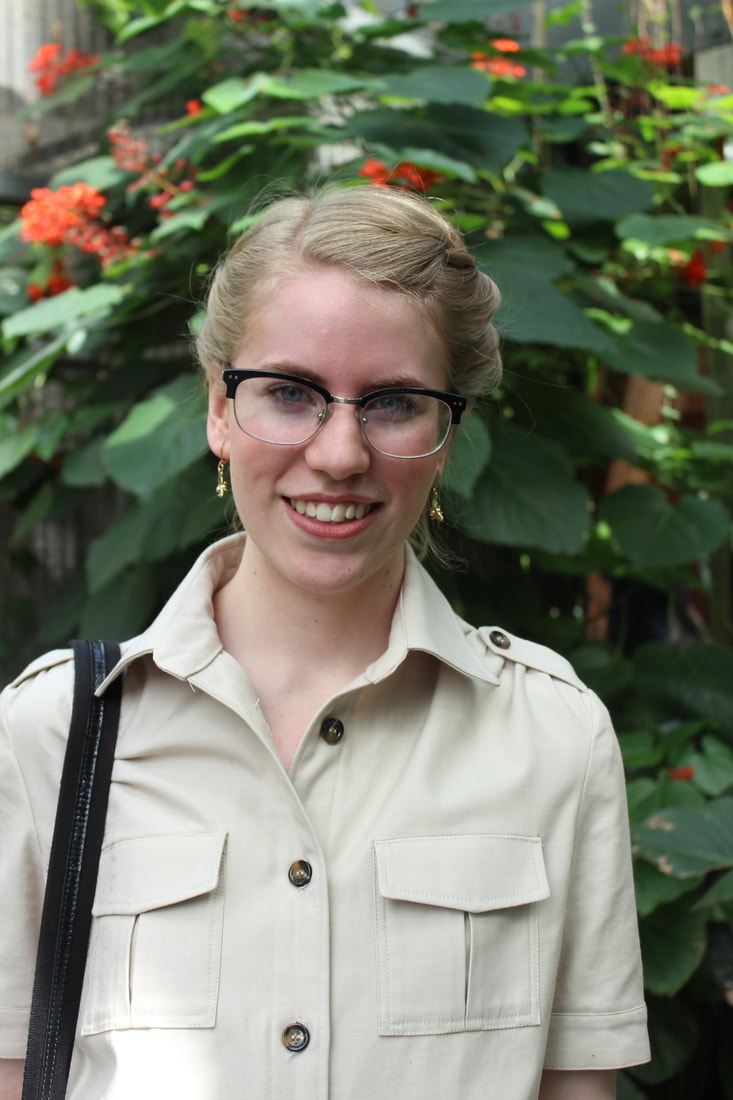 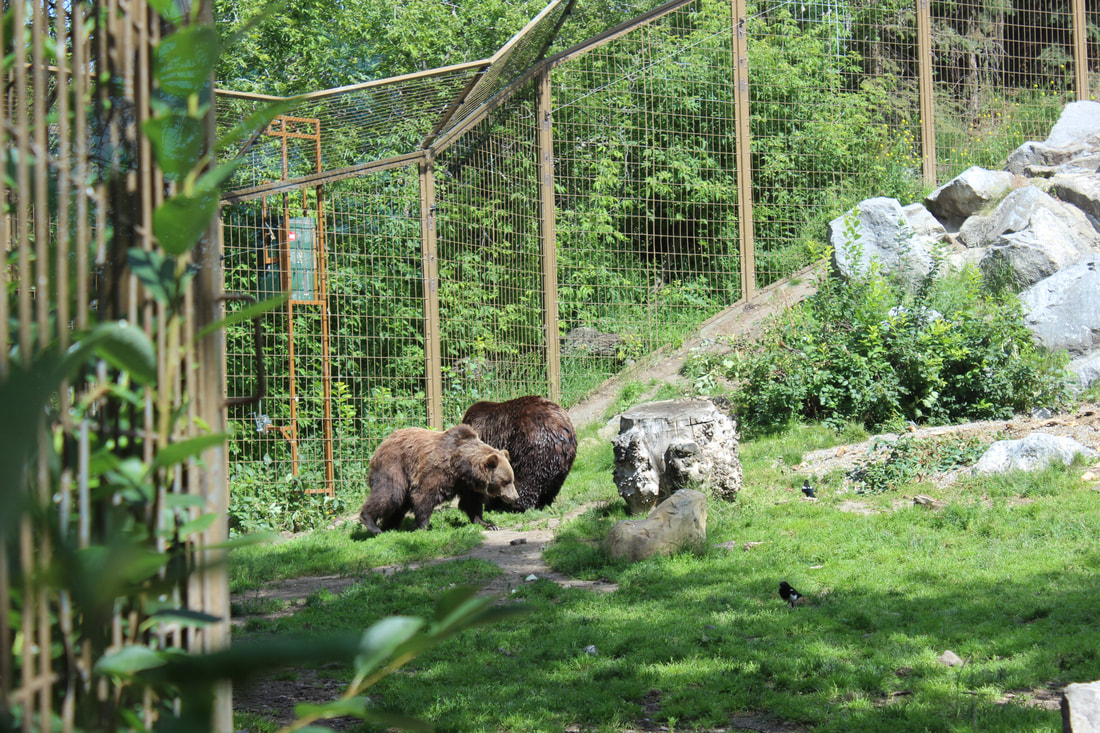 Thanks for reading! ~K 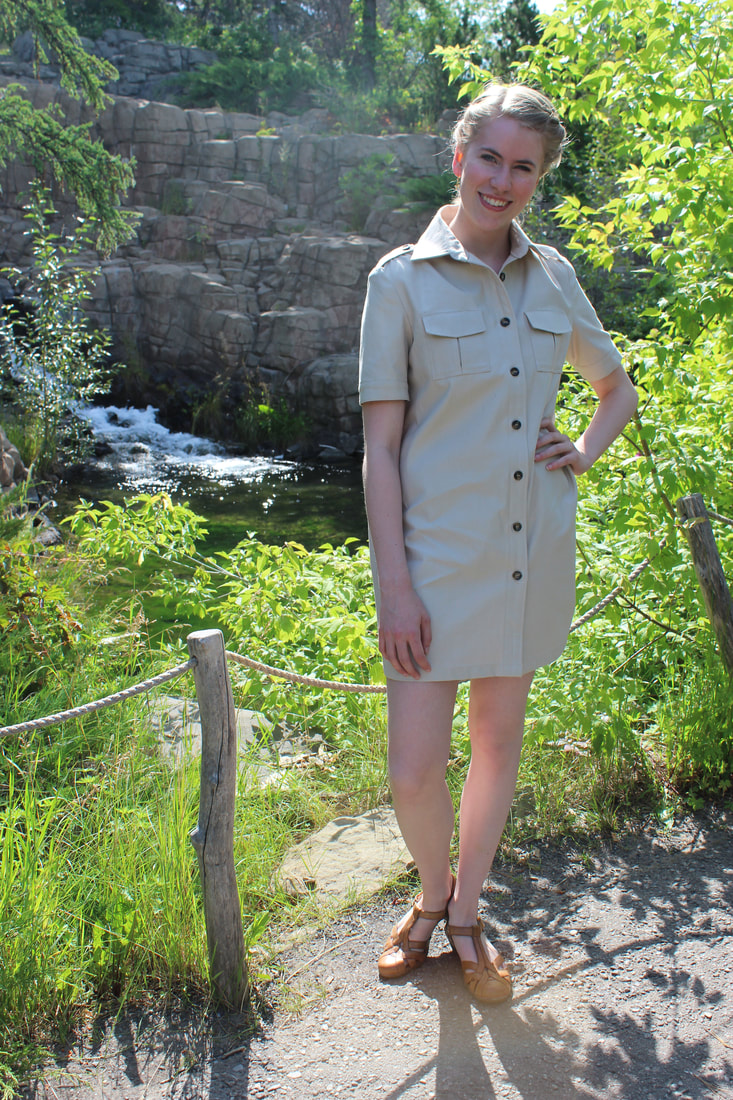  The day has finally come that I can talk about the Future Oceans fashion show and the pieces I made for it! I have been waiting as patiently as possible to show what I've been working on, and I am so excited to show the pictures that I have from this weekend. There were some incredible photographers at the event as well that I will be showing photos from as soon as I am able to. 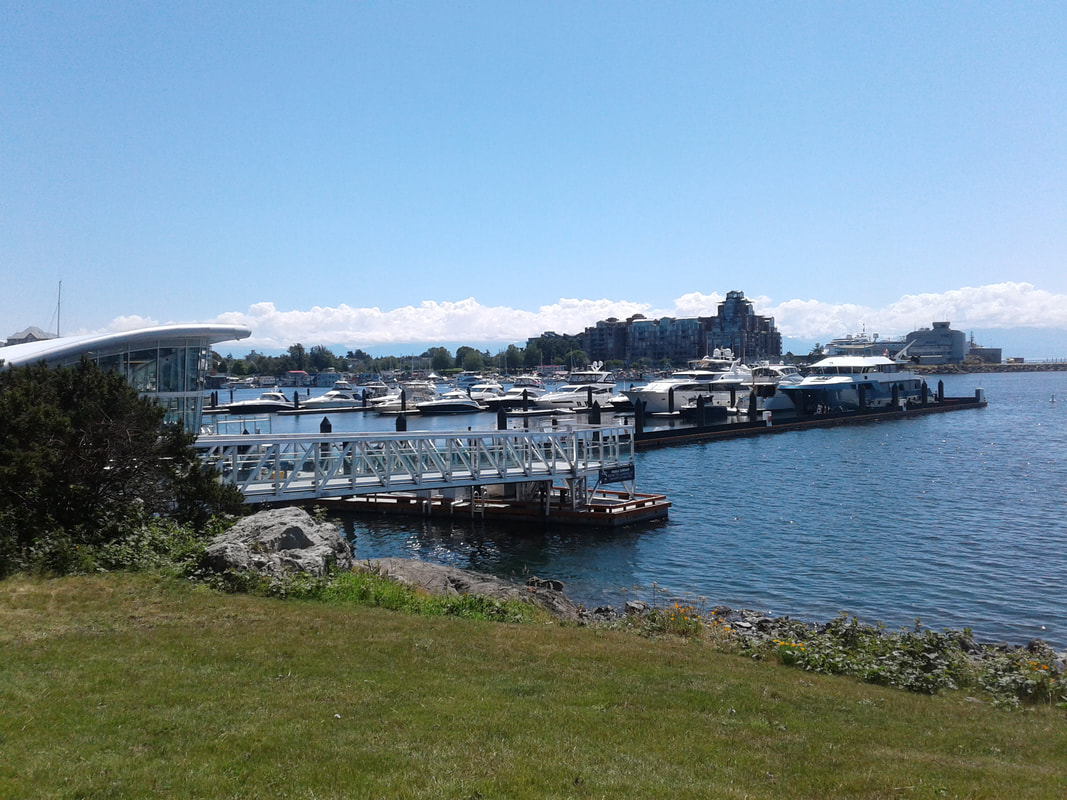 The Victoria International Marina, the location of the fashion show Before I talk about my designs at the time that I spent in Victoria, I want to talk about the reason for this show. Future Oceans partnered with the Victoria International Marina (where the show was held), Natural Talent Alliance, and the Ocean Legacy Foundation. The point of the show was to give a platform to ocean conservation in the fashion industry. The fashion industry is the second largest polluter, and by bringing attention to it and giving people an alternative we are taking the first step to turning the Fashion Industry into something that is more earth friendly and thoughtful. Learning about how terrible the fashion industry is on the environment was making me lose my faith in something that I really love. Being a part of this helped me get excited about it again. I hope that this show will help in getting people and brands to think twice before choosing certain fabrics The event started on Canada Day with the ribbon cutting for the Victoria International Marina. There was live music, performances by the Nanaimo Contemporary Ballet, and the fashion show. We had so many incredible people working together to make this a reality! 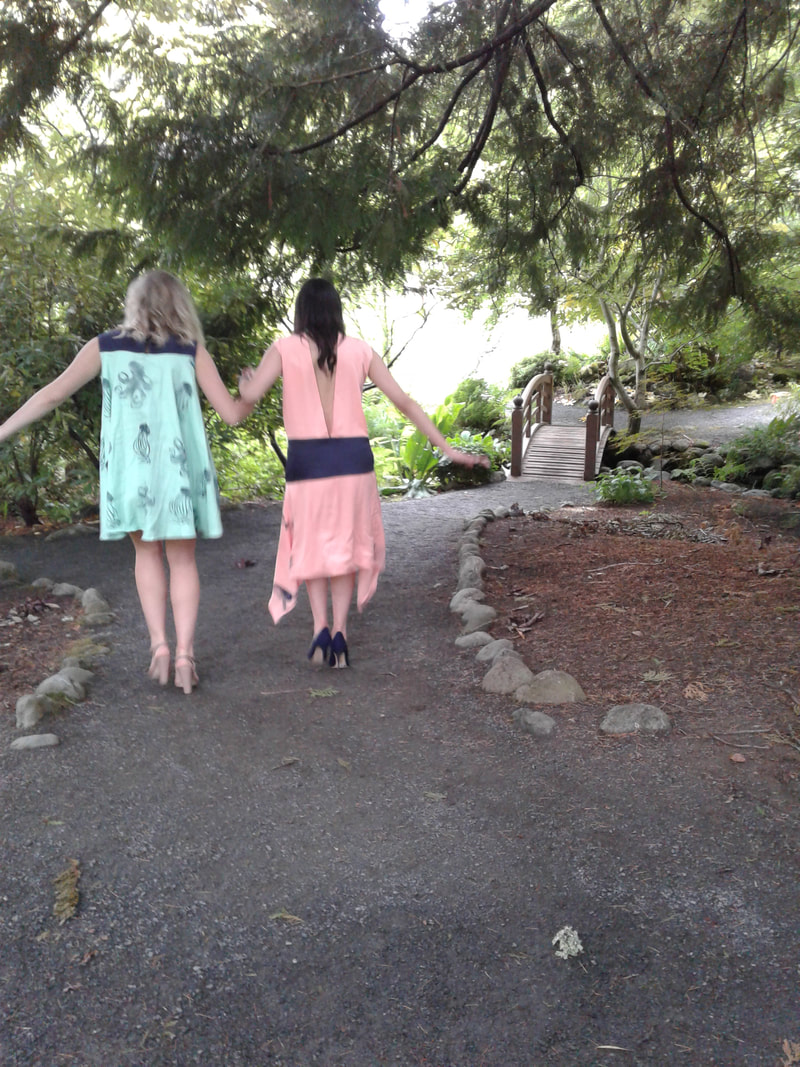 Natalia Hennady and Mildred Rincon in two of my designs I created 6 Eco Couture pieces inspired by different eras and 1 Art Dress. The Art Dress was created from garbage that was fished from the ocean. The Eco Couture pieces are all created from eco friendly fabrics from KenDor Textiles, a Canadian company that specializes in environmentally and socially responsible fabrics. I will wait to talk about the design process of each of my pieces for when the photos come back and you can actually see them in detail (all of these photos are just from my phone), but for now, here are some travel pics! I was in Victoria for 3 crazy, hectic days that were filled with fittings and photo shoots. The first day I spent almost entirely at the Marina (which is a stunning building) getting ready for the show. We had an amazing lunch at Spinnakers (Canada's first microbrewery), and spent the rest of the day planning and prepping. 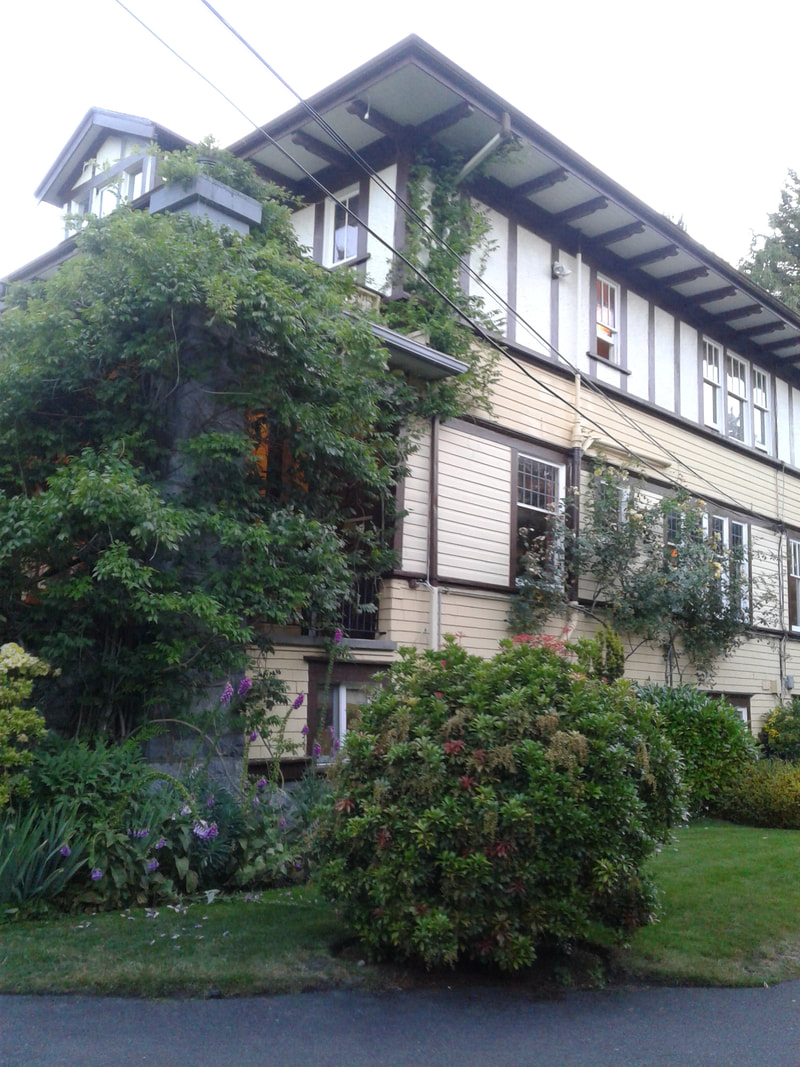 The Abbeymoore Manor We were housed in the most amazing Bed and Breakfast called Abbeymoore Manor. It's an old house with beautiful rooms, the best breakfast I've ever had, and really friendly staff. 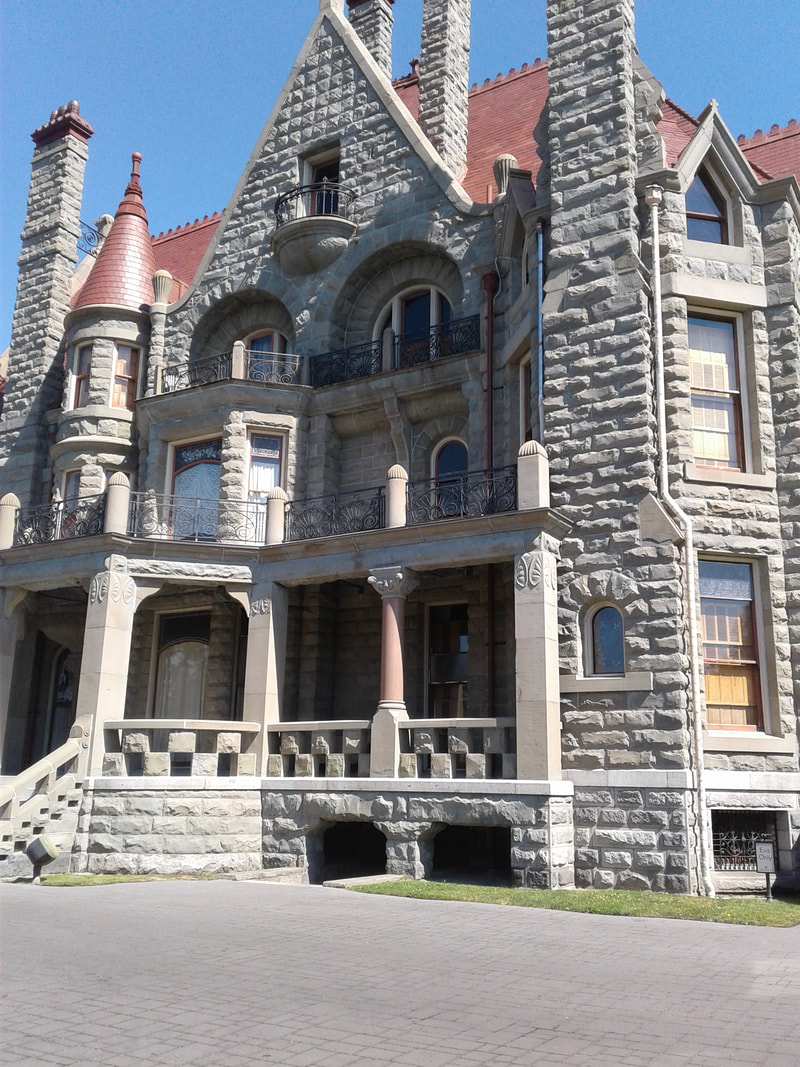 Craigdarroch Castle 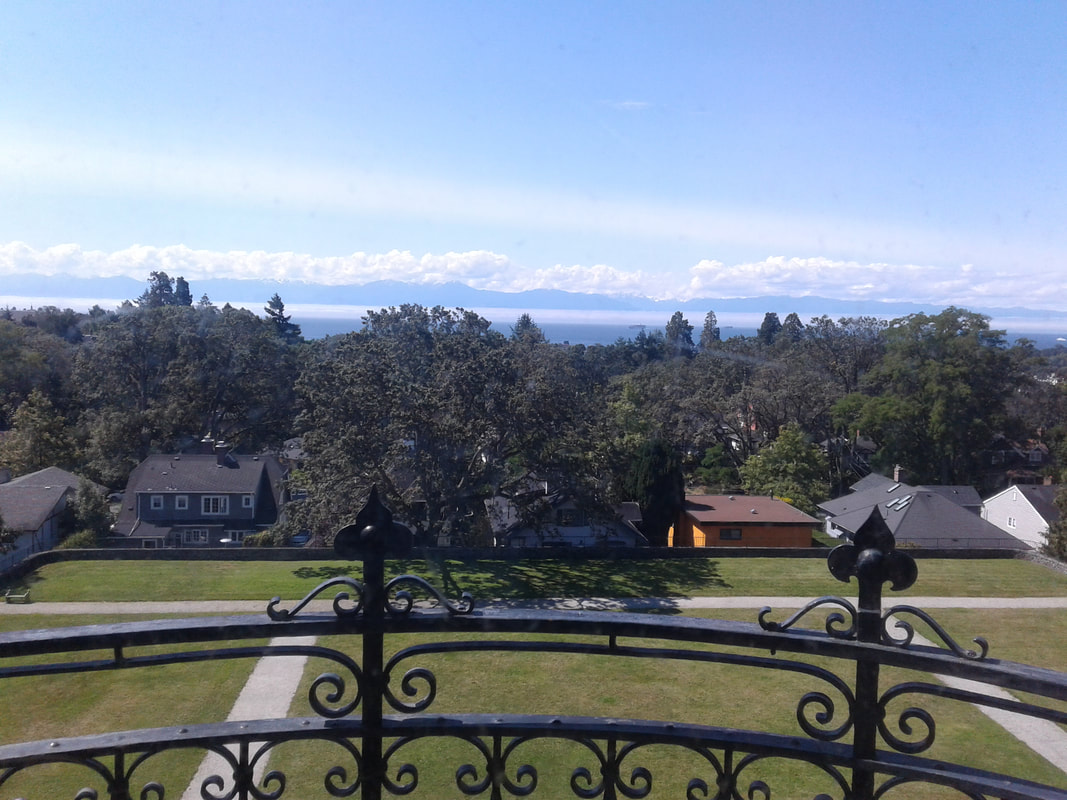 The view from the top floor of the castle The next day that I was there was Canada Day, meaning the day of the fashion show! I've been working on this for 6 months, so it was like a dream to be there. Luckily enough, the designers weren't needed until noon so I had all morning to myself. I ended up going for a walk to the Craigdarroch Castle, which was a 5 minute walk away. The castle was built in 1890 by Robert Dunsmuir, who passed away before it was finished. His wife, Joan, lived there until her death in 1908. During WW1 it was used as a military hospital, and after that it was used as a College, Conservatory, School Board, and now a museum. 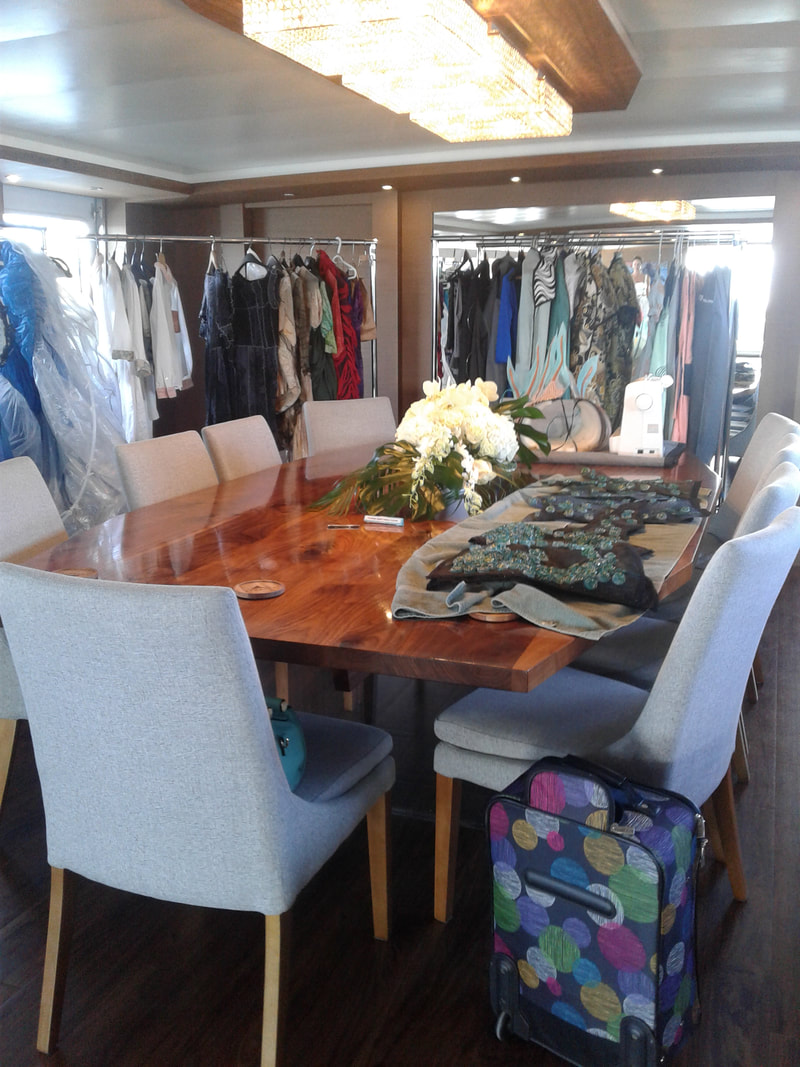 The dining room of the Ascente, which we took over for our garments 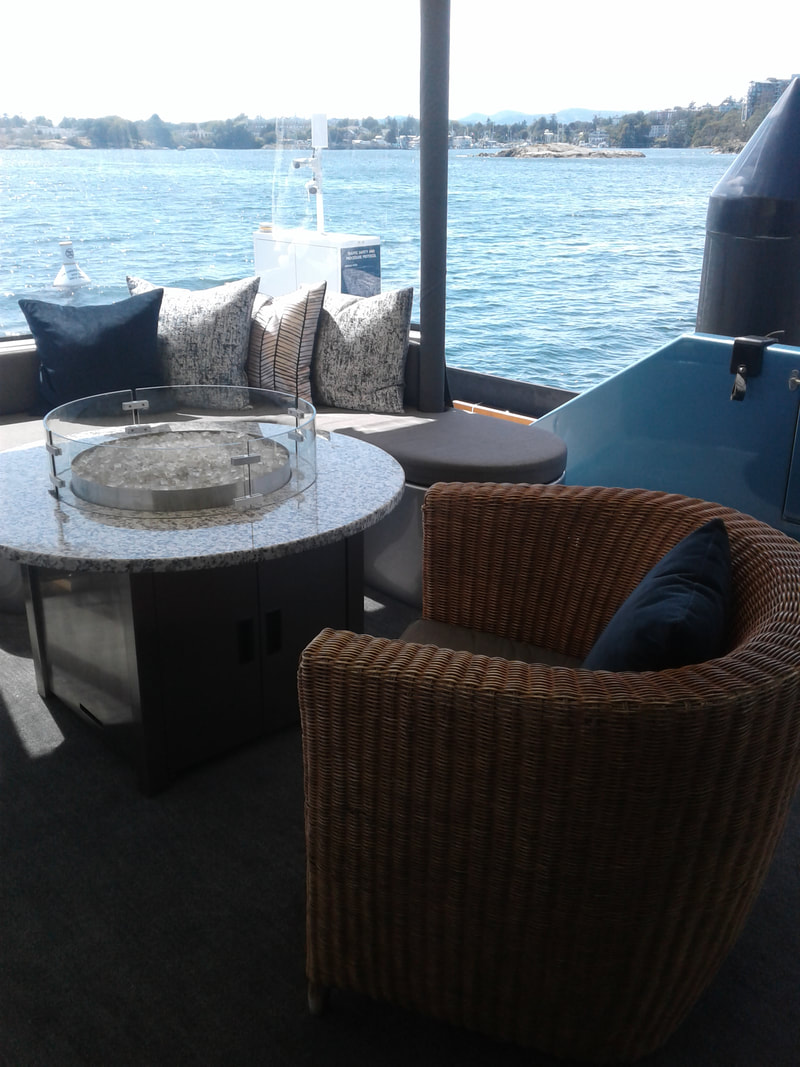 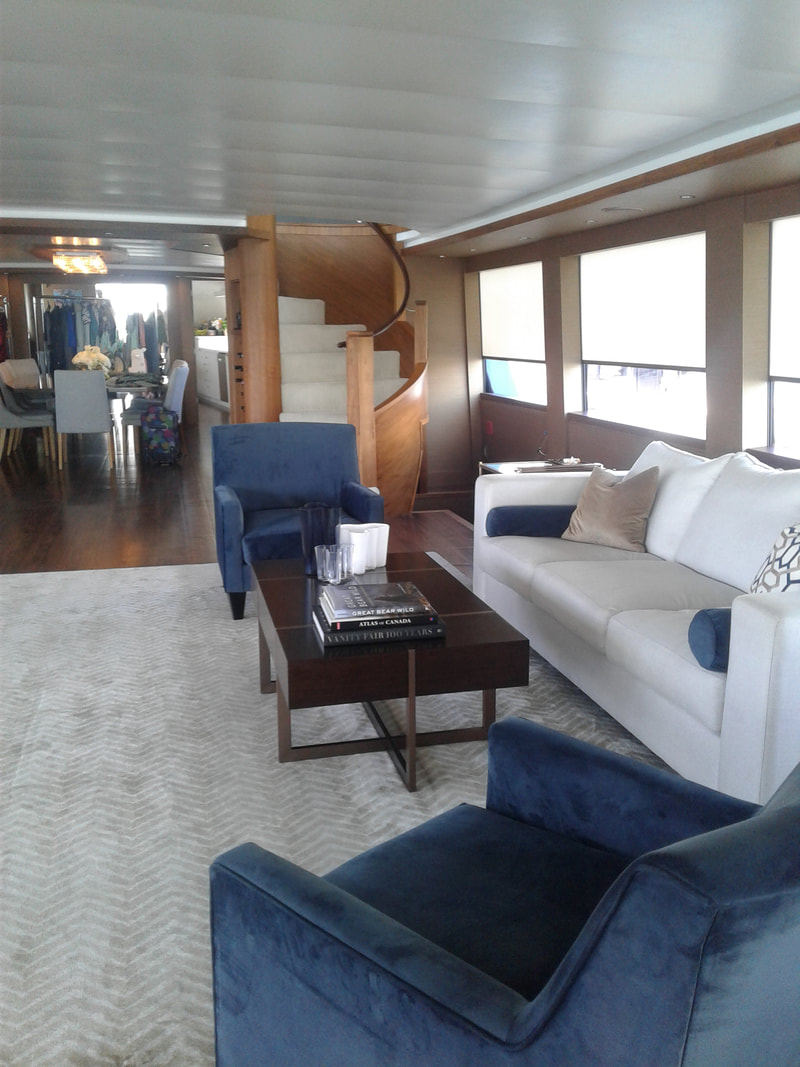 We were able to use a beautiful yacht, the Ascente, as our backstage. They were extremely generous with us and the space was the nicest backstage that I have ever worked in. This was definitely a trip of a lifetime. 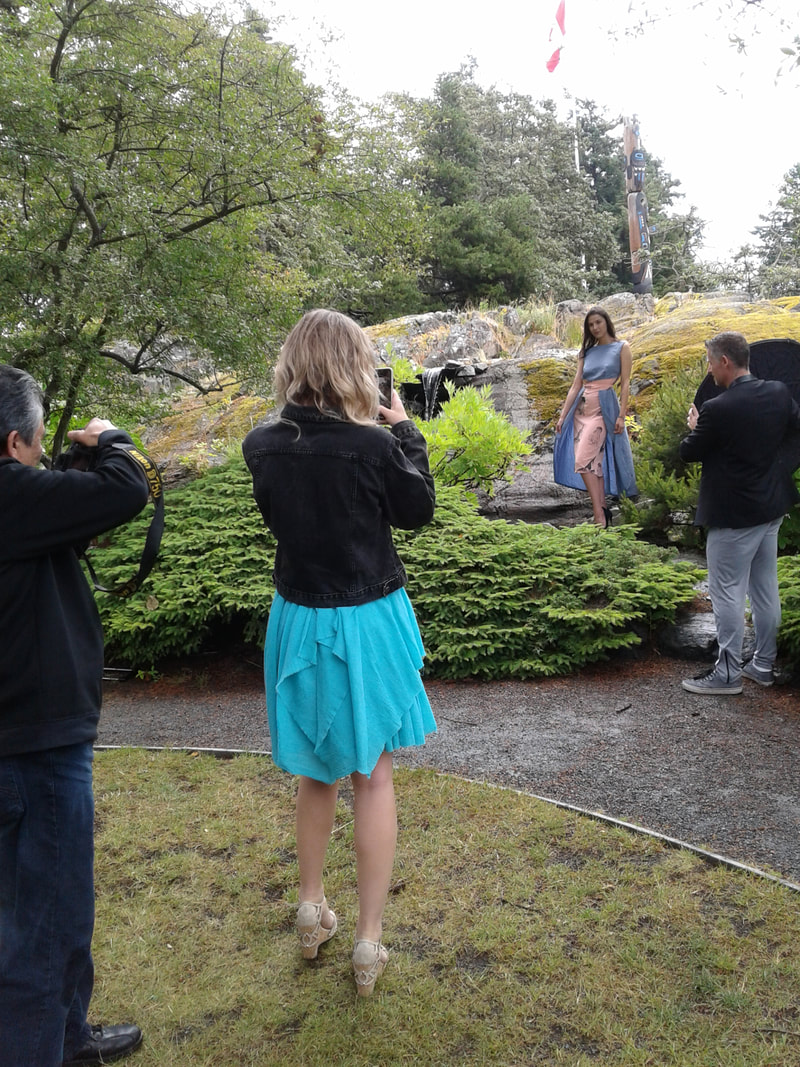 Shooting at the Government House in Victoria. The lovely model wearing one of my dresses on the rocks in Mildred Rincon, the other model is Natalia Hennady, We had Doug Wong taking some amazing photos and Matt Laprairie, the Director of Operations and Stage Manager, helping him out 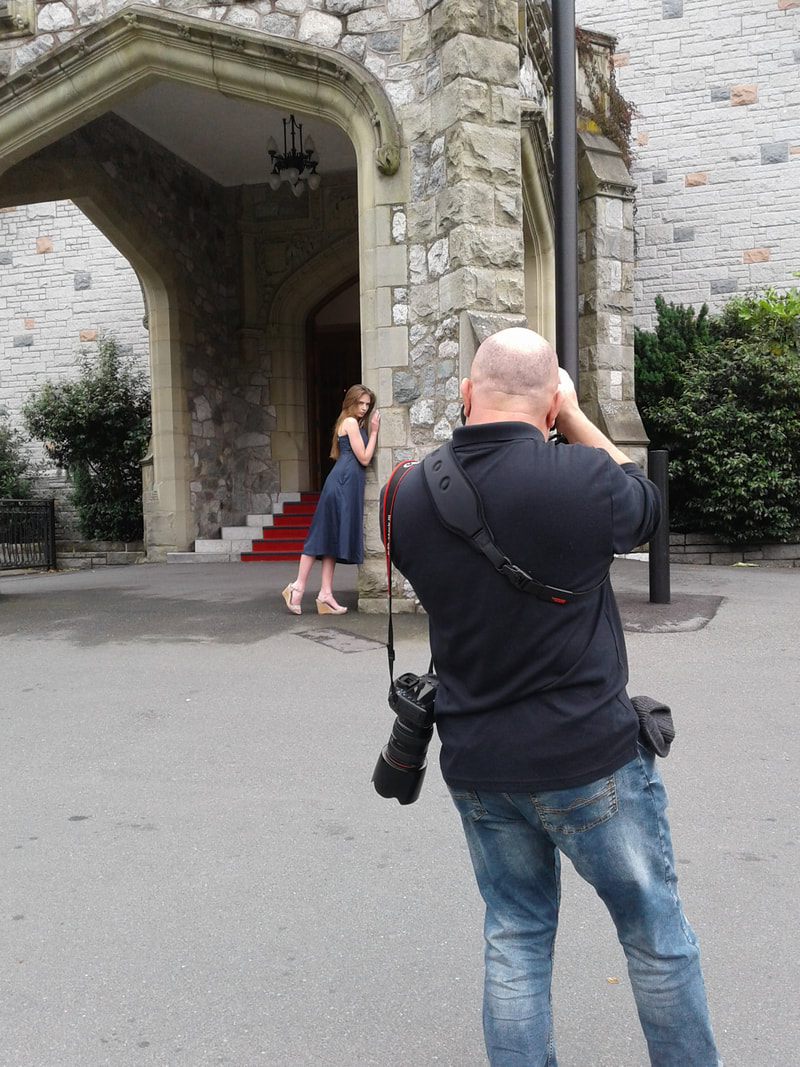 Zev Vitally Abosh (the photographer) and the stunning Taylor McCarroll wearing one of my designs  Natalia Hennady in one of my Eco Couture designs at the Government Mansion The last day that I was there was photo shoot day! And boy, did we have some really incredible places to take pictures in. While a group of people went to get photos at the ocean, I went with another group to the Government House. I can not wait to get all of the photos back from the 2nd because not only are the photographers fantastic, but the locations were some of the prettiest places I've been to since Germany. The last location of the day was Hatley Castle, which some of you may recognize from movies such as X Men and Deadpool. Everyone here was also so accommodating for us and we were able to go everywhere on the extensive grounds to get photos. If you aren't from Canada, you might not understand how exciting it is to find 2 castles, but in Canada it is very rare to have such old and beautiful architecture. 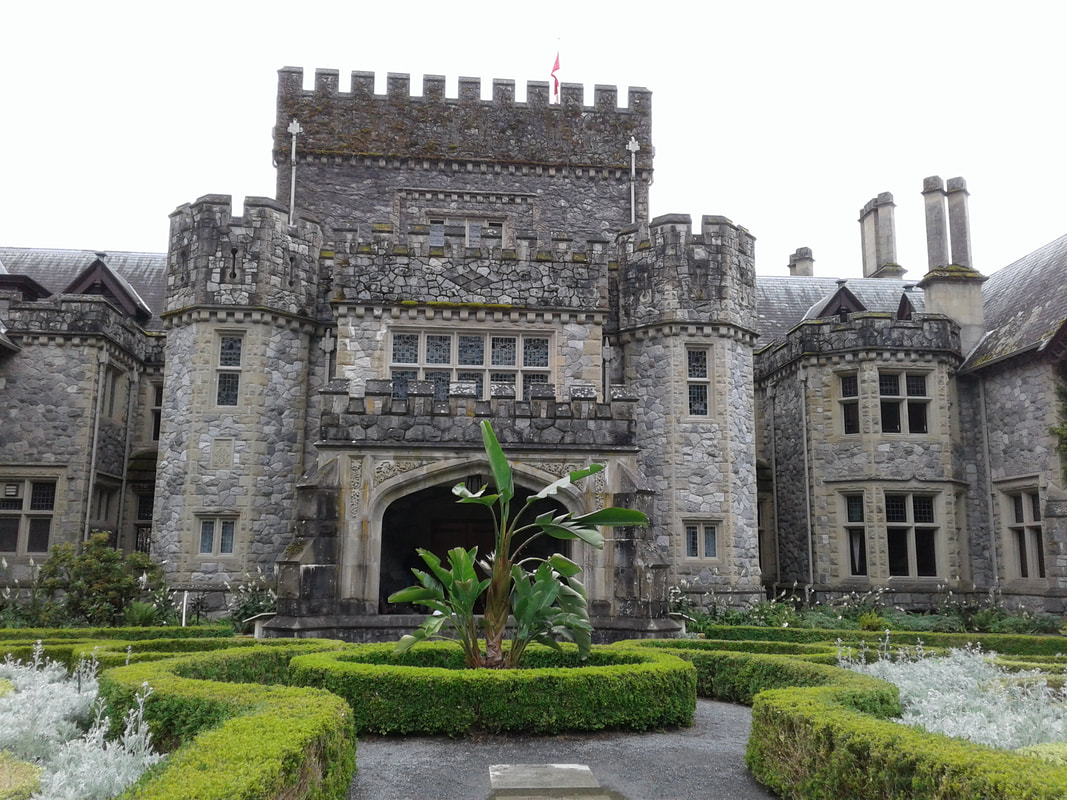 Hatley Castle 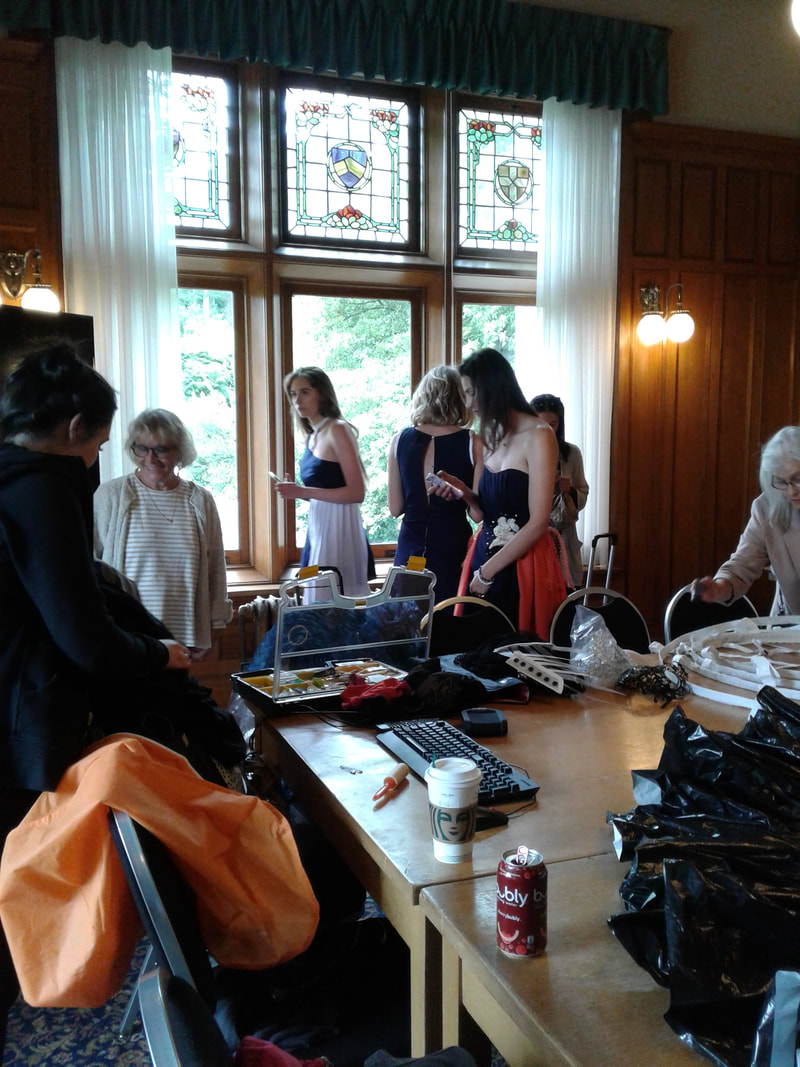 The room inside Hatley that they gave us to get ready in. As you can see, behind the scenes of a photo shoot can be pretty hectic and messy 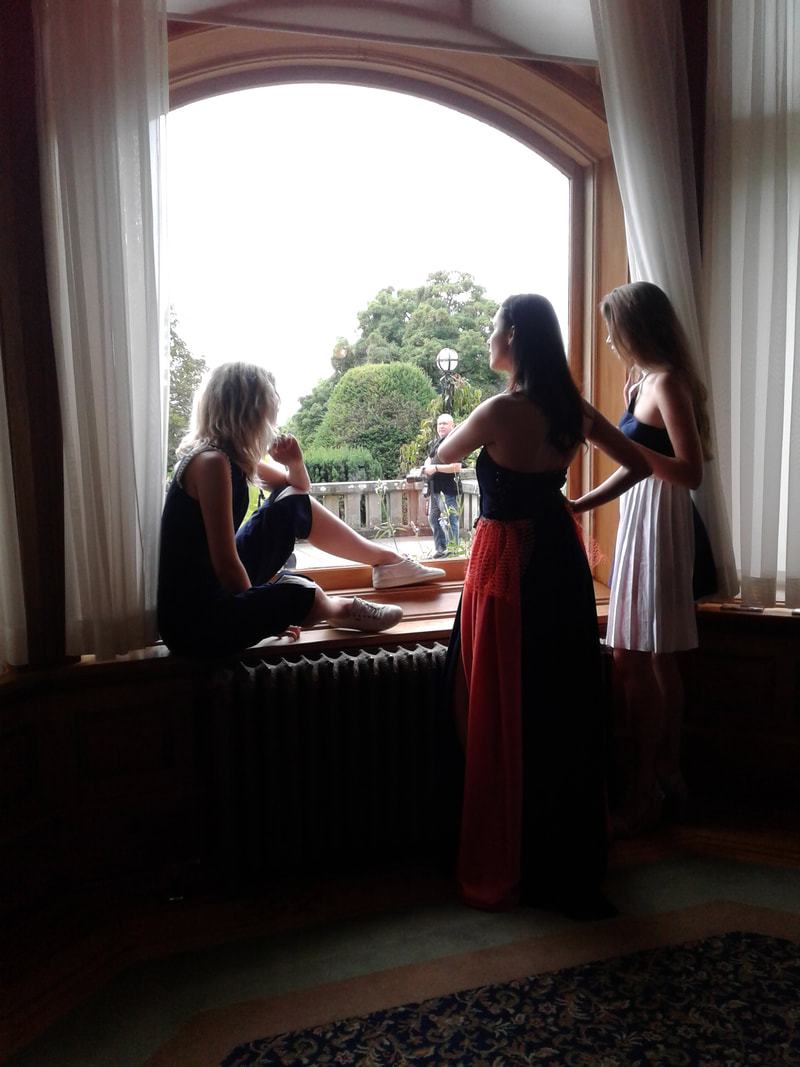 Taylor, Mildred, and Natalia getting photos done in the window of the castle wearing designs by Janani Senarathne 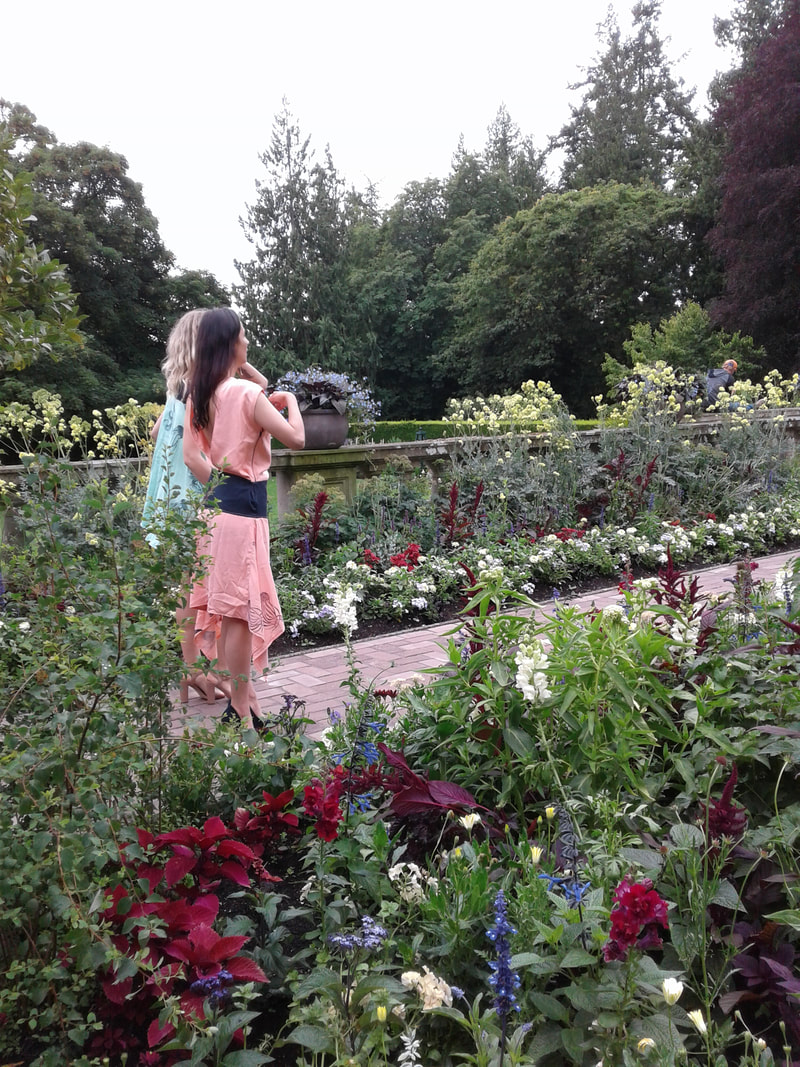 Natalia and Mildred in two more of my designs in the garden behind the castle I can't wait to show you my pieces in better detail, but in the meantime I hope you enjoyed a bit of a behind the scenes of my time for the Future Oceans Fashion Show! ~K
I have been taking videos of a lot of my progress while I have been working on my collection right now, and before taking a video I always take a quick picture to make sure that it frames everything I want it to. I ended up with a bunch of photos of my workspace, and I found it interesting to see how I set myself up without even realizing it. It was also interesting (for me, at least) to see all of the places that I work on projects. Here is a peak at where I work on different parts of my projects.  I often work on my bed when I am hand sewing. I love watching movies, and it's fun to watch something while doing some hand work. I also have a habit of watching the same movies over and over again, which is why I watch them in my room and not in the living room (to save my poor parents from hearing the same movie a million times). 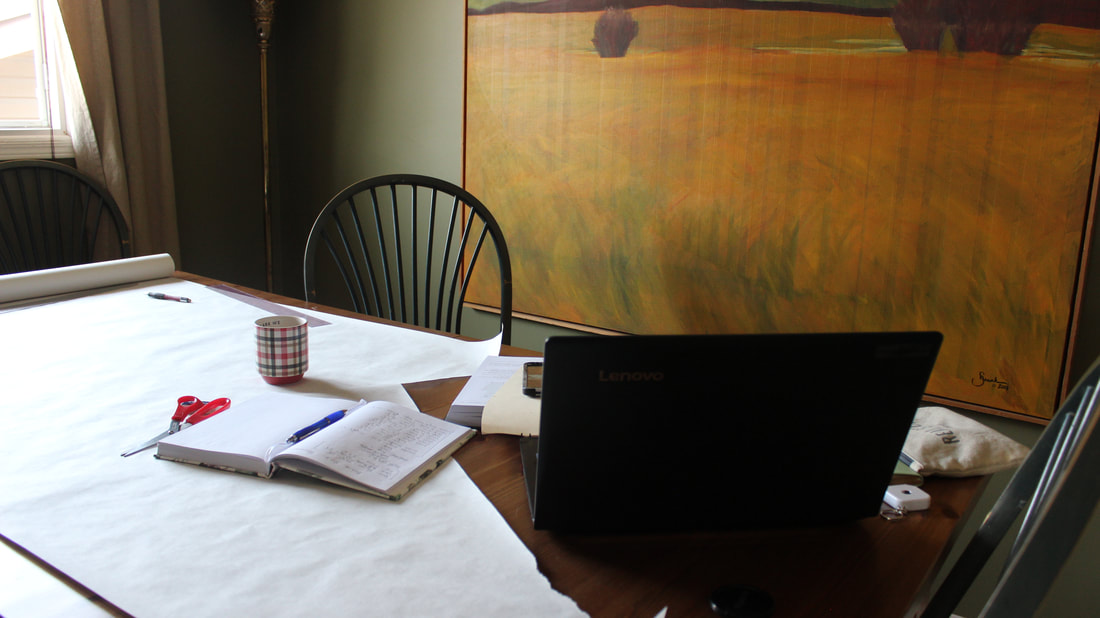 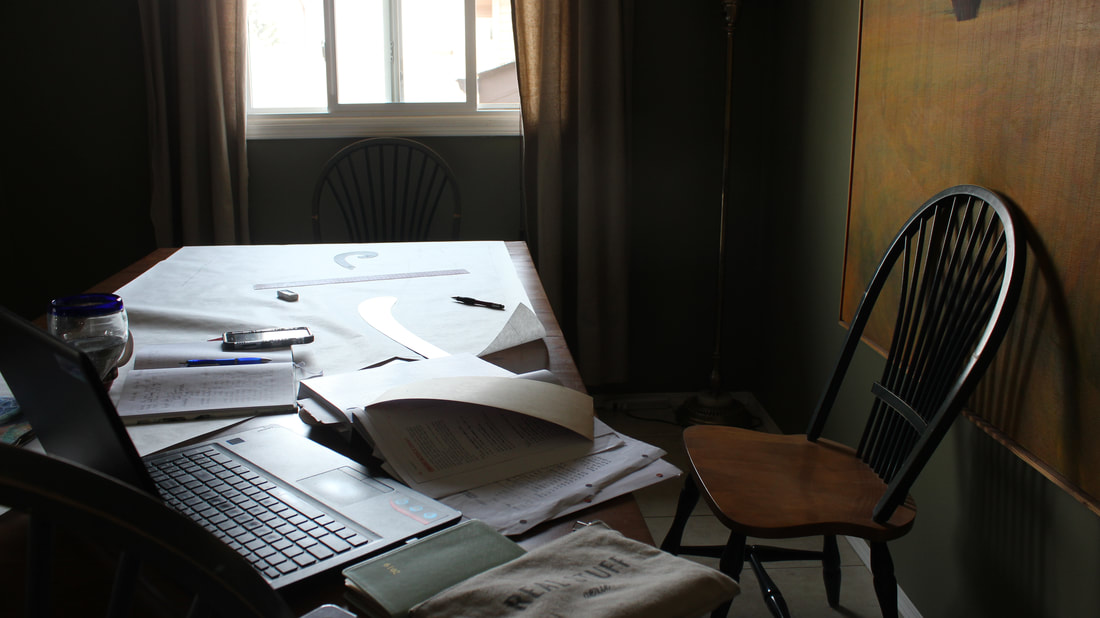 I need a lot of space for pattern drafting, so I take over our dining room table for it. I normally start out with a tidy and pleasing work space and always end up with a very cluttered one. Pattern drafting is not my favourite thing to do, but I have grown to appreciate the way it works, and it is satisfying to end up with something made completely from scratch.  Most of my time is spent in my studio since that is where all of my supplies, my sewing machine, and my serger are. It's also nice to have a space where I can leave everything set up exactly how I want it to continue working the next day. It is usually pretty crazy while I'm working on a project, and I tidy in between. 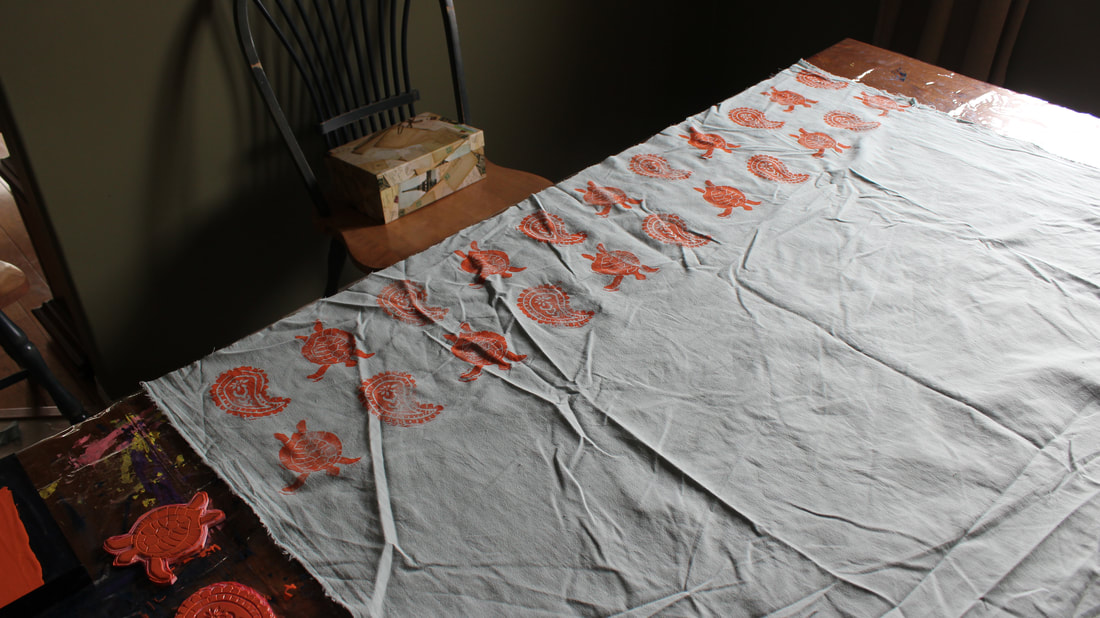 While I print fabrics I take over the dining room table again. It takes up a lot of space just like the pattern drafting. I also cut on the dining table, although I prefer to cut the smaller pieces on the floor of my studio. Printing the fabric is a pretty messy process, so I have a plastic table cloth to put down before I start. ~K
After much consideration and the realization that I have way too many clothes (the ability to make whatever clothing I desire really adds to that problem...), so I decided to do a huge update on my Etsy account. Going through the photos for each of these made me quite sad to be selling them, but there is no more room in my sewing room closet! I hope that they all go to good homes:) All of the basic information about the pieces are below the photos, and you can buy any of these, plus more, on my Etsy account here 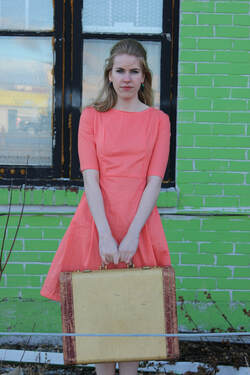 Wes Anderson Inspired cotton summer dress with pleated skirt, boat neckline, and half length sleeves. $75.00 Wes Anderson Inspired cotton summer dress with pleated skirt, boat neckline, and half length sleeves. $75.00  High waisted, retro style trousers with zip fly, straight waistband, side seam pockets, and yoke detail. $100  Fully lined, mid-calf length, high waist skirt with faux wrap style, side invisible zipper, and side seam pocket. 100% wool. $100 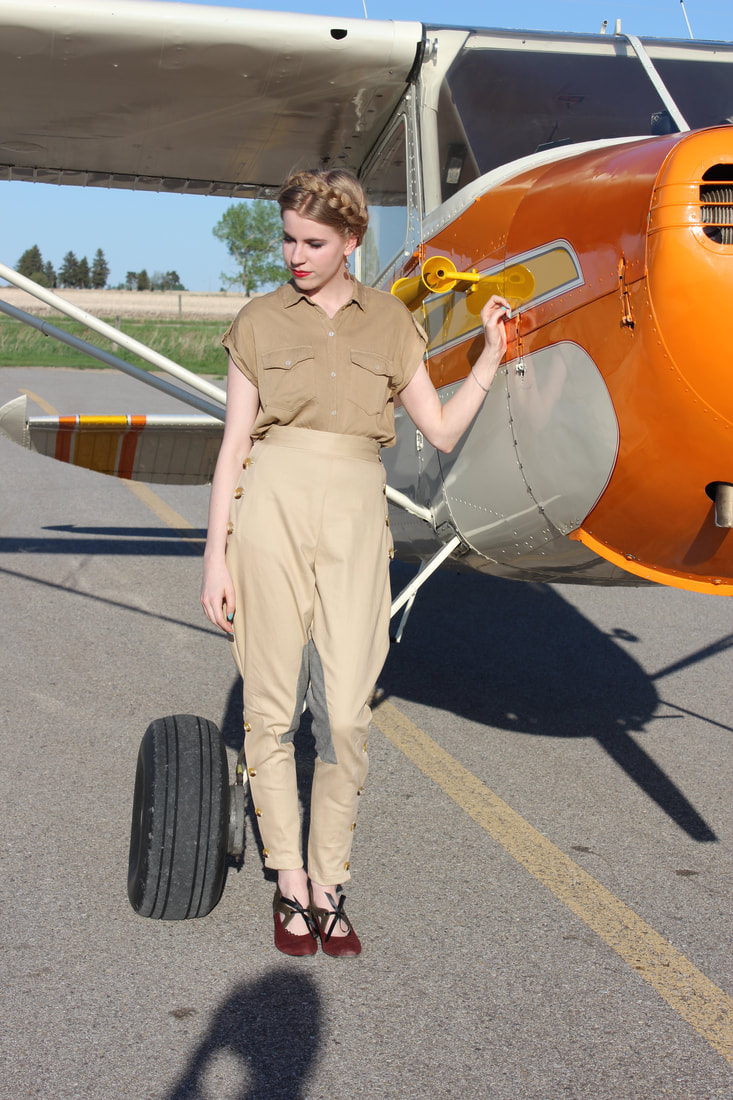 High waisted, cotton twill with some spandex Jodhpurs. Retro style with button closure and patch details. $75.00  Mid-calf length, high waisted, fully lined skirt inspired by 1930's styles. Wool with center back zip. $95.00  Mid-calf length flannel plaid dress with shawl collar, half length sleeves, bottom ruffle detail, and large pockets. $85.00  1960's Mid Mod dress and jacket (sold separately). Crew neck mini dress with princess seams and center back zip, $75.00. Fully lined spring coat with wide collar, $85.00 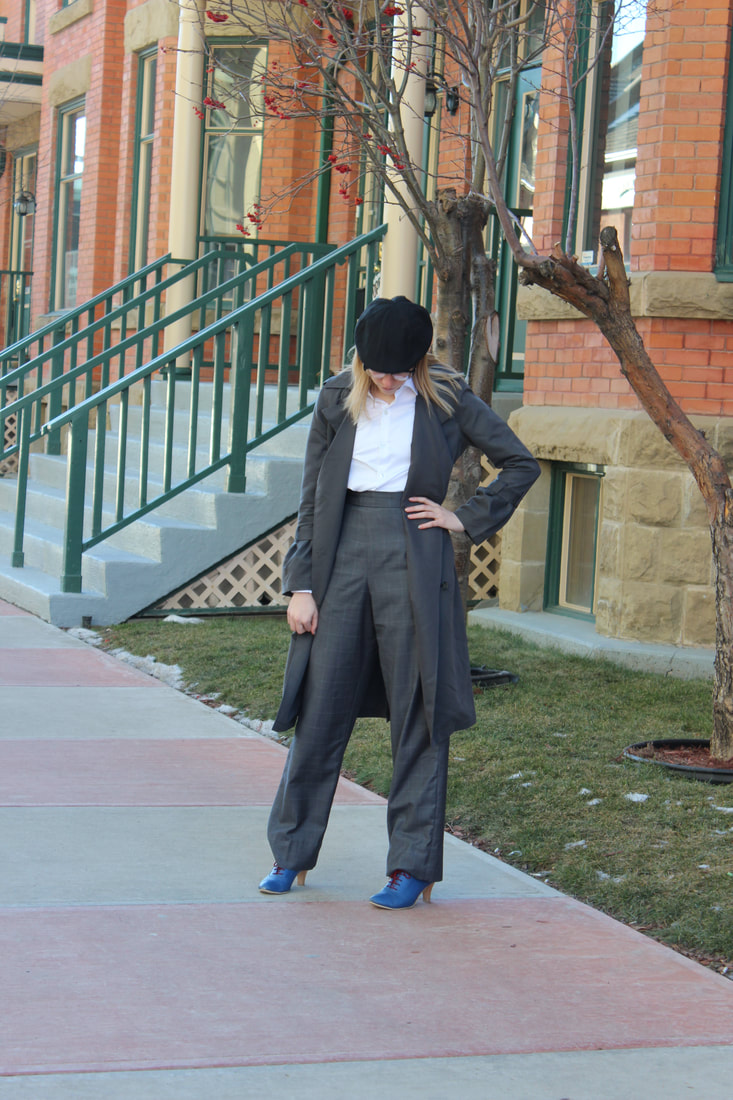 Peaky Blinders styled wool trousers with side button closure and high straight waistband. $75.00  Red flannel wrap top with dolman sleeves, V front and back neckline, and half length sleeves, $75.00  Hand printed, knee length owl dirndl with coordinating apron. Pleated ribbon trim, pockets, and center front zip. $95.00 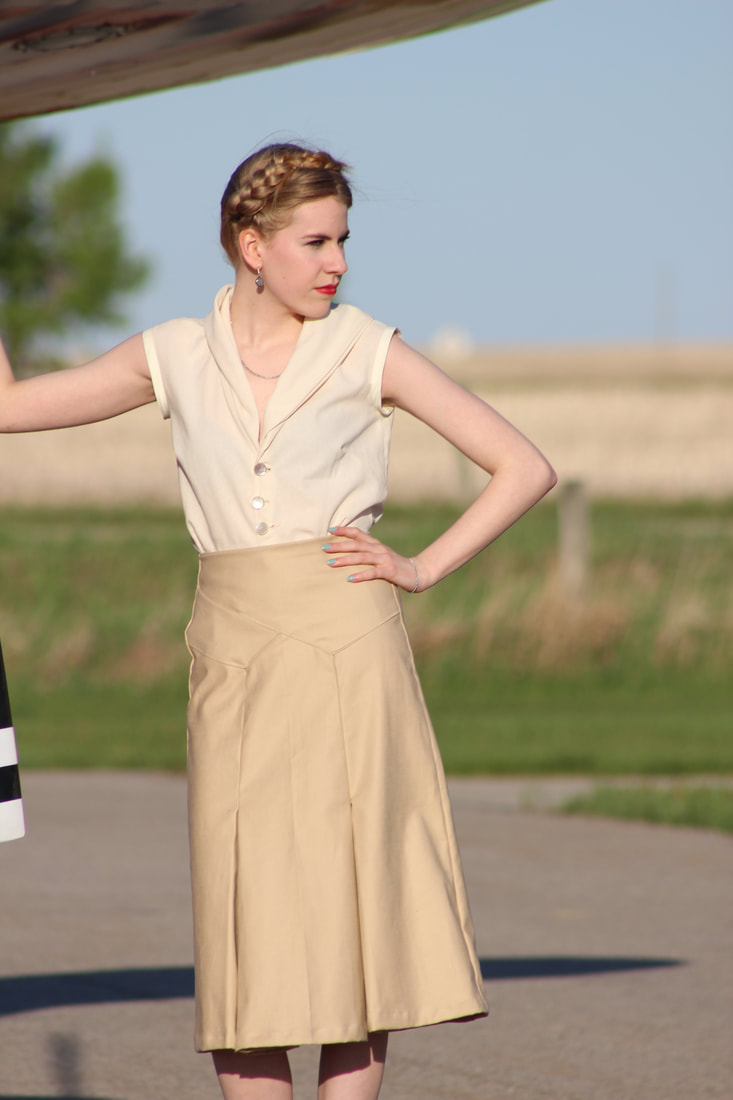 Mid-calf length cotton twill skirt with unique yoke and front pleat detail inspired by 1930's clothing and sewing patterns. Closes with a center back zipper. $85.00 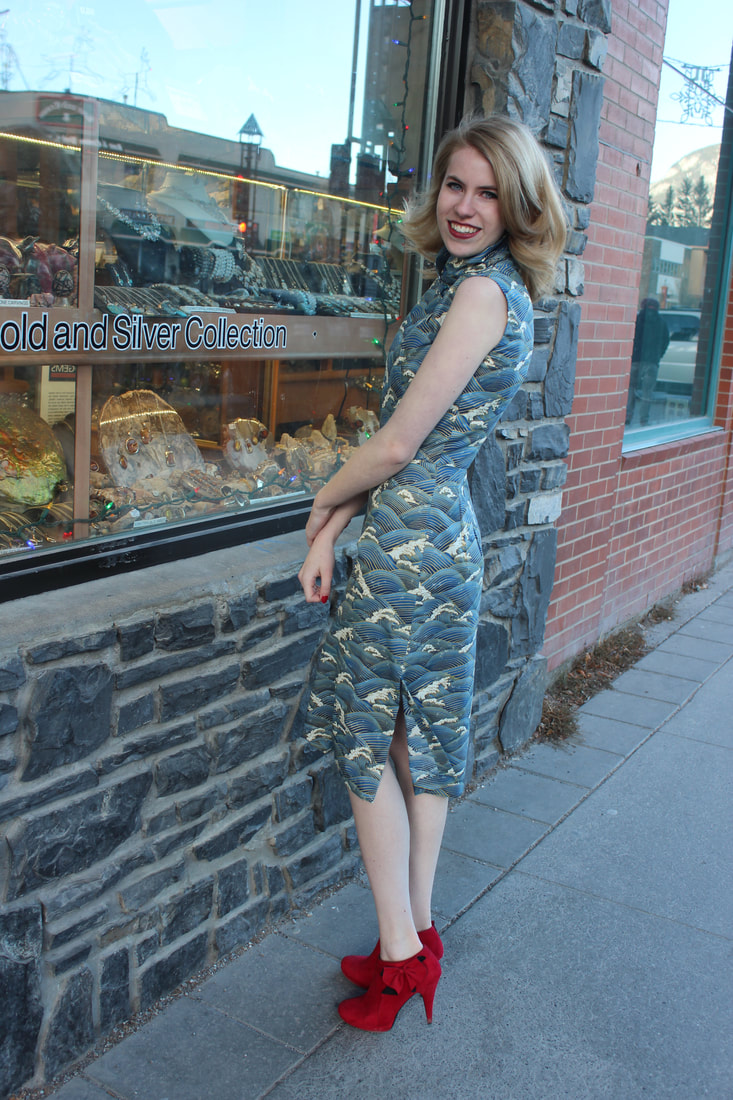 Cotton shift dress inspired by the movie In the Mood for Love. Side zipper and snap closure, mandarin collar, and small side slit. $85.00  Mid-calf length cotton dress with custom moth print and orange center back zipper. Slight off the should silhouette, inspired by the 1950's. $85.00  Silk dupioni sleeveless dress with mandarin collar and side zipper. Small side slit for easier movement. $100  Mid-calf length, A-line, light linen skirt with center back zipper and invisible waistband and hem. $75.00 Enjoy! If you are interested in purchasing any of these, they are up in my Etsy account here ~K
 I was lucky enough to be chosen as one of the 10 designers to create a small ready to wear collection and one art dress for a fashion show that will take place on Canada Day in Victoria, BC, at the Victoria International Marina. 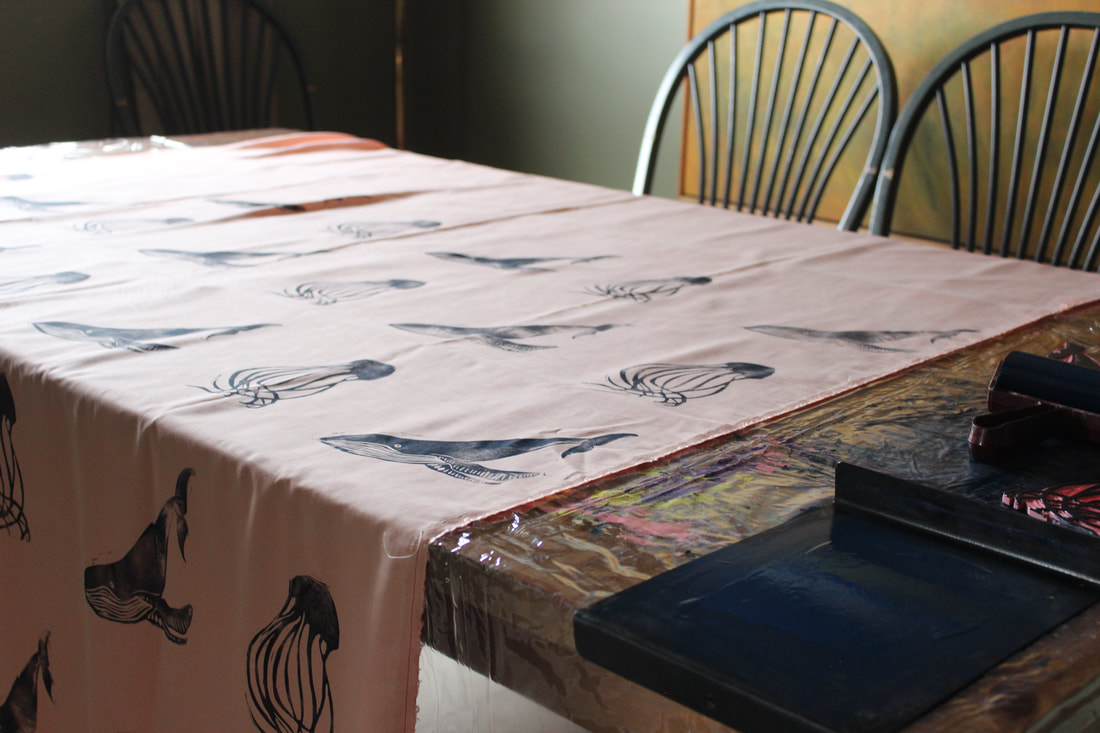 Printing on of the fabrics I had so much fun coming up with the design ideas since I could do whatever era's and whatever styles I wanted to, as long as I used eco-friendly materials to make them. I am currently working on the ready to wear pieces and having a great deal of fun playing around with the materials and designs. 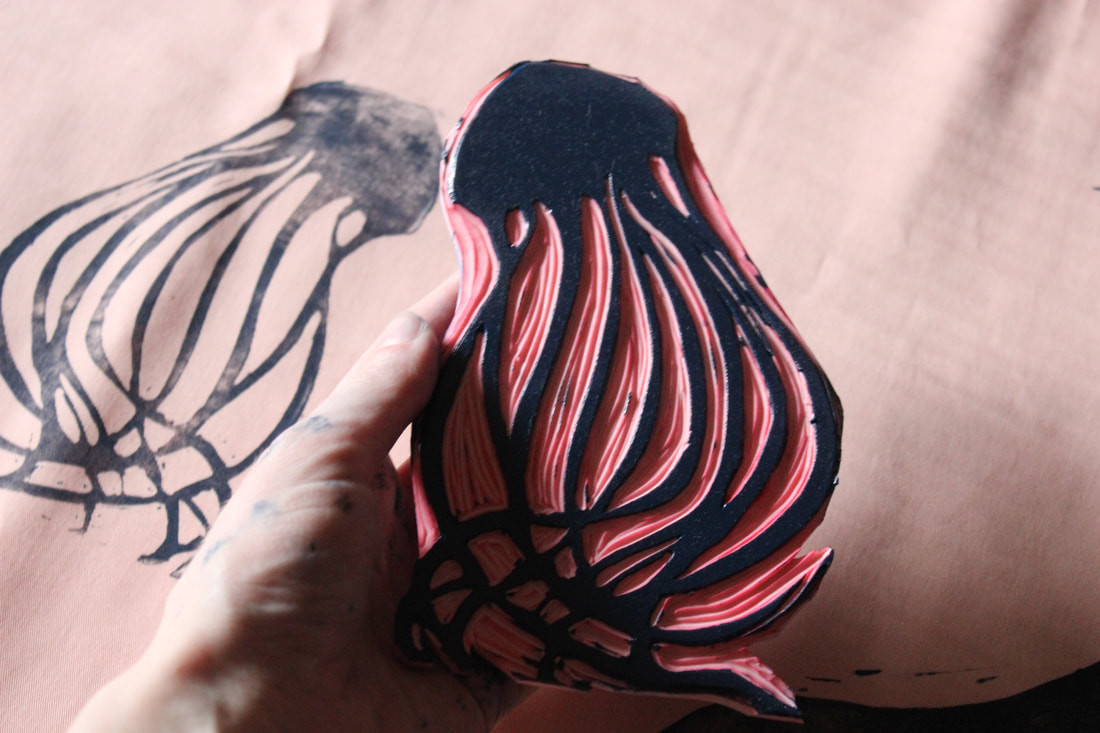 So far I have gotten all of my fabric through KenDor Textiles, which is a Canadian company that specializes in eco-friendly and sustainable fabrics. I have so far printed two of the fabrics, drafted two of the patterns, and cut out those two dresses so they are ready to be sewn together. Once I got my fabrics in, it has all been coming together pretty quickly!  Trying on a quick bodice toile I can't wait for the actual show so I can show everyone exactly what I have been working on, but for now here are some sneak peaks! If you would like to hear more about V.I.M. Future Oceans, you can check out their website here, Instagram here, and their Facebook page here. 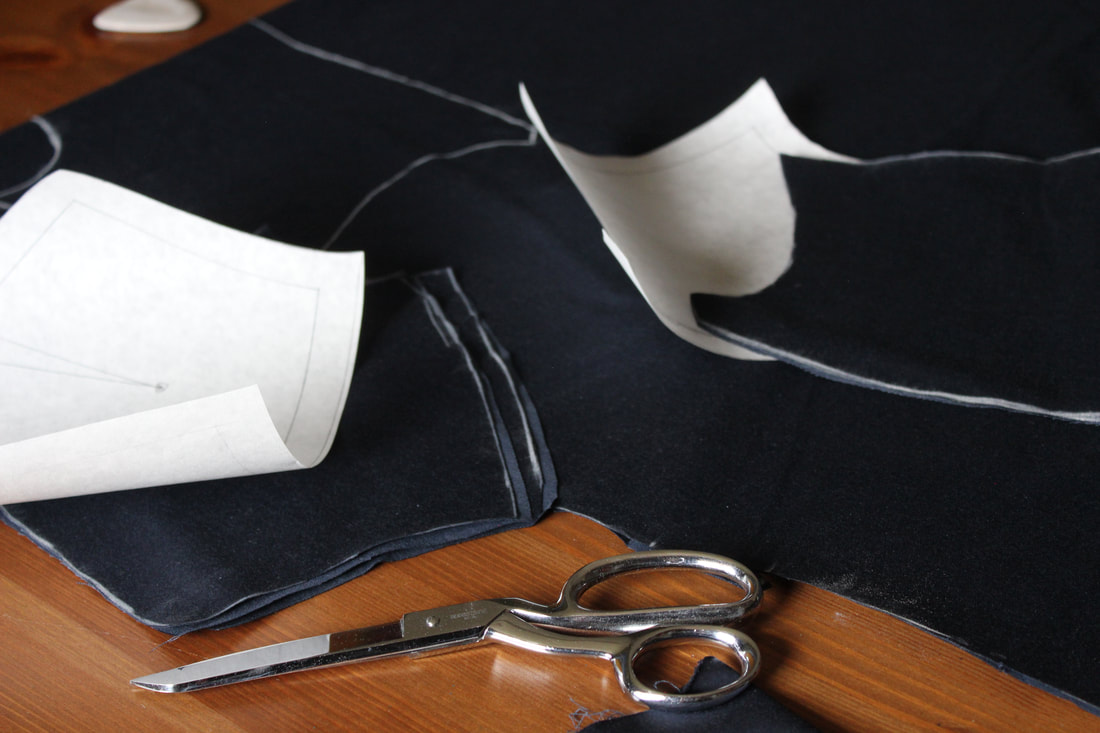 Cutting out pieces 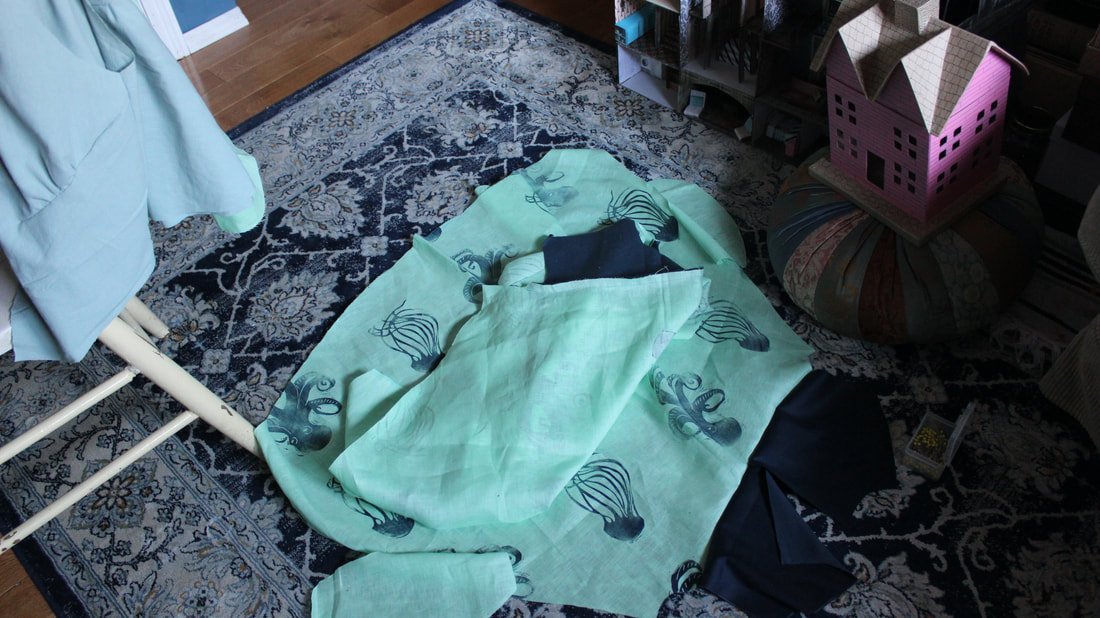 ~K
 The final projects in my second semester of school were making a blouse and vest. I haven't gotten photos of my blouse (yet), but we spent a lovely day in the city getting photos of my vest yesterday. We took photos near the Simmons Building, which used to be a mattress factory but now holds three businesses: Charbar, Phil and Sebastian Coffee Roasters, and Sidewalk Citizen Bakery. This area is really beautiful since it is right on the river, plus it is on the edge of downtown Calgary. It was easy to find some lovely spots to get photos, plus we got the added benefit of a delicious breakfast of pastries and tea.   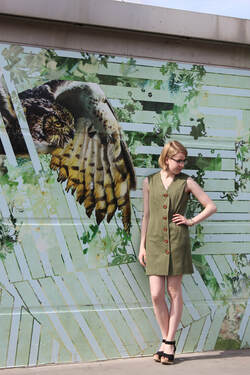 This vest is made using the same wool as my trousers and skirt projects from last semester (more photos of those ones here) and is fully lined. This vest is completely designed, patterned, and sewn by me. It includes princess seams, top stitching, and a welt pocket. 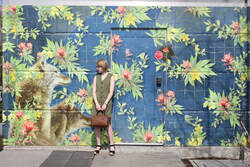  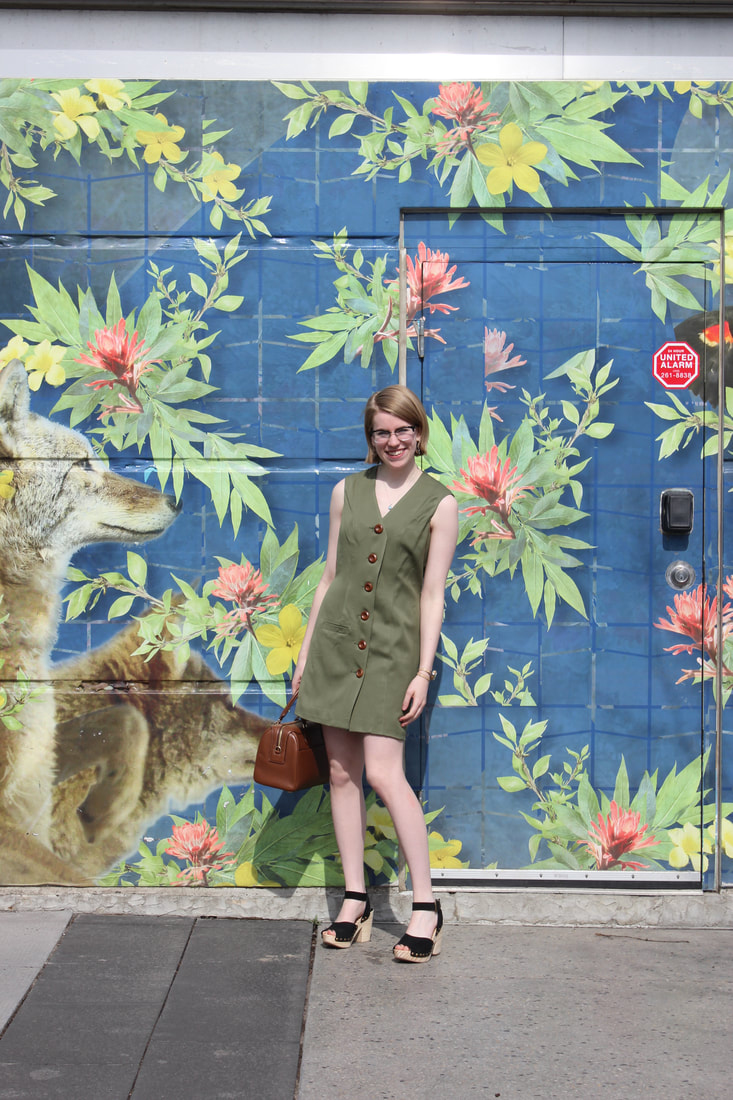 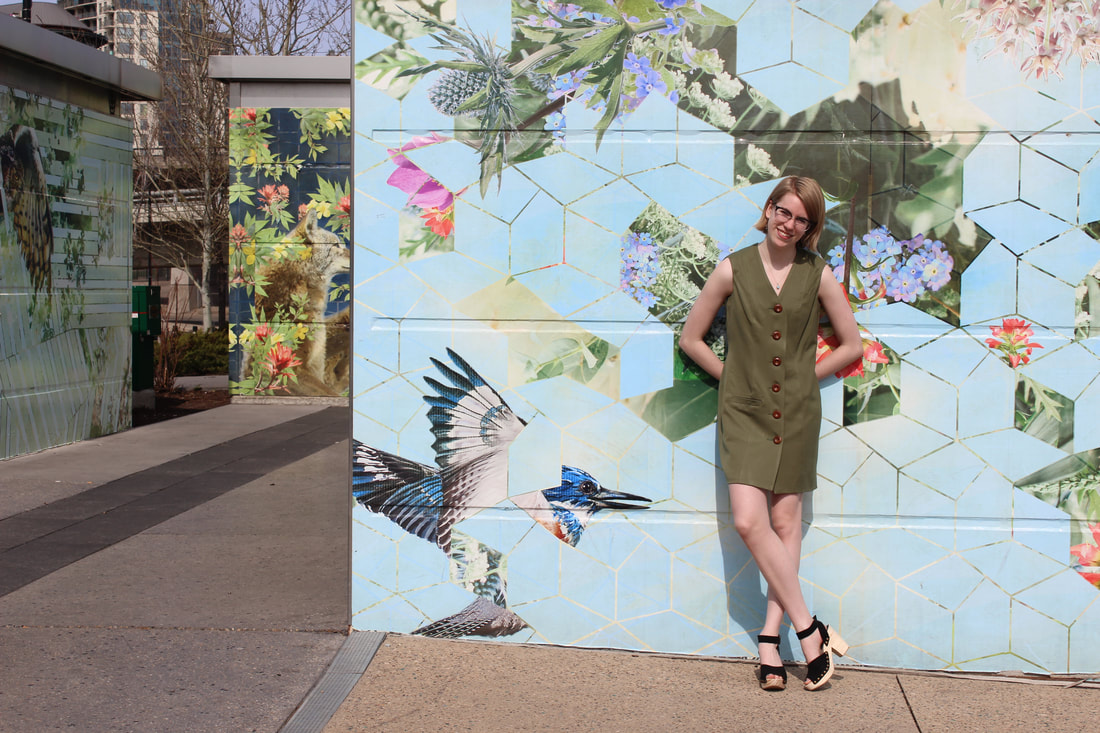 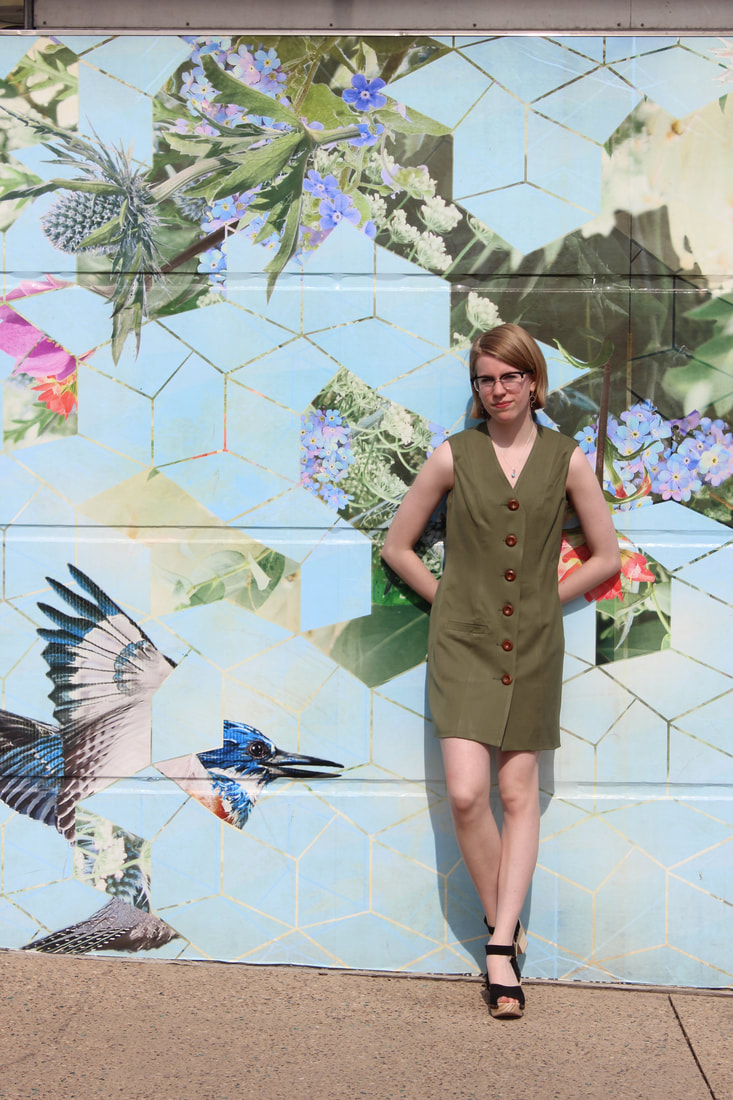 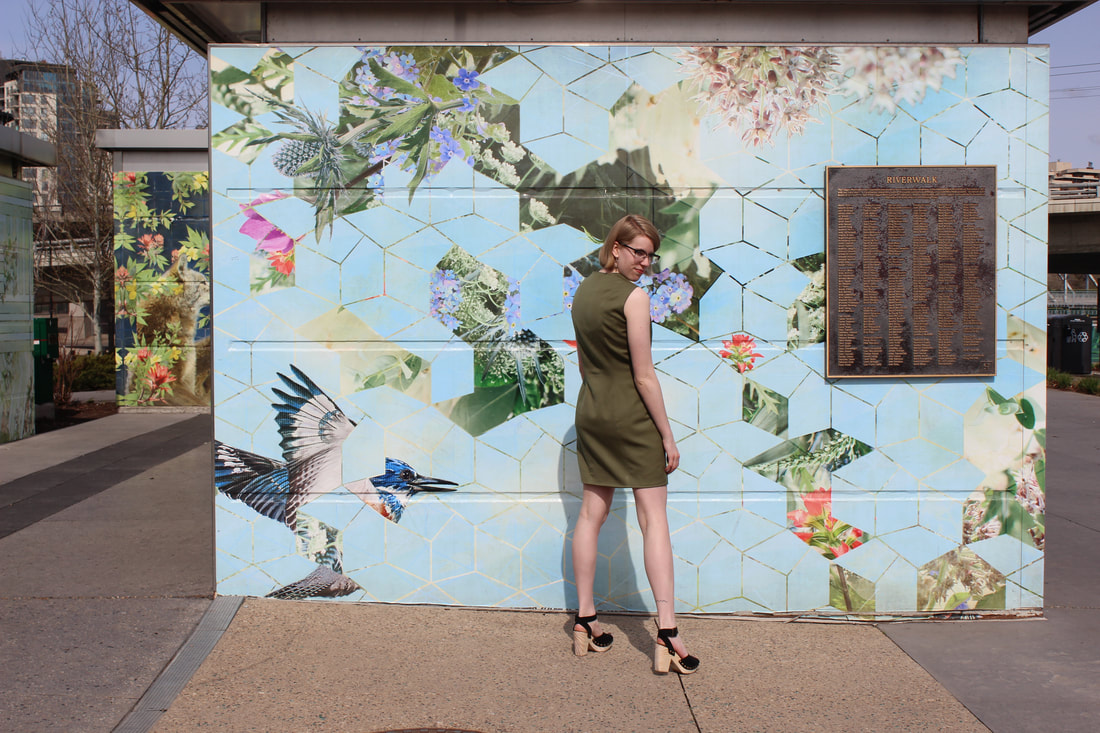 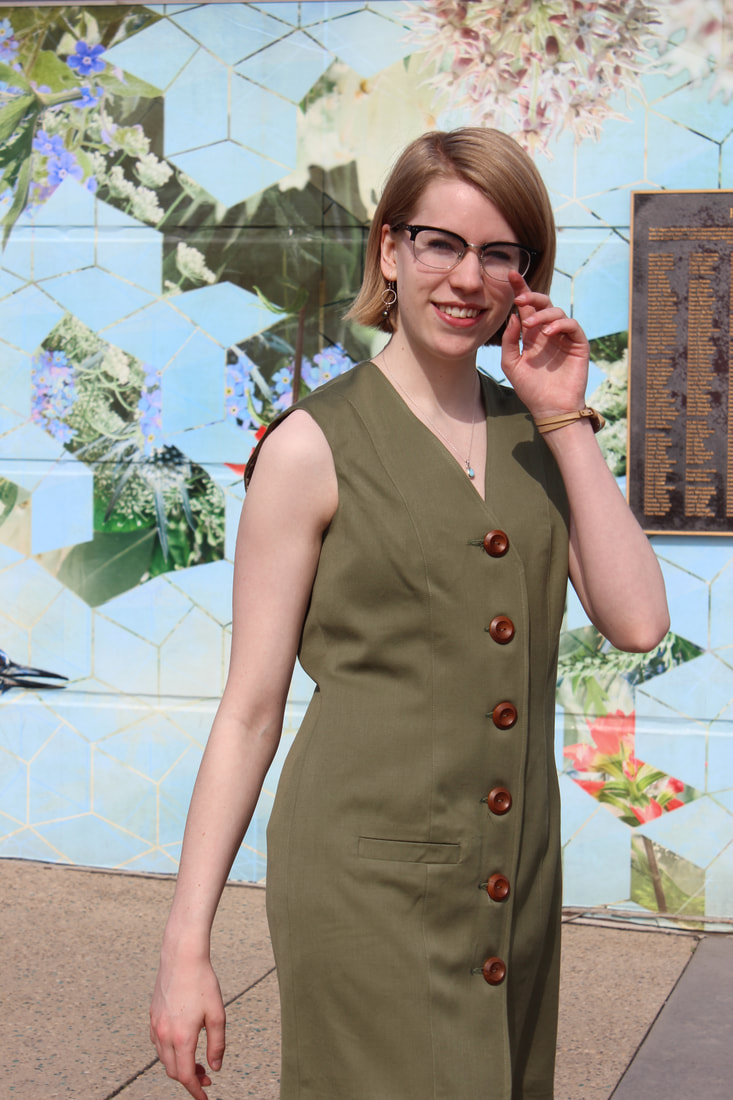 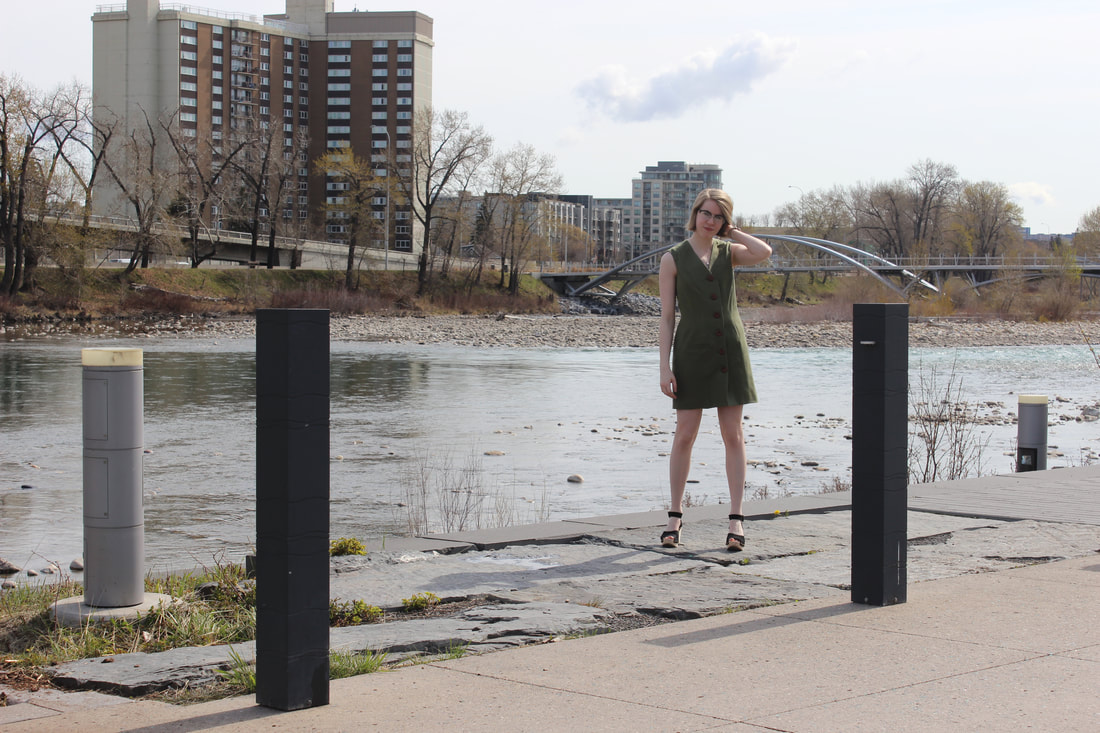 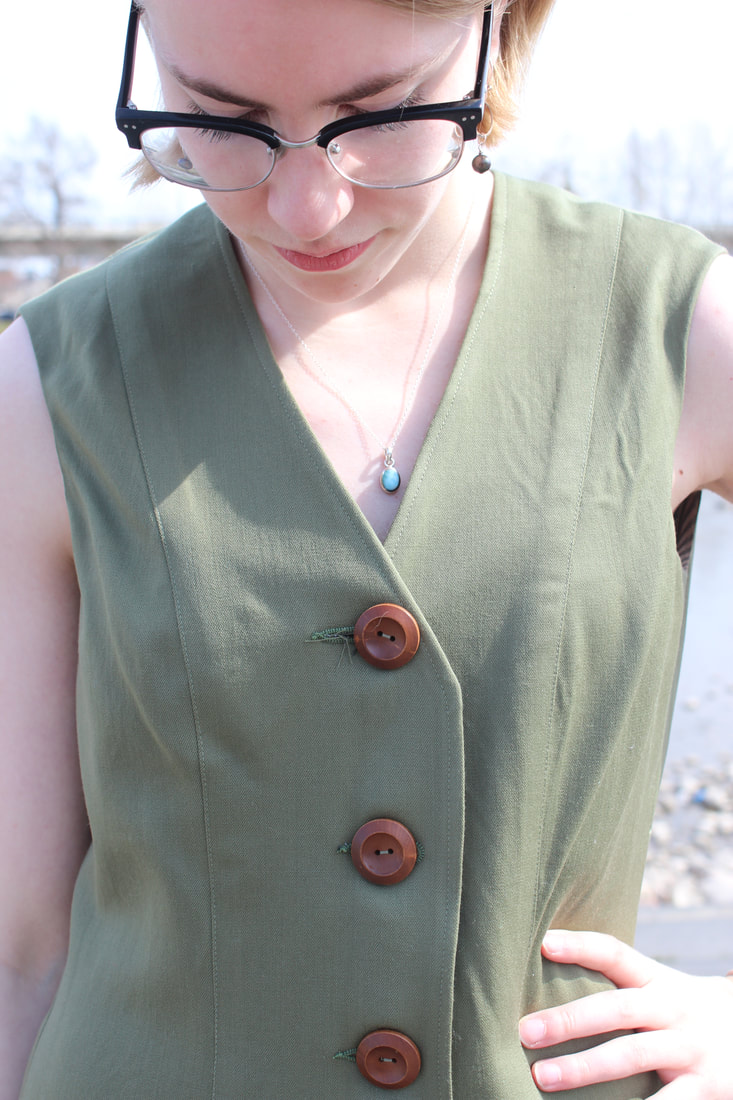  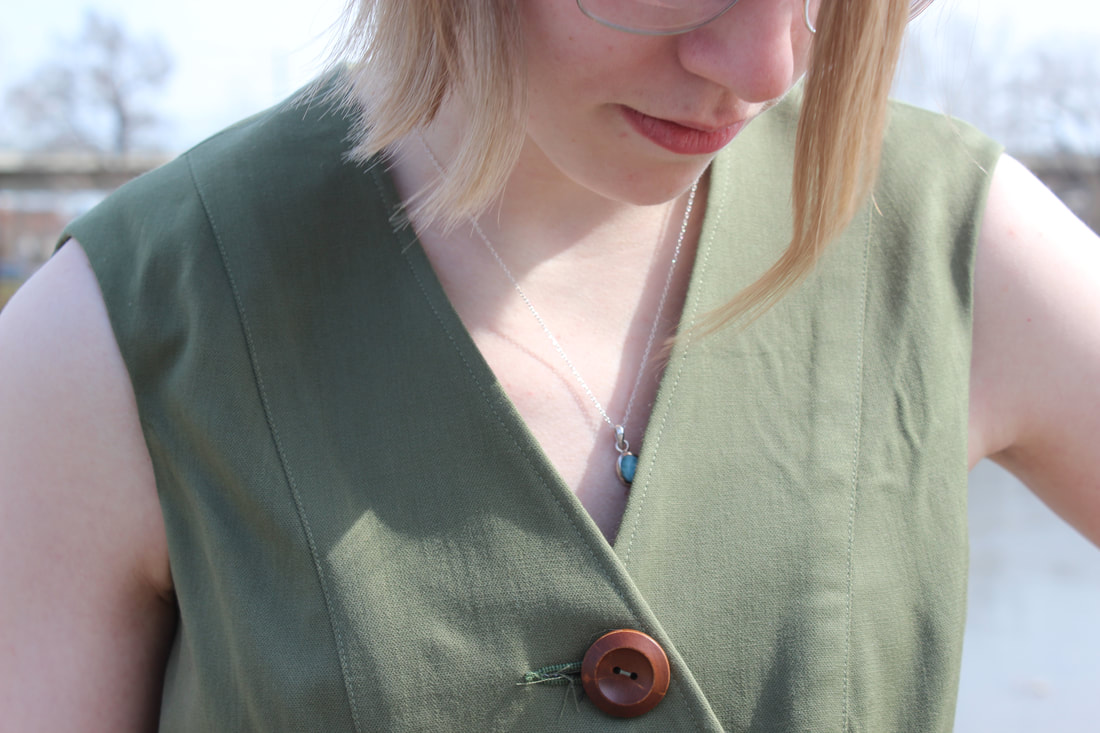 ~K
|
EtsyArchives
April 2020
Categories
All
|
 RSS Feed
